アプリ説明
Rubyで翌日の天気予報を表示するプログラム
外部APIでOpenWeatherMapを使用
開発環境
ruby:2.6.6
外部API:OpenWeatherMap
完成イメージ
操作の流れ
- アプリのルートディレクトリで
ruby execution.rbを実行。 - 都道府県が一覧表示される。
- 都道府県の番号を入力。
- 翌日の天気予報を、3時間毎に区切り、一覧表示される。
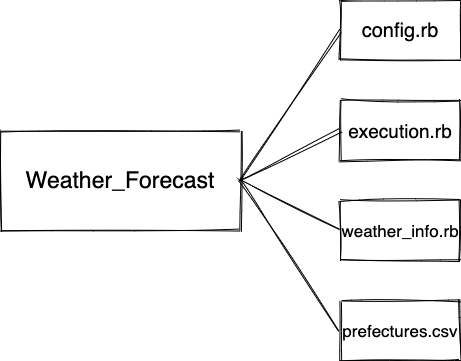
ディレクトリ構成図
事前準備でOpenWeatherMapのAPIキーが必要
このプログラムを作成するにあたり、OpenWeatherMapのAPIキーが必要。
-
OpenWeatherMapのホームページからアカウント登録。 - 登録したメールアドレス宛にメールが送信される。
- 受信したメール本文内に
APIキーが記載されていますので、こちらを利用。
※ 有料プランもありますが、無料で利用することができる。
※ 今回作成するプログラムのような、5日以内の天気情報を取得する場合は無料枠で使用できる。
環境変数にAPIキーを格納
セキリュティ対策のため、外部から参照できない環境変数にAPIキーを格納しておく。
操作方法
vim ~/.zshrc
インサートモードにし、下記を追加。
export WEATHER_API_KEY="APIキーを入力"
:wqで保存終了し、下記を実行し設定を反映させる。
source ~/.zshrc
コード内でAPIキーを使用できるようにする
config.rbファイルを作成し下記を追加。
WEATHER_API_KEY = ENV["WEATHER_API_KEY"]
この記事では定数に代入して使用するようにしています。
これでWEATHER_API_KEYという定数名でAPIキーを使用することができる。
都道府県一覧のCSVファイルを作成し、読み込む
prefectures.csvファイルを作成し、下記の都道府県一覧を追加。
prefecture,english
北海道,Hokkaido
青森県,Aomori-ken
岩手県,Iwate-ken
宮城県,Miyagi-ken
秋田県,Akita-ken
山形県,Yamagata-ken
福島県,Fukushima-ken
茨城県,Ibaraki-ken
栃木県,Tochigi-ken
群馬県,Gunma-ken
埼玉県,Saitama-ken
千葉県,Chiba-ken
東京都,Tokyo
神奈川県,Kanagawa-ken
新潟県,Niigata-ken
富山県,Toyama-ken
石川県,Ishikawa-ken
福井県,Fukui-ken
山梨県,Yamanashi-ken
長野県,Nagano-ken
岐阜県,Gifu-ken
静岡県,Shizuoka-ken
愛知県,Aichi-ken
三重県,Mie-ken
滋賀県,Shiga-ken
京都府,Kyoto Prefecture
大阪府,Osaka-fu
兵庫県,hyogo
奈良県,Nara-ken
和歌山県,Wakayama-ken
鳥取県,Tottori-ken
島根県,Shimane-ken
岡山県,Okayama-ken
広島県,Hiroshima-ken
山口県,Yamaguchi-ken
徳島県,Tokushima-ken
香川県,Kagawa-ken
愛媛県,Ehime-ken
高知県,Kochi Prefecture
福岡県,Fukuoka-ken
佐賀県,Saga-ken
長崎県,Nagasaki-ken
熊本県,Kumamoto-ken
大分県,Oita Prefecture
宮崎県,Miyazaki-ken
鹿児島県,Kagoshima-ken
沖縄県,Okinawa-ken
CSVファイルの読み込み
execution.rbを作成し、下記を追加。
require "csv"

prefectures = CSV.read("./prefectures.csv", headers: true)
WeatherInfoクラスを作成
weather_info.rbを作成し、クラスを定義。
class WeatherInfo
  def initialize(prefectures)
    @prefectures = prefectures
  end
end
execution.rbでWeatherInfoクラスからインスタンスを作成しCSVデータを渡す
require "csv"

prefectures = CSV.read("./prefectures.csv", headers: true)

# --------- 下記を追加 ---------

weather_info = WeatherInfo.new(prefectures)

# ----------- ここまで -----------
都道府県一覧を表示し番号選択できるメソッドを定義
WeatherInfoクラスに、都道府県を一覧表示し番号選択できるselect_prefectureメソッドを定義。
class WeatherInfo
  def initialize(prefectures)
    @prefectures = prefectures
  end

  #--------- 下記を追加 ---------

  def select_prefecture
    puts <<~TEXT
            ☀~~~~~~~~~~~~~~~~~~~~~~~~~~~~~~☀
            ☁                              ☁
            ☂        明日の天気予報        ☂
            ☆                              ☆
            ☀~~~~~~~~~~~~~~~~~~~~~~~~~~~~~~☀

          TEXT

    # 都道府県一覧をインデックス番号付きで一覧出力
    @prefectures.each.with_index(1) do |prefecture, i|
      puts "#{i.to_s.rjust(2)}. #{prefecture["prefecture"]}"
    end
    puts <<~TEXT

            明日の天気情報を3時間毎に表示します。
            都道府県の番号を入力してください。
          TEXT
    while true
      input = gets.to_i
      # 正しいリスト番号が入力されればメソッドを抜ける
      if input.between?(1, @prefectures.count)
        return @prefectures[input - 1]
      else
        # リスト番号以外が入力されればエラー表示し再ループ
        puts <<~TEXT
                --------------------------------------------
                error : 表示の番号のみを入力してください。
                --------------------------------------------
              TEXT
      end
    end
  end

  #----------- ここまで -----------

end
- 表示される都道府県一覧のインデックス番号の桁数が違う場合、縦方向に揃わなくなります。縦方向に揃えるために
to_sで文字列に変換してrjust(2)を使用しています。 - インデックス番号以外が入力された場合はエラー文を表示してループさせるようにしています。
execution.rbでselect_prefectureメソッドを実行
execution.rbに上記で定義したselect_prefectureメソッドを実行する。
また、weather_info.rbを読み込んでおく。
require "csv"

# --------- 下記を追加 ---------

require_relative "weather_info"

# ----------- ここまで -----------

prefectures = CSV.read("./prefectures.csv", headers: true)
weather_info = WeatherInfo.new(prefectures)

# --------- 下記を追加 ---------

prefecture = weather_info.select_prefecture

# ----------- ここまで -----------
OpenWeatherMapから天気情報を取得
外部APIのOpenWeatherMapから天気情報を取得します。
weather_info.rbにget_weather_forecastメソッドを定義。
class WeatherInfo
  #----------*** 略 ***---------
  def select_prefecture
    #--------*** 略 ***---------
  end

  #--------- 下記を追加 ---------

  def get_weather_forecast(prefecture)
    # 外部API「OpenWeatherMap」から天気情報を取得
    response = open("http://api.openweathermap.org/data/2.5/forecast" + "?q=#{prefecture["english"]}&appid=#{WEATHER_API_KEY}&units=metric&lang=ja")
    # 取得したデータをJSONとして解析
    data = JSON.parse(response.read)
    # JSONデータ内の一部の情報のみ取得しハッシュ化
    datas = { list: data["list"], prefecture_name: data["city"]["name"] }
  end

  #----------- ここまで -----------
end
openメソッドでURLを指定し、天気情報を取得します。
-
http://api.openweathermap.org/data/2.5/forecast→ 3時間ごとの天気予報を5日分取得できる -
?q=→ CSVデータの英語化した都市名が入る -
&appid=→ APIキーが入る -
&units=metric→ データ形式の単位を指定 -
&lang=→ 言語を日本語に指定
各パラメータやJSONデータの中身について、詳しくはこちらで確認できます。
execution.rbでget_weather_forecastメソッドを実行
execution.rbに、上記で定義したget_weather_forecastメソッドを実行する。
また、config.rbファイル、jsonライブラリ、open-uriライブラリ を読み込んでおく。
require "csv"
require_relative "weather_info"

# --------- 下記を追加 ---------

require_relative "config"
require "json"
require "open-uri"

# ----------- ここまで -----------

prefectures = CSV.read("./prefectures.csv", headers: true)
weather_info = WeatherInfo.new(prefectures)
prefecture = weather_info.select_prefecture

# --------- 下記を追加 ---------

datas = weather_info.get_weather_forecast(prefecture)

# ----------- ここまで -----------
翌日の天気情報を一覧表示する
取得した天気情報を一覧表示するdisplay_weather_forecastメソッドを定義。
class WeatherInfo
  #----------*** 略 ***---------
  def select_prefecture
    #--------*** 略 ***---------
  end

  def get_weather_forecast(prefecture)
    #--------*** 略 ***---------
  end

  #--------- 下記を追加 ---------

  def display_weather_forecast(weathers)
    # 曜日を日本語表示できるようにしておく
    wd = ["日", "月", "火", "水", "木", "金", "土"]
    # 翌日
    tomorrow = Date.today + 1
    puts <<~TEXT


           ☀~~☆~~☁~~☂~~☀~~☆~~☁~~☂~~☀~~☆~~☁~~☂

              #{weathers[:prefecture_name]}の#{tomorrow.strftime("%m/%d(#{wd[tomorrow.wday]})")}の天気予報

           ☀~~☆~~☁~~☂~~☀~~☆~~☁~~☂~~☀~~☆~~☁~~☂

         TEXT
    weathers[:list].each do |weather|
      # DateTime型に変換
      date_and_time = DateTime.parse(weather["dt_txt"])
      # 比較用にDate型も用意
      date = Date.parse(weather["dt_txt"])
      # 翌日の情報だけに限定して一覧表示
      if date == tomorrow
        puts <<~TEXT
               ---------------------------
               #{date_and_time.strftime("%p%H時頃")}
               天気:#{weather["weather"][0]["description"]}
               気温:#{weather["main"]["temp"]}℃
               ---------------------------
             TEXT
      end
    end
  end

  #----------- ここまで -----------

end
execution.rbでdisplay_weather_forecastメソッドを実行
execution.rbに上記で定義したdisplay_weather_forecastメソッドを実行する。
また、dateライブラリ を読み込んでおく。
require "csv"
require_relative "weather_info"
require_relative "config"
require "json"
require "open-uri"

# --------- 下記を追加 ---------

require "date"

# ----------- ここまで -----------

prefectures = CSV.read("./prefectures.csv", headers: true)
weather_info = WeatherInfo.new(prefectures)
prefecture = weather_info.select_prefecture
datas = weather_info.get_weather_forecast(prefecture)

# --------- 下記を追加 ---------

weather_info.display_weather_forecast(datas)

# ----------- ここまで -----------
これで完成したので、あとは
ruby execution.rb
を実行

