Power Apps と共に使われることが多く、また、 Dynamics 365 Customer Engagement 製品群の既定のデータストアとして機能するのが Dataverse です。.NET の技術を使って Dataverse の API を呼び出そうとすると、これまで長らく .NET Framework v4.x が必要でした。
先日、 NuGet パッケージ Microsoft.PowerPlatform.Dataverse.Client (執筆時点で Public preview) を使うと、 .NET 5.0 がサポートされていることを発見しました。
それを使ってみたくって、この記事では、これまた最近 .NET 5 がサポートされた Azure Functions アプリの中から利用してみます。
目的
以下のようなアプリを開発します。
- Azure Functions アプリである
- Azure Functions v3
- .NET 5.0 の C# で開発する
- Visual Studio Code を使う
- 接続文字列をコードの中に記述せず、Azure ポータル上で登録する
- Dataverse にアクセスして、エンティティ レコードの プライマリ画像 のデータを返す
- NuGet パッケージ Microsoft.PowerPlatform.Dataverse.Client v0.4.12 (Public preview) を利用する
開発環境
- .NET SDK 5.0.301
- .NET Core SDK 3.1.410
- (Azure Functions v3 で .NET 5 を採用する際にも .NET Core 3.1 が必要なようです。詳しく調べてません。)
- Visual Studio Code v1.57.0
開発手順
① アプリの登録などの認証の設定
後に Azure Functions アプリ内から Dataverse にアクセスする際、 OAuth 認証が使用されます。そのために、以下のページの記述にしたがって、アプリを登録したり Dataverse へのアクセス権を付与する必要があります。「アプリ登録」セクションにおいては、アプリケーションの種類としては "Web アプリ /API" の方が該当します。
- Microsoft Dataverse で OAuth 認証を使用する ( https://docs.microsoft.com/ja-jp/powerapps/developer/data-platform/authenticate-oauth )
② Azure Functions アプリの開発
1. Azure ポータル上で Azure Functions の 関数アプリ を作成します
関数アプリ を新規作成します。以下のように設定しました。
- ランタイムスタック: .NET
- Version: 3.1 (他の選択肢がない)
2. Visual Studio Code 上での 関数アプリの関数の開発を開始します
以下のページを参考に開発の準備をします。
- Visual Studio Code を使用して Azure Functions を開発する ( https://docs.microsoft.com/ja-jp/azure/azure-functions/functions-develop-vs-code?tabs=csharp )
3. Visual Studio Code 内の Azure Functions 拡張機能を使ってプロジェクトを作成する
私は作成時に、以下の選択肢を選びました。
- 言語: C# (これは、上記ページに記載の "C# コンパイル済み" に該当するはず)
- .NET ランタイム: .NET 5
- テンプレート: HTTP trigger
- 関数名: HttpTrigger1
- 名前空間: Keiji.Function
- AccessRIghts (認証レベルのことであろう): Function
4. 接続文字列を登録する
関数アプリから Dataverse にアクセスするための、接続文字列を登録します。Azure ポータル上で当該 関数アプリ についての Configuration で、新しい Connection string を登録します。
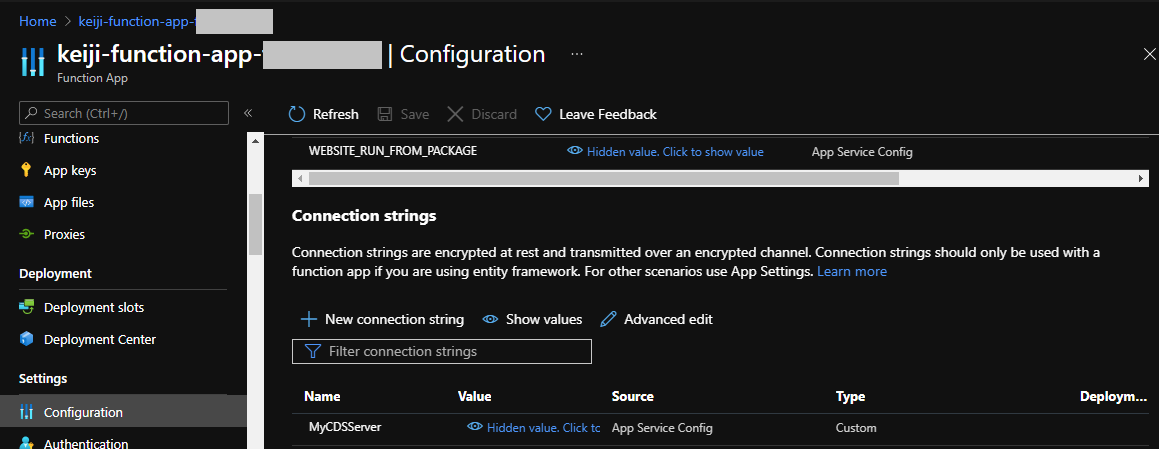
登録する Connection string として、私は名前を "MyCDSServer" とし、値は、以下のようなもので登録しました。「① アプリの登録などの認証の設定」で登録したアプリにしたがって、適宜ご自身の環境に合わせて編集ください。
AuthType=OAuth;Username=user@xxxxxxx.onmicrosoft.com;Password=12345;Url=https://xxxxxxx.crm.dynamics.com;AppId=xxxxxxxxx-8155-44e5-95e4-8615e5d12150;RedirectUri=https://localhost/appname;LoginPrompt=Auto
この辺りは、以下のページの記載を参考にしています。
- XRM ツールの接続文字列を使用して Microsoft Dataverse に接続する ( https://docs.microsoft.com/ja-jp/powerapps/developer/data-platform/xrm-tooling/use-connection-strings-xrm-tooling-connect )
5. 接続文字列をコードから取得する準備
Visual Studio Code にて、以下のページに記載の通り Startup.cs ファイルを追加します。namespace 関連以外は同じです。
- App Configuration ストアに接続する ( https://docs.microsoft.com/ja-jp/azure/azure-app-configuration/quickstart-azure-functions-csharp#connect-to-an-app-configuration-store )
using System;
using Microsoft.Azure.Functions.Extensions.DependencyInjection;
using Microsoft.Extensions.Configuration;

[assembly: FunctionsStartup(typeof(Keiji.Function.Startup))]

namespace Keiji.Function
{
    class Startup : FunctionsStartup
    {
        public override void ConfigureAppConfiguration(IFunctionsConfigurationBuilder builder)
        {
            string cs = Environment.GetEnvironmentVariable("ConnectionString");
            builder.ConfigurationBuilder.AddAzureAppConfiguration(cs);
        }

        public override void Configure(IFunctionsHostBuilder builder)
        {
        }
    }
}
6. 接続文字列をコードから取得する
Visual Studio Code で、関数である HttpTrigger1.cs で、実際に接続文字列を取得します。コンストラクタを追加するので、静的クラスではなく、動的クラスにするため、 static を取り除いています。(コードの全体は後程記載します。)
    public class HttpTrigger1
    {
        private IConfiguration _configuration;
        public HttpTrigger1(IConfiguration configuration)
        {
            _configuration = configuration;
        }
7. 関数で受け取るためのクラスを作成する
後に Dataverse に対するクエリのために必要なクラスを作成します。具体的には、以下のような JSON 文字列を受け付けたいという設計です。
この例では、論理名 keiji_property というエンティティがあって、その中で プライマリ画像 データが格納されている属性の論理名が keiji_primaryimage である、という意味合いです。
{ "entityName": "keiji_property", "recordId": "76485703-2556-eb11-bb23-000d3a8b6647", "imageAttributeName": "keiji_primaryimage" }
その JSON 文字列に対応するクラスとして、今回は HttpTrigger1.cs の中に以下のようなクラスを作成しました。
    public class MyClass
    {
        public string entityName { get; set; }
        public string recordId { get; set; }
        public string imageAttributeName { get; set; }
    }
8. NuGet パッケージのインストール
NuGet パッケージ Microsoft.PowerPlatform.Dataverse.Client をインストールします。
dotnet add package Microsoft.PowerPlatform.Dataverse.Client --version 0.4.12
9. Dataverse へのクエリを発行して、レスポンスを返す
ServiceClient が NuGet パッケージ Microsoft.PowerPlatform.Dataverse.Client にて提供されていて、以下のようなコードで利用できます。今回は RetrieveAsync() を使って、単一の エンティティ レコード の 1個の属性の値を取得しようとしています。
ServiceClient を利用する際に、接続文字列を利用しています。
            string connectionString = _configuration.GetConnectionString("MyCDSServer");
            var serviceClient = new ServiceClient(connectionString);

            var result = await serviceClient.RetrieveAsync(
                myClass.entityName,
                new Guid(myClass.recordId),
                new ColumnSet(myClass.imageAttributeName)
            );

            var response = req.CreateResponse(HttpStatusCode.OK);
            response.Headers.Add("Content-Type", "text/plain; charset=utf-8");

            byte[] responseByteArray = (byte[])result[myClass.imageAttributeName];
            string imageBase64 = Convert.ToBase64String(responseByteArray, 0, responseByteArray.Length);
            response.WriteString("data:image/png;base64," + imageBase64);

            return response;
10. 関数のコード全体
以下が、関数のコード全体です。
using System;
using System.Net;
using Microsoft.Azure.Functions.Worker;
using Microsoft.Azure.Functions.Worker.Http;
using Microsoft.Extensions.Logging;
using System.Threading.Tasks;
using System.Text.Json;
using Microsoft.Extensions.Configuration;
using Microsoft.PowerPlatform.Dataverse.Client;
using Microsoft.Xrm.Sdk.Query;

namespace Keiji.Function
{
    public class HttpTrigger1
    {
        private IConfiguration _configuration;
        public HttpTrigger1(IConfiguration configuration)
        {
            _configuration = configuration;
        }

        [Function("HttpTrigger1")]
        public async Task<HttpResponseData> Run([HttpTrigger(AuthorizationLevel.Function, "get", "post")] HttpRequestData req,
            FunctionContext executionContext)
        {
            var logger = executionContext.GetLogger("HttpTrigger1");
            logger.LogInformation("C# HTTP trigger function processed a request.");

            byte[] byteArray = new byte[req.Body.Length];
            await req.Body.ReadAsync(byteArray, 0, (int)req.Body.Length);
            string jsonContent = System.Text.Encoding.UTF8.GetString(byteArray);
            MyClass myClass = JsonSerializer.Deserialize<MyClass>(jsonContent);

            string connectionString = _configuration.GetConnectionString("MyCDSServer");
            var serviceClient = new ServiceClient(connectionString);

            var result = await serviceClient.RetrieveAsync(
                myClass.entityName,
                new Guid(myClass.recordId),
                new ColumnSet(myClass.imageAttributeName)
            );

            var response = req.CreateResponse(HttpStatusCode.OK);
            response.Headers.Add("Content-Type", "text/plain; charset=utf-8");

            byte[] responseByteArray = (byte[])result[myClass.imageAttributeName];
            string imageBase64 = Convert.ToBase64String(responseByteArray, 0, responseByteArray.Length);
            response.WriteString("data:image/png;base64," + imageBase64);

            return response;
        }
    }

    public class MyClass
    {
        public string entityName { get; set; }
        public string recordId { get; set; }
        public string imageAttributeName { get; set; }
    }
}
11. (参考) .csproj ファイル
参考までに、 .csproj ファイルを記載します。
<Project Sdk="Microsoft.NET.Sdk">
  <PropertyGroup>
    <TargetFramework>net5.0</TargetFramework>
    <AzureFunctionsVersion>v3</AzureFunctionsVersion>
    <OutputType>Exe</OutputType>
  </PropertyGroup>
  <ItemGroup>
    <PackageReference Include="Microsoft.Azure.Functions.Extensions" Version="1.1.0" />
    <PackageReference Include="Microsoft.Azure.Functions.Worker.Extensions.Http" Version="3.0.12" />
    <PackageReference Include="Microsoft.Azure.Functions.Worker.Sdk" Version="1.0.3" OutputItemType="Analyzer" />
    <PackageReference Include="Microsoft.Azure.Functions.Worker" Version="1.1.0" />
    <PackageReference Include="Microsoft.Extensions.Configuration.AzureAppConfiguration" Version="4.4.0" />
    <PackageReference Include="Microsoft.PowerPlatform.Dataverse.Client" Version="0.4.12" />
  </ItemGroup>
  <ItemGroup>
    <None Update="host.json">
      <CopyToOutputDirectory>PreserveNewest</CopyToOutputDirectory>
    </None>
    <None Update="local.settings.json">
      <CopyToOutputDirectory>PreserveNewest</CopyToOutputDirectory>
      <CopyToPublishDirectory>Never</CopyToPublishDirectory>
    </None>
  </ItemGroup>
</Project>
③ Azure Functions アプリのデプロイ
Visual Studio Code 内の Azure Functions 拡張機能を使って、Azure 上の関数アプリにデプロイします。
④ 動作確認
1. 関数を呼び出すための URL を取得
Visual Studio Code 内の Azure Functions 拡張機能を使って、関数の URL を取得 ("Copy Function Url") します。
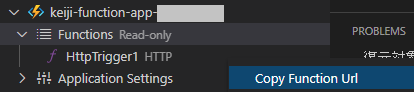
その URL は以下のようなものになります。
https://keiji-function-app-xxxxxx.azurewebsites.net/api/httptrigger1?code=xxxxxxxxxxxxxxxxxxxxxxxxxxxxxxxxxxxxxxxxxxxxxxx
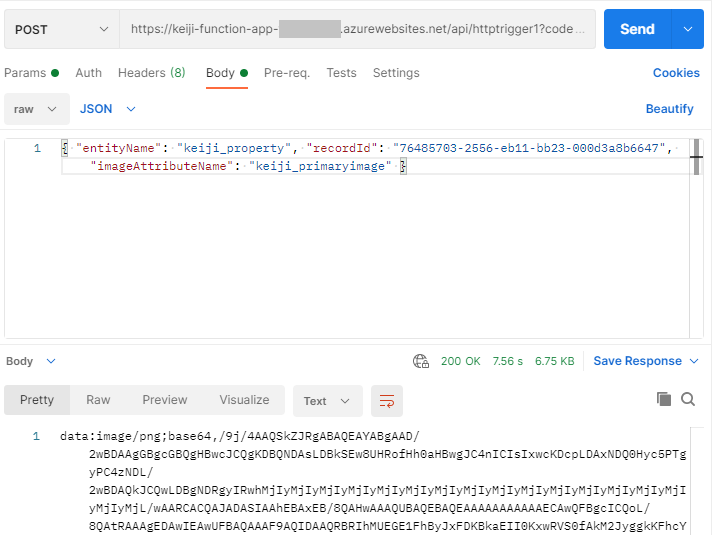
2. Postman を使って動作確認
Postman を使って、先ほど得た URL に対して、 POST メソッドを使って、先に紹介した JSON 文字列を Body に入力して Send します。
以下のように画像データを取得できると成功です。
なお、(今回の Dataverse へのクエリの例では) 事前に Dataverse の当該エンティティで当該レコードIDを持つレコードに、画像が登録されていることを確認してください。
リファレンス
- NuGet パッケージ Microsoft.PowerPlatform.Dataverse.Client ( https://www.nuget.org/packages/Microsoft.PowerPlatform.Dataverse.Client/ )