はじめに
前の記事 でAuth0の基本動作を確認したので、今度は Auth0 認証となる API を作ってみる・使ってみるという内容です。
結論としては、またもや至れり尽くせりなのでワンパン作業になります。
API の作成
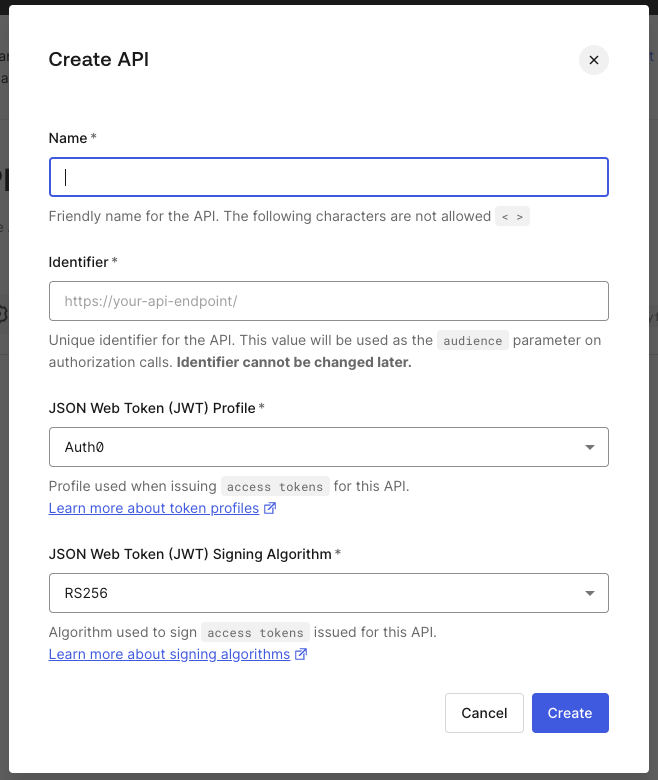
Auth0 ダッシュボードにログインし、 「Applications > APIs」 と選択。
「Create API」ボタンをクリック。
以下を入力。
- Name:
Auth0 Practice API - Audience:
https://auth0.com/[Auth0 Tenant ID]/api/auth0-practice-api- こちらの値ですが、
Auth0 Managment APIの audience はhttps://[auth0 Tenant ID].us.auth0.com/api/v2/となっていたのでそれを踏襲しています- (Audience設定のベストプラクティスが知りたい...)
- こちらの値ですが、
残りの項目はデフォルトのまま「Create」ボタンをクリック。
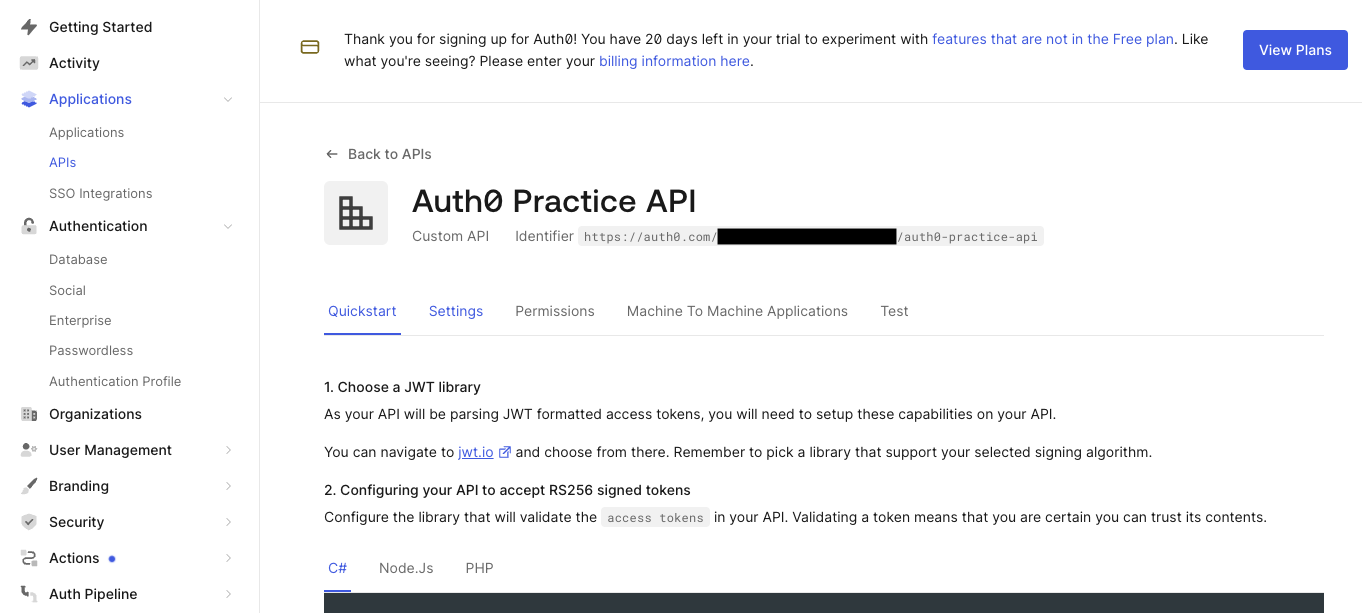
このような感じで API が作成されます。
この時点で画面を下の方にスクロールすると Node.js のサンプルが表示されている。
API のサンプルコード (Node.js)
const express = require('express');
const app = express();
const { auth } = require('express-oauth2-jwt-bearer');

const port = process.env.PORT || 8080;

const jwtCheck = auth({
  audience: '[設定した Audience]',
  issuerBaseURL: 'https://[Auth0 Tenant ID].us.auth0.com/',
  tokenSigningAlg: 'RS256'
});

// enforce on all endpoints
app.use(jwtCheck);

app.get('/authorized', function (req, res) {
    res.send('Secured Resource');
});

app.listen(port);

console.log('Running on port ', port);
/authorize に接続すると、ミドルウェアの jwtChek により Token Verify がされて Secured Resource というレスポンスが返る
というコードがもう表示されている。親切だ...
API と同時に作成されている Application の確認
この時点で、API とは別に Application も作られています。
Auth0 ダッシュボードで「Applications > Applications」と遷移すると、一覧に表示されている。
このアプリケーションを開いて、表示されている「Quickstart」タブを開くと、本 API に対して Client Credentials Flow で認証を取るための curl コマンド (等) が表示されていたりする。
いやもう至れり尽くせり。
curl --request POST \
  --url https://[Auth0 Tenant ID].us.auth0.com/oauth/token \
  --header 'content-type: application/json' \
  --data '{"client_id":"[Client ID]","client_secret":"[Client Secret]","audience":"[設定した Audience]","grant_type":"client_credentials"}'
これを実行するとJWTが取得できる。
さらに下には、「取得した JWT は、こうやって API に送ってあげれば良いよ」と言う解説まで...
curl --request GET \
  --url http://path_to_your_api/ \
  --header 'authorization: Bearer [Access Token]'
ただ、残念ながら API として作成したアプリケーションの場合、サンプルの Express コードの zip は落とせないみたい。
とはいえ 1 ファイルで済むんでなんの問題もなし。
前の記事 と動作環境は同じだと思うので、 API のサンプルコード をその中に足し込んで npm から PORT = 8080 (がコード内で指定されているので) で起動していく。
cd /path/to/前回の01-login.zipを添加したところ

ここにサンプルの Express コードを api.js として設置
次に必要なパッケージのインストール。
% npm install express-oauth2-jwt-bearer --save
npm warn EBADENGINE Unsupported engine {
npm warn EBADENGINE   package: 'express-oauth2-jwt-bearer@1.6.0',
npm warn EBADENGINE   required: { node: '^12.19.0 || ^14.15.0 || ^16.13.0 || ^18.12.0 || ^20.2.0' },
npm warn EBADENGINE   current: { node: 'v22.13.0', npm: '10.9.2' }
npm warn EBADENGINE }
ぐあ、そのバージョンの node は入れてない...
volta install からやり直し。
% volta install node@20.2.0
success: installed and set node@20.2.0 (with npm@9.6.6) as default
   note: you are using node@22.13.0 in the current project; to
         instead use node@20.2.0, run `volta pin node@20.2.0`

% volta pin node@20.2.0

% npm install express-oauth2-jwt-bearer --save

% node ./api.js
Running on port  8080
起動OK。
で、Auth0 のチュートリアルに従って、実際にこの API に対して JWT を投げてみる。
前述の通り、Auth0 ダッシュボードの「Application Quickstart > Sending the token API」に実行コマンドのサンプルが表示されていますが、そこに表示されている Access Token はどうやらそのまま使える (有効) なようす。
今回のように 8080 で起動しているなら以下で試すことができる。
curl --request GET \
  --url http://locahost:8080/authorized \
  --header 'authorization: Bearer [ここに表示されている Access Tokenがすでに有効なやつなのでそののまま使える]'
結果以下のようにレスポンスが返ってくる。
Secured Resource
次に先程のコマンドにおける Token を無効な値に編集 (一部削除するなりで) した場合、レスポンスは以下のようになった。
* Request completely sent off
< HTTP/1.1 401 Unauthorized
< X-Powered-By: Express
< WWW-Authenticate: Bearer realm="api", error="invalid_token", error_description="signature verification failed"
< Content-Security-Policy: default-src 'none'
< X-Content-Type-Options: nosniff
< Content-Type: text/html; charset=utf-8
< Content-Length: 401
< Date: Tue, 21 Jan 2025 06:24:15 GMT
< Connection: keep-alive
< Keep-Alive: timeout=5
<
<!DOCTYPE html>
<html lang="en">
<head>
<meta charset="utf-8">
<title>Error</title>
</head>
<body>
<pre>InvalidTokenError: signature verification failed<br> at /Users/yuzu/dev/work/01-login/node_modules/express-oauth2-jwt-bearer/dist/index.js:300:19<br> at async /path/to/01-login/node_modules/express-oauth2-jwt-bearer/dist/index.js:403:24</pre>
</body>
</html>
しっかり Verify も効いているということがわかる。
ということで Auth0 で API を試しに作成して、簡易に動かすところまでが完了。
次回は API のクライアントを SPA にして、そこから認証・API実行の流れを試してみたいと思います。


