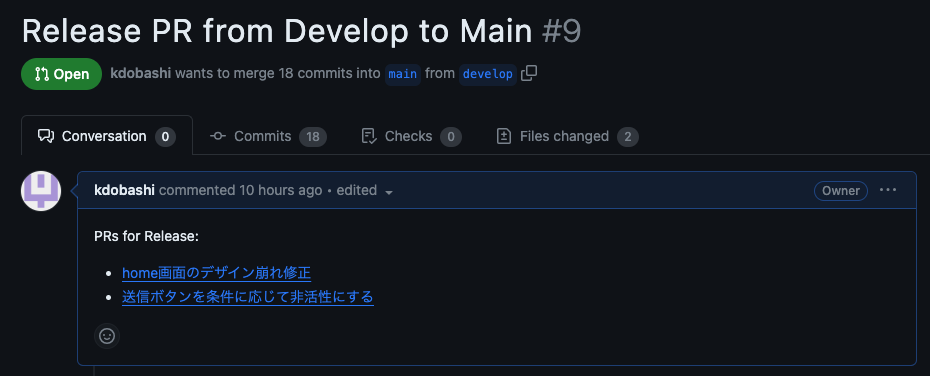
概要
リリース時に、リリース対象の洗い出しが大変なため自動で作りたいと思った。
developにPRがマージされるタイミングで
- develop to mainのPRがなければ
→PR作成とdevelopにマージしたPRのタイトルとリンクをbodyに入れる - develop to mainのPRがあれば
既存PRのbodyにdevelopにマージしたPRのタイトルとリンクをbodyに追記
ワークフロー定義ファイル作成
下記のようにyamlファイルを配置する
./.github/workflows/pr_to_main_on_develop_merge.yaml
pr_to_main_on_develop_merge.yaml
name: Automate and Update Release PR

on:
  pull_request:
    types: [closed]
    branches:
      - develop

jobs:
  createOrUpdateReleasePR:
    if: github.event.pull_request.merged == true
    runs-on: ubuntu-latest

    steps:
      - name: Checkout code
        uses: actions/checkout@v3

      - name: Setup GitHub CLI
        run: |
          if gh --version; then
            echo "GitHub CLI is already installed."
          else
            sudo apt update
            sudo apt install gh
          fi

      - name: Create or Update PR to Main
        env:
          GITHUB_TOKEN: ${{ secrets.CREATE_RELEASE_PR_TOKEN }}
        run: |
          PR_TITLE="${{ github.event.pull_request.title }}"
          PR_URL="${{ github.event.pull_request.html_url }}"

          # 既存のPRを検索
          existing_pr=$(gh pr list --base main --head develop --state open --json number --jq '.[0].number')

          if [ -z "$existing_pr" ]; then
            description=$(printf "PRs for Release:\n- [$PR_TITLE]($PR_URL)")
            # 新しいPRを作成し、説明にマージされたPRの情報を含める
            gh pr create --base main --head develop --title "Release PR from Develop to Main" --body "$description"
          else
            # 既存のPRの説明を取得
            existing_description=$(gh pr view $existing_pr --json body -q .body)
            # 既存のPRの説明を更新
            updated_description=$(printf "$existing_description\n- [$PR_TITLE]($PR_URL)")
            gh pr edit $existing_pr --body "$updated_description"
          fi
個人アクセストークン(PAT)の生成:
- GitHubにログイン:まずGitHubにログインします。
- 設定にアクセス:右上のプロフィール画像をクリックし、「Settings」を選択します。
- Developer settingsに進む:画面の左側のメニューから「Developer settings」を選択します。
- Personal access tokensに移動:「Personal access tokens」セクションを選択します。
- 新しいトークンを生成:「Generate new token」ボタンをクリックします。
- トークンの設定:
トークンに名前を付けます(例:「CREATE_RELEASE_PR_TOKEN」)。
必要なスコープ(権限)を選択します。通常、「repo」スコープが適切です。
「Generate token」をクリックしてトークンを生成します。

- トークンをコピー:
生成されたトークンをコピーします。これは一度しか表示されないので、安全な場所に保存してください。
GitHubリポジトリにトークンを追加:
- リポジトリの設定にアクセス:GitHubで対象のリポジトリに移動し、「Settings」タブをクリックします。
- Secretsに移動:左側のメニューから「Secrets」セクションを選択します。
- 新しいシークレットを追加:「New repository secret」をクリックします。
- シークレットの詳細を入力:
「Name」フィールドには、シークレットの名前を入力します(例:「CREATE_RELEASE_PR_TOKEN」)。
「Value」フィールドには、先ほどコピーしたトークンの値をペーストします。
「Add secret」をクリックしてシークレットを保存します。

設定完了
この後に、developにPRがマージされるとリリースPRが作成されると思います。
試行錯誤したこと
毎回対象のPRを全て取得するアプローチ
PRのbodyを間違って消してしまったりすることを考慮して、対象のPRを毎度一から取得する方法がよさそうと考えました。
しかしこちらを確認したところ、下記ができそうになかったため膨大なPRを取得する可能性があると思ったため断念しました。
・mainの最新コミット以降の、PRマージを取得すること
・日時でフィルターをかけて取得
labelで取得すればできなくはなさそうであるが
- developにマージする時にlabelつけて
- mainにマージする時にlabel消す
をする必要がありGitHub Actionsが増えるし、label運用方法を周知したりすることが面倒そうなので諦めました。
