【Google Cloud】 Cloud Runを使ってVertex AI Agent Builderを利用するwebアプリを試作してみた
はじめに
こんにちは。京セラコミュニケーションシステムの森島(@kccs_takahiro-morishima)です。よろしくお願いします。
今回は、Vertex AI Agent Builderで作成した検索アプリを、FlaskとCloud Runを使って自作のWebアプリからAPI経由で利用する方法を検証しました。
AIを活用したWebアプリの開発に興味がある方の参考になれば幸いです。APIの利用、Cloud Run、IAMの権限など、つまずきやすいポイントが多いため、Cloudの理解を深めるきっかけになると思います。
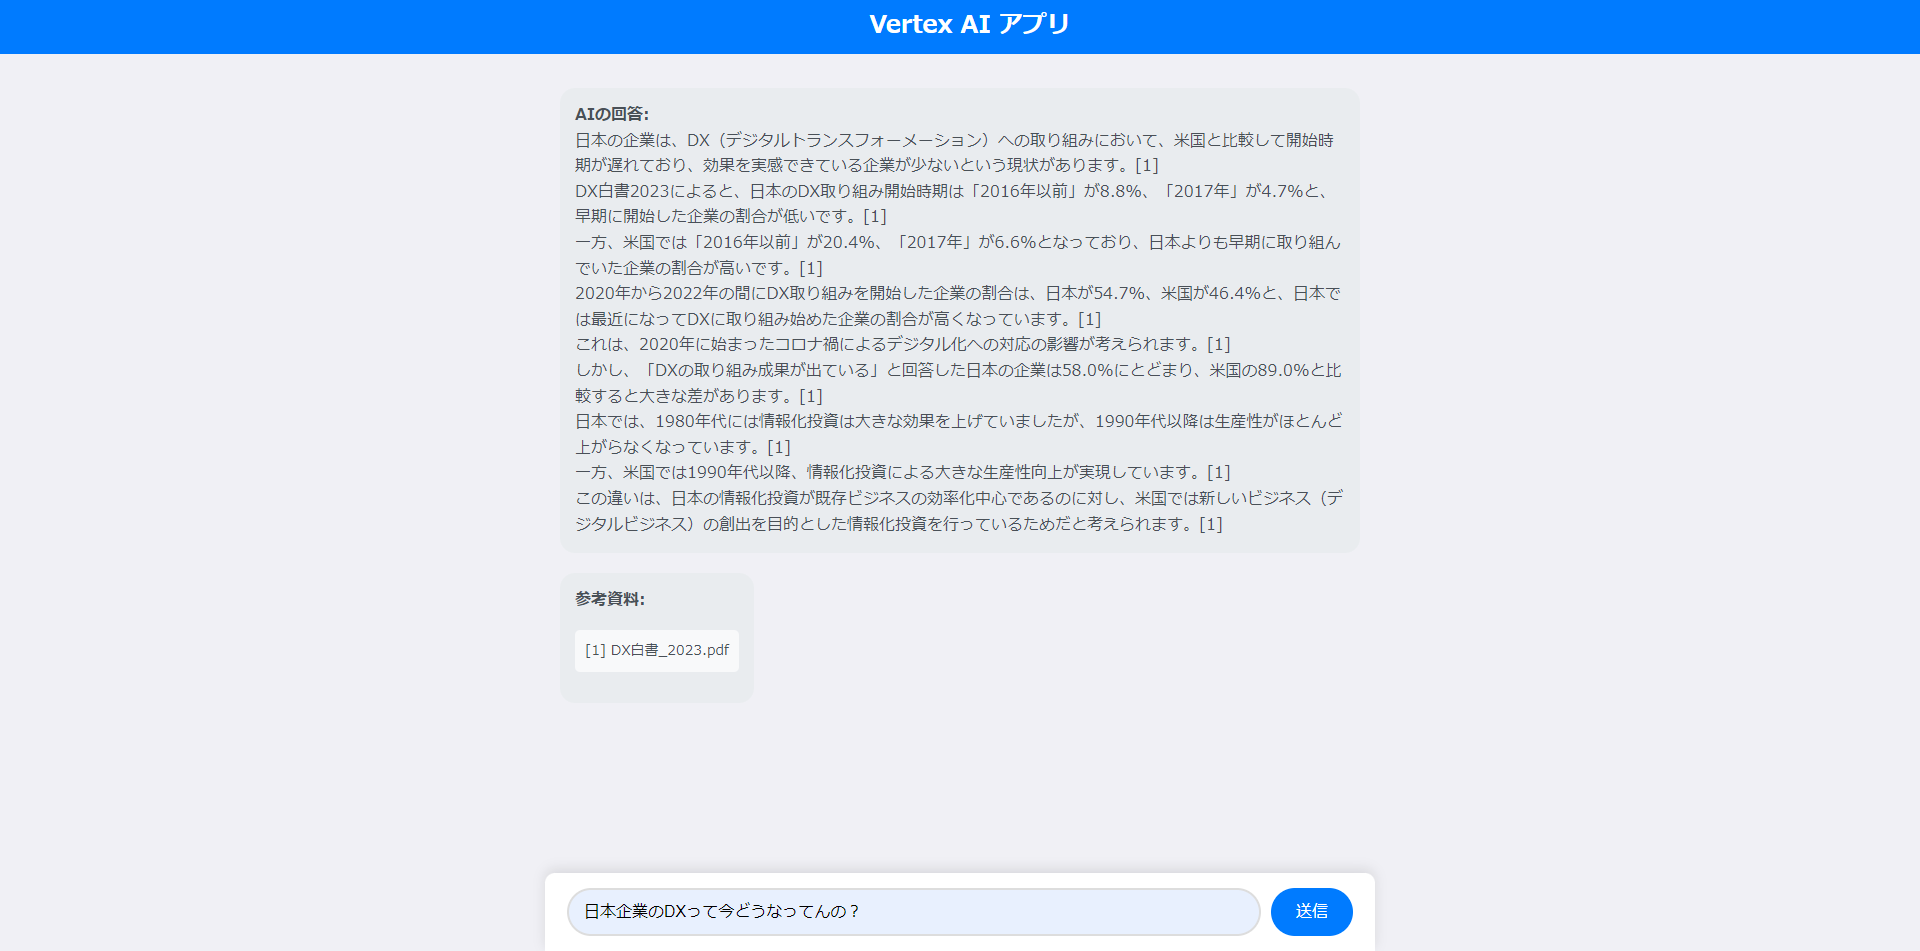
用意した資料をAIが参照し、その内容について質問したら回答してくれるwebアプリ作成を想定しています。本来資料検索機能にAIを組み合わせたのがAgent Builderの検索アプリですが、今回はAIのコメント機能にのみ注目しました。
※gcloud CLIがない場合はインストールしてください。
※Windows環境を想定しています。Macの場合はgcloudの部分が異なるためご注意ください。
この記事の対象者
- AIを使ったWebアプリの開発に興味がある方
- Googleの生成AI(Vertex AI Search)をAPIで使ってみたい方
- FlaskやCloud Runの基本的な使い方を知りたい方
実施内容
目的
- Vertex AI Agent Builderで作成した検索アプリを、API経由でWebアプリから利用できるようにする
- Flaskを使ってシンプルなWebアプリを構築し、Cloud Run上で動作させる
- AIを使ったチャットボットのプロトタイプを自作する
手順
1. Google Cloud Storageに文書データを保存
まず、AIの回答根拠としたい文書データ(今回はPDFファイル)をGoogle Cloud Storageに保存します。
例として、2023年のDX白書のPDFを使用しました。今回は資料は一つのみですが、実際は複数が望ましいでしょう。
2. Vertex AI Agent Builderのセットアップ
Vertex AI Agent Builderを使って、資料検索アプリを作成します。
-
Google CloudコンソールでVertex AI Agent Builderを開きます。
-
アプリを作成するをクリックします。

-
種類で検索を選択します。

-
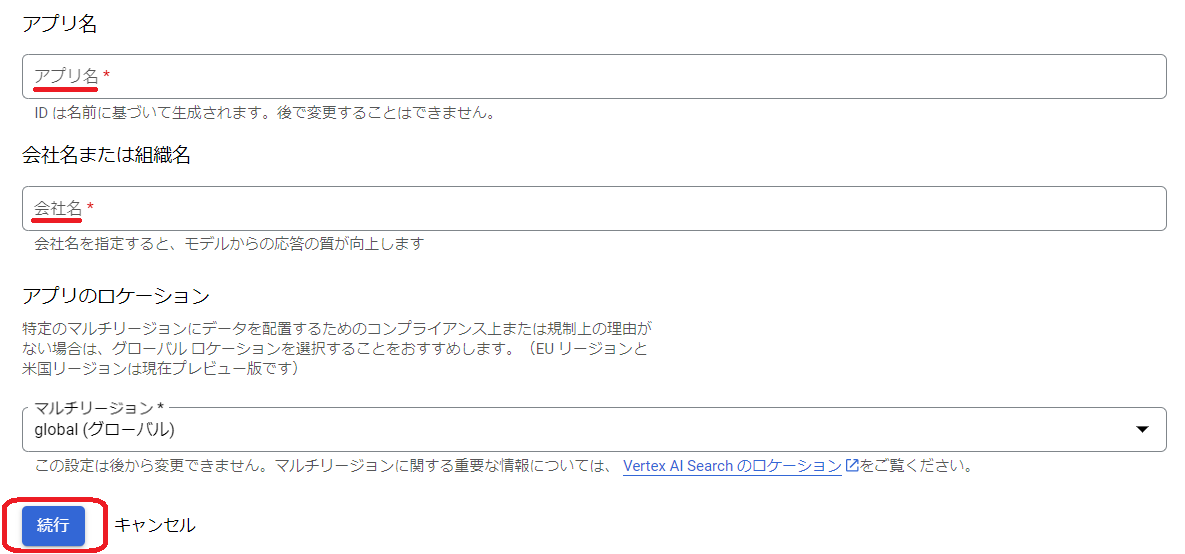
構成でエージェント名と組織名を入力します(適当な名前でOKです)。続行をクリックします。
-
データストアを作成をクリックします。

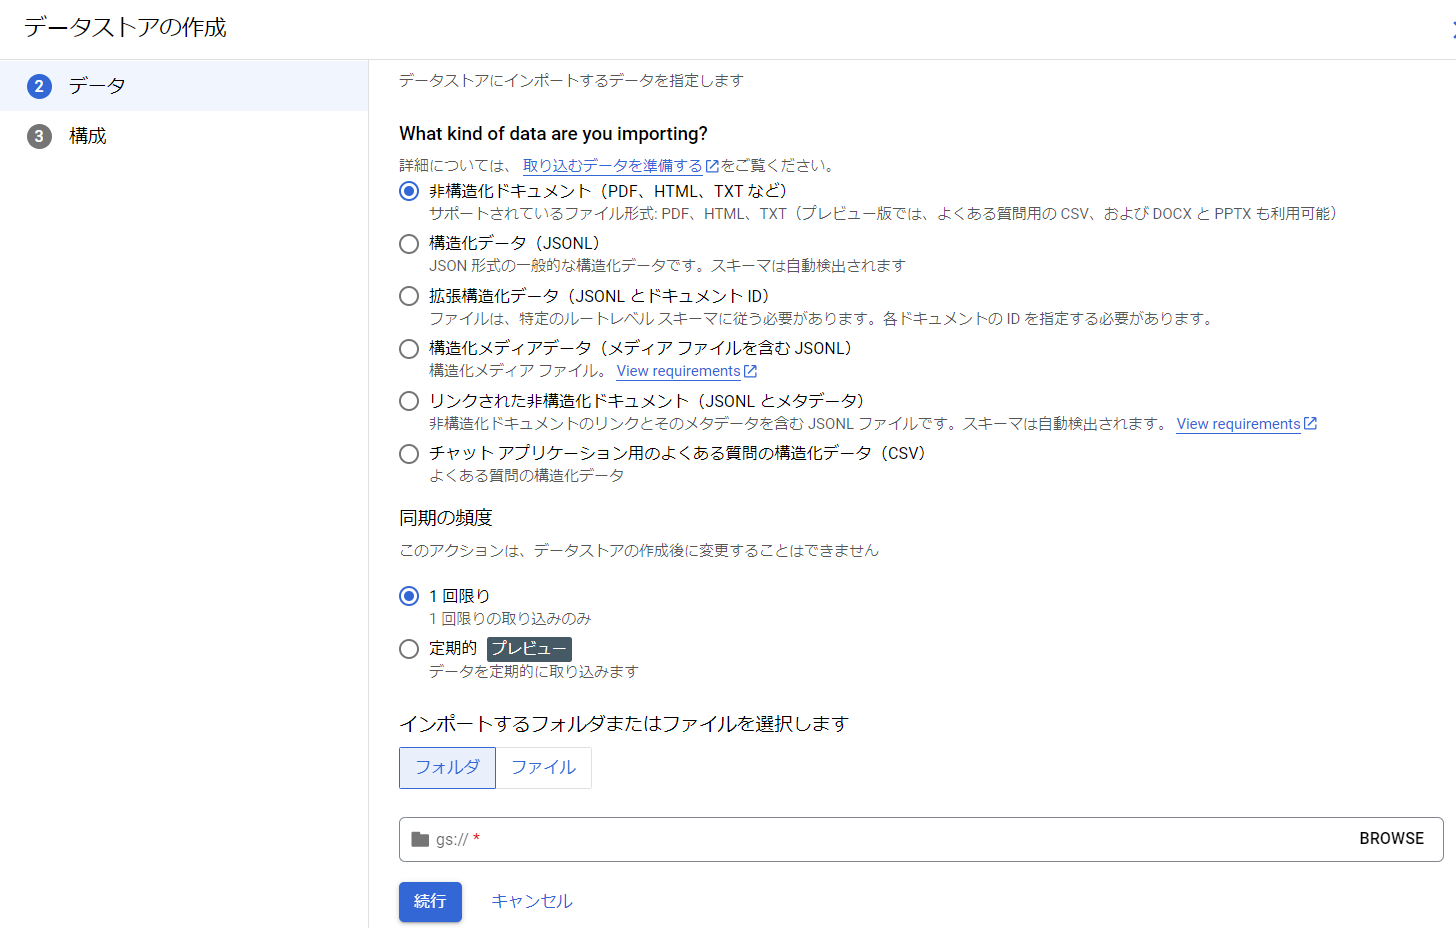
- データソースを選択でCloud Storageを選びます。

- Cloud Storageのデータをインポートで、先ほどGCSにアップロードしたフォルダ(またはファイル)を指定します。
-
任意のデータストア名を入力し、作成をクリックします。

-
作成したデータストアを選択し、作成をクリックします。※データストアのIDをメモしておいてください。コード開発で使います。

この時点でコンソール上で検索アプリのプレビューが可能ですが、今回はAPI経由でWebアプリから利用します。
3. Webアプリの作成
ローカル環境でFlaskを使ったWebアプリを構築します。Visual Studio Codeなどで開発してください。基本は下記のファイル構成、コードで問題ありません(プロジェクトIDなどは追加する必要があります)。
ファイル構成
project/
├── main.py
├── requirements.txt
├── templates/
│   └── index.html
└── static/
    └── css/
        └── style.css
main.py
import os
from flask import Flask, render_template, request
# Googleの生成AI(Vertex AI Search)APIのクライアントライブラリをインポート
from google.cloud import discoveryengine_v1alpha as discoveryengine
from google.api_core.client_options import ClientOptions

app = Flask(__name__)

# 認証情報を削除(Cloud Runのデフォルト認証を使用)
# credentials = service_account.Credentials.from_service_account_info(service_account_info)

def extract_path_from_link(link: str) -> str:
    """
    ドキュメントのリンクからパスを抽出する関数
    """
    return "/".join(link[5:].split("/")[1:])

def search_from_json(input_json):
    """
    Vertex AI Search (Agent Builder 検索) APIを使用して検索を行う関数
    """
    # 入力JSONからパラメータを取得
    project_id = input_json['project_id']
    location = input_json['location']
    data_store_id = input_json['data_store_id']
    query = input_json['query']

    # APIエンドポイントの設定
    client_options = ClientOptions(api_endpoint=f"{location}-discoveryengine.googleapis.com") if location != "global" else None

    # Discovery Engineクライアントを作成(デフォルト認証情報を使用)
    client = discoveryengine.SearchServiceClient(client_options=client_options)

    # Serving Configのパスを作成
    serving_config = client.serving_config_path(
        project=project_id,
        location=location,
        data_store=data_store_id,
        serving_config="default_config",
    )

    # APIリクエストの作成
    request = discoveryengine.SearchRequest(
        serving_config=serving_config,
        query=query,
        page_size=5,
        content_search_spec=discoveryengine.SearchRequest.ContentSearchSpec(
            extractive_content_spec=discoveryengine.SearchRequest.ContentSearchSpec.ExtractiveContentSpec(
                max_extractive_segment_count=3,
                max_extractive_answer_count=1,
            ),
            summary_spec=discoveryengine.SearchRequest.ContentSearchSpec.SummarySpec(
                summary_result_count=5,
                include_citations=True,
                model_spec=discoveryengine.SearchRequest.ContentSearchSpec.SummarySpec.ModelSpec(
                    version="preview"
                ),
            ),
        ),
    )

    # APIを呼び出し、レスポンスを取得
    response = client.search(request=request)

    # レスポンスから検索結果を抽出
    search_results = {
        "answer": response.summary.summary_text,
        "results": [
            {
               "document_path": extract_path_from_link(result.document.derived_struct_data["link"]),
            } for result in response.results
        ]
    }

    return search_results

@app.route("/", methods=["GET", "POST"])
def index():
    if request.method == "POST":
        query = request.form["query"]

        # 入力パラメータの設定
        input_json = {
            "project_id": "your-project-id",  # プロジェクトIDを入れてください
            "location": "global",
            "data_store_id": "your-datastore-id",  # データストアIDを入れてください
            "query": query
        }

        try:
            # 検索を実行
            result = search_from_json(input_json)
            answer = result.get("answer", "No answer found.")
            # 「]」のあとに改行を入れる処理
            answer = answer.replace("]", "]<br>")
            document_paths = [res["document_path"] for res in result.get("results", [])]
        except Exception as e:
            answer = f"エラーが発生しました: {str(e)}"
            document_paths = []

        return render_template("index.html", answer=answer, document_paths=document_paths)

    return render_template("index.html")

if __name__ == "__main__":
    # アプリケーションを起動
    app.run(debug=True, host="0.0.0.0", port=int(os.environ.get("PORT", 8080)))
注意:project_idとdata_store_idはご自身の環境に合わせて設定してください。
index.html
<!DOCTYPE html>
<html lang="ja">
<head>
    <meta charset="UTF-8">
    <meta name="viewport" content="width=device-width, initial-scale=1.0">
    <title>Vertex AI アプリ</title>
    <link rel="stylesheet" href="{{ url_for('static', filename='css/style.css') }}">
</head>
<body>

    <!-- ヘッダー(タイトル部分)。クリックするとトップページへリダイレクト -->
    <div class="header">
        <a href="/"><h1>Vertex AI アプリ</h1></a> <!-- ここをリンクに -->
    </div>

    <!-- チャットコンテンツ -->
    <div class="chat-container">
        <div class="chat-box">

            <!-- AIの回答 -->
            {% if answer %}
            <div class="chat-message ai-message">
                <div class="message-content">
                    <strong>AIの回答:</strong> <br>{{ answer|safe }} <!-- |safe フィルターを追加 -->
                </div>
            </div>
            {% endif %}

            <!-- AIの参考資料パス -->
            {% if document_paths %}
            <div class="chat-message ai-message">
                <div class="message-content">
                    <strong>参考資料:</strong>
                    <ul>
                        {% for path in document_paths %}
                        <li>[{{ loop.index }}] {{ path }}</li>
                        {% endfor %}
                    </ul>
                </div>
            </div>
            {% endif %}

        </div>
    </div>

    <!-- 検索フォーム -->
    <form method="POST" class="form-container">
        <input type="text" id="query" name="query" placeholder="質問を入力してください..." size="100" required>
        <button type="submit">送信</button>
    </form>

</body>
</html>
style.css
/* 画面全体の設定 */
body, html {
    height: 100%;
    margin: 0;
    display: flex;
    flex-direction: column;
    font-family: 'Roboto', sans-serif;
    background-color: #f0f0f5;
}

/* ヘッダー部分 */
.header {
    background-color: #007bff;
    color: white;
    padding: 10px;
    position: fixed;
    top: 0;
    width: 100%;
    z-index: 100;
    display: flex;
    align-items: center;
    justify-content: center; /* タイトルを中央に配置 */
}

.header h1 {
    font-size: 1.5em;
    margin: 0;
}

.header a {
    color: white;
    text-decoration: none;
}

.header a:hover {
    text-decoration: underline;
}

/* チャットコンテンツエリアの設定 */
.chat-container {
    flex: 1;
    padding-top: 70px; /* ヘッダーに対する余白 */
    padding-bottom: 100px; /* 検索フォームに対する余白 */
    overflow-y: auto;
}

.chat-box {
    padding: 20px;
    max-width: 800px;
    margin: 0 auto;
    width: 100%;
}

.chat-message {
    margin-bottom: 20px;
    display: flex;
    flex-direction: column;
}

.message-content {
    padding: 15px;
    border-radius: 15px;
    line-height: 1.6;
    max-width: 100%;
    background-color: #e9ecef;
    color: #495057;
    word-wrap: break-word; /* 長いテキストを折り返す */
}

.ai-message .message-content {
    align-self: flex-start;
}

.user-message .message-content {
    background-color: #d1e7dd;
    color: #155724;
    align-self: flex-end;
}

ul {
    list-style-type: none;
    padding-left: 0;
}

ul li {
    background-color: #f8f9fa;
    padding: 10px;
    border-radius: 5px;
    margin-bottom: 5px;
    font-size: 14px;
}

/* フォームを画面の一番下に固定 */
.form-container {
    position: fixed;
    bottom: 0;
    left: 50%;
    transform: translateX(-50%);
    background-color: #ffffff;
    padding: 15px;
    width: 100%;
    max-width: 800px;
    box-shadow: 0 -4px 12px rgba(0, 0, 0, 0.1);
    border-radius: 10px 10px 0 0;
    z-index: 1000;
    display: flex;
    justify-content: center;
}

.form-container input[type="text"] {
    padding: 12px 15px;
    font-size: 16px;
    border: 2px solid #ddd;
    border-radius: 30px;
    margin-right: 10px;
    width: calc(100% - 140px);
    transition: border-color 0.3s ease;
}

.form-container input[type="text"]:focus {
    border-color: #007bff;
    outline: none;
}

.form-container button {
    padding: 12px 25px;
    font-size: 16px;
    background-color: #007bff;
    color: white;
    border: none;
    border-radius: 30px;
    cursor: pointer;
    transition: background-color 0.3s ease;
}

.form-container button:hover {
    background-color: #0056b3;
}

/* リンクのスタイル */
a {
    color: #007bff;
    text-decoration: none;
}

a:hover {
    text-decoration: underline;
}

/* メディアクエリでモバイル表示を調整 */
@media screen and (max-width: 600px) {
    .form-container input[type="text"] {
        width: calc(100% - 110px);
    }

    .header h1 {
        font-size: 1.2em;
    }
}
requirements.txt
Flask==2.3.3
gunicorn==20.1.0
Werkzeug==2.3.7
google-cloud-discoveryengine==0.12.2
4. IAMの設定
自分のアカウントに必要な権限を付与
※Google Cloudのアカウントが開発中のプロジェクトでオーナー権限を持っている前提で話を進めます。ご了承ください。
サービスアカウントの作成
Cloud Runでアプリを実行するためのサービスアカウントを作成し、必要な権限を付与します。
-
Google CloudコンソールでIAMと管理 > サービスアカウントに移動します。

-
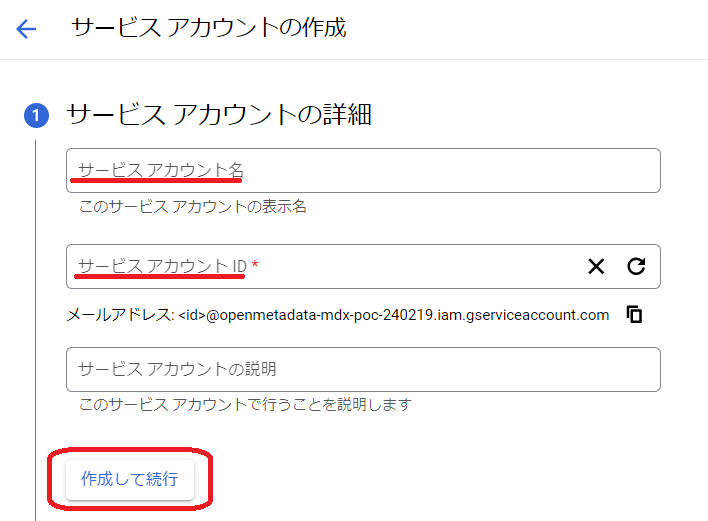
サービスアカウントを作成をクリックし、適切な名前を設定します。
-
ロールには以下を追加します。
- Cloud Run デベロッパー
- ディスカバリー エンジン ユーザー

こうすることで、Cloud Runにデプロイしたアプリが利用するサービスアカウントにAgent Builderの検索機能APIを叩く権限を与えることができます。
5. Cloud RunでFlaskアプリをデプロイ
Cloud Runを使ってアプリをデプロイします。
デプロイ手順
-
Cloud Build APIの有効化
- デプロイ時に自動的に利用されますが、事前に有効化しておきます。
-
デプロイコマンドの実行
※デプロイ時に自分のアカウントに権限が不足していた場合は適宜追加してください。
ターミナルで開発したファイルの場所に移動し、以下のコマンドを実行します。
gcloud run deploy --service-account サービスアカウントのメールアドレスコマンド実行時の入力
- Source code location: デフォルト(現在のディレクトリ)でOKなのでそのままエンター。
- Service name: 任意のサービス名を入力します(そのままエンターでデフォルト名)。
-
Region: 希望のリージョンを選択します(例:
asia-northeast1)。 -
Allow unauthenticated invocations:
yを入力して認証なしでアクセス可能にします。
-
デプロイ完了後
- コマンド実行後、Cloud Run上にデプロイされたアプリのURLが表示されます。
- ブラウザでそのURLにアクセスすると、アプリが動作していることを確認できます。
完成イメージ
考察
検討
GoogleのAIをAPIから利用し、Cloud Runにデプロイする各作業は単純ですが、Cloud Run上のアプリから生成AIのAPIを呼び出す段階になると、権限の管理が複雑になります。デプロイ時に、適切な権限を持つサービスアカウントと紐付けることで正常に動作させることが最も重要です。
今回の実装だけでは正直なところVertex AI Agent Builder側が用意している画面の劣化となります。しかし、アプリを一から作成することで、画面やAPI利用部分を自由にカスタマイズでき、柔軟性が向上します。GeminiのAPIを組み合わせてAgentの回答をより良いものにするといった工夫も考えられるでしょう。ただそこまで努力するなら、DifyなどのLLMOpsを使用した方が良いかもしれません。あくまでプロトタイプととらえていただけると幸いです。
改善点
-
Cloud Runの選択:Cloud Runはアプリケーションを簡単にデプロイできるため、今回のように素早く動作させたい場合には便利です。ですが、以下の点に注意する必要があります。
- スケーラビリティ:大量のトラフィックや高いパフォーマンス要件がある場合、より詳細なリソース管理が可能なGKE(Google Kubernetes Engine)などのプラットフォームが適しています。
- 長時間実行プロセス:Cloud Runはリクエスト駆動型のサービスであり、長時間実行するバックグラウンドプロセスには向いていません。
以上の理由から、大規模な開発になる場合はGKEなどの他のサービスも検討すると良いでしょう。
-
webページの見せ方:今回は伝統的な方法でwebページを作りましたが、Vertex AI Agent Builderの画面をwebページに埋め込む方法もあります。また、参考資料に直接アクセスできないのは不便なので、ここを解決する必要があると思います(試作時にはあえて参考資料に直接飛べないようにしていました)。今回はAPIの自由度や拡張性を重視しましたが、一般的な利用の場合は公式が提供するものをそのまま使用した方が良いかもしれません。
おわりに
今回は、Vertex AI SearchをAPI経由で利用し、FlaskとCloud Runを使ってWebアプリからAIによる文書検索を行う方法を紹介しました。重要な点は以下の通りです。
- GoogleのAIのAPI利用
- API利用に伴い必要な権限の整理
- Cloud Runの利用の仕方
意外と幅広いので実際に試すと勉強になると思います。AIを使ったWebアプリの基礎的な部分をカバーできる内容となっていますので、ぜひご参考ください。
おしらせ
弊社X(旧:Twitter)では、Qiita投稿に関する情報や各種セミナー情報をお届けしております。情報収集や学びの場を求める皆さん!ぜひフォローしていただき、最新情報を手に入れてください!
KCCSのXアカウント