Information
こちらの記事はOCI CLIをWindowsにインストールした後の手順となります。
OCI CLI未インストールの場合は以下の記事をご覧ください。
WindowsにOCI CLIを導入してタスクスケジューラと組み合わせてComputeの自動起動を実装してみた①
はじめに
Oracle Cloud上にあるコンピュートの起動/停止などの操作はWebコンソールやモバイルアプリから簡単に利用できるが、Webコンソールやモバイルアプリの場合、スケジュールを設定した状態での自動起動/自動停止は実装できません。
運用上、夜間のみ停止し、朝には起動させておきたいなどの要件がある場合は別途ユーザ側で何かしたの仕組みを実装する必要があります。
今回はOCI CLIと呼ばれるOracle Cloudのリソースを操作するコマンドをLocalのWindows端末にインストールし、パワーシェルを作成し、それをタスクスケジューラで設定し、コンピュートの自動起動/自動停止を実装してみようと思います。
これを常時稼働しているWindowsServerで実行することで運用に応用も可能です。
前提 / 流れ
⓪事前に操作するComputeは作成しています。未作成の方は別途Computeの作成をお願いします。
①OCI CLIはLocalのWindows10 proにインストールします。WindowsServerも操作,コマンドは同じです。
②起動/停止を実行する.ps1ファイルを作成します。
③タスクスケジューラを設定し、自動化を実装します。
※今回は②③の作業となります。
OCI CLI未インストールの場合は以下の記事をご確認ください。
WindowsにOCI CLIを導入してタスクスケジューラと組み合わせてComputeの自動起動を実装してみた①
事前準備
Computeの操作に必要なOCIDを取得します。
Webコンソールにアクセスし「コンピュート>>インスタンス>>インスタンス詳細」からOCIDをメモします。

インスタンスを起動/停止する前に、インスタンスの詳細情報を取得できるか確認します。
ここでエラーにならなければ概ね、停止/起動の操作は可能かと思います。
エラーになる原因としては権限不足やネットワークの疎通(社内環境の場合はプロキシ設定が必要など)に問題があるかと思います。
PS C:\windows\system32> oci compute instance get --instance-id <メモしたインスタンスのOCIDを入力します>
{
  "data": {
    "agent-config": {
      "are-all-plugins-disabled": false,
      "is-management-disabled": false,
      "is-monitoring-disabled": false,
      "plugins-config": [
        {
          "desired-state": "DISABLED",
          "name": "Vulnerability Scanning"
        },
        {
          "desired-state": "ENABLED",
          "name": "Compute Instance Monitoring"
        },
        {
          "desired-state": "DISABLED",
          "name": "Bastion"
        }
      ]
    },
    "availability-config": {
      "is-live-migration-preferred": null,
      "recovery-action": "RESTORE_INSTANCE"
    },
    "availability-domain": "fLzU:US-SANJOSE-1-AD-1",
    "capacity-reservation-id": null,
    "compartment-id": "ocid1.tenancy.oc1..xxxxxxxxxxxxxxxxxxxxxxxxxxxxxxxxxxxxx",
    "dedicated-vm-host-id": null,
    "defined-tags": {
      "Oracle-Tags": {
        "CreatedBy": "oracleidentitycloudservice/hogefuga",
        "CreatedOn": "2022-01-18T03:51:40.095Z"
      }
    },
    "display-name": "ubuntu-instance",
    "extended-metadata": {},
    "fault-domain": "FAULT-DOMAIN-2",
    "freeform-tags": {},
    "id": "ocid1.instance.oc1.us-sanjose-1.xxxxxxxxxxxxxxxxxxxxxxxxxxxxxxxxxxxxx",
    "image-id": "ocid1.image.oc1.us-sanjose-1.xxxxxxxxxxxxxxxxxxxxxxxxxxxxxxxxxxxxx",
    "instance-options": {
      "are-legacy-imds-endpoints-disabled": false
    },
    "ipxe-script": null,
    "launch-mode": "PARAVIRTUALIZED",
    "launch-options": {
      "boot-volume-type": "PARAVIRTUALIZED",
      "firmware": "UEFI_64",
      "is-consistent-volume-naming-enabled": true,
      "is-pv-encryption-in-transit-enabled": true,
      "network-type": "PARAVIRTUALIZED",
      "remote-data-volume-type": "PARAVIRTUALIZED"
    },
    "lifecycle-state": "RUNNING",
    "metadata": {
      "ssh_authorized_keys": "ssh-rsa"
    },
    "platform-config": null,
    "preemptible-instance-config": null,
    "region": "us-sanjose-1",
    "shape": "VM.Standard.A1.Flex",
    "shape-config": {
      "baseline-ocpu-utilization": null,
      "gpu-description": null,
      "gpus": 0,
      "local-disk-description": null,
      "local-disks": 0,
      "local-disks-total-size-in-gbs": null,
      "max-vnic-attachments": 2,
      "memory-in-gbs": 6.0,
      "networking-bandwidth-in-gbps": 1.0,
      "ocpus": 1.0,
      "processor-description": "3.0 GHz Ampere\u00ae Altra\u2122"
    },
    "source-details": {
      "boot-volume-size-in-gbs": null,
      "image-id": "ocid1.image.oc1.us-sanjose-1.xxxxxxxxxxxxxxxxxxxxxxxxxxxxxxxxxxxxx",
      "kms-key-id": null,
      "source-type": "image"
    },
    "system-tags": {},
    "time-created": "2022-01-18T03:51:40.410000+00:00",
    "time-maintenance-reboot-due": null
  },
  "etag": "05bb3a959c20f26ad7ccb948d8698be492fdc41dc70479878e1f41fdcbbdd6c0"
}
操作用PowerShell作成
問題なく対象インスタンスの情報にアクセスできることを確認したら、PowerShell ISEを起動します。
下記コマンドで起動用と停止用の.ps1ファイルを用意します。
#対象インスタンスを停止するコマンド
oci compute instance action --action STOP --instance-id <メモしたインスタンスのOCIDを入力します>
#対象インスタンスを起動するコマンド
oci compute instance action --action START --instance-id <メモしたインスタンスのOCIDを入力します>
タスクスケジューラ設定
タスクスケジューラを起動し、任意フォルダ下で"タスクの作成"をクリックします。
●全般タブ:任意
※Windows Serverの場合はタスク実行時のアカウントをAdministrator、
"ユーザのログオンにかかわらず実行するオプション"がおすすめ。
今回はローカルPCなので"ユーザがログオンしているときのみ実行"オプションを選択しています。

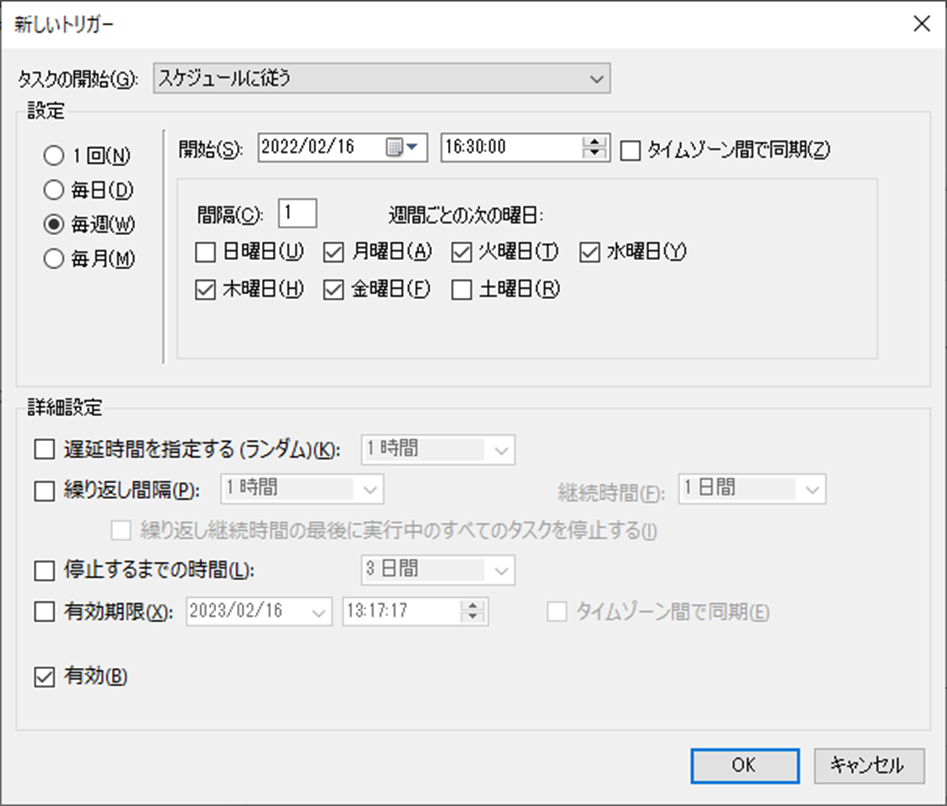
●トリガータブ:任意
●操作タブ:以下のように設定
| 項目 | 入力値 |
|---|---|
| プログラム/スクリプト(P) | %Systemroot%\System32\WindowsPowerShell\v1.0\powershell.exe |
| 引数の追加(オプション)(A) | -Command [.ps1の格納パス] |
| 開始(オプション)(T): | 空欄 |
上記手順を繰り返し、起動用と停止用のタスク設定を完了します。

タスクスケジューラ稼働確認
起動用と停止用のタスク設定が完了した後、稼働確認を実施します。
※今回は手動でタスクスケジューラを実行しています
Webコンソールにて対象インスタンスが起動中であることを確認します。

タスクスケジューラより、停止タスクを右クリック→"実行する"をクリック

次に起動コマンドについても問題なく動作するか確認するため、タスクスケジューラより起動タスクを実行します。

参考
OCI CLI Commandリファレンス
WindowsにOCI CLIを導入してタスクスケジューラと組み合わせてComputeの自動起動を実装してみた①
最後に
現状、OCIのComputeの自動起動/停止 機能は提供されていないので、ユーザ側で仕組みを作成する必要があります。
今回は簡易的にLocalのWindows端末上でOCI CLIとタスクスケジューラを組み合わせて実装しましたが、24時間稼働しているWindows Server上で実装すれば比較的簡単に運用の自動化が実装できます。
とはいえ、OCIのデフォルト機能としてComputeの自動起動/停止の機能が提供されることを祈っています。


