はじめに
UnityのWebGLビルドでは他プラットフォームとは異なり、Unity標準で用意されている Screen.SetResolution を使って気軽に解像度を変更することができません。
この記事では、Unity WebGLビルドで解像度を変更する方法を紹介します。
手順
- C#スクリプトの作成
まず、以下のC#スクリプトをUnityプロジェクトに追加します。このスクリプトでは、解像度を変更するためのボタンを設定し、クリックするとjslibファイルのメソッドを呼び出すようにしています。
ResolutionChanger.cs
using System;
using System.Runtime.InteropServices;
using UnityEngine;
using UnityEngine.Serialization;
using UnityEngine.UI;

public class ResolutionChanger : MonoBehaviour
{
    [DllImport("__Internal")]
    private static extern void SetCanvasResolution(int width, int height);

    private record Resolution
    {
        public int Width;
        public int Height;
    }

    [SerializeField] private Button _144PButton;
    [SerializeField] private Button _240PButton;
    [SerializeField] private Button _360PButton;
    [SerializeField] private Button _480PButton;
    [SerializeField] private Button _720PButton;
    [SerializeField] private Button _1080PButton;
    [SerializeField] private Button _1440PButton;
    [SerializeField] private Button _2160PButton;

    private readonly Resolution _144P = new() { Width = 256, Height = 144 };
    private readonly Resolution _240P = new() { Width = 427, Height = 240 };
    private readonly Resolution _360P = new() { Width = 640, Height = 360 };
    private readonly Resolution _480P = new() { Width = 720, Height = 480 };
    private readonly Resolution _720P = new() { Width = 1280, Height = 720 };
    private readonly Resolution _1080P = new() { Width = 1920, Height = 1080 };
    private readonly Resolution _1440P = new() { Width = 2560, Height = 1440 };
    private readonly Resolution _2160P = new() { Width = 3840, Height = 2160 };

    private void Start()
    {
        _144PButton.onClick.AddListener(() => ChangeResolution(_144P.Width, _144P.Height));
        _240PButton.onClick.AddListener(() => ChangeResolution(_240P.Width, _240P.Height));
        _360PButton.onClick.AddListener(() => ChangeResolution(_360P.Width, _360P.Height));
        _480PButton.onClick.AddListener(() => ChangeResolution(_480P.Width, _480P.Height));
        _720PButton.onClick.AddListener(() => ChangeResolution(_720P.Width, _720P.Height));
        _1080PButton.onClick.AddListener(() => ChangeResolution(_1080P.Width, _1080P.Height));
        _1440PButton.onClick.AddListener(() => ChangeResolution(_1440P.Width, _1440P.Height));
        _2160PButton.onClick.AddListener(() => ChangeResolution(_2160P.Width, _2160P.Height));
    }

    private void ChangeResolution(int width, int height)
    {
        Debug.Log($"int width={width}, int height={height}");
        SetCanvasResolution(width, height);
    }
}
- JavaScriptライブラリ(jslib)の作成
次に解像度変更用のjslibを作成します。以下のコードをPluginsディレクトリの配下に以下のjslibスクリプトを追加してください。
mergeInto(LibraryManager.library, {
    SetCanvasResolution: function (width, height) {
        var canvas = document.getElementById("unity-canvas");
        canvas.width = width;
        canvas.height = height;
    }
});
このメソッドはC#スクリプトから呼び出され、指定された解像度にキャンバスを変更することができます。
- index.htmlの変更
最後に、Unityプロジェクトをビルドした後に生成されるindex.htmlファイルに変更を加えます。
以下のコメントアウトを外すことで、上記のスクリプトによるCanvas要素の解像度変更が反映されるようになります。
index.html
// config.matchWebGLToCanvasSize = false;
以上でUnity WebGLアプリケーションの解像度を変更できるようになります。
以下の動画の解像度切替機能は本ページのコードで実装しています。
アスペクト比の変更に対応させる
上記のjslibではスマホの回転や全画面化などでアスペクト比率に変更があった際にレイアウトが崩れるため、アスペクト比が変更される可能性が有る場合は以下のように修正が必要となります。
var ResolutionPlugin = {

    // 静的変数の宣言
    _userWidth: 0,
    _userHeight: 0,
    _userRatio: 0,
    _unityCanvas: null,

    // 共通で呼ばれる関数、$を先頭につけるとautoAddDepsの対象になる。ビルド時に$が取れるので参照する側では$は付けない
    $UpdateResolution: function () {
        this._userRatio = this._userHeight / this._userHeight;
        var canvasRatio = this._unityCanvas.clientWidth / this._unityCanvas.clientHeight;
        if (canvasRatio > _userRatio) {
            // ウィンドウの横幅比率が大きい場合
            this._unityCanvas.height = _userWidth / canvasRatio;
            this._unityCanvas.width = _userWidth;
        } else {
            // ウィンドウの縦幅比率が大きい場合
            this._unityCanvas.height = _userHeight;
            this._unityCanvas.width = _userHeight * canvasRatio;
        }
    },

    WindowManagerInitialize: function () {
        this._unityCanvas = document.getElementById("unity-canvas");
        this._userHeight = this._unityCanvas.width;
        this._userWidth = this._unityCanvas.height;
        this._userRatio = this._userHeight / this._userHeight;
        window.addEventListener('resize', () => UpdateResolution());

    },
    SetCanvasResolution: function (width, height) {
        this._userHeight = width;
        this._userWidth = height;
        UpdateResolution();
    },
};

autoAddDeps(ResolutionPlugin, '$UpdateResolution');
mergeInto(LibraryManager.library, ResolutionPlugin);
【おまけ】なぜ解像度を変えるのか?
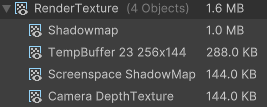
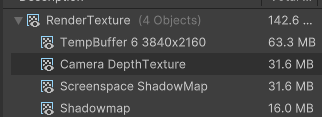
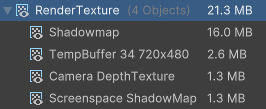
ブラウザのCanvas要素に表示されるRederTextureのサイズに反映されるため、この解像度を必要最低限に抑えることでモバイルブラウザ対応時に重要となるメモリ消費を抑えることができます。
-
2160p
-
480p
-
144p