今回は2部構成で、Spring MVCベースのWebアプリケーションで、Servlet 3.0からサポートされた非同期処理を利用する方法をについて説明します。なお、Servlet標準の非同期処理の仕組みについては、こちらの記事をご覧ください。
Spring Boot上での使い方と実装サンプルは、最後の方に記載してあります。Spring Bootユーザーは方は、もしかしたら先にそちらをみた方がイメージがつきやすいかもしれません。
動作確認環境
- Java SE 8
- Tomcat 8.5.5 (Servlet 3.1)
- Spring Framework 4.3.3.RELESAE
- Spring Boot 1.4.1.RELEASE
前提知識
- Servlet標準の非同期処理の仕組みを知っている人
- Spring MVCで画面遷移アプリを使ったことがある人 (Java Config +
ViewResolverの仕組みを理解している人)
Spring MVCがサポートしている非同期処理の方式
Spring MVCの非同期処理は、大きくわけると以下の2種類に分類することができます。
非同期実行が終了してからHTTPレスポンスを開始する方式
この方式は、時間の掛かる重たい処理をアプリケーションサーバーが管理するスレッドから分離して実行することで、 アプリケーションサーバーのスレッドを有効利用したい場合に使用します。 勘違いしやすいのですが、HTTPレスポンスは非同期実行している処理が終了した後に行うため、クライアント側から見ると同期処理と同じ動作なります。
非同期実行の処理中にHTTPレスポンスを開始する方式
この方式は、サーバーから任意のタイミングでデータを送信(Push)したい場合に使用します。 サーバー側は非同期処理を起動したタイミングでいったんHTTPレスポンスを行い、その後、非同期処理中の任意のタイミングでレスポンスデータを送信(Push)します。 このパターンを利用する場合は、クライアントが分割レスポンス("Transfer-Encoding: chunked")に対応している必要があります。
なお、本投稿は「非同期実行が終了してからHTTPレスポンスを開始する方式」の説明になります。「非同期実行の処理中にHTTPレスポンスを開始する方式」については、第2部をご覧ください。
まずはSpring MVCで同期処理を実装してみる
まずは、「Servlet標準の非同期処理に触れてみる」で実装したServletを、Spring MVCのHandlerメソッドとして実装してみましょう。Spring MVCで置き換えると以下のようになります。
package com.example.component;

import java.time.LocalDateTime;

public class Console {
    public static void println(Object target) {
        System.out.println(LocalDateTime.now() + " " + Thread.currentThread() + ": " + target);
    }
}
package com.example.component;

import org.springframework.stereotype.Controller;
import org.springframework.ui.Model;
import org.springframework.web.bind.annotation.ExceptionHandler;
import org.springframework.web.bind.annotation.RequestMapping;
import org.springframework.web.bind.annotation.RequestMethod;
import org.springframework.web.bind.annotation.RequestParam;

import java.time.LocalDateTime;
import java.util.concurrent.TimeUnit;

@Controller
@RequestMapping("/standard")
public class StandardController {

    @RequestMapping(method = RequestMethod.GET)
    public String get(@RequestParam(defaultValue = "0") long waitSec, Model model) {

        Console.println("Start get.");

        model.addAttribute("acceptedTime", LocalDateTime.now());

        heavyProcessing(waitSec, model);

        Console.println("End get.");

        return "complete";
    }

    private void heavyProcessing(long waitSec, Model model) {

        if (waitSec == 999) {
            throw new IllegalStateException("Special parameter for confirm error.");
        }

        try {
            TimeUnit.SECONDS.sleep(waitSec);
        } catch (InterruptedException e) {
            Thread.interrupted();
        }

        model.addAttribute("completedTime", LocalDateTime.now());

    }

}
JSPは同じものを使いますが、JSPの格納先をSpring MVCのデフォルトの場所(/WEB-INF)にします。
<%@ page import="com.example.component.Console" %>
<% Console.println("Called complete.jsp"); %>
<% Console.println(request.getDispatcherType()); %>

<html>
<body>
<h2>Processing is complete !</h2>
<p>Accept timestamp is ${acceptedTime}</p>
<p>Complete timestamp is ${completedTime}</p>
<p><a href="${pageContext.request.contextPath}/">Go to Top</a></p>
</body>
</html>
JSP用のViewResolverを有効にします。
package com.example.config;

import org.springframework.context.annotation.ComponentScan;
import org.springframework.context.annotation.Configuration;
import org.springframework.web.servlet.config.annotation.EnableWebMvc;
import org.springframework.web.servlet.config.annotation.ViewResolverRegistry;
import org.springframework.web.servlet.config.annotation.WebMvcConfigurerAdapter;

@EnableWebMvc // 注意:Spring Bootの場合は、@EnableWebMvcはつけちゃダメ!!
@ComponentScan("com.example.component")
@Configuration
public class WebMvcConfig extends WebMvcConfigurerAdapter {
    @Override
    public void configureViewResolvers(ViewResolverRegistry registry) {
        registry.jsp(); // JSP用のViewResolverを有効化
    }
}
Warning: Spring BootでWebMvcConfigurerAdapterを利用する際の注意点
Spring Bootで
WebMvcConfigurerAdapterの子クラスを作成する場合は、@EnableWebMvcは絶対につけないでください。@EnableWebMvcをつけてしまうと、Spring BootのAutoConfigureのコンフィギュレーションが一部無効になってしまいます。これはSpring Bootのリファレンスにも記述されています。
cURLやブラウザを使ってアクセスすると、complete.jspで生成されたHTMLが返却されます。
$ curl -D - http://localhost:8080/standard?waitSec=1
HTTP/1.1 200
Set-Cookie: JSESSIONID=469B8E011EAE404434D889F2E20B1CFA;path=/;HttpOnly
Content-Type: text/html;charset=ISO-8859-1
Content-Language: ja-JP
Content-Length: 204
Date: Tue, 04 Oct 2016 15:22:48 GMT


<html>
<body>
<h2>Processing is complete !</h2>
<p>Accept timestamp is 2016-10-05T00:22:46.929</p>
<p>Complete timestamp is 2016-10-05T00:22:47.933</p>
<p><a href="/">Go to Top</a></p>
</body>
</html>
アプリケーションサーバー上のコンソールには以下のようなログが出力されます。(すべて同じスレッドで実行されているのがわかります)
2016-10-05T00:22:46.929 Thread[http-nio-8080-exec-1,5,main]: Start get.
2016-10-05T00:22:47.933 Thread[http-nio-8080-exec-1,5,main]: End get.
2016-10-05T00:22:48.579 Thread[http-nio-8080-exec-1,5,main]: Called complete.jsp
2016-10-05T00:22:48.579 Thread[http-nio-8080-exec-1,5,main]: FORWARD
Spring MVCで非同期処理を実装してみる
StandardControllerの実装を、Spring MVCの仕組みを使って非同期実装にしてみます。ここでは、非同期用に別のControllerを作成します。まずは、伝統的な実装方法であるjava.util.concurrent.Callableを使用して実装してみましょう。
package com.example.component;

import org.springframework.stereotype.Controller;
import org.springframework.ui.Model;
import org.springframework.web.bind.annotation.ExceptionHandler;
import org.springframework.web.bind.annotation.RequestMapping;
import org.springframework.web.bind.annotation.RequestMethod;
import org.springframework.web.bind.annotation.RequestParam;

import java.time.LocalDateTime;
import java.util.concurrent.Callable;
import java.util.concurrent.TimeUnit;

@Controller
@RequestMapping("/async")
public class AsyncController {

    @RequestMapping(method = RequestMethod.GET)
    public Callable<String> get(@RequestParam(defaultValue = "0") long waitSec, Model model) {

        Console.println("Start get.");

        model.addAttribute("acceptedTime", LocalDateTime.now());

        // Callableのcallメソッドの中に非同期処理を実装する
        // Callableは関数型インターフェースなのでJava SE 8+ならラムダ式が使えます。
        Callable<String> asyncProcessing = () -> {

            Console.println("Start Async processing.");

            heavyProcessing(waitSec, model);

            Console.println("End Async processing.");

            return "complete";
        };

        Console.println("End get.");

        return asyncProcessing;
    }

    private void heavyProcessing(long waitSec, Model model) {

        if (waitSec == 999) {
            throw new IllegalStateException("Special parameter for confirm error.");
        }

        try {
            TimeUnit.SECONDS.sleep(waitSec);
        } catch (InterruptedException e) {
            Thread.interrupted();
        }

        model.addAttribute("completedTime", LocalDateTime.now());

    }

    @ExceptionHandler(Exception.class)
    public String handleException() {
        return "error";
    }

}
DispatcherServletと各種Filterで非同期リクエスをサポートします。
<servlet>
    <servlet-name>appServlet</servlet-name>
    <servlet-class>org.springframework.web.servlet.DispatcherServlet</servlet-class>
    <!-- ... -->
    <async-supported>true</async-supported> <!-- 非同期をサポート -->
</servlet>
Filterを利用している場合は、<filter>タグの中にも<async-supported>true</async-supported>を指定してください。
<filter>
    <filter-name>CharacterEncodingFilter</filter-name>
    <filter-class>org.springframework.web.filter.CharacterEncodingFilter</filter-class>
    <async-supported>true</async-supported>
    <!-- ... -->
</filter>
なお、Spring MVCの非同期機能は、Java Configに@EnableWebMvcを付与すると自動でサポートされる仕組みになっています。ちなみに・・・XMLでBean定義を行う場合は、<mvc:async-support>タグを指定してください。本投稿ではJava Configベースで説明していきます。
cURLやブラウザを使ってアクセスすると、complete.jspで生成されたHTMLが返却されます。
$ curl -D - http://localhost:8080/async?waitSec=1
HTTP/1.1 200
Set-Cookie: JSESSIONID=74481230450E5A2A4CB6A376408A8F21;path=/;HttpOnly
Content-Type: text/html;charset=ISO-8859-1
Content-Language: ja-JP
Content-Length: 204
Date: Tue, 04 Oct 2016 15:28:25 GMT


<html>
<body>
<h2>Processing is complete !</h2>
<p>Accept timestamp is 2016-10-05T00:28:24.161</p>
<p>Complete timestamp is 2016-10-05T00:28:25.172</p>
<p><a href="/">Go to Top</a></p>
</body>
</html>
2016-10-05T00:28:24.161 Thread[http-nio-8080-exec-1,5,main]: Start get.
2016-10-05T00:28:24.163 Thread[http-nio-8080-exec-1,5,main]: End get.
2016-10-05T00:28:24.168 Thread[MvcAsync1,5,main]: Start Async processing.
2016-10-05T00:28:25.172 Thread[MvcAsync1,5,main]: End Async processing.
2016-10-05T00:28:25.663 Thread[http-nio-8080-exec-2,5,main]: Called complete.jsp
2016-10-05T00:28:25.663 Thread[http-nio-8080-exec-2,5,main]: FORWARD
サーバー側のログをみると、非同期処理の部分がTomcatのスレッド(http-nio-8080-exec-xx)ではなく、Spring MVCが用意したスレッド(MvcAsync1)で実行されていることがわかります。
スレッドプールを利用する
Spring MVCのデフォルトの動作では、残念ながらスレッドプールは使用せず、非同期実行の依頼の度に新しくスレッドを生成します。ここでは、スレッドプールを使うようにしてみましょう。
@EnableWebMvc // 注意:Spring Bootの場合は、@EnableWebMvcはつけちゃダメ!!
@ComponentScan("com.example.component")
@Configuration
public class WebMvcConfig extends WebMvcConfigurerAdapter {
    // ...
    @Override
    public void configureAsyncSupport(AsyncSupportConfigurer configurer) {
        configurer.setTaskExecutor(mvcAsyncExecutor()); // スレッドプールを利用するようにカスタマイズ
    }

    // ThreadPoolTaskExecutorはDIコンテナ上で管理するのがポイント
    // SpringのDIコンテナのライフサイクルに合わせて、適切なタイミングでinitializeとshutdownメソッドが呼び出される
    @Bean
    public AsyncTaskExecutor mvcAsyncExecutor() {
        ThreadPoolTaskExecutor executor = new ThreadPoolTaskExecutor();
        executor.setCorePoolSize(10);
        executor.setMaxPoolSize(10);
        executor.setQueueCapacity(10);
        return executor;
    }
}
2016-10-05T00:35:20.574 Thread[http-nio-8080-exec-1,5,main]: Start get.
2016-10-05T00:35:20.576 Thread[http-nio-8080-exec-1,5,main]: End get.
2016-10-05T00:35:20.580 Thread[mvcAsyncExecutor-1,5,main]: Start Async processing.
2016-10-05T00:35:21.583 Thread[mvcAsyncExecutor-1,5,main]: End Async processing.
2016-10-05T00:35:22.065 Thread[http-nio-8080-exec-2,5,main]: Called complete.jsp
2016-10-05T00:35:22.065 Thread[http-nio-8080-exec-2,5,main]: FORWARD
修正前は、Spring MVCが用意したスレッド(MvcAsync1)で実行されていた部分が、スレッドプールから取得したスレッド(mvcAsyncExecutor-1)になりました。 原則スレッドプールを使用して、安全かつ効率的にスレッドを利用するように心がけましょう。
Spring MVCの非同期処理を紐解く
とりあえず、Servlet標準の機能と連携したSpring MVCの非同期機能を使ってリクエストをさばくことはできましたが、どのようにSpring MVCが非同期処理を実現しているのかが気になるところです。「Servlet標準の非同期処理に触れてみる」で紹介しましたが、非同期処理が完了したことをサーブレットコンテナに通知するためには、AsyncContext#dispatchかAsyncContext#completeメソッドを呼び出す必要があります。でも、実装したControllerクラスではいっさいサーブレットAPIを意識していません。ここからは、Spring MVCがどのようにしてServlet標準の非同期処理と連携しているのかを説明します。
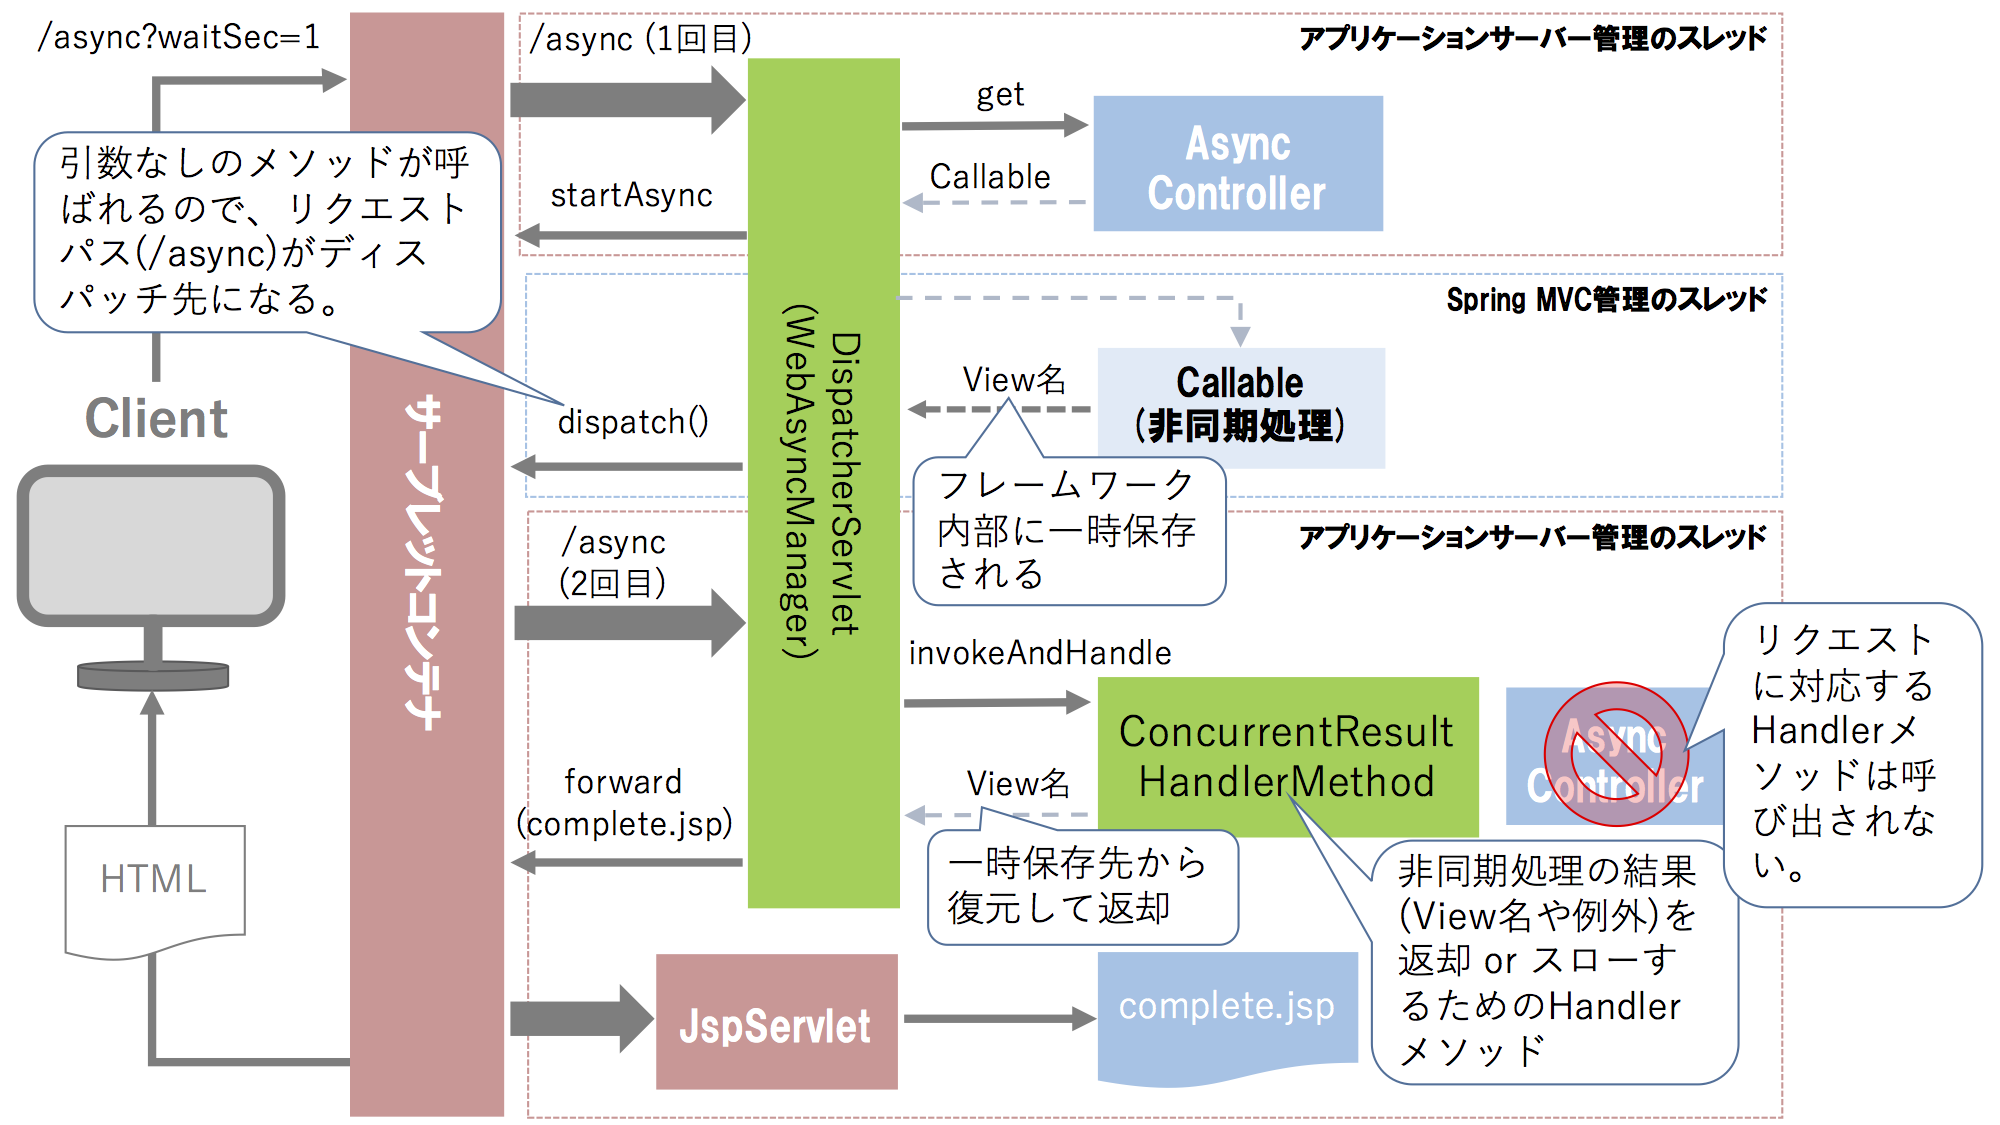
ざっくり絵にすることこんな感じです。実際にはもっと多くのクラスが登場しますが、シンプルにするためにかなり簡略化しています。(それでもちょっと複雑ですね・・・)
ポイントは、非同期処理完了後のディスパッチ先がリクエスト時のパスと同じになるという点でしょう。つまり、再度Spring MVC(DispatcherServlet)がリクエストをうけて、リクエスト内容に対応するHandlerメソッドを呼び出す経路に入っていくわけです。それじゃ〜Handlerメソッドが2回呼ばれちゃうの!?と思った方もいるかもしれませんが・・・もちろん大丈夫です!!Spring MVCがちゃんと制御してくれています。
絵にも書きましたが、非同期処理完了後にディスパッチされると、Spring MVCの内部ではConcurrentResultHandlerMethodというクラスのメソッドが呼び出されるような仕掛けになっています。ConcurrentResultHandlerMethodは、非同期処理の結果(View名など)を返却するか、または非同期処理中に発生した例外をスローします。どちらにせよ、以降の処理は、通常のSpring MVCの挙動と同じになります。
具体的には・・・
- View名(画面遷移型アプリ)なら、
ViewResolverによって解決されたViewが生成したデータ -
@ResponseBody+ JavaBean(RESTfulなアプリ)なら、HttpMessageConverterが生成したデータ - 例外なら、
ExceptionResolverやサーブレットコンテナのエラーページ機能によってハンドリングされて生成したデータ
がレスポンスされます。
Note: WebAsyncTask
org.springframework.web.context.request.async.WebAsyncTaskを使用すると、Callable使用時の非同期処理のデフォルト動作(タイムアウトやAsyncTaskExecutor)を個別にカスタマイズすることができます。本投稿では、タイムアウトのところで使い方を説明しています。
Spring MVC管理外のスレッドを使う
Spring MVCが管理するスレッド以外で非同期処理を行うこともできます。
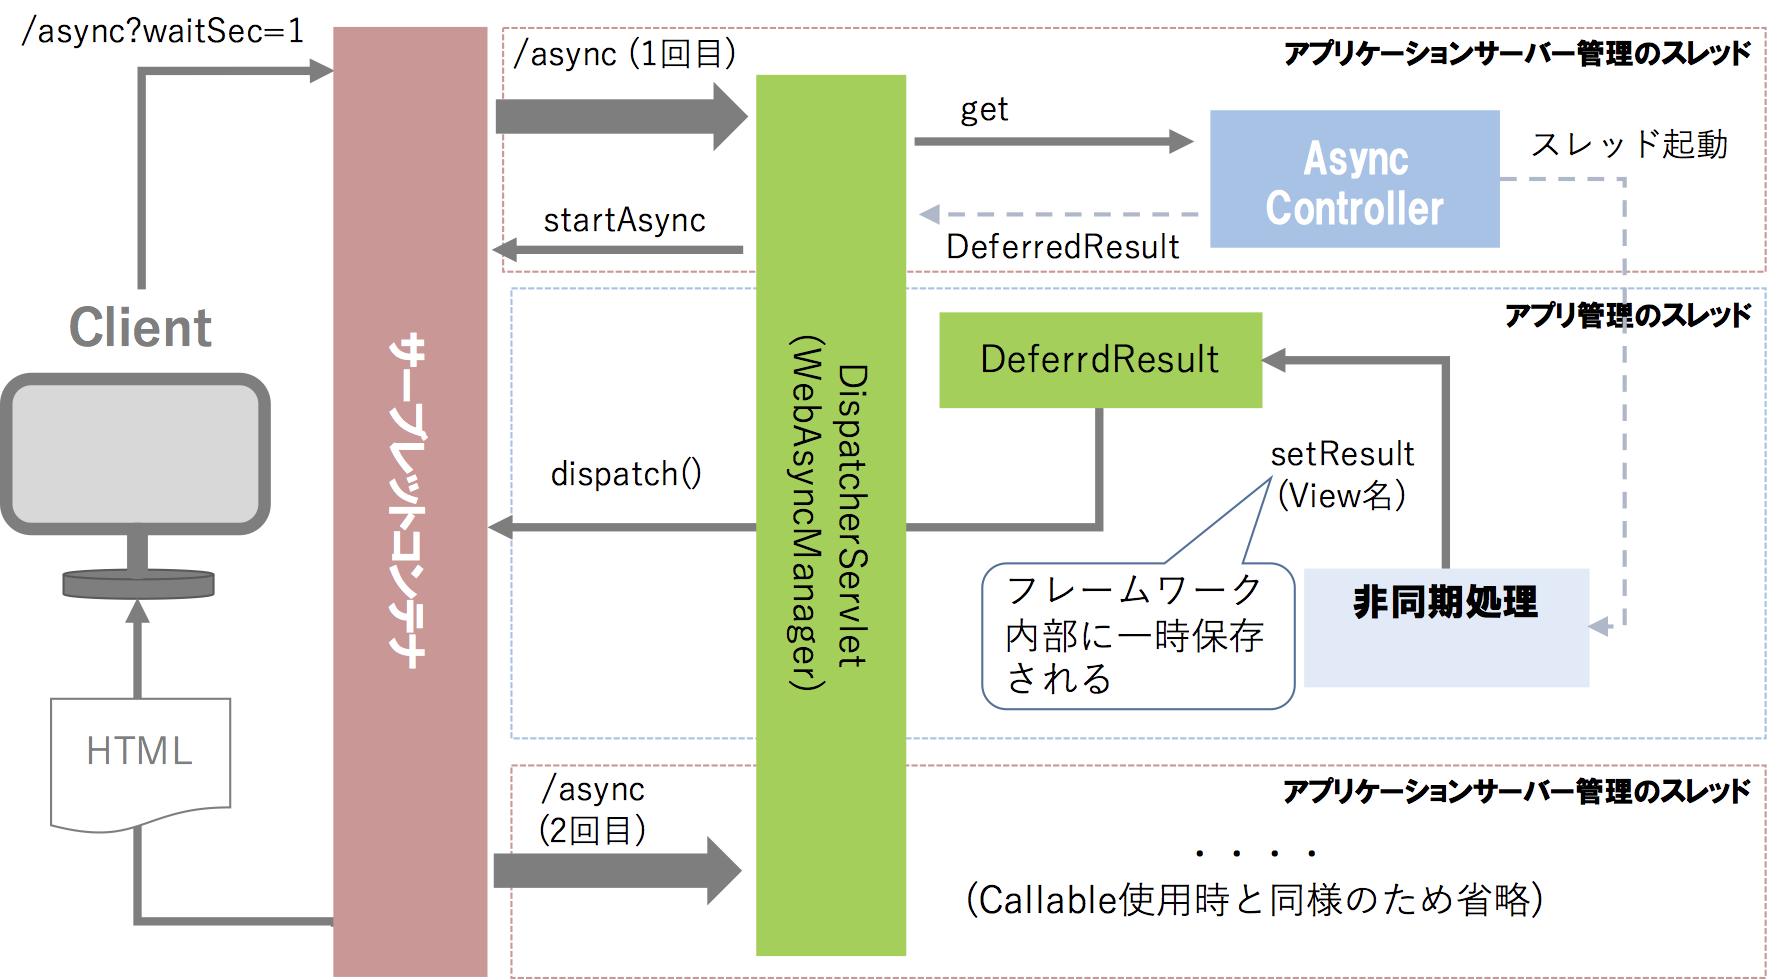
絵の中では、org.springframework.web.context.request.async.DeferredResultをControllerから返却していますが、以下の2つのクラスもサポートされています。
org.springframework.util.concurrent.ListenableFuture-
java.util.concurrent.CompletableFuture(Java SE 8+)
ListenableFutureとCompletableFutureをControllerから返却すると、Spring MVC側でDeferredResultを生成し、ListenableFutureとCompletableFutureと連携してくれます。
@Asyncの利用
Spring MVCの非同期処理とは直接関連はありませんが、Spring Frameworkは指定したメソッドを非同期(別スレッド)で実行する仕組みを提供しています。この仕組みを有効にするためのBean定義を行った上で、非同期で実行したいメソッドに@org.springframework.scheduling.annotation.Asyncを付与してください。また、クラスレベルにアノテーションを付与すると、すべてのpublicメソッドが非同期実行になります。これは、Spring MVC管理外のスレッドを使用する際に、非常に便利な仕組みです。
@Async // 別スレッドで実行される
public void save(InputStream in, File file) {
    // ...
}
@Async // すべてのpublicメソッドが別スレッドで実行される
@Service
public class AsyncService {
    // ...
}
Note: Executorの指定
別スレッドとして実行する際に利用するTaskExecutorを選択することができます。@Async("registrationTaskExecutor") // 使用したいTaskExecutorのBean名を指定する public void save(InputStream in, File file) { // ... }
@Asyncを利用する場合は、以下のようなBean定義を行ってください。
Spring Frameworkのデフォルトの動作では、残念ながらスレッドプールは使用せず、非同期実行の依頼の度に新しくスレッドを生成します。ここでは、スレッドプールを使用するように修正します。要件に応じてカスタマイズしてください。 原則スレッドプールを使用して、安全かつ効率的にスレッドを利用するように心がけましょう。
package com.example.config;

import org.springframework.context.annotation.Configuration;
import org.springframework.core.task.AsyncTaskExecutor;
import org.springframework.scheduling.annotation.EnableAsync;
import org.springframework.scheduling.concurrent.ThreadPoolTaskExecutor;

import java.util.concurrent.Executor;

@Configuration
@EnableAsync // @Asyncの有効化
public class AsyncConfig {
    @Bean
    public AsyncTaskExecutor taskExecutor() { // デフォルトだと"taskExecutor"という名前のBeanが利用される
        ThreadPoolTaskExecutor executor = new ThreadPoolTaskExecutor();
        executor.setCorePoolSize(10);
        executor.setMaxPoolSize(10);
        executor.setQueueCapacity(10);
        return executor;
    }
}
なお、@Asyncの設定をカスタマイズするためのクラスとしてorg.springframework.scheduling.annotation.AsyncConfigurerSupportというクラスも提供されています。AsyncConfigurerSupportはAsyncConfigurerインタフェースを実装しており、AsyncConfigurerは以下の2つのメソッドを提供します。
public interface AsyncConfigurer {
    // @Asyncで利用するTaskExecutorを返却する
    // nullを返却するとSimpleAsyncTaskExecutorが利用される
    Executor getAsyncExecutor();

    // @Asyncが適用されたメソッド内で例外が発生した時のハンドリング処理を行うAsyncUncaughtExceptionHandlerを返却する
    // nullを返却するとSimpleAsyncUncaughtExceptionHandlerが利用される
    AsyncUncaughtExceptionHandler getAsyncUncaughtExceptionHandler();
}
デフォルトで利用されるSimpleAsyncUncaughtExceptionHandlerは、ERRORレベルのログを出力するだけのシンプルな実装になっています。
DeferredResultの利用
DeferredResultは、Spring独自のクラスで、非同期処理で行った結果をSpring MVC側に通知する役割を担います。DeferredResultを直接使用する場合は、以下のような実装になります。
@Controller
@RequestMapping("/async")
public class AsyncController {

    // ...

    @RequestMapping(path = "deferred", method = RequestMethod.GET)
    public DeferredResult<String> getReferred(@RequestParam(defaultValue = "0") long waitSec, Model model) {

        Console.println("Start get.");

        model.addAttribute("acceptedTime", LocalDateTime.now());

        // 非同期処理を呼び出す。DeferredResultを非同期処理に引き渡すのがポイント。
        DeferredResult<String> deferredResult = new DeferredResult<>();
        asyncHelper.asyncProcessing(model, waitSec, deferredResult);

        Console.println("End get.");

        return deferredResult; // DeferredResultを返却する
    }

}
以下が非同期処理の実装になります。
package com.example.component;

import org.springframework.scheduling.annotation.Async;
import org.springframework.stereotype.Component;
import org.springframework.ui.Model;
import org.springframework.web.context.request.async.DeferredResult;

import java.time.LocalDateTime;
import java.util.concurrent.TimeUnit;

@Component
public class AsyncHelper {

    @Async // 非同期実行するメソッドに@Asyncを付与する
    public void asyncProcessing(Model model, long waitSec, DeferredResult<String> deferredResult) {
        Console.println("Start Async processing.");

        if (waitSec == 999) {
            // 例外はスローではなく、setErrorResultメソッドを使用する
            // throw new IllegalStateException("Special parameter for confirm error.");
            deferredResult.setErrorResult(new IllegalStateException("Special parameter for confirm error."));
            return;
        }

        sleep(waitSec);

        model.addAttribute("completedTime", LocalDateTime.now());

        deferredResult.setResult("complete"); // 処理結果はDeferredResult#setResultメソッドを呼び出して設定する。

        Console.println("End Async processing.");
    }

    private void sleep(long timeout) {
        try {
            TimeUnit.SECONDS.sleep(timeout);
        } catch (InterruptedException e) {
            Thread.interrupted();
        }
    }
}
cURLやブラウザを使ってアクセスすると、complete.jspで生成されたHTMLが返却されます。
$ curl -D - http://localhost:8080/async/deferred?waitSec=1
HTTP/1.1 200
Set-Cookie: JSESSIONID=4E8812A3288081EB6A88EA9E38E9EBC4;path=/;HttpOnly
Content-Type: text/html;charset=ISO-8859-1
Content-Language: ja-JP
Content-Length: 204
Date: Tue, 04 Oct 2016 15:41:48 GMT


<html>
<body>
<h2>Processing is complete !</h2>
<p>Accept timestamp is 2016-10-05T00:41:46.672</p>
<p>Complete timestamp is 2016-10-05T00:41:47.685</p>
<p><a href="/">Go to Top</a></p>
</body>
</html>
2016-10-05T00:41:46.672 Thread[http-nio-8080-exec-1,5,main]: Start get.
2016-10-05T00:41:46.675 Thread[http-nio-8080-exec-1,5,main]: End get.
2016-10-05T00:41:46.682 Thread[taskExecutor-1,5,main]: Start Async processing.
2016-10-05T00:41:47.688 Thread[taskExecutor-1,5,main]: End Async processing.
2016-10-05T00:41:48.193 Thread[http-nio-8080-exec-2,5,main]: Called complete.jsp
2016-10-05T00:41:48.193 Thread[http-nio-8080-exec-2,5,main]: FORWARD
Callableと同様に、非同期実行された結果がクライアントに返却できました。
最初に紹介しておいてなんですが・・・個人的にはなんとなくこの方法は好きではありません ![]()
Spring専用のクラスに強く依存しており、処理結果をsetResultやsetErrorResultといったメソッドを明示的に呼び出して設定する必要があるのもなんとなくイマイチ・・・かな〜(特にsetErrorResultの方はかなり微妙・・・)。とはいえ、このクラスを使うと、Spring MVCのデフォルトの動作を簡単に(アドホック?に)カスタマイズできるので、使いたくなることはあるかもしれません。
ListenableFutureの利用
Springが提供しているJava SE標準のjava.util.concurrent.Futureのサブインタフェースです。このインタフェースを使うと、非同期処理が成功した時と失敗した時に任意の処理を組み込むことができます。Spring提供のインタフェースなのでSpringとの結合度は残るものの、ベースとなる考え方がJava SE標準のFutureなので、DeferredResultに比べると独自色は薄くなります。
@Controller
@RequestMapping("/async")
public class AsyncController {

    // ...

    @RequestMapping(path = "listenable", method = RequestMethod.GET)
    public ListenableFuture<String> getListenable(@RequestParam(defaultValue = "0") long waitSec, Model model) {

        Console.println("Start get.");

        model.addAttribute("acceptedTime", LocalDateTime.now());

        ListenableFuture<String> future = asyncHelper.asyncProcessingForListenable(model, waitSec);
        future.addCallback(
                Console::println, // 正常終了時のコールバック
                Console::println  // 例外発生時時のコールバック
        );

        Console.println("End get.");
        return future;
    }
}
@Component
public class AsyncHelper {
    // ...
    @Async // 非同期実行対象のメソッド
    public ListenableFuture<String> asyncProcessingForListenable(Model model, long waitSec) {
        Console.println("Start Async processing.");
        if (waitSec == 999) {
            throw new IllegalStateException("Special parameter for confirm error.");
        }

        sleep(waitSec);

        model.addAttribute("completedTime", LocalDateTime.now());

        Console.println("End Async processing.");

        return new AsyncResult<>("complete");
    }
    // ...
}
cURLやブラウザを使ってアクセスし、サーバ側の動作をログをみて確認します。
$ curl -D - http://localhost:8080/async/listenable?waitSec=1
2016-10-05T00:46:19.949 Thread[http-nio-8080-exec-1,5,main]: Start get.
2016-10-05T00:46:19.954 Thread[http-nio-8080-exec-1,5,main]: End get.
2016-10-05T00:46:19.959 Thread[taskExecutor-1,5,main]: Start Async processing.
2016-10-05T00:46:20.964 Thread[taskExecutor-1,5,main]: End Async processing.
2016-10-05T00:46:20.965 Thread[taskExecutor-1,5,main]: complete    ← 非同期処理成功時のコールバックメソッドで出力したログ
2016-10-05T00:46:21.459 Thread[http-nio-8080-exec-2,5,main]: Called complete.jsp
2016-10-05T00:46:21.459 Thread[http-nio-8080-exec-2,5,main]: FORWARD
ログをみると、非同期処理成功時のコールバックメソッドが呼び出されていることが確認できます。
CompletableFutureの利用
CompletableFutureはJava SE 8から追加されたクラスです。このクラスを使用すると、Springに依存しない実装にすることできます。(下のサンプルコードは別の箇所でSpringに依存しちゃっていますが ![]() 、理論的には完全に非依存にすることも可能です!!) 個人的には、デフォルトの動作を個別にカスタマイズする必要がないなら、
、理論的には完全に非依存にすることも可能です!!) 個人的には、デフォルトの動作を個別にカスタマイズする必要がないなら、CompletableFutureを利用するのがいいと思います。
@Controller
@RequestMapping("/async")
public class AsyncController {

    // ...

    @RequestMapping(path = "completable", method = RequestMethod.GET)
    public CompletableFuture<String> getCompletable(@RequestParam(defaultValue = "0") long waitSec, Model model) {

        Console.println("Start get.");

        model.addAttribute("acceptedTime", LocalDateTime.now());

        CompletableFuture<String> future = asyncHelper.asyncProcessingForCompletable(model, waitSec);
        future.thenAccept(Console::println); // 正常終了時のコールバック

        Console.println("End get.");
        return future;
    }
}
@Component
public class AsyncHelper {
    // ...
    @Async // 非同期実行対象のメソッド
    public CompletableFuture<String> asyncProcessingForCompletable(Model model, long waitSec) {
        Console.println("Start Async processing.");
        if (waitSec == 999) {
            throw new IllegalStateException("Special parameter for confirm error.");
        }

        sleep(waitSec);

        model.addAttribute("completedTime", LocalDateTime.now());

        Console.println("End Async processing.");

        return CompletableFuture.completedFuture("complete");
    }
    // ...
}
cURLやブラウザを使ってアクセスし、サーバ側の動作をログをみて確認します。
$ curl -D - http://localhost:8080/async/completable?waitSec=1
2016-10-05T00:49:58.061 Thread[http-nio-8080-exec-1,5,main]: Start get.
2016-10-05T00:49:58.070 Thread[http-nio-8080-exec-1,5,main]: End get.
2016-10-05T00:49:58.076 Thread[taskExecutor-1,5,main]: Start Async processing.
2016-10-05T00:49:59.081 Thread[taskExecutor-1,5,main]: End Async processing.
2016-10-05T00:49:59.083 Thread[taskExecutor-1,5,main]: complete    ← 非同期処理成功時のコールバックメソッドで出力したログ
2016-10-05T00:49:59.558 Thread[http-nio-8080-exec-2,5,main]: Called complete.jsp
2016-10-05T00:49:59.558 Thread[http-nio-8080-exec-2,5,main]: FORWARD
ログをみると、非同期処理成功時のコールバックメソッドが呼び出されていることが確認できます。CompletableFutureには、thenAcceptメソッド以外にも様々なメソッドが用意されているので、それらのメソッドの詳細は「CompletableFutureのJava Doc」をご覧ください。
タイムアウト値の指定
非同期処理にはタイムアウト値(ミリ秒単位)を設けることができます。デフォルトはアプリケーションサーバーの設定に依存しますが、Spring MVCやアプリケーション側で明示的にしているすることもできます。
ここで指定した値を超えても非同期処理が完了しない場合は、クライアントにレスポンスを返却するためにDispatcherServletに処理要求が来ますが、**非同期処理は実行され続けているという点を意識しておく必要があります。**ちなみに・・・タイムアウト後に非同期処理が完了した場合は、非同期処理完了後の遷移処理(AsyncContext#dispatch)が行われないようにSpring MVCが制御してくれています ![]()
Note: タイムアウト後の遷移処理の抑止制御の仕組み
StandardServletAsyncWebRequestの中で制御しています。このクラスはServlet標準のjavax.servlet.AsyncListenerを実装しており、onCompleteメソッドの中で処理状態を管理するフラグ(AtomicBoolean)を更新することで、2重で遷移処理が行われないように制御しています。実際に遷移処理を制御しているのは、WebAsyncManager#setConcurrentResultAndDispatchメソッドの中です。これは、IBMのページで紹介されていた実装方法と同じっぽいですね。
デフォルト値
Spring MVCの設定で、デフォルトのタイムアウト値を指定することができます。以下のサンプルでは、デフォルトのタイムアウト値を3秒にしています。
@EnableWebMvc // 注意:Spring Bootの場合は、@EnableWebMvcはつけちゃダメ!!
@ComponentScan("com.example.component")
@Configuration
public class WebMvcConfig extends WebMvcConfigurerAdapter {
    // ...
    @Override
    public void configureAsyncSupport(AsyncSupportConfigurer configurer) {
        configurer.setDefaultTimeout(3000); // デフォルトのタイムアウト時間の指定
    }
}
Spring MVC管理下のスレッド使用時の処理固有の指定値
WebAsyncTaskの使用すると、処理固有のタイムアウト値を指定することができます。以下のサンプルでは、タイムアウト値を2秒にしています。
@RequestMapping(method = RequestMethod.GET)
public WebAsyncTask<String> get(@RequestParam(defaultValue = "0") long waitSec, Model model) {
    // ...
    return new WebAsyncTask<>(2000, asyncProcessing);
}
Spring MVC管理外のスレッド使用時の処理固有の指定値
DeferredResultの使用すると、処理固有のタイムアウト値を指定することができます。以下のサンプルでは、タイムアウト値を4秒にしています。
@RequestMapping(path = "deferred", method = RequestMethod.GET)
public DeferredResult<String> getReferred(@RequestParam(defaultValue = "0") long waitSec, Model model) {
    // ...
    DeferredResult<String> deferredResult = new DeferredResult<>(4000L);
    // ...
}
タイムアウト時の動作
サーブレットコンテナによってタイムアウトが検知されると、Spring MVCのデフォルトの動作だと503(Service Unavailable)になります。ちなみに・・・Spring 4.2系は4.2.7.RELEASE、Spring 4.3系は4.3.2までは500(Internal Server Error)になってしまうので、バージョンアップしましょう。
$ curl -D - http://localhost:8080/async/completable?waitSec=4
HTTP/1.1 503
Content-Type: application/json;charset=UTF-8
Transfer-Encoding: chunked
Date: Tue, 04 Oct 2016 15:55:06 GMT
Connection: close

{"timestamp":1475596506606,"status":503,"error":"Service Unavailable","exception":"org.springframework.web.context.request.async.AsyncRequestTimeoutException","message":"No message available","path":"/async/completable"}
なお、例外を@ExceptionHandlerを使用してハンドリングする場合は、Controllerや@ControllerAdviceクラスに以下のようなメソッドがあると期待通りに動作しないことがあります。具体的には・・・
@ExceptionHandler
@ResponseStatus(HttpStatus.INTERNAL_SERVER_ERROR)
public String handleException(Exception e) {
    return "error";
}
といった感じのメソッドがあると、先にこのメソッドによってAsyncRequestTimeoutExceptionがハンドリングされてしまいます。このようなケースでは、AsyncRequestTimeoutExceptionをハンドリングする@ExceptionHandlerメソッドを作成するのがよいでしょう。
@ExceptionHandler
@ResponseStatus(HttpStatus.SERVICE_UNAVAILABLE)
public String handleAsyncRequestTimeoutException(AsyncRequestTimeoutException e) {
    return "timeout";
}
レスポンスが空でよい場合は返り値をvoidにすればOKですが、ここではタイムアウトが発生したことを通知するHTMLを返却するようにしています。なので、タイムアウトエラー用のView(JSP)も用意します。
<%@ page import="com.example.component.Console" trimDirectiveWhitespaces="true" %>
<% Console.println("Called timeout.jsp"); %>
<% Console.println(request.getDispatcherType()); %>

<html>
<body>
<h2>Timeout!</h2>
<p><a href="${pageContext.request.contextPath}/">Go to Top</a></p>
</body>
</html>
タイムアウトを発生するようにリクエストを送ると、エラー画面のHTML + 503(Service Unavailable)がレスポンスされます ![]()
$ curl -L -D - http://localhost:8080/async/completable?waitSec=4
HTTP/1.1 503
Set-Cookie: JSESSIONID=CE9005C6067914827C61E4B9B52B3A4A;path=/;HttpOnly
Content-Type: text/html;charset=ISO-8859-1
Content-Language: ja-JP
Content-Length: 80
Date: Tue, 04 Oct 2016 16:15:49 GMT
Connection: close

<html>
<body>
<h2>Timeout!</h2>
<p><a href="/">Go to Top</a></p>
</body>
</html>
例外ハンドリング
基本的には非同期処理固有の対処は不要で、非同期処理中に発生した例外は、Spring MVCのExceptionResolverによってハンドリングされる仕組みになっています ![]()
@Controller
@RequestMapping("/async")
public class AsyncController {
    private static final Logger logger = LoggerFactory.getLogger(AsyncController.class);
    // ...
    @ExceptionHandler // ExceptionResolverの仕組みを使用して例外ハンドリング可能
    @ResponseStatus(HttpStatus.INTERNAL_SERVER_ERROR)
    public String handleException(Exception e) {
        logger.error("System error is occurred.", e);
        return "error";
    }
}
ここでは、Controllerに例外ハンドリング処理を実装しましたが、例外ハンドリングはアプリケーション全体で行うことの方が多いと思いので、実際のアプリケーション開発の現場では@ControllerAdviceを利用するのがよいでしょう。@ControllerAdviceの実装方法については、「Spring MVC(+Spring Boot)上でのリクエスト共通処理の実装方法を理解する」をご覧ください。
エラー画面を応答するView(JSP)を用意します。
<%@ page import="com.example.component.Console" trimDirectiveWhitespaces="true" %>
<% Console.println("Called error.jsp"); %>
<% Console.println(request.getDispatcherType()); %>

<html>
<body>
<h2>Error!</h2>
<p><a href="${pageContext.request.contextPath}/">Go to Top</a></p>
</body>
</html>
Note: Spring Boot上でJSPを使う場合は・・・
Spring BootでViewとしてJSPを使う場合は、"error"という名前View(JSP)を配置しただけではSpring Bootが提供するデフォルトのエラーページを上書きすることができません。エラーページを上書きする場合は、error.jspを配置したうえでデフォルトのエラーページを無効化する必要があります。
application.propertiesserver.error.whitelabel.enabled=false
例外が発生するようにリクエストを送ると、エラー画面がレスポンスされます ![]()
$ curl -L -D - http://localhost:8080/async/completable?waitSec=999
HTTP/1.1 500
Set-Cookie: JSESSIONID=F375D29720A50CA5A81A28EDB501BCB7;path=/;HttpOnly
Content-Type: text/html;charset=ISO-8859-1
Content-Language: ja-JP
Content-Length: 78
Date: Tue, 04 Oct 2016 16:26:16 GMT
Connection: close

<html>
<body>
<h2>Error!</h2>
<p><a href="/">Go to Top</a></p>
</body>
</html>
DeferredResult使用時の例外ハンドリング
Handlerメソッドの返り値としてDeferredResultを返却する場合のみ、個別の実装が必要になります・・・(残念だ)
DeferredResultを使う場合は、例外をキャッチしてDeferredResultのsetErrorResultメソッドの引数に例外を設定してください。 こうすることで、Spring MVCのExceptionResolverによって例外がハンドリングされます。
try {
    service.anyProcessing();
} catch (Exception e) { // 例外をキャッチしてからの・・・
    deferredResult.setErrorResult(e); // これが必要!! (これを忘れると、タイムアウトが検知されるまでレスポンスが返却されなくなる・・・)
    return; // +後続処理が実行されないようにすること!!
}
う〜ん・・・やっぱりDeferredResultは使わない方がいいな・・・。
共通処理の実装
ProcessingInterceptorの利用
タイムアウトのところで軽く紹介しましたが、Spring MVCは、いくつかのポイント(タイミング)で共通的な処理を実行できる仕組み(CallableProcessingInterceptor or DeferredResultProcessingInterceptor)を提供しています。
| インタフェース名 | 説明 |
|---|---|
CallableProcessingInterceptor |
Spring MVC管理下のスレッドで実行する非同期処理向けの仕組み。 |
DeferredResultProcessingInterceptor |
Spring MVC管理外のスレッドで実行する非同期処理向けの仕組み。 |
この2つのインターフェースにはほとんど同じようなメソッドが定義されており、呼び出されるタイミングも基本的には一緒です。
public interface CallableProcessingInterceptor {
    static final Object RESULT_NONE = new Object();
    static final Object RESPONSE_HANDLED = new Object();
    <T> void beforeConcurrentHandling(NativeWebRequest request, Callable<T> task) throws Exception;
    <T> void preProcess(NativeWebRequest request, Callable<T> task) throws Exception;
    <T> void postProcess(NativeWebRequest request, Callable<T> task, Object concurrentResult) throws Exception;
    <T> Object handleTimeout(NativeWebRequest request, Callable<T> task) throws Exception;
    <T> void afterCompletion(NativeWebRequest request, Callable<T> task) throws Exception;
}
    <T> void beforeConcurrentHandling(NativeWebRequest request, DeferredResult<T> deferredResult) throws Exception;
    <T> void preProcess(NativeWebRequest request, DeferredResult<T> deferredResult) throws Exception;
    <T> void postProcess(NativeWebRequest request, DeferredResult<T> deferredResult, Object concurrentResult) throws Exception;
    <T> boolean handleTimeout(NativeWebRequest request, DeferredResult<T> deferredResult) throws Exception;
    <T> void afterCompletion(NativeWebRequest request, DeferredResult<T> deferredResult) throws Exception;
}
| メソッド名 | 実行スレッド | 説明 |
|---|---|---|
beforeConcurrentHandling |
APサーバのリクエスト受付スレッド |
ServletRequest#startAsyncを実行する直前に呼び出される。 |
preProcess |
ServletRequest#startAsyncを実行した直後に呼び出される。 |
|
postProcess |
非同期処理が終了し、AsyncContext#dispatchを実行する直前に呼び出される。 |
|
handleTimeout |
APサーバのレスポンス返却スレッド | サーブレットコンテナがタイムアウトを検知した際に呼び出される。 (AsyncListener#onTimeoutがトリガー) |
afterCompletion |
Servlet標準の非同期処理を終了した際に呼び出される。 (AsyncListener#onCompleteとonErrorがトリガー) |
なお、Servlet標準のイベントリスナー(AsyncListener)が呼び出されるタイミングについては、こちらに簡単に記載してあります。言葉だけだとよくわからないと思うので、絵にしてみます。
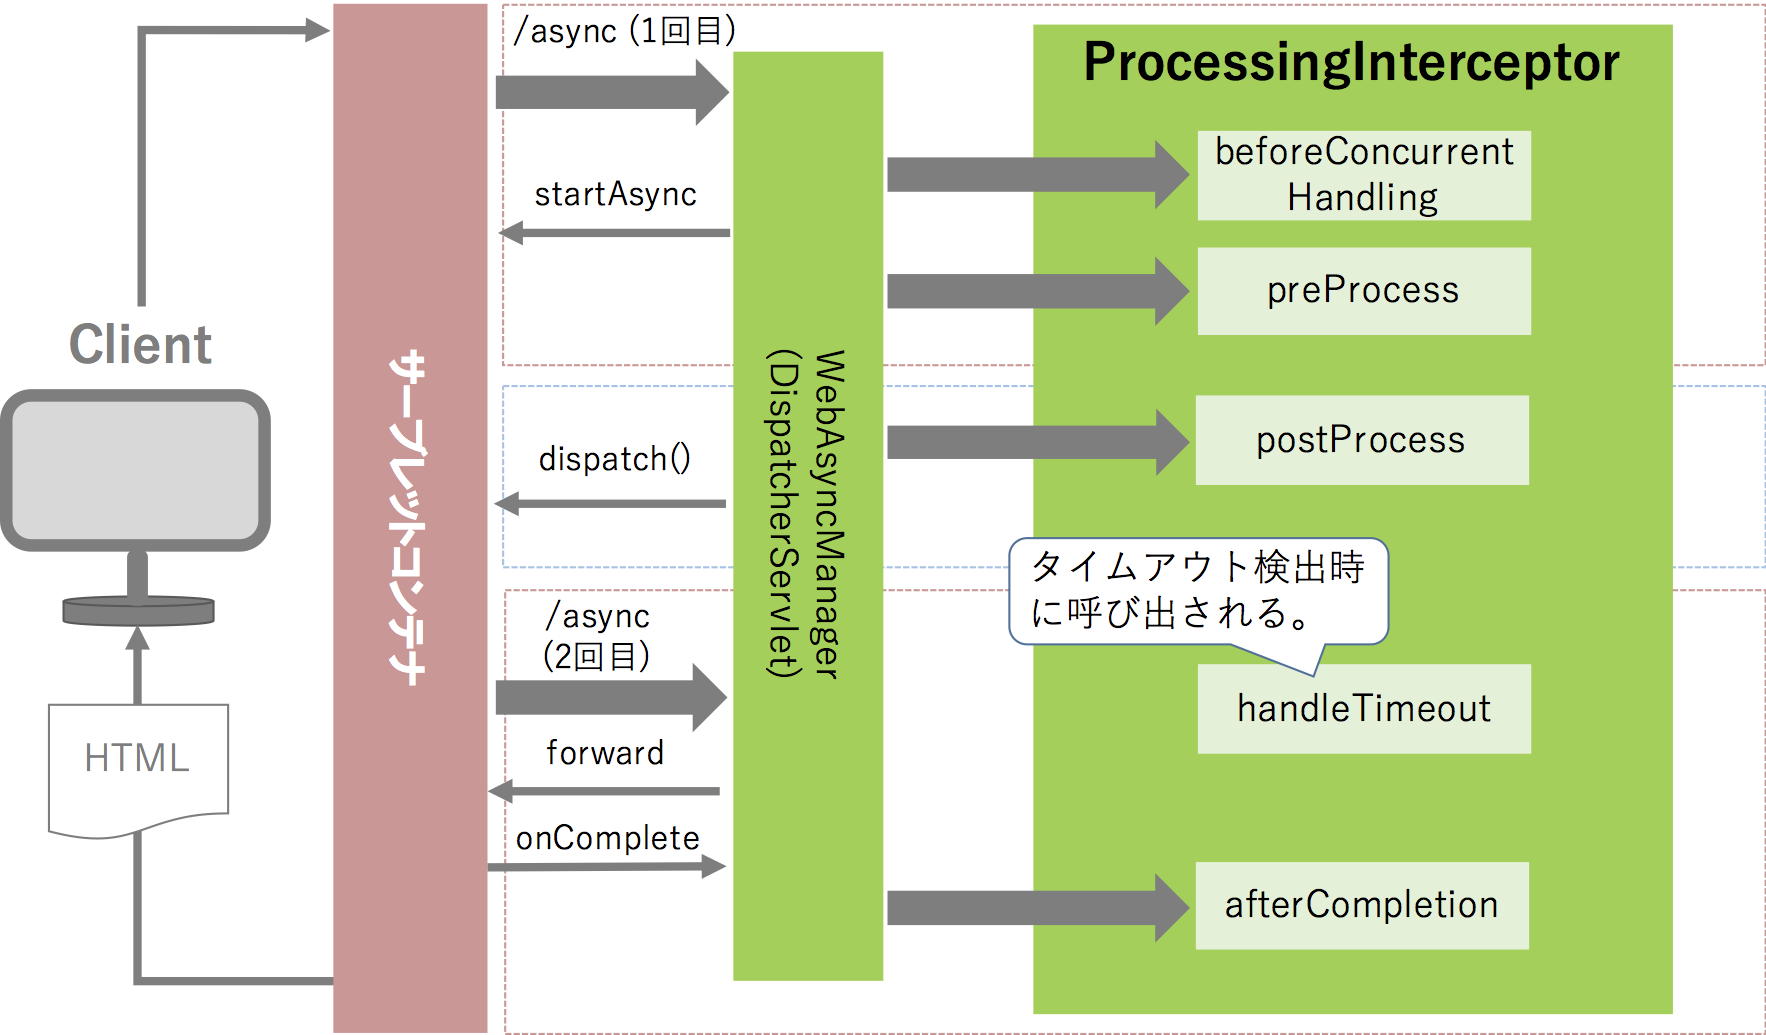
絵をシンプルにするためにタイムアウトは省略しましたが、サーブレットコンテナがタイムアウトを検知すると、絵の中の「/async(2回目)」のかわりに、Spring MVC側で実装しているonTimeoutメソッドがコールバックされます。コールバック後は、ProcessingInterceptorのhandleTimeoutメソッドが呼び出される仕組みになっています。
CallableProcessingInterceptorの実装
CallableProcessingInterceptorを実装する場合は、空実装が行われているAdapterクラス(CallableProcessingInterceptorAdapter)を継承し、 実装が必要なメソッドだけオーバーライドするのがオススメです。
public class CustomCallableProcessingInterceptor extends CallableProcessingInterceptorAdapter {
    // 実装が必要なメソッドだけオーバーライドする
}
作成したクラスをSpring MVCに適用します。
@EnableWebMvc // 注意:Spring Bootの場合は、@EnableWebMvcはつけちゃダメ!!
@ComponentScan("com.example.component")
@Configuration
public class WebMvcConfig extends WebMvcConfigurerAdapter {
    // ...
    @Override
    public void configureAsyncSupport(AsyncSupportConfigurer configurer) {
        // ...
        configurer.registerCallableInterceptors(new CustomCallableProcessingInterceptor());
    }
}
DeferredResultProcessingInterceptorの実装
DeferredResultProcessingInterceptorを実装する場合は、空実装が行われているAdapterクラス(DeferredResultProcessingInterceptorAdapter)を継承し、 実装が必要なメソッドだけオーバーライドするのがオススメです。
public class CustomDeferredResultProcessingInterceptor extends DeferredResultProcessingInterceptorAdapter {
    // 実装が必要なメソッドだけオーバーライドする
}
@Override
public void configureAsyncSupport(AsyncSupportConfigurer configurer) {
    // ...
    configurer.registerDeferredResultInterceptors(new CustomDeferredResultProcessingInterceptor());
}
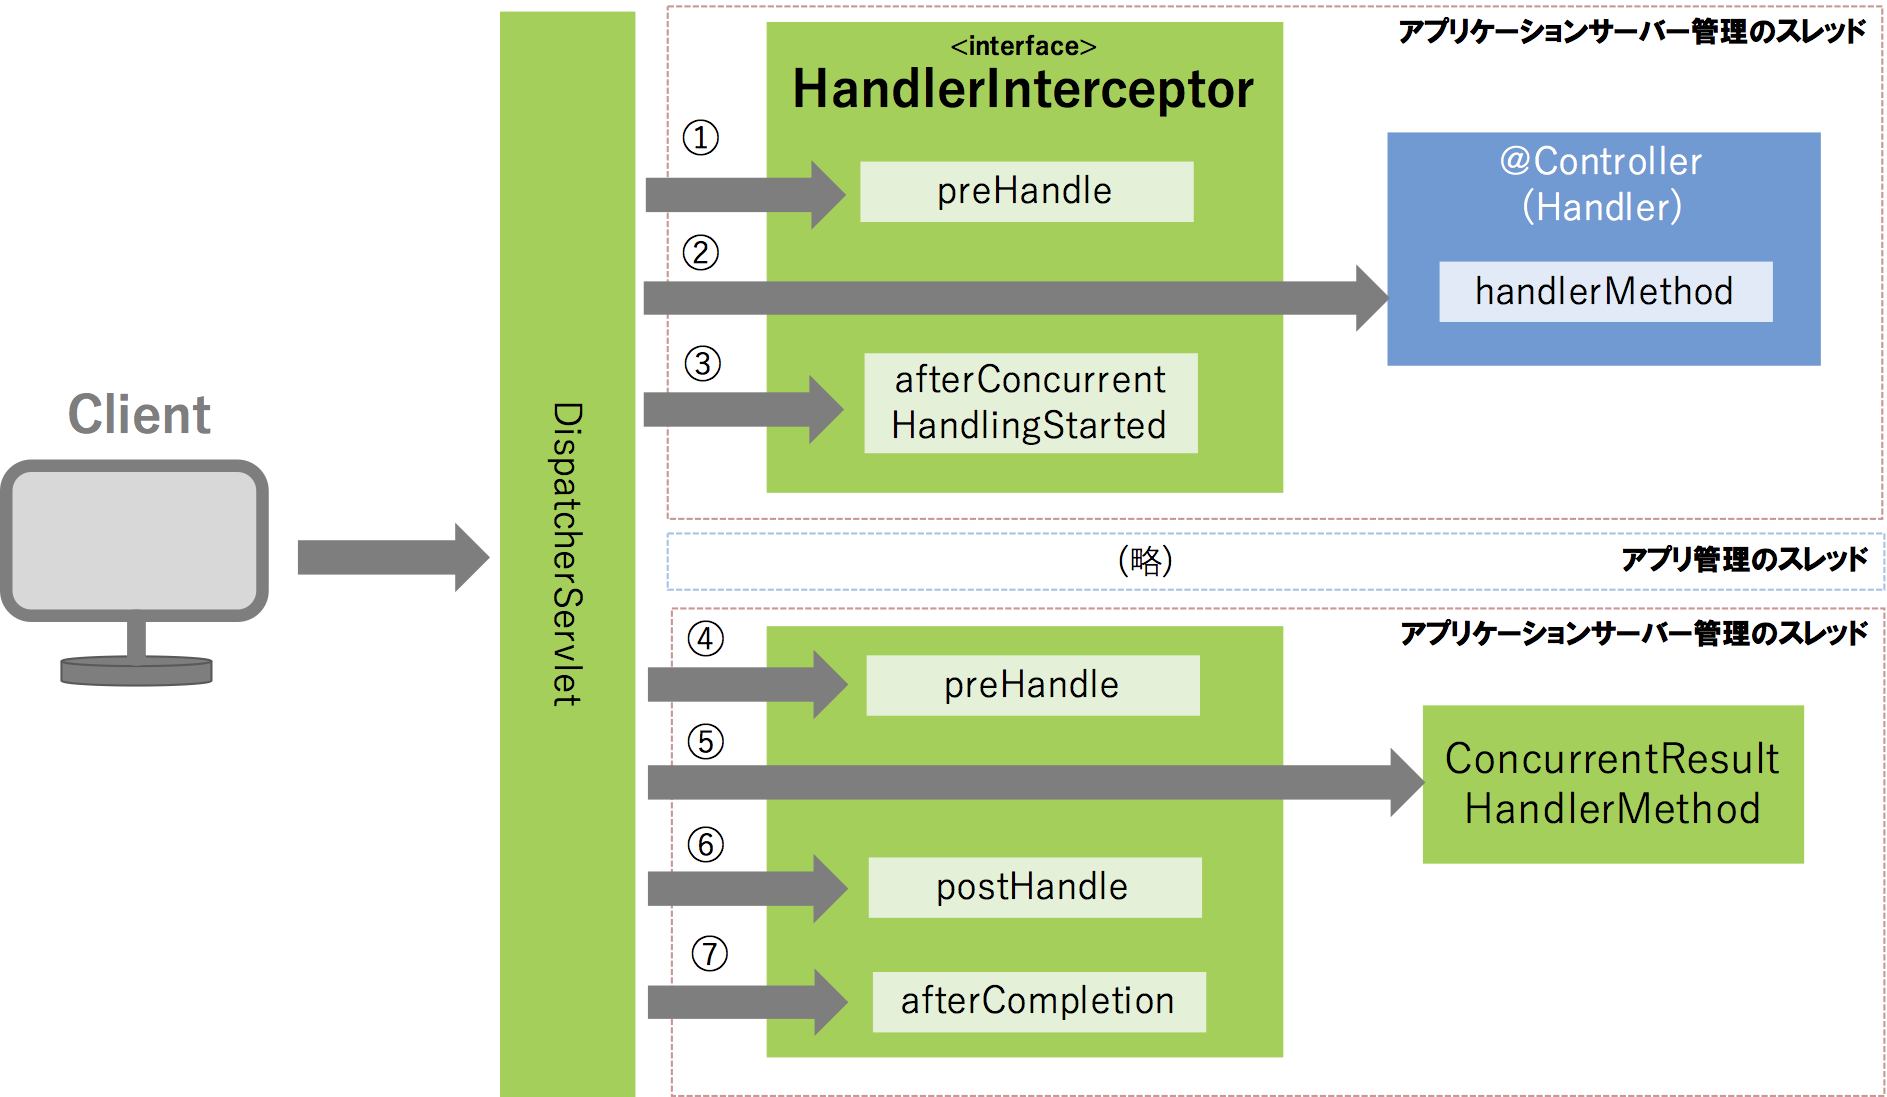
AsyncHandlerInterceptorの利用
AsyncHandlerInterceptorは、HandlerInterceptorのサブインタフェースで、非同期処理を開始したスレッドに対する終了処理を実装するための用意されています。
public interface AsyncHandlerInterceptor extends HandlerInterceptor {
    void afterConcurrentHandlingStarted(HttpServletRequest request, HttpServletResponse response, Object handler) throws Exception;
}
afterConcurrentHandlingStartedが呼び出されるタイミングは、ProcessingInterceptorのpostProcessメソッドより後で、正確にいうとDispatcherServletのメイン処理の最後に呼び出されます。これは、同期型のリクエスト処理時に呼び出されるHandlerInterceptor#afterCompletionメソッドに相当します。ちなみに・・・非同期処理を開始した場合は、HandlerInterceptor#postHandle
とafterCompletionメソッドは呼び出されません。と、書いてみたものの・・・よくわかりませんね ![]() そんな時は絵で表現するのが一番です。
そんな時は絵で表現するのが一番です。
AsyncHandlerInterceptorの実装
AsyncHandlerInterceptorを実装する場合は、空実装が行われているAdapterクラス(HandlerInterceptorAdapter)を継承し、 実装が必要なメソッドだけオーバーライドするのがオススメです。
public class CustomHandlerInterceptor implements AsyncHandlerInterceptor {
    // 実装が必要なメソッドだけオーバーライドする
    @Override
    public void afterConcurrentHandlingStarted(
            HttpServletRequest request, HttpServletResponse response, Object handler)
            throws Exception {
        Console.println("afterConcurrentHandlingStarted");
    }
}
作成したクラスをSpring MVCに適用します。
@EnableWebMvc // 注意:Spring Bootの場合は、@EnableWebMvcはつけちゃダメ!!
@ComponentScan("com.example.component")
@Configuration
public class WebMvcConfig extends WebMvcConfigurerAdapter {
    // ...
    @Override
    public void addInterceptors(InterceptorRegistry registry) {
        registry.addInterceptor(new CustomHandlerInterceptor());
    }
}
Spring Boot上での非同期リクエスト
ここでは、REST APIを使って動きを確認していきます。
まず・・・SPRING INITIALIZR 又はIDE(STS or IDEA)の機能を使ってWeb向けのプロジェクトを作成します。
今回の投稿には全く関係ありませんが、JSR-310 Date and Time APIのクラスをJacksonで正しく扱えるようにするための設定もこのタイミングで行っておきます。(説明は割愛します・・)
<dependency>
    <groupId>com.fasterxml.jackson.datatype</groupId>
    <artifactId>jackson-datatype-jsr310</artifactId>
</dependency>
spring.jackson.serialization.write-dates-as-timestamps=false
非同期リクエスト対応のREST APIを作ってみる
ここでは、リクエストを受け付けた時間と非同期処理が終了した時間を返却するREST APIを作ります。(ってか、REST APIではないですね・・・ ![]() )
)
まず、JSONで返却する情報を保持するJavaBeanを作ります。
package com.example.component;

import java.time.LocalDateTime;

public class ProcessingResult {
    private LocalDateTime acceptedTime;
    private LocalDateTime completedTime;
    // ...
}
つぎに、非同期処理を行う@Asyncメソッドを作成しましょう。
package com.example.component;

import org.springframework.scheduling.annotation.Async;
import org.springframework.stereotype.Component;

import java.time.LocalDateTime;
import java.util.concurrent.CompletableFuture;
import java.util.concurrent.TimeUnit;

@Component
public class AsyncHelper {
    // ...
    @Async
    public CompletableFuture<ProcessingResult> asyncProcessing(ProcessingResult result, long waitSec) {
        Console.println("Start Async processing.");

        if (waitSec == 999) {
            throw new IllegalStateException("Special parameter for confirm error.");
        }

        sleep(waitSec);

        result.setCompletedTime(LocalDateTime.now());

        Console.println("End Async processing.");

        return CompletableFuture.completedFuture(result);
    }
    // ...
}
さいごに、@RestControllerクラスを作ります。
package com.example.component;

import org.springframework.beans.factory.annotation.Autowired;
import org.springframework.web.bind.annotation.RequestMapping;
import org.springframework.web.bind.annotation.RequestMethod;
import org.springframework.web.bind.annotation.RequestParam;
import org.springframework.web.bind.annotation.RestController;

import java.time.LocalDateTime;
import java.util.concurrent.CompletableFuture;

@RequestMapping("/api/async")
@RestController
public class AsyncRestController {
    @Autowired
    AsyncHelper asyncHelper;

    @RequestMapping(method = RequestMethod.GET)
    public CompletableFuture<ProcessingResult> get(@RequestParam(defaultValue = "0") long waitSec) {
        Console.println("Start get.");

        ProcessingResult result = new ProcessingResult();
        result.setAcceptedTime(LocalDateTime.now());

        CompletableFuture<ProcessingResult> future = asyncHelper.asyncProcessing(result, waitSec);

        Console.println("End get.");
        return future;
    }
}
cURLでREST APIを呼び出すと以下のようなレスポンスが返却されます。
$ curl -D - http://localhost:8080/api/async?waitSec=1
HTTP/1.1 200
Content-Type: application/json;charset=UTF-8
Transfer-Encoding: chunked
Date: Tue, 04 Oct 2016 16:45:30 GMT

{"acceptedTime":"2016-10-05T01:45:29.403","completedTime":"2016-10-05T01:45:30.406"}
サーバー側のログを見てみましょう。
2016-10-05T01:45:29.403 Thread[http-nio-8080-exec-1,5,main]: Start get.
2016-10-05T01:45:29.403 Thread[http-nio-8080-exec-1,5,main]: Start Async processing.
2016-10-05T01:45:30.406 Thread[http-nio-8080-exec-1,5,main]: End Async processing.
2016-10-05T01:45:30.408 Thread[http-nio-8080-exec-1,5,main]: End get.
すべて同じスレッドで実行されちゃってますね・・・ ![]()
さすがのSpring Bootも自動コンフィギュレーションしてくれなかったみたいですね。おそらく、@Asyncが有効になっていないのが原因だと思うので、@EnableAsyncを追加します。
package com.example;

import org.springframework.boot.SpringApplication;
import org.springframework.boot.autoconfigure.SpringBootApplication;
import org.springframework.scheduling.annotation.EnableAsync;

@EnableAsync // 追加
@SpringBootApplication
public class DemoMvcAsyncApplication {
    public static void main(String[] args) {
        SpringApplication.run(DemoMvcAsyncApplication.class, args);
    }
}
REST APIを呼び出すと、今度は別のスレッドが使われるようになりました。
2016-10-05T01:48:08.342 Thread[http-nio-8080-exec-3,5,main]: Start get.
2016-10-05T01:48:08.342 Thread[http-nio-8080-exec-3,5,main]: End get.
2016-10-05T01:48:08.342 Thread[SimpleAsyncTaskExecutor-2,5,main]: Start Async processing.
2016-10-05T01:48:09.346 Thread[SimpleAsyncTaskExecutor-2,5,main]: End Async processing.
このログからだとレスポンスを返却する処理がどのスレッドで行われているか確認できないので、ログを出力するHandlerInterceptorを作ってみましょう。
package com.example.component;

import org.springframework.web.servlet.handler.HandlerInterceptorAdapter;

import javax.servlet.http.HttpServletRequest;
import javax.servlet.http.HttpServletResponse;

public class CompletionLoggingHandlerInterceptor extends HandlerInterceptorAdapter {
    @Override
    public void afterCompletion(HttpServletRequest request, HttpServletResponse response, Object handler, Exception ex) throws Exception {
        Console.println("afterCompletion");
    }
}
本投稿では、簡易的に@SpringBootApplicationクラスでSpring MVCの設定を行ってしまいます。(実際のアプリ開発では、WebMvcConfig的なクラスを作りましょう!!)
@EnableAsync
@SpringBootApplication
public class DemoMvcAsyncApplication extends WebMvcConfigurerAdapter {
    public static void main(String[] args) {
        SpringApplication.run(DemoMvcAsyncApplication.class, args);
    }
    @Override
    public void addInterceptors(InterceptorRegistry registry) {
        registry.addInterceptor(new CompletionLoggingHandlerInterceptor()); // HandlerInterceptorの適用
    }
}
REST APIにアクセスすると、Spring Bootでも非同期リクエストが扱えていることが確認できます。
2016-10-05T01:51:08.065 Thread[http-nio-8080-exec-3,5,main]: Start get.
2016-10-05T01:51:08.065 Thread[http-nio-8080-exec-3,5,main]: End get.
2016-10-05T01:51:08.065 Thread[SimpleAsyncTaskExecutor-2,5,main]: Start Async processing.
2016-10-05T01:51:09.069 Thread[SimpleAsyncTaskExecutor-2,5,main]: End Async processing.
2016-10-05T01:51:09.074 Thread[http-nio-8080-exec-4,5,main]: afterCompletion
スレッドプールを使う
ログをみると、やはり残念ながらスレッドプールが使われていないですね・・・。スレッドプールを使うようにしましょう!!! "taskExecutor"という名前でスレッドプールを使うAsyncTaskExecutorをBean定義するだけでOKです。
@EnableAsync
@SpringBootApplication
public class DemoMvcAsyncApplication extends WebMvcConfigurerAdapter {
    // ...
    @Bean // Bean定義を追加
    public AsyncTaskExecutor taskExecutor() {
        ThreadPoolTaskExecutor executor = new ThreadPoolTaskExecutor();
        executor.setCorePoolSize(10);
        executor.setMaxPoolSize(10);
        executor.setQueueCapacity(10);
        return executor;
    }
}
REST APIにアクセスすると、スレッドプール(カスタマイズしたAsyncTaskExecutor)が使われていることが確認できます。
2016-10-05T01:52:38.445 Thread[http-nio-8080-exec-1,5,main]: Start get.
2016-10-05T01:52:38.449 Thread[http-nio-8080-exec-1,5,main]: End get.
2016-10-05T01:52:38.456 Thread[taskExecutor-1,5,main]: Start Async processing.
2016-10-05T01:52:39.461 Thread[taskExecutor-1,5,main]: End Async processing.
2016-10-05T01:52:39.508 Thread[http-nio-8080-exec-2,5,main]: afterCompletion
Spring MVC管理のスレッドを使う場合もスレッドプールから取得するようにしましょう。
@EnableAsync
@SpringBootApplication
public class DemoMvcAsyncApplication extends WebMvcConfigurerAdapter {
    // ...
    @Override
    public void configureAsyncSupport(AsyncSupportConfigurer configurer) {
        configurer.setTaskExecutor(taskExecutor()); // Spring MVC管理下でもスレッドプールを使う
    }
    // ThreadPoolTaskExecutorはDIコンテナ上で管理するのがポイント
    // SpringのDIコンテナのライフサイクルに合わせて、適切なタイミングでinitializeとshutdownメソッドが呼び出される
    @Bean
    public AsyncTaskExecutor taskExecutor() {
        ThreadPoolTaskExecutor executor = new ThreadPoolTaskExecutor();
        executor.setCorePoolSize(10);
        executor.setMaxPoolSize(10);
        executor.setQueueCapacity(10);
        return executor;
    }
}
タイムアウト値の指定
タイムアウト値の指定は、WebMvcConfigurerAdapterのconfigureAsyncSupportメソッドをオーバーすることで指定できますが、Spring Bootではプロパティを使って全体のデフォルト値を指定することもできます。
spring.mvc.async.request-timeout=3000
タイムアウト時の動作
Spring Boot固有の仕組みは特にありませんが、デフォルトだと以下のようなJSONが返却されます。
$ curl -D - http://localhost:8080/api/async?waitSec=4
HTTP/1.1 503
Content-Type: application/json;charset=UTF-8
Transfer-Encoding: chunked
Date: Tue, 04 Oct 2016 16:58:17 GMT
Connection: close

{"timestamp":"2016-10-04T16:58:17.939+0000","status":503,"error":"Service Unavailable","exception":"org.springframework.web.context.request.async.AsyncRequestTimeoutException","message":"No message available","path":"/api/async"}
例外ハンドリング
Spring Boot固有の仕組みは特にありませんが、デフォルトだと以下のようなJSONが返却されます。
$ curl -D - http://localhost:8080/api/async?waitSec=999
HTTP/1.1 500
Content-Type: application/json;charset=UTF-8
Transfer-Encoding: chunked
Date: Tue, 04 Oct 2016 17:00:39 GMT
Connection: close

{"timestamp":"2016-10-04T17:00:39.558+0000","status":500,"error":"Internal Server Error","exception":"java.util.concurrent.CompletionException","message":"java.lang.IllegalStateException: Special parameter for confirm error.","path":"/api/async"}
JSONを見てわかると思いますが、デフォルト実装だとアプリケーション内部の情報が漏洩してしまいます。開発環境ならこのJSONでも問題ありませんが、商用環境でこのJSONを返却しないようにしましょう。なお、エラーのカスタマイズ方法は本投稿では扱わないので、「Spring Bootの公式リファレンス」を参照してください。
まとめ
今回は、Servlet標準の非同期処理をSpring MVCでどうやって利用するのか(実装するのか)を紹介しました。今回紹介した方式は、APサーバーのリソース(スレッド)をできるだけ占有せずに効率的に処理を実行したい場合に利用する処理方式です。次回は、「HTTPの分割レスポンス("Transfer-Encoding: chunked")の仕組みを利用したPush型の非同期処理」を、Spring MVCがどのようにサポートしているのかを紹介します。
なお、サーバーのリソースを効率的に使うという観点だと、Servlet 3.1から追加されたNon-blocking I/O向けのAPI(javax.servlet.ReadListenerとjavax.servlet.WriteListener)があります。Spring MVCにおけるNon-blocking I/Oのサポートは、Spring 5からになる予定です。また、Spring 5からはReactive Programingがサポートされ、プログラミングスタイルとしてもNon-blockingな方向に向かっています。SpringのReactive対応については、@making@github のスライド「Reactive Webアプリケーション - そしてSpring 5へ」がオススメです。
参考サイト
- http://docs.spring.io/spring/docs/current/spring-framework-reference/htmlsingle/#mvc-ann-async
- http://docs.spring.io/spring/docs/current/spring-framework-reference/htmlsingle/#scheduling-annotation-support-async
- http://docs.spring.io/spring-boot/docs/current/reference/htmlsingle/
- http://www.ibm.com/support/knowledgecenter/SSAW57_8.5.5/com.ibm.websphere.nd.doc/ae/cweb_asyncservlet.html?lang=ja
- http://www.slideshare.net/makingx/reactive-web-spring-5-jjugccc-cccef3
- http://qiita.com/kazuki43zoo/items/8be79f98621f90865b78
- http://qiita.com/kazuki43zoo/items/757b557c05f548c6c5db