目的
ポートフォリオ作成に当たりメモ。
ポートフォリオ完成が目的であり、deviseのみの導入が目的ではないので、devise以外の話も出てきます。
deviseは公式に沿って導入。
https://github.com/heartcombo/devise#getting-started
Windows10home
Rails 6.0.3.1
devise 4.7.2
導入
gem "devise"
$ bundle install
$ rails g devise:install
 create  config/initializers/devise.rb
      create  config/locales/devise.en.yml
===============================================================================

Depending on your application's configuration some manual setup may be required:

  1. Ensure you have defined default url options in your environments files. Here
     is an example of default_url_options appropriate for a development environment
     in config/environments/development.rb:

       config.action_mailer.default_url_options = { host: 'localhost', port: 3000 }

     In production, :host should be set to the actual host of your application.

     * Required for all applications. *

  2. Ensure you have defined root_url to *something* in your config/routes.rb.
     For example:

       root to: "home#index"

     * Not required for API-only Applications *

  3. Ensure you have flash messages in app/views/layouts/application.html.erb.
     For example:

       <p class="notice"><%= notice %></p>
       <p class="alert"><%= alert %></p>

     * Not required for API-only Applications *
―――以下グーグル翻訳―――
アプリケーションの構成によっては、いくつかの手動設定が必要になる場合があります。
1 環境ファイルにデフォルトのURLオプションが定義されていることを確認します。
開発環境に適したdefault_url_optionsの例。
config.action_mailer.default_url_options = {host: 'localhost', port: 3000}
本番環境では、`:hostIをアプリケーションの実際のホストに設定する必要があります。
- すべてのアプリケーションに必要です。 *
2 config/routes.rbでroot_urlが* something *に定義されていることを確認します。
例えば。
root to: "home#index"
- APIのみのアプリケーションには必要ありません。 *
3 app/views/layouts/application.html.erbにフラッシュメッセージがあることを確認します。
例えば。
<p class = "notice"> <%= notice %> </p>
<p class = "alert"> <%= alert %> </p>
- APIのみのアプリケーションには必要ありません*
―――以上グーグル翻訳―――
注意書きのとおりdefault_url_optionsを設定。メーラーのデフォルトURLを設定できる。
メールテンプレートでURLを生成するときに利用される。
このようにデフォルトのURLを設定することで、毎回URLを渡さなくて済む。
詳細は以下が分かりやすい。
https://stackoverflow.com/questions/43961548/what-is-actionmailer-default-url-options
config.action_mailer.default_url_options = { host: 'localhost', port: 3000 }
フラッシュが表示されるように設定(なくてもエラーにはならない。)。
これで上部にフラッシュが表示されるようになる。
後はパーシャルにしたりとカスタマイズするだけ。
<!DOCTYPE html>
<html>
  <head>
    <title></title>
    <%= csrf_meta_tags %>
    <%= csp_meta_tag %>

    <%= stylesheet_link_tag 'application', media: 'all', 'data-turbolinks-track': 'reload' %>
    <%= javascript_pack_tag 'application', 'data-turbolinks-track': 'reload' %>
  </head>

  <body>
    <p class="notice"><%= notice %></p>
    <p class="alert"><%= alert %></p>
    <%= yield %>
  </body>
</html>
ルートページにはカレンダーを表示させたいので、rails g controller calendarsで作成し、rootパスもcalendars#indexにする。
ビューも適当に作成。
Rails.application.routes.draw do
  root "calendars#index"
end
<h1>ここにカレンダーを表示します。</h1>
モデル作成
$ rails g devise user
      invoke  active_record
      create    db/migrate/20200612115820_devise_create_users.rb
      create    app/models/user.rb
      invoke    test_unit
      create      test/models/user_test.rb
      create      test/fixtures/users.yml
      insert    app/models/user.rb
       route  devise_for :users
今回はusersテーブルにnameカラムを追加したいのでマイグレーションファイルにnameカラムを追加。
オプションは全部使わないと思うが試しに入れてみる。追加をするならマイグレーションファイルだけではなくモデルの設定もすること。
モデルとマイグレーションファイルの設定が決まればrails db:migrate。
class DeviseCreateUsers < ActiveRecord::Migration[6.0]
  def change
    create_table :users do |t|
      t.string :name, null: false
      ## Database authenticatable
      t.string :email,              null: false, default: ""
      t.string :encrypted_password, null: false, default: ""

      ## Recoverable
      t.string   :reset_password_token
      t.datetime :reset_password_sent_at

      ## Rememberable
      t.datetime :remember_created_at

      # Trackable
      t.integer  :sign_in_count, default: 0, null: false
      t.datetime :current_sign_in_at
      t.datetime :last_sign_in_at
      t.inet     :current_sign_in_ip
      t.inet     :last_sign_in_ip

      # Confirmable
      t.string   :confirmation_token
      t.datetime :confirmed_at
      t.datetime :confirmation_sent_at
      t.string   :unconfirmed_email # Only if using reconfirmable

      # Lockable
      t.integer  :failed_attempts, default: 0, null: false # Only if lock strategy is :failed_attempts
      t.string   :unlock_token # Only if unlock strategy is :email or :both
      t.datetime :locked_at


      t.timestamps null: false
    end

    add_index :users, :email,                unique: true
    add_index :users, :reset_password_token, unique: true
    add_index :users, :confirmation_token,   unique: true
    add_index :users, :unlock_token,         unique: true
  end
end
class User < ApplicationRecord
  # Include default devise modules. Others available are:
  # :confirmable, :lockable, :timeoutable, :trackable and :omniauthable
  devise :database_authenticatable, :registerable,
         :recoverable, :rememberable, :validatable,
ここから追加→:confirmable, :lockable, :timeoutable,
         :trackable, :omniauthable
end
オプションは以下のとおりで、全てモジュール。
標準オプション(コメントアウトされていないもの)
database_authenticatable
パスワードのハッシュ化とサインイン時のユーザーの真正性の検証。
t.string :email,              null: false, default: ""
t.string :encrypted_password, null: false, default: ""
registerable
新しいリソースの登録(ユーザーのサインアップなど)に関連するすべてのことを担当。
アカウントの編集・削除も。
recoverable
ユーザーパスワードをリセットし、リセット指示のメールを送信する。
t.string   :reset_password_token
パスワードをリセットする際に使用するトークン。
t.datetime :reset_password_sent_at
パスワードをリセットするためのメール送信時のタイムスタンプ。
rememberable
保存されたクッキーからユーザーを記憶するためのトークンの生成と削除を管理。
OauthのSNS認証を利用する際はリメンバーミー機能が使えなくなる場合がある。そのときはremember_tokenというカラムを作成すればその問題を回避できる。
http://higan96.hatenablog.com/entry/2014/03/02/153941
t.datetime :remember_created_at
記憶時のタイムスタンプ。他のカラムはない。
`database_authenticatable`のカラム
`encrypted_password`を使用してリメンバーミー機能を実現している。
validatable
ユーザのメールアドレスとパスワードに必要なすべてのバリデーションを作成。自分でバリデーションを作成したい場合はオプション。メールアドレスが存在しているかどうか、一意であるかどうか、そしてそのフォーマットが有効であるかどうかを自動的に検証する。また、パスワードの存在、確認、長さのテストも行う。
追加オプション(コメントアウトされているもの)
confirmable
アカウントへのサインインがすでに確認されているかどうかを確認し、確認手順を記載した電子メールを送信する。確認指示は、レコードの作成後、新しい確認指示要求によって手動で要求されたときに、ユーザーの電子メールに送信される。
次の情報を保持する。
t.string   :confirmation_token
一意のランダムトークン
t.datetime :confirmed_at
ユーザーが確認リンクをクリックしたときのタイムスタンプ
t.datetime :confirmation_sent_at
confirm_tokenが生成された(送信されなかった)タイムスタンプ
t.string   :unconfirmed_email
メール属性からコピーされたメールアドレス。
lockable
一定回数試行した後にユーザーのアクセスをブロックする処理を行う。Lockableは、ユーザーがブロックされた後にロックを解除するために、電子メールと時間という二つの異なる手段がある。前者はロックがかかったときにユーザーにメールを送り、その中にはアカウントのロックを解除するためのリンクが含まれる。もう一つは、設定した時間(例えば2時間)が経過した後に自動的にロックを解除する。メールと時間の両方を使用するようにロック可能に設定することも可能です。
t.integer  :failed_attempts, default: 0, null: false
試行して失敗した回数。
t.string   :unlock_token
ロック解除用のトークン。
メールでロック解除するときに使用するので、時間のみでロック解除される場合は不要。
t.datetime :locked_at
ロックされた時間
timeoutable
指定された期間アクティブでなかったセッションを期限切れにする。
ユーザーのセッションが既に期限切れになっているかどうかの検証を行う。設定された時間後にセッションが期限切れになると、ユーザーは再び認証情報を要求され、サインインページにリダイレクトされる。
trackable
ユーザーのサインインに関する情報を追跡する。
サインインの日時・IP情報を保持
t.integer  :sign_in_count, default: 0, null: false
サインインが行われるたびに増加。
t.datetime :current_sign_in_at
ユーザーがサインインしたときに更新されるタイムスタンプ。
t.datetime :last_sign_in_at
前回のサインインのタイムスタンプを保持。
t.inet     :current_sign_in_ip
ユーザーがサインインしたときに更新されるリモートIP
t.inet     :last_sign_in_ip
前回のサインインのリモートIPを保持。
omiauthable
OmniiAuthをサポートする。
OmniAuthは、Webアプリケーションのためのマルチプロバイダ認証を標準化するgem。FacebookやTwitter、Googleなどのアカウント情報を使用してログインができるようになる。
こちらを有効にするならomniauthをGemfileに書き込んでインストールする必要がある。
なお、認証したい対象のアプリ(facebookなど)のgemも追加する必要がある。
ビュー作成
deviseがviewも提供している。
rails g devise:viewsだけでビューを作成するが、今後adminなど複数のdeviseモデルを作成する予定なので、ビューを簡単にカスタマイズできるように以下のようにして作成する。
$ rails g devise:views users
      invoke  Devise::Generators::SharedViewsGenerator
      create    app/views/users/shared
      create    app/views/users/shared/_error_messages.html.erb
      create    app/views/users/shared/_links.html.erb
      invoke  form_for
      create    app/views/users/confirmations
      create    app/views/users/confirmations/new.html.erb
      create    app/views/users/passwords
      create    app/views/users/passwords/edit.html.erb
      create    app/views/users/passwords/new.html.erb
      create    app/views/users/registrations
      create    app/views/users/registrations/edit.html.erb
      create    app/views/users/registrations/new.html.erb
      create    app/views/users/sessions
      create    app/views/users/sessions/new.html.erb
      create    app/views/users/unlocks
      create    app/views/users/unlocks/new.html.erb
      invoke  erb
      create    app/views/users/mailer
      create    app/views/users/mailer/confirmation_instructions.html.erb
      create    app/views/users/mailer/email_changed.html.erb
      create    app/views/users/mailer/password_change.html.erb
      create    app/views/users/mailer/reset_password_instructions.html.erb
      create    app/views/users/mailer/unlock_instructions.html.erb
なお、ビューをカスタマイズするためには以下のように設定する。
config.scoped_views = true
いくつかのビューだけを生成したければ、以下のように-vフラグで生成できる。
$ rails generate devise:views -v registrations confirmations
コントローラー作成
コントローラーを作成しなくてもdeviseがいいようにしてくれるが、コントローラーもカスタマイズできる。
特定のコントローラーだけカスタマイズしたいときはrails generate devise:controllers users -c=sessionsと-cフラグを付ける。
$ rails g devise:controllers users
      create  app/controllers/users/confirmations_controller.rb
      create  app/controllers/users/passwords_controller.rb
      create  app/controllers/users/registrations_controller.rb
      create  app/controllers/users/sessions_controller.rb
      create  app/controllers/users/unlocks_controller.rb
      create  app/controllers/users/omniauth_callbacks_controller.rb
===============================================================================

Some setup you must do manually if you haven't yet:

  Ensure you have overridden routes for generated controllers in your routes.rb.
  For example:

    Rails.application.routes.draw do
      devise_for :users, controllers: {
        sessions: 'users/sessions'
      }
    end

↑の翻訳
まだ設定をしていない場合は、いくつかの設定を手動で行う必要があります。

routes.rb で生成されたコントローラのルートをオーバーライドしていることを確認してください。
例えば、以下のようにします。

===============================================================================
コントローラーを作成するなら指示通りに訂正。
Rails.application.routes.draw do
  devise_for :users, controllers: {
    sessions: "users/sessions",
    confirmations: "users/confirmations",
    passwords: "users/passwords",
    registrations: "users/registrations",
    unlocks: "users/unlocks",
    omniauth_callbacks: "users/omniauth_callbacks",
  }
end
application_controller.rbにauthenticate_user!を追加。
これによりログインしていないとログインページに飛ばされる。
class ApplicationController < ActionController::Base
  before_action :authenticate_user!
end
views/deviseにビューがあれば、views/usersにビューをコピーする。コントローラーが変更されたため、前者のデフォルトのビューは使用されないから。
この記事の手順通りにしていれば既にビューが作成されているので無視していい。
後は自由にコントローラーをカスタマイズする。
deviseの導入は以上。
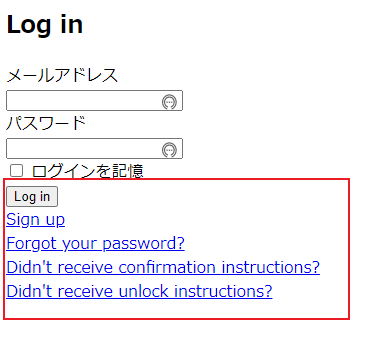
deviseの日本語化
require_relative 'boot'
require 'rails/all'

Bundler.require(*Rails.groups)

module MkMatchingTest
  class Application < Rails::Application
    config.load_defaults 6.0
    # ↓追記
    config.i18n.default_locale = :ja
  end
end
gem追加。
gem "devise-i18n"
gem "devise-i18n-views"
$ bundle install
日本語化ファイルを作成。
$ rails g devise:views:locale ja
      create  config/locales/devise.views.ja.yml
後はdevise.views.ja.ymlを好きなようにカスタマイズ。
大抵の訳はdevise.views.ja.ymlに書いてあるので英語が苦手でも安心。
ファイルの中身はデフォルトでこのようになっている。
ja:
  activerecord:
    attributes:
      user:
        current_password: "現在のパスワード"
        email: "メールアドレス"
        password: "パスワード"
        password_confirmation: "確認用パスワード"
        remember_me: "ログインを記憶"
    models:
      user: "ユーザ"
  devise:
    confirmations:
      new:
        resend_confirmation_instructions: "アカウント確認メール再送"
    mailer:
      confirmation_instructions:
        action: "アカウント確認"
        greeting: "ようこそ、%{recipient}さん!"
        instruction: "次のリンクでメールアドレスの確認が完了します:"
      reset_password_instructions:
        action: "パスワード変更"
        greeting: "こんにちは、%{recipient}さん!"
        instruction: "誰かがパスワードの再設定を希望しました。次のリンクでパスワードの再設定が出来ます。"
        instruction_2: "あなたが希望したのではないのなら、このメールは無視してください。"
        instruction_3: "上のリンクにアクセスして新しいパスワードを設定するまで、パスワードは変更されません。"
      unlock_instructions:
        action: "アカウントのロック解除"
        greeting: "こんにちは、%{recipient}さん!"
        instruction: "アカウントのロックを解除するには下のリンクをクリックしてください。"
        message: "ログイン失敗が繰り返されたため、アカウントはロックされています。"
    passwords:
      edit:
        change_my_password: "パスワードを変更する"
        change_your_password: "パスワードを変更"
        confirm_new_password: "確認用新しいパスワード"
        new_password: "新しいパスワード"
      new:
        forgot_your_password: "パスワードを忘れましたか?"
        send_me_reset_password_instructions: "パスワードの再設定方法を送信する"
    registrations:
      edit:
        are_you_sure: "本当に良いですか?"
        cancel_my_account: "アカウント削除"
        currently_waiting_confirmation_for_email: "%{email} の確認待ち"
        leave_blank_if_you_don_t_want_to_change_it: "空欄のままなら変更しません"
        title: "%{resource}編集"
        unhappy: "気に入りません"
        update: "更新"
        we_need_your_current_password_to_confirm_your_changes: "変更を反映するには現在のパスワードを入力してください"
      new:
        sign_up: "アカウント登録"
    sessions:
      new:
        sign_in: "ログイン"
    shared:
      links:
        back: "戻る"
        didn_t_receive_confirmation_instructions: "アカウント確認のメールを受け取っていませんか?"
        didn_t_receive_unlock_instructions: "アカウントの凍結解除方法のメールを受け取っていませんか?"
        forgot_your_password: "パスワードを忘れましたか?"
        sign_in: "ログイン"
        sign_in_with_provider: "%{provider}でログイン"
        sign_up: "アカウント登録"
    unlocks:
      new:
        resend_unlock_instructions: "アカウントの凍結解除方法を再送する"
