はじめに
以下の公式ドキュメントに沿ってクライアントVPNエンドポイントを作成した後、SSH接続、SessionManager接続を行います。
クライアントはmacOS。
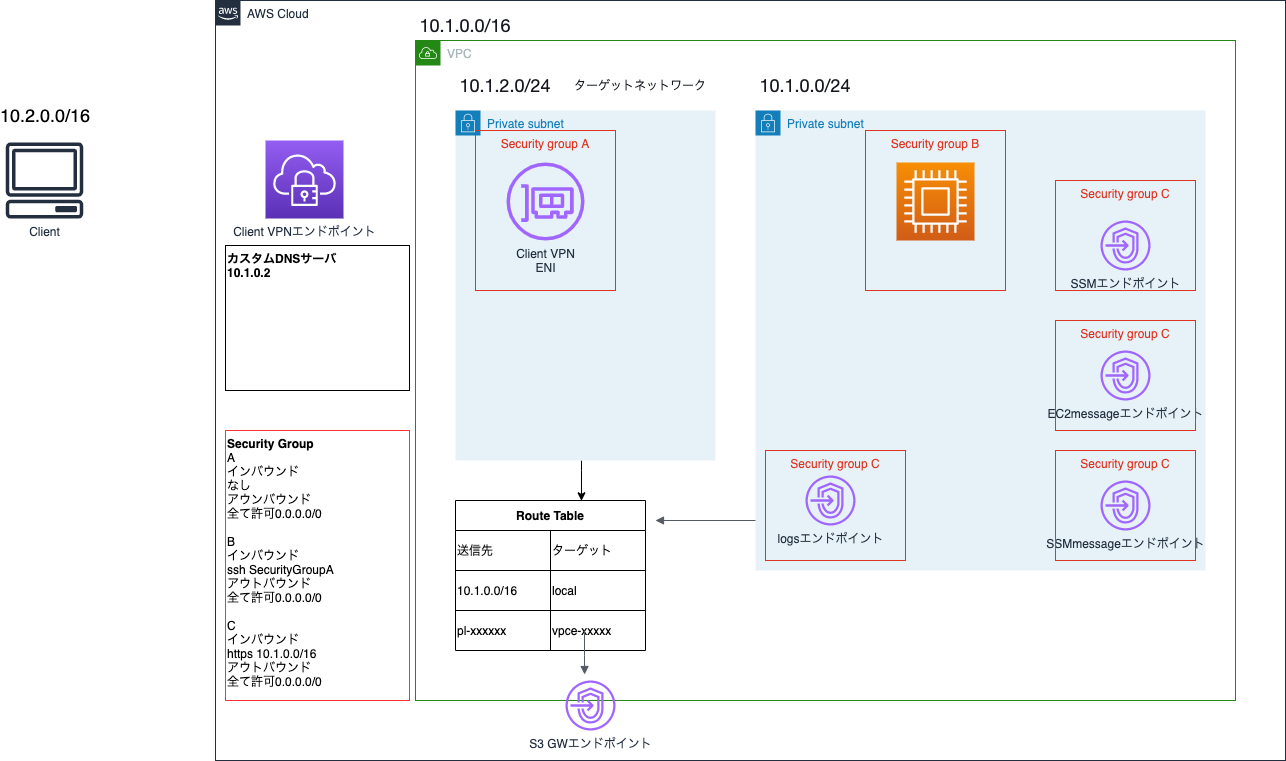
完成図はこちら。
クライアントVPNエンドポイント作成前の注意・確認事項
クライアントVPNの制限とルール
- VPNエンドポイント作成時のクライアントIPv4CIDR範囲は、関連付けられたサブネットのVPCのCIDRや、クライアントVPNエンドポイントのルートテーブルのルートを重複しないこと
- クライアントIPv4CIDR範囲は /22 以上 /12 以下
- クライアントIPv4CIDR範囲は必要なIPアドレス数の2倍の数が必要
- クライアントIPv4CIDR範囲は変更できないから注意
- クライアントVPNエンドポイントにはIPアドレスを使用して接続しない
- アクティブな関連付けと接続数で1時間ごとに料金がかかるから注意
サーバ証明書は事前作成してACMへインポートする
ACMへのサーバ証明書のプロビジョニングは必須。
クライアント証明書とサーバ証明書のCAが異なる場合のみクライアント証明書をACMにアップロードする。
CAが同一の場合はサーバ証明書のみアップロードでOK。
クライアントごとに個別の証明書とキーを指定可能。
これにより、クライアントが組織を離れた際は該当の証明書を取り消すことで、そのクライアントの接続を拒否できる。
クライアントVPNエンドポイントは、1024ビット、2048ビットのRSAキーサイズのみサポート。
以下ではサーバ証明書とクライアント証明書を作成し、サーバ証明書をACMにインポートしています。
[21-10-15 23:04 ~/aws]# git clone https://github.com/OpenVPN/easy-rsa.git
Cloning into 'easy-rsa'...
remote: Enumerating objects: 2095, done.
remote: Counting objects: 100% (13/13), done.
remote: Compressing objects: 100% (11/11), done.
remote: Total 2095 (delta 3), reused 4 (delta 0), pack-reused 2082
Receiving objects: 100% (2095/2095), 11.72 MiB | 7.54 MiB/s, done.
Resolving deltas: 100% (917/917), done.
[21-10-15 23:04 ~/aws]# cd easy-rsa/easyrsa3
[21-10-15 23:04 ~/aws/easy-rsa/easyrsa3]# ./easyrsa init-pki

init-pki complete; you may now create a CA or requests.
Your newly created PKI dir is: /Users/xxxx/aws/easy-rsa/easyrsa3/pki


[21-10-15 23:04 ~/aws/easy-rsa/easyrsa3]# ./easyrsa build-ca nopass
Using SSL: openssl LibreSSL 2.8.3
Generating RSA private key, 2048 bit long modulus
.........................................................+++
........................................................................................+++
e is 65537 (0x10001)
You are about to be asked to enter information that will be incorporated
into your certificate request.
What you are about to enter is what is called a Distinguished Name or a DN.
There are quite a few fields but you can leave some blank
For some fields there will be a default value,
If you enter '.', the field will be left blank.
-----
Common Name (eg: your user, host, or server name) [Easy-RSA CA]:

CA creation complete and you may now import and sign cert requests.
Your new CA certificate file for publishing is at:
/Users/xxxx/aws/easy-rsa/easyrsa3/pki/ca.crt


[21-10-15 23:05 ~/aws/easy-rsa/easyrsa3]# ./easyrsa build-server-full server nopass
Using SSL: openssl LibreSSL 2.8.3
Generating a 2048 bit RSA private key
............+++
.......................................................+++
writing new private key to '/Users/xxx/aws/easy-rsa/easyrsa3/pki/easy-rsa-41774.zU59Ev/tmp.cvFWOK'
-----
Using configuration from /Users/xxx/aws/easy-rsa/easyrsa3/pki/easy-rsa-41774.zU59Ev/tmp.i6rTfS
Check that the request matches the signature
Signature ok
The Subject's Distinguished Name is as follows
commonName            :ASN.1 12:'server'
Certificate is to be certified until Jan 18 14:05:37 2024 GMT (825 days)

Write out database with 1 new entries
Data Base Updated

[21-10-15 23:05 ~/aws/easy-rsa/easyrsa3]# ./easyrsa build-client-full client1.domain.tld nopass
Using SSL: openssl LibreSSL 2.8.3
Generating a 2048 bit RSA private key
.............................................................+++
.................+++
writing new private key to '/Users/xxx/aws/easy-rsa/easyrsa3/pki/easy-rsa-41882.glbR44/tmp.QAQPzY'
-----
Using configuration from /Users/xxx/aws/easy-rsa/easyrsa3/pki/easy-rsa-41882.glbR44/tmp.QkNLCo
Check that the request matches the signature
Signature ok
The Subject's Distinguished Name is as follows
commonName            :ASN.1 12:'client1.domain.tld'
Certificate is to be certified until Jan 18 14:05:48 2024 GMT (825 days)

Write out database with 1 new entries
Data Base Updated

[21-10-15 23:05 ~/aws/easy-rsa/easyrsa3]# mkdir ~/aws/cetificate/
[21-10-15 23:06 ~/aws/easy-rsa/easyrsa3]# cp pki/ca.crt ~/aws/cetificate/
[21-10-15 23:07 ~/aws/easy-rsa/easyrsa3]# cp pki/issued/server.crt ~/aws/cetificate/
[21-10-15 23:07 ~/aws/easy-rsa/easyrsa3]# cp pki/private/server.key ~/aws/cetificate/
[21-10-15 23:07 ~/aws/easy-rsa/easyrsa3]# cp pki/issued/client1.domain.tld.crt ~/aws/cetificate/
[21-10-15 23:07 ~/aws/easy-rsa/easyrsa3]# cp pki/private/client1.domain.tld.key ~/aws/cetificate/
[21-10-15 23:08 ~/aws/easy-rsa/easyrsa3]# cd ~/aws/cetificate/
[21-10-15 23:08 ~/aws/cetificate]# aws acm import-certificate --certificate fileb://server.crt --private-key fileb://server.key --certificate-chain fileb://ca.crt --profile hands-on-user
{
    "CertificateArn": "arn:aws:acm:ap-northeast-1:xxxxxxxxxxxx:certificate/xxxxxx-b862-xxxx-b0d3-xxxxxxxxxxx"
}
クライアントVPNエンドポイントを作成して接続する
セキュリティグループの作成
クライアントVPNエンドポイント作成時、クライアントVPNエンドポイントのENIにアタッチされるセキュリティグループを選択できるので、そのセキュリティグループを作成します。
インバウンドルールはなし、アウトバウンドはフルオープンで作成。
インバウンドルールがないが、クライアントVPNエンドポイント接続時に拒否されません。
このセキュリティグループは接続できるクライアントを制限するのものではなく、接続を許可するリソースのセキュリティグループで使用される用途が想定されているようです。
例:以下のインバウンドルールだと、クライアントVPNエンドポイントENIからのssh接続を許可している
ssh 22 sg-xxxxxx(クライアントVPNエンドポイントENIのセキュリティグループ)
アプリケーションのセキュリティグループにルールを追加して、関連付けに適用されたセキュリティグループからのトラフィックを許可することで、クライアント VPN ユーザーが VPC 内のアプリケーションにアクセスできるようにすることができます。
エンドポイントの作成
クライアントIPv4 CIDRは重複しないように設定します。
サーバ証明書のCAとクライアント証明書のCAが同一であればクライアント証明書ARNはサーバ証明書のものを選択してOK。
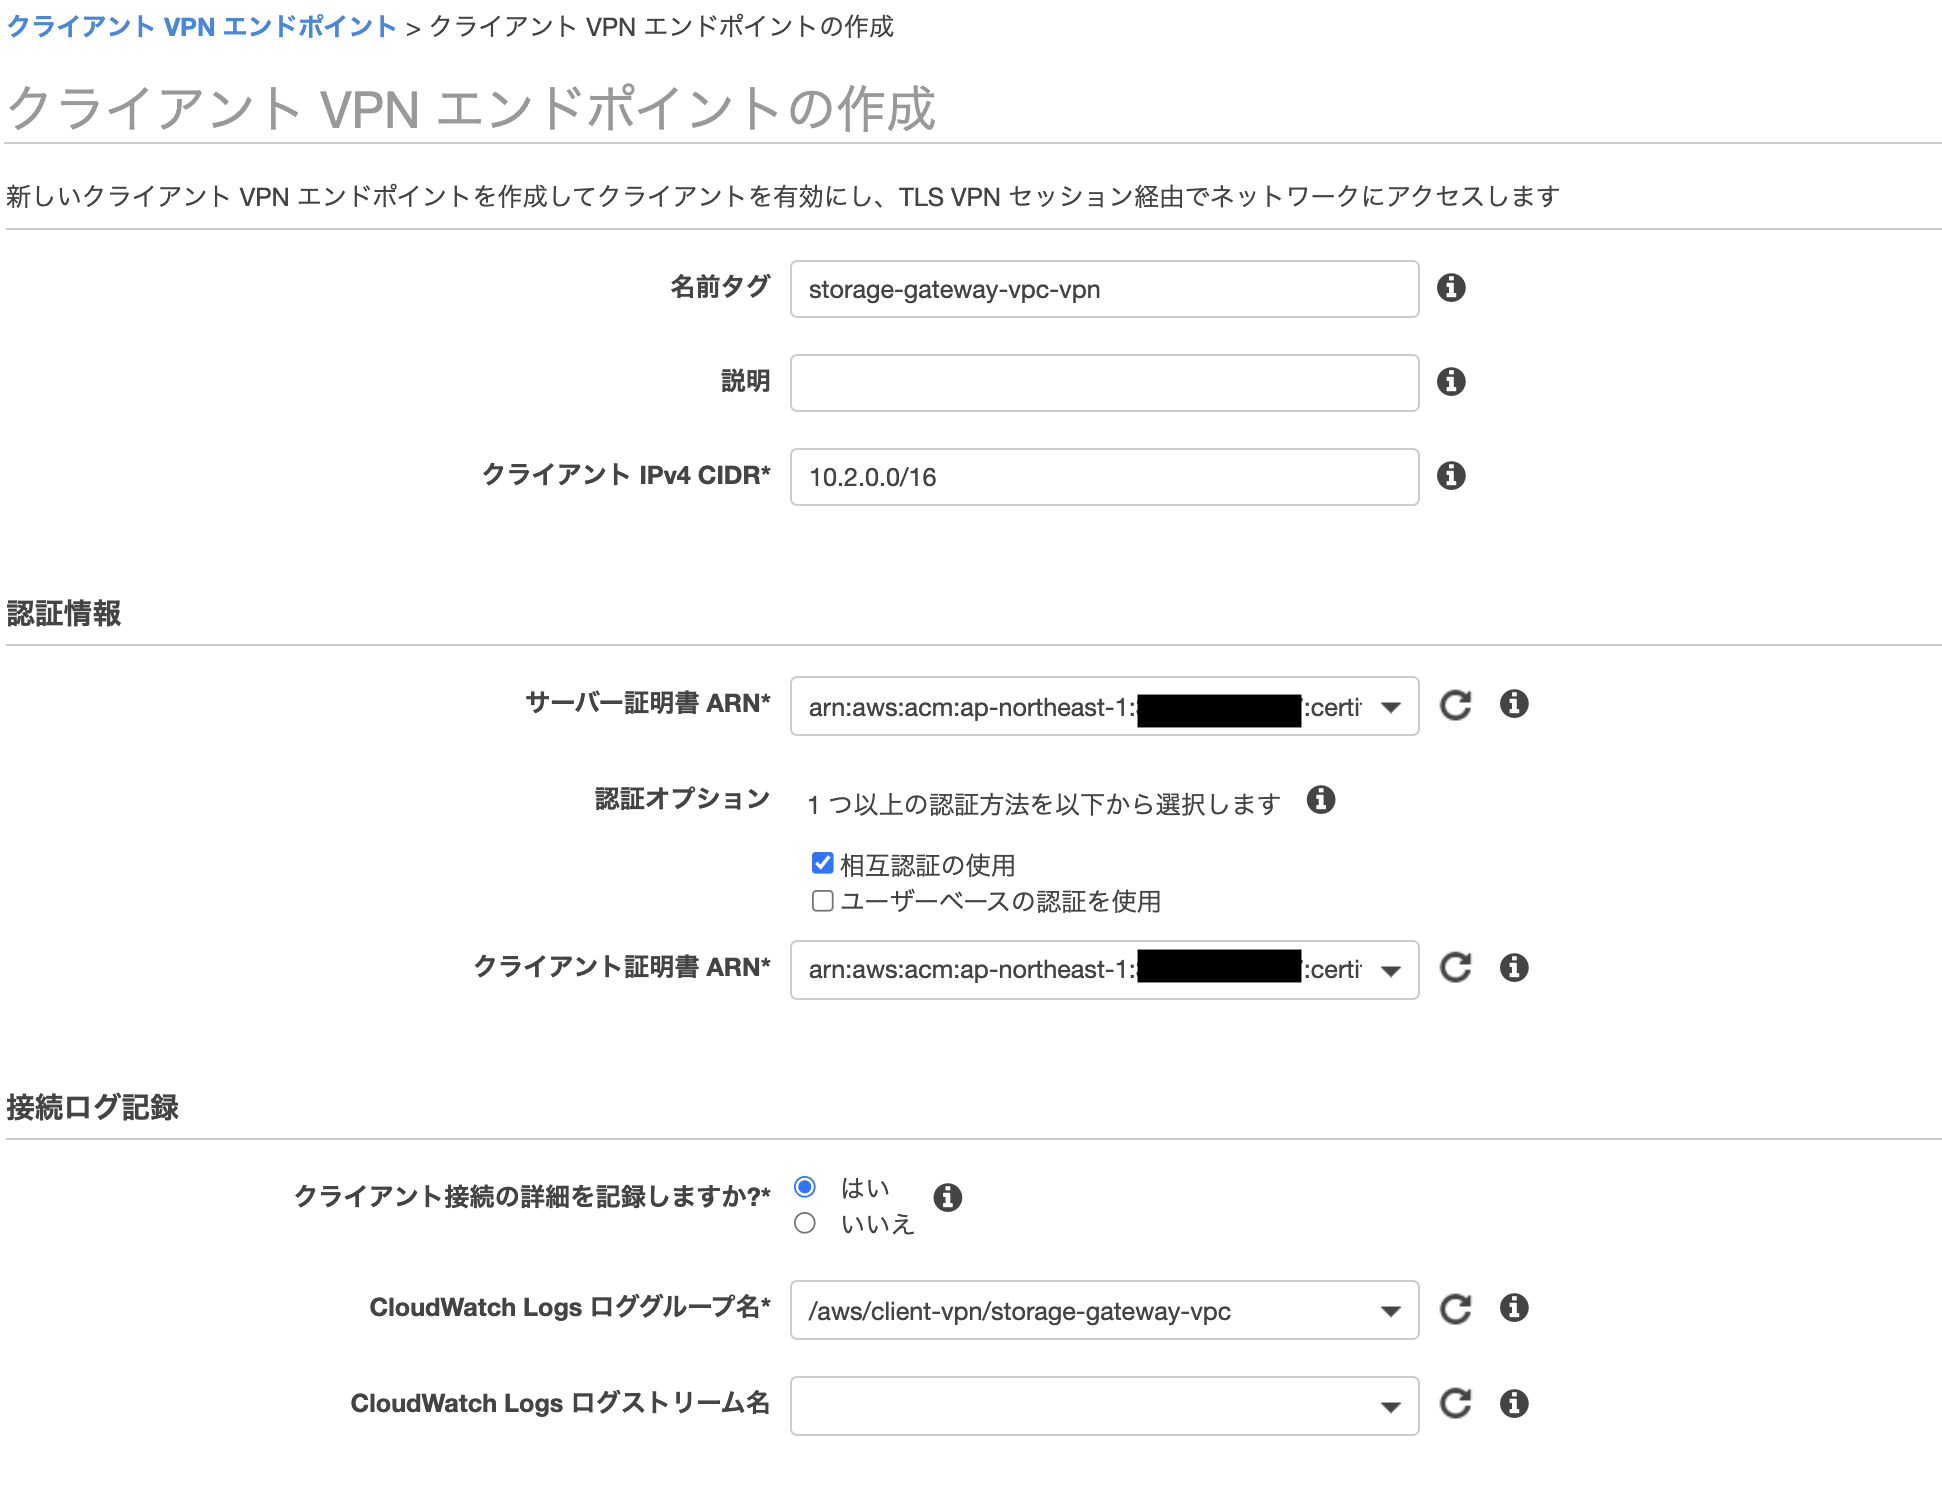
DNSサーバーのIPアドレスは10.1.0.2を指定。AmazonProvidedDNSサーバーを指定しています。
AmazonProvidedDNS は、リザーブド IP アドレスで実行中の DNS サーバーにマップされ、VPC IPv4 ネットワークの範囲に 2 をプラスした値です。例えば、10.0.0.0/16 ネットワークの DNS サーバーの位置は 10.0.0.2 となります。
セキュリティグループは、先ほど作成したインバウンドルールがないセキュリティグループを選択。
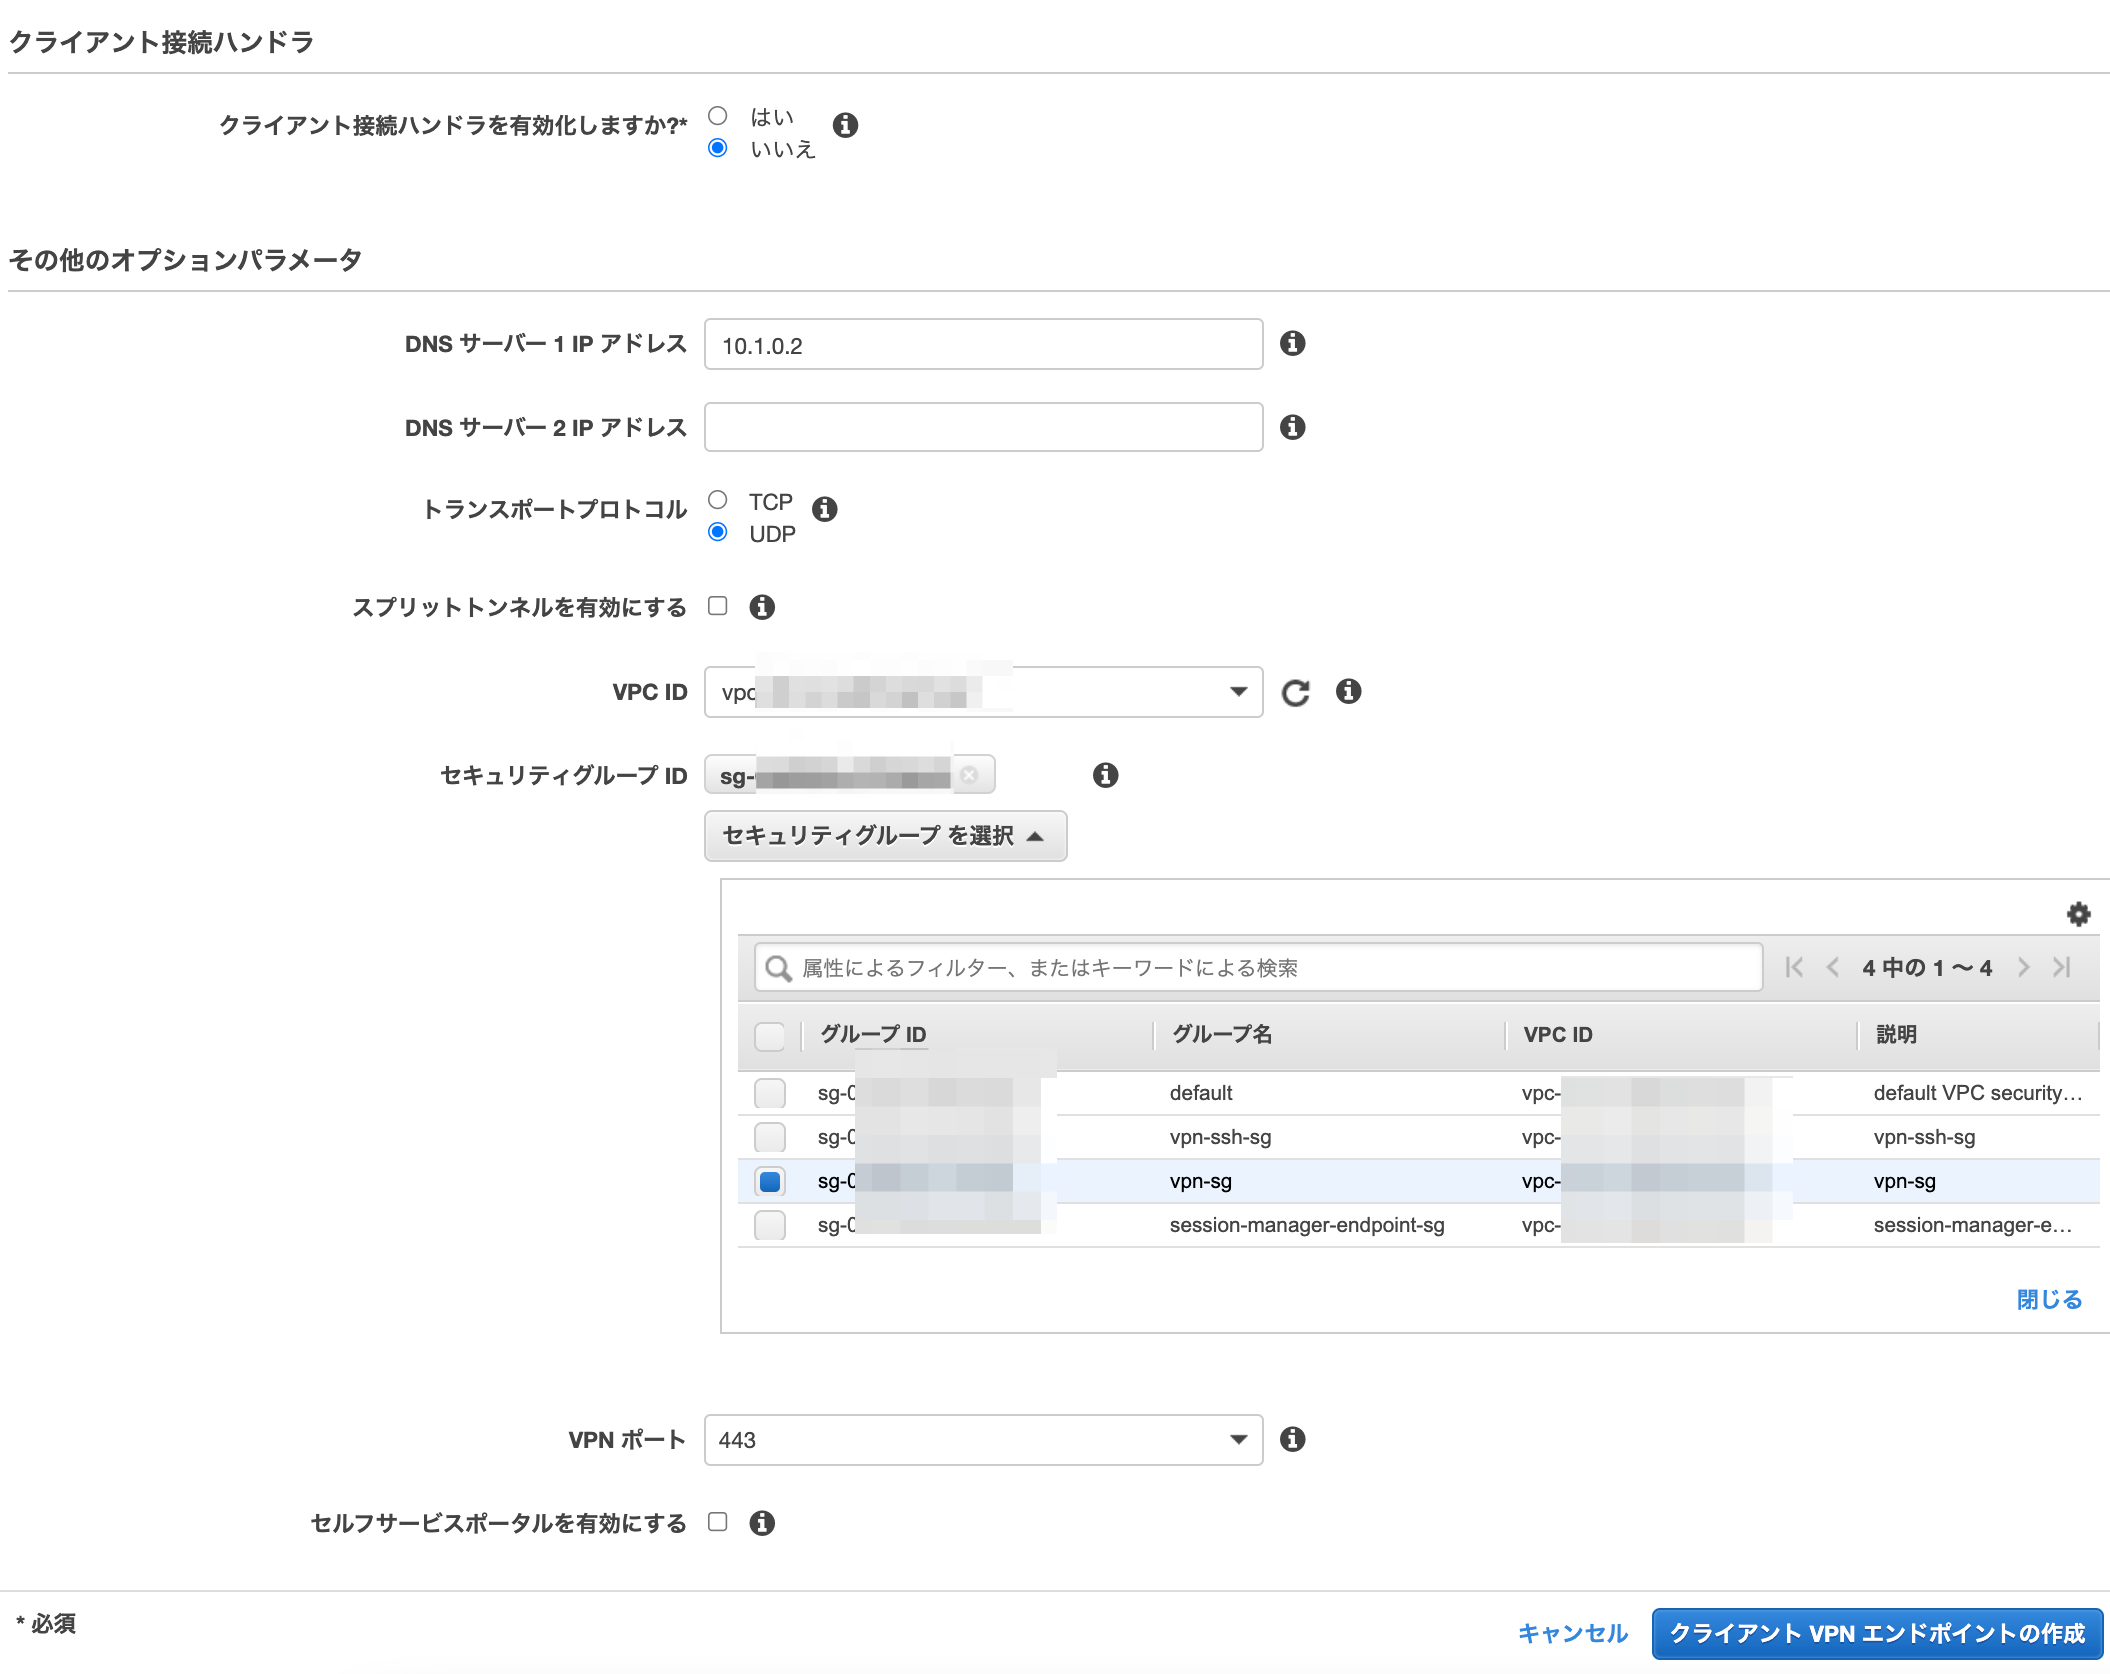
これでエンドポイントの作成は終了です。
しかし、今までの設定だけでは接続できないので、以下の設定等を行います。
- ターゲットネットワークの関連付け
- 承認ルール設定
- クライアントVPNエンドポイント設定ファイルをダウンロード
- AWS提供のクライアントを使用して接続
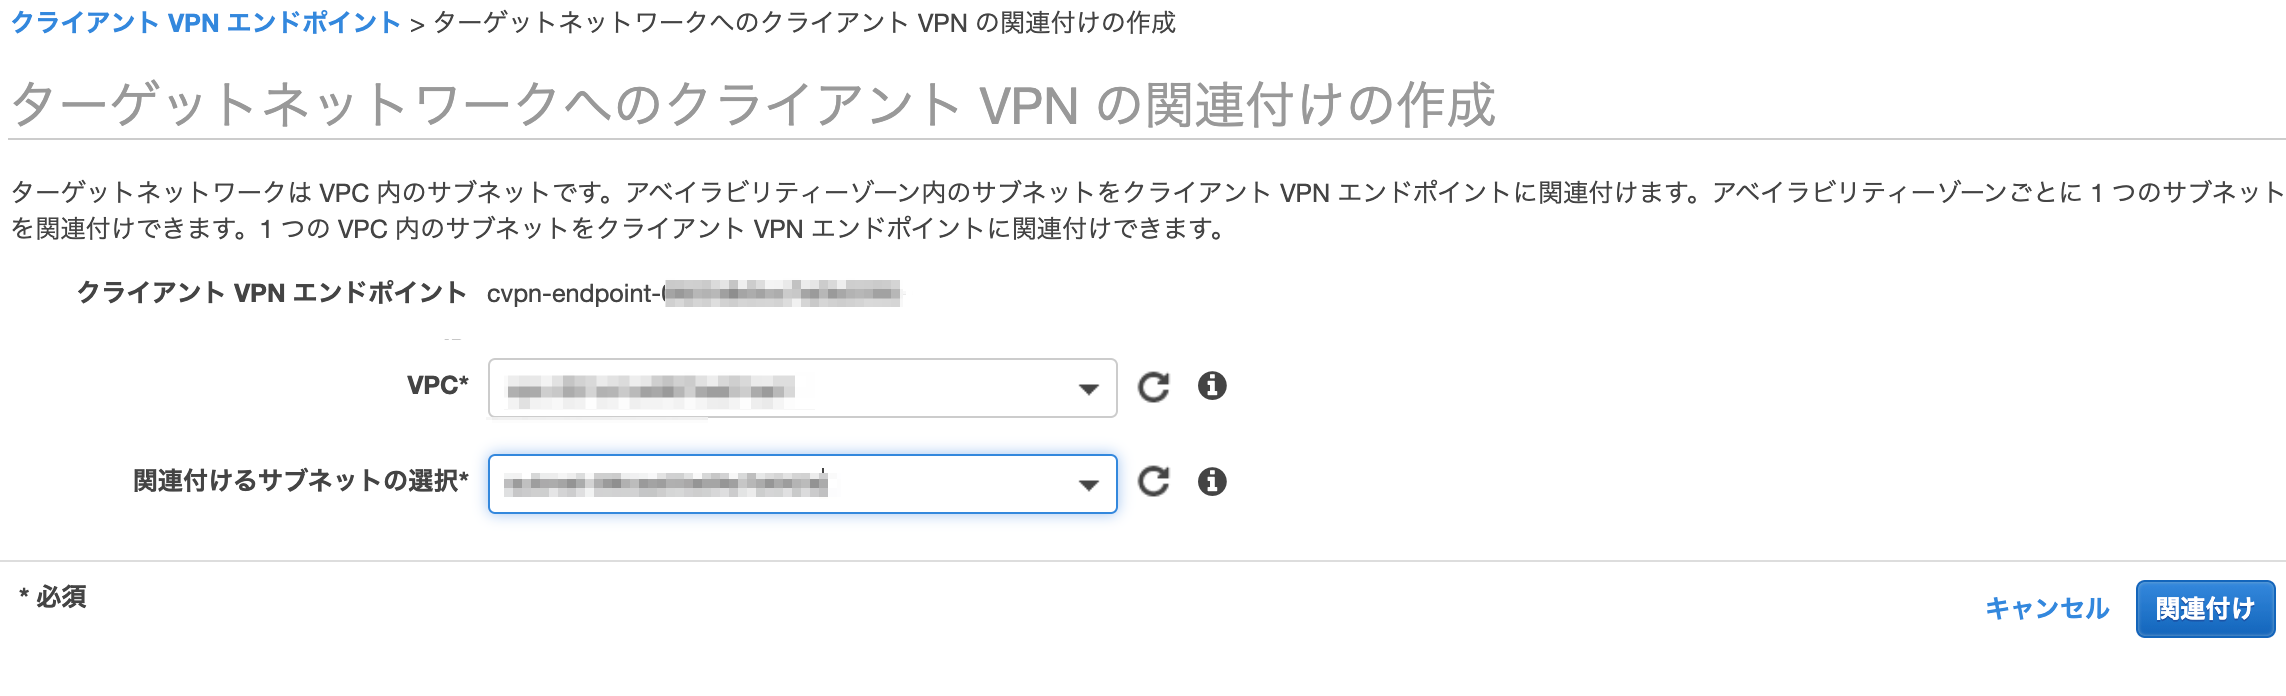
ターゲットネットワークの関連付け
サブネットをクライアントVPNエンドポイントに関連付けます。
- サブネットは少なくとも /27 が必要
- クライアントVPNエンドポイントのCIDR範囲と重複しない
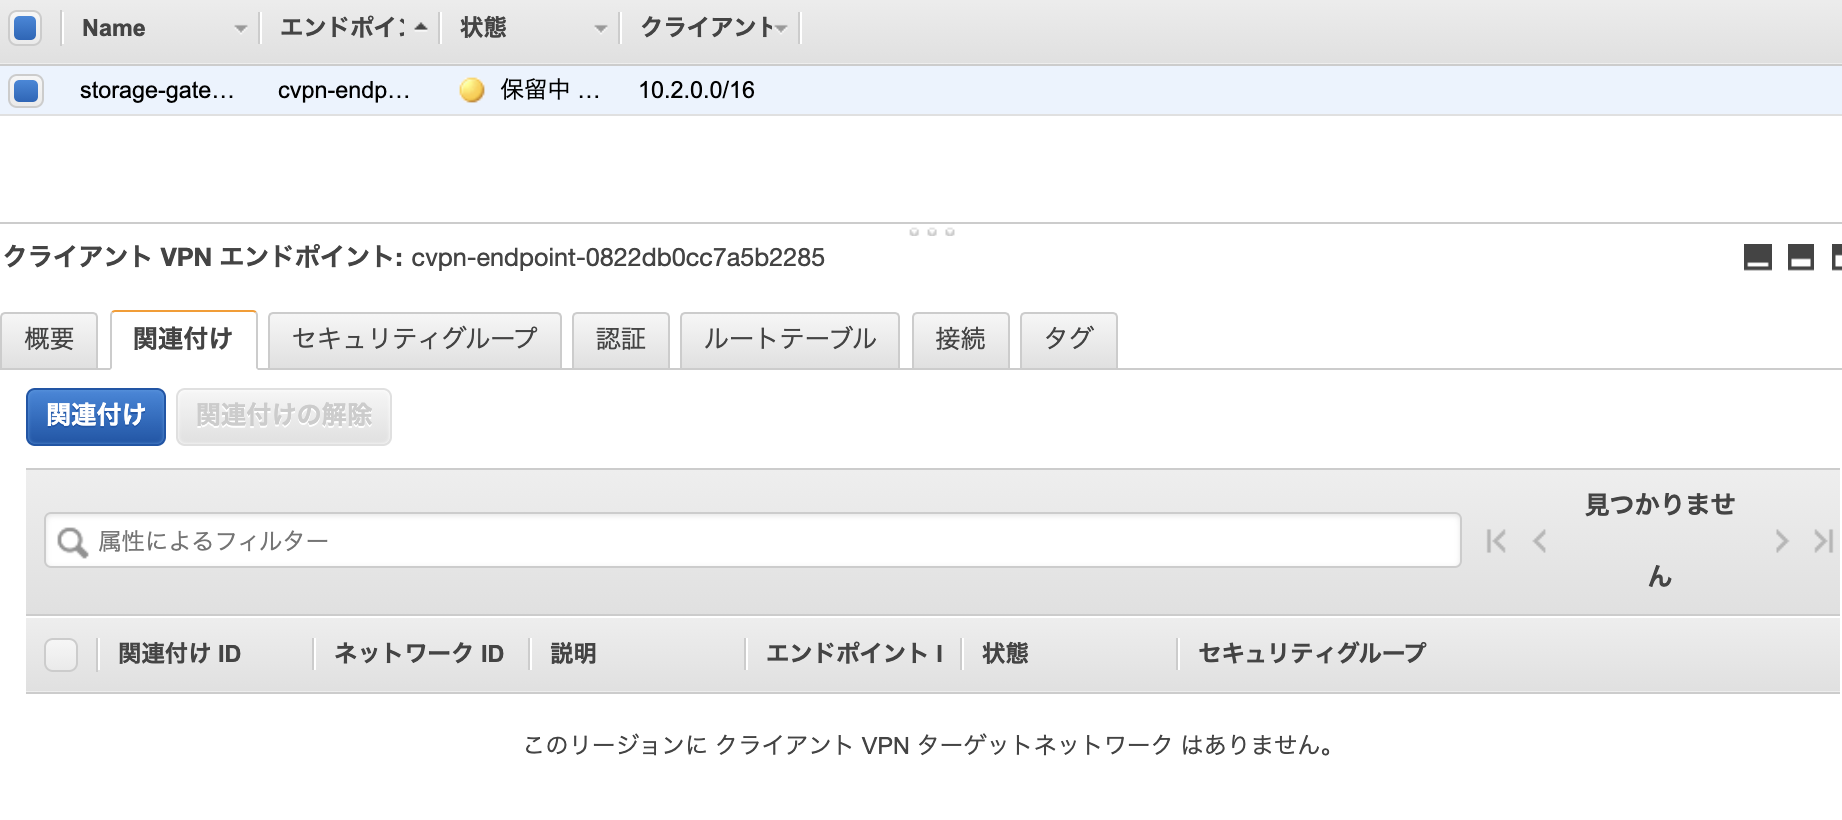
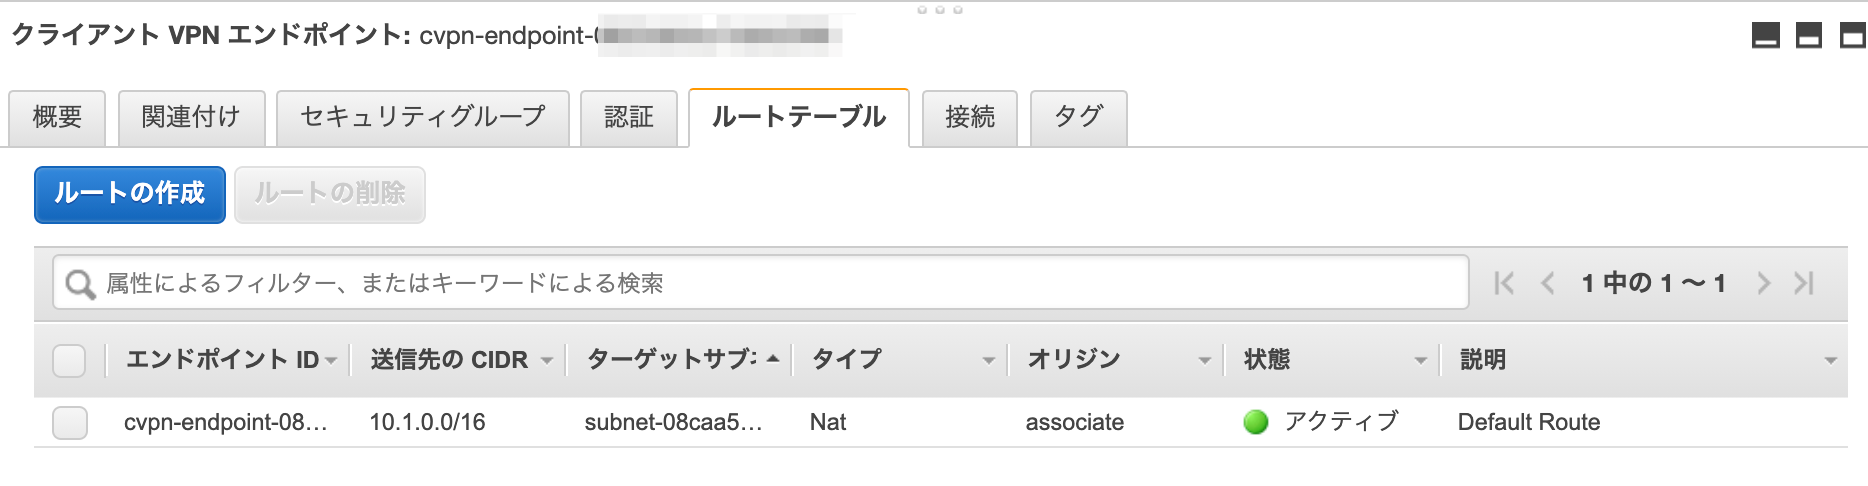
関連付けるとクライアントVPNのルートテーブルにも反映されます。
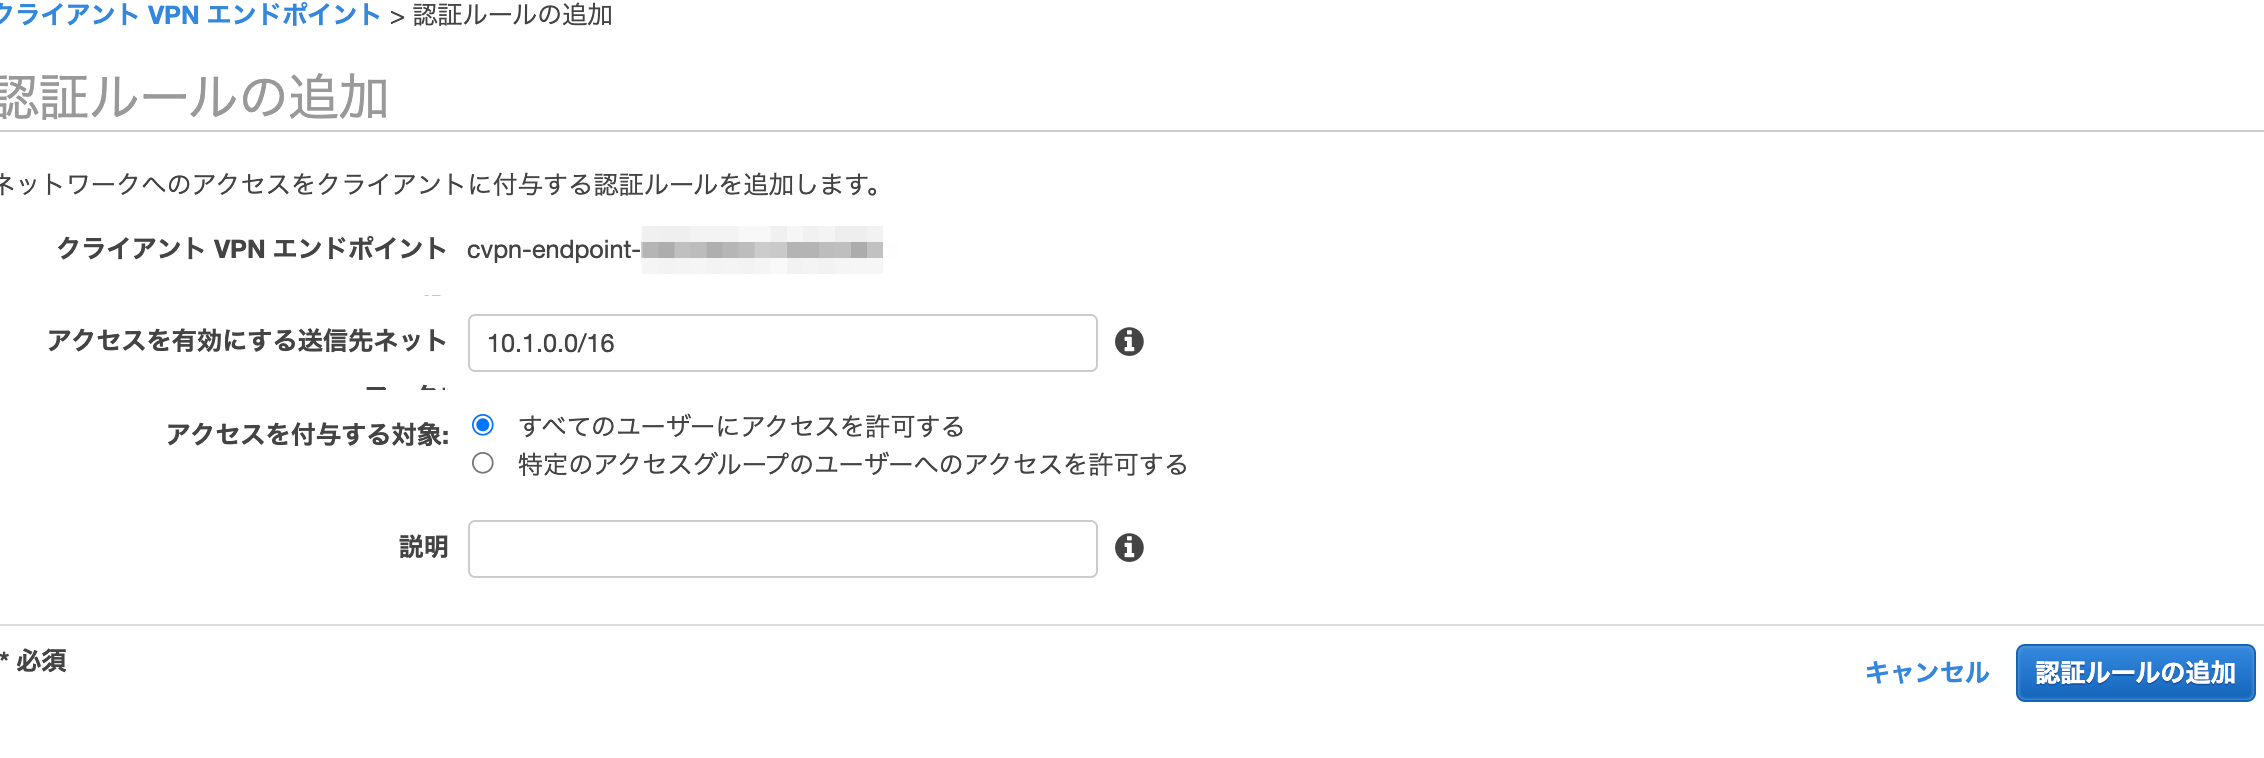
認証ルールの追加
特定のネットワークへのアクセスを付与。
今回はVPC内へのアクセスを付与したいため、VPCのCIDRを指定。
設定ファイルのダウンロード
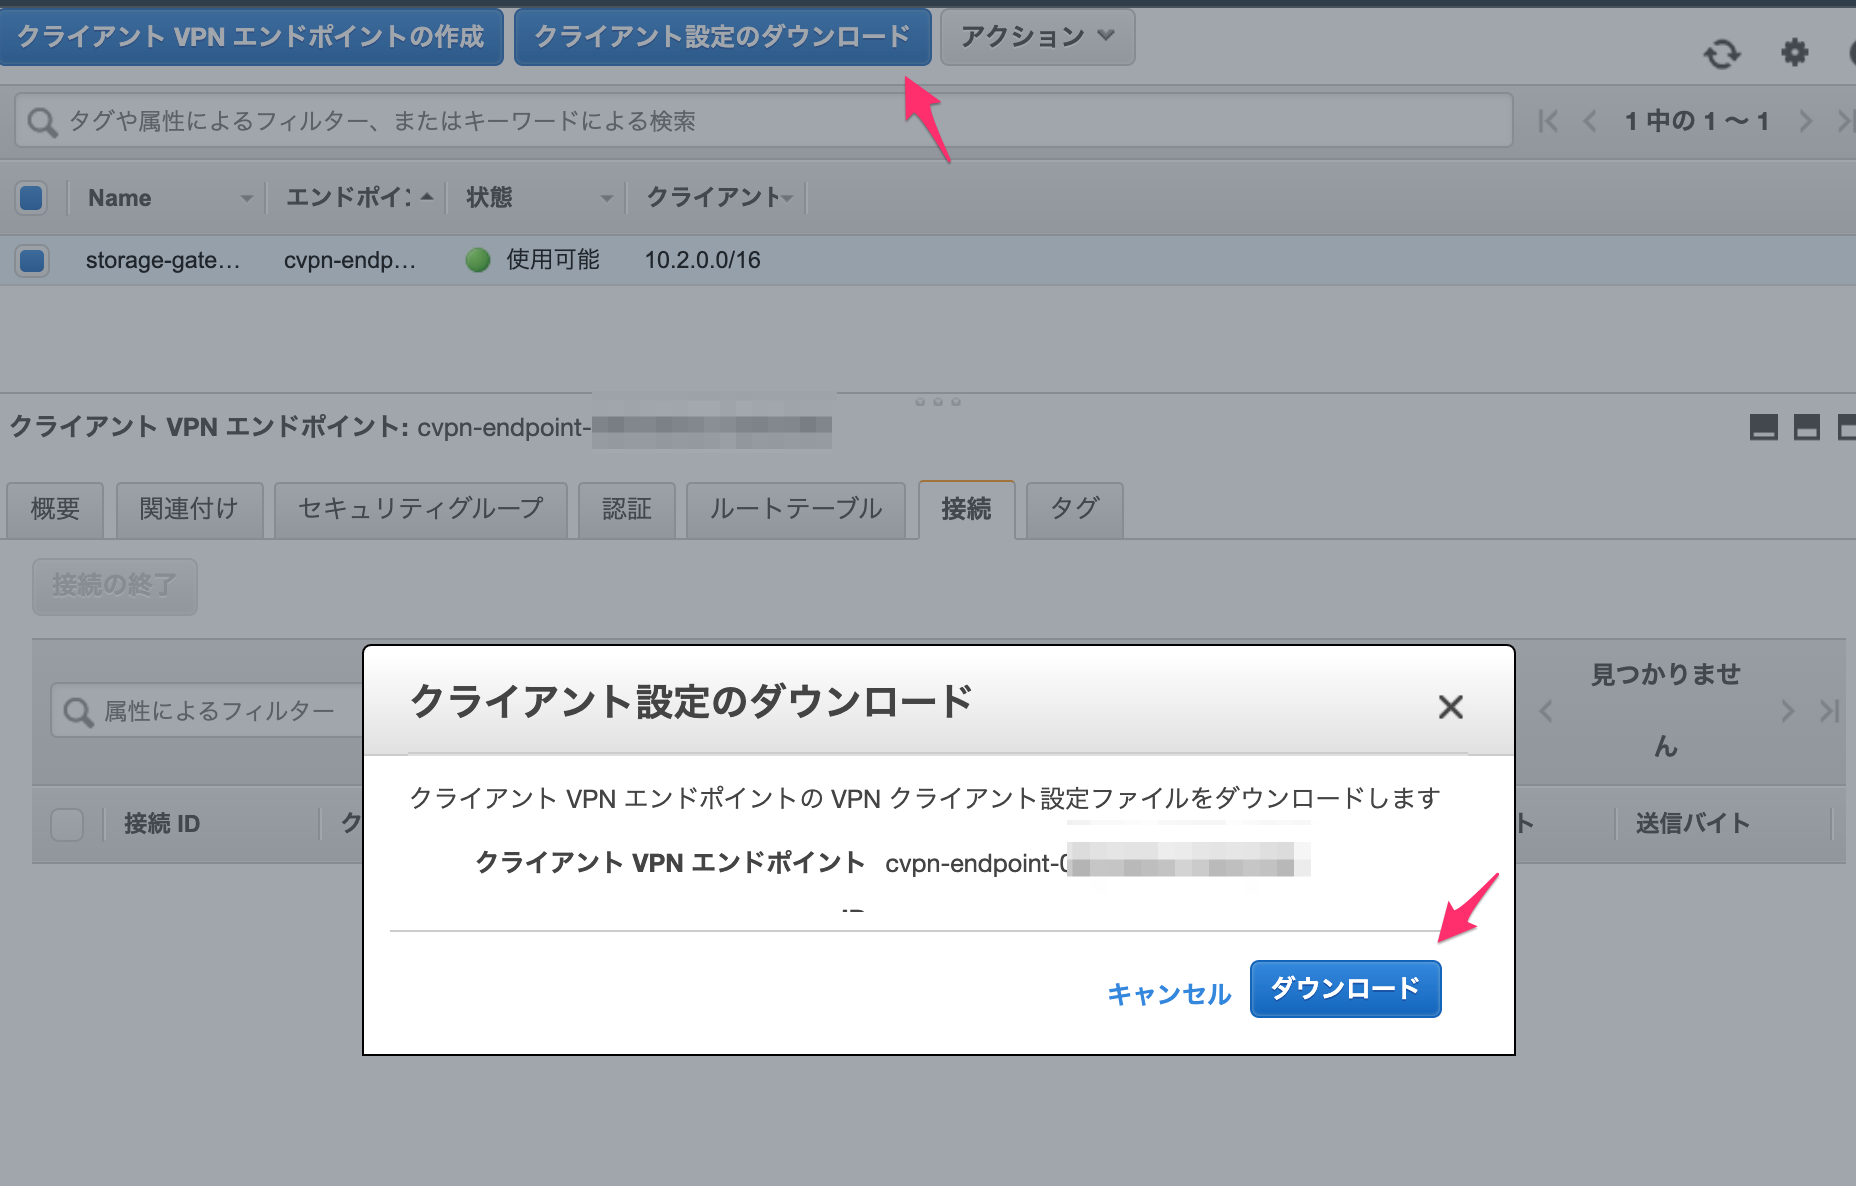
今回は相互認証を利用するので、ダウンロードした設定ファイルにクライアント証明書とクライアントプライベートキーを追加。
以下のcaは既に記載されているので、certとkeyを追加する。
~/aws/cetificate/client1.domain.tld.crtの-----BEGIN CERTIFICATE-----から-----END CERTIFICATE-----までを、~/aws/cetificate/client1.domain.tld.keyの-----BEGIN PRIVATE KEY-----から-----END PRIVATE KEY-----までをそれぞれ含めて追記。
また、remoteの行にクライアントVPNエンドポイントのDNS名を指定していますが、VPN接続時にDNS名を解決できないエラーが発生するので、こちらのDNS名の先頭にランダムな文字列を追加します。
random_stringと記載されている箇所はランダムな文字列にしてます。
client
dev tun
proto udp
remote random_string.cvpn-endpoint-0011abcabcabcabc1.prod.clientvpn.eu-west-2.amazonaws.com 443
remote-random-hostname
resolv-retry infinite
nobind
persist-key
persist-tun
remote-cert-tls server
cipher AES-256-GCM
verb 3

<ca>
Contents of CA
</ca>

<cert>
Contents of client certificate (.crt) file
</cert>

<key>
Contents of private key (.key) file
</key>

reneg-sec 0
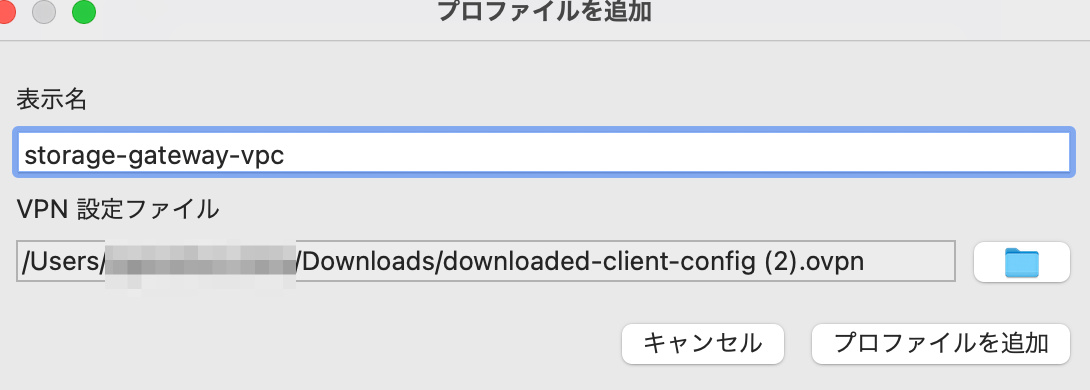
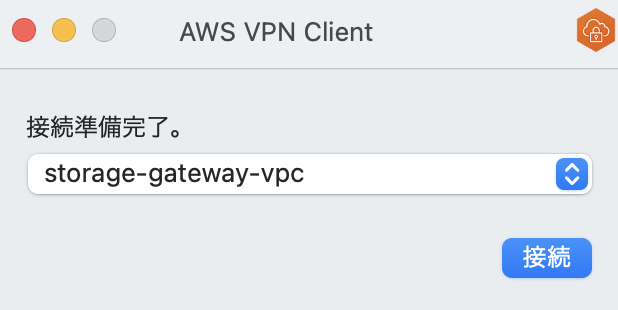
AWS提供のクライアントを使用して接続
こちらからダウンロード。
設定ファイルを使用してプロファイルを追加。
SSH接続
VPN接続できているか確認するため、今回接続するVPCにEC2インスタンスを建て、プライベートIPアドレスでSSH接続してみます。
EC2のセキュリティグループでは、クライアントVPNエンドポイントのENIのセキュリティグループからのsshを許可します。
EC2の作成方法は省略。

VPN接続開始。
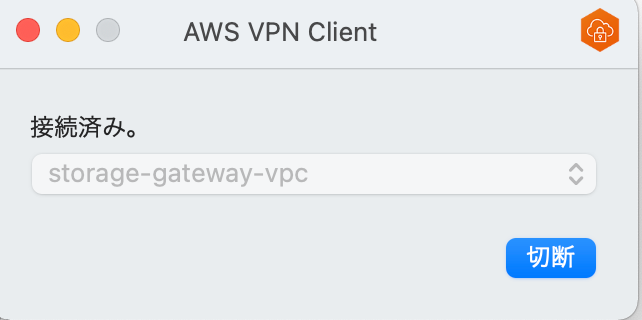
ssh接続成功。
[21-10-16 0:57 ~]# ssh -i KeyPair.pem ec2-user@10.1.0.206
The authenticity of host '10.1.0.206 (10.1.0.206)' can't be established.
ECDSA key fingerprint is SHA256:
Are you sure you want to continue connecting (yes/no/[fingerprint])? yes
Warning: Permanently added '10.1.0.206' (ECDSA) to the list of known hosts.

       __|  __|_  )
       _|  (     /   Amazon Linux 2 AMI
      ___|\___|___|

https://aws.amazon.com/amazon-linux-2/
3 package(s) needed for security, out of 15 available
Run "sudo yum update" to apply all updates.
[ec2-user@ip-10-1-0-206 ~]$ pwd
/home/ec2-user
カスタムDNSサーバを設定しているので、ec2-user@10.1.0.206ではなく、プライベートDNSのec2-user@ip-10-1-0-206.ap-northeast-1.compute.internalでも接続可能です。
カスタムDNSサーバを設定していない場合、ssh: Could not resolve hostname ip-10-1-0-206.ap-northeast-1.compute.internal: nodename nor servname provided, or not knownというエラーが発生しました。
Session Manager接続
今度はSession Managerで接続を試すので、一旦VPNは切断します。
以下構成図の通信の矢印は以下公式ドキュメント及びVPCフローログを参考に作成したものですが、正確さは保証しません(VPCフローログの有効化手順や見方については本記事では説明していません。)。
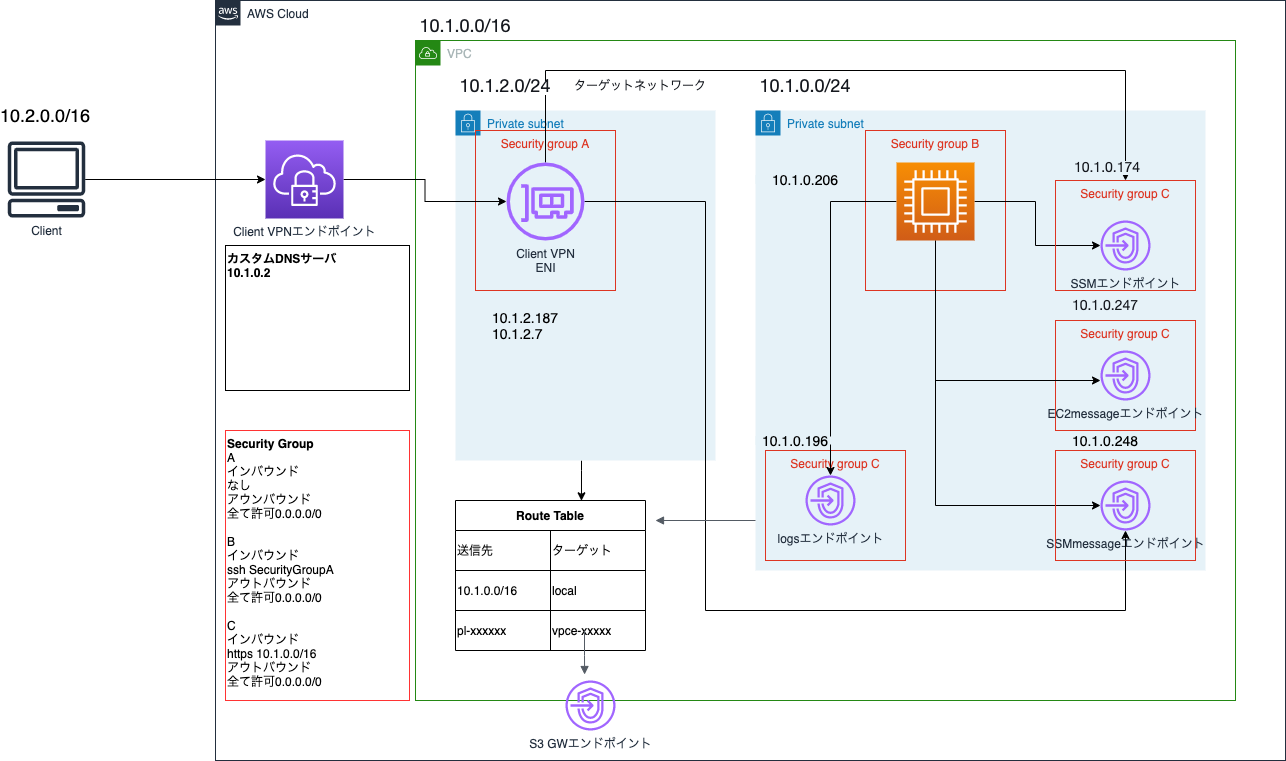
VPCエンドポイント作成
接続先のVPCにはインターネットゲートウェイが存在しないため、Session Manager接続に必要なエンドポイントを用意します。
私のSession Managerの設定ではログを有効化しているので、logsとS3のエンドポイントも作成します。
また、Session Managerに必要なSSM,EC2message,SSMmessageのエンドポイントも作成します。
DNS解決ができるように、Private DNS names enabled は true にします。
falseにしてSession Managerで接続しようとすると、名前解決できず接続できません。
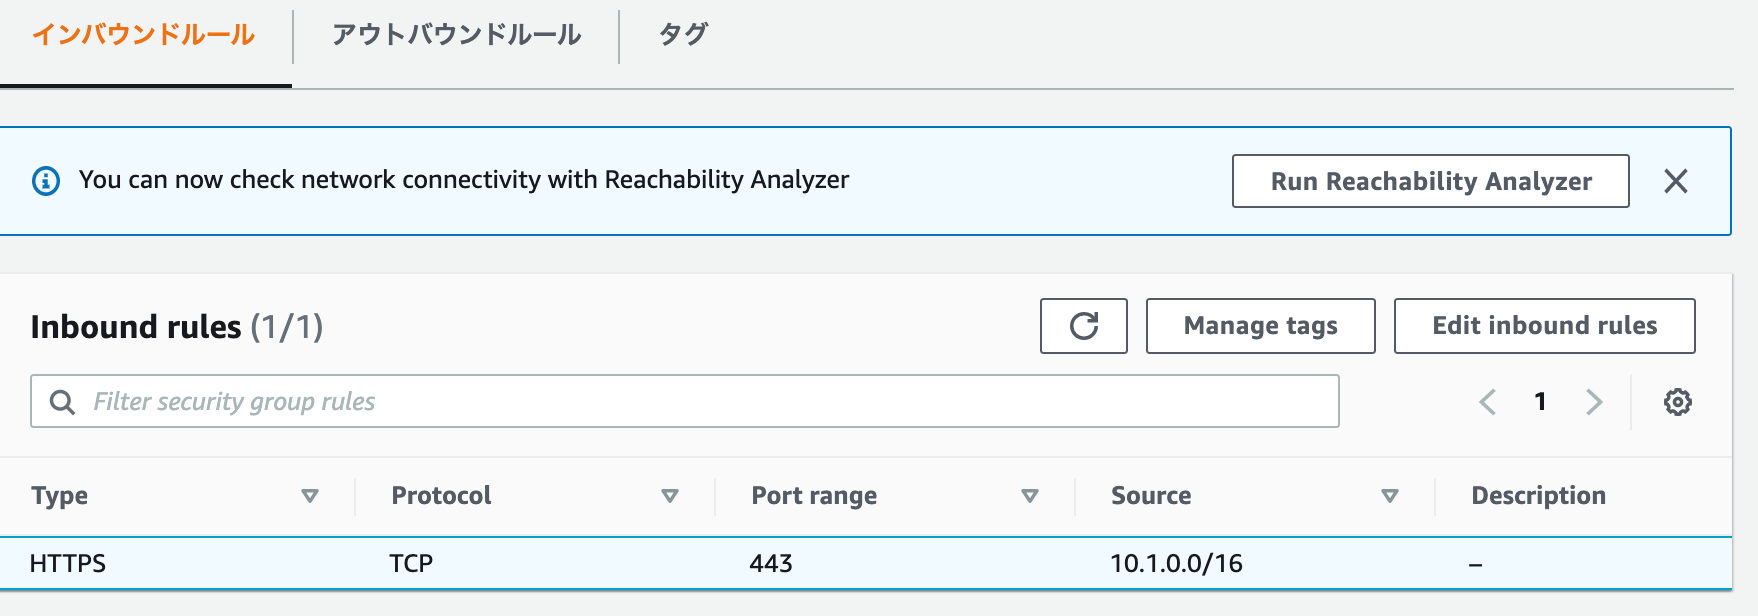
VPCエンドポイントのセキュリティグループは、インバウンドルールで VPC内からの 443 を許可するように設定します。
コンソールからも作成できますが、インターフェース型のエンドポイントはスクリプトで作成しました。
なお、削除はスクリプトからではなくコンソールから行いました。
# ! /bin/bash

endpoint_list=("com.amazonaws.ap-northeast-1.ssm" "com.amazonaws.ap-northeast-1.ssmmessages" "com.amazonaws.ap-northeast-1.ec2messages
" "com.amazonaws.ap-northeast-1.logs")

vpc="vpcID"

subnet="subnetId"

security_group="sgId"


for endpoint in ${endpoint_list[@]};
do
    aws ec2 create-vpc-endpoint --vpc-endpoint-type Interface --vpc-id $vpc --service-name $endpoint --subnet-ids $subnet --security-group-ids $security_group --profile $1
done
S3は無料のゲートウェイ型を使用しますが、作成手順は省略します。
インスタンスへのIAMロールアタッチ
インスタンスにIAMロールをアタッチします。
IAMロールには、AmazonEC2RoleforSSMというAWS管理ポリシーを付けています。
接続
Session Managerで接続します。
[21-10-16 1:55 ~]# aws ssm start-session --target ixxxxxxx

Starting session with SessionId: xxxxxx-xxxxxxx
sh-4.2$
なお、logsのエンドポイントがない状態で接続すると以下のようになりました。
Starting session with SessionId: xxxxxxxxx-xxxx


Exiting session with sessionId: xxxxxxxxxx-xxxx.
まとめ
インターネットゲートウェイがないプライベートなVPCにVPN接続し、SSH接続、SessionManager接続を行いました。
普段あまり気にしないVPC内のDNSについて、どのような構成であればDNSの有効化が必要か、少し理解できた気がします。
個人的にはAWSのクライアントVPNでVPN接続する際、ネームサーバの設定が変更されていたので驚きました(カスタムDNSを設定した場合)。
通常の設定
[21-10-16 20:11]# cat /etc/resolv.conf | grep nameserver
nameserver 2001:xx:xx:xx:xx:xxxx:xx:xx
nameserver 192.168.10.1
VPN接続時の設定
[21-10-16 20:10]# cat /etc/resolv.conf | grep nameserver
nameserver 10.1.0.2
クライアントVPNのDNSについてはこちらをどうぞ。