この記事は、株式会社エイチームフィナジー の Advent Calendar 2020 20日目の記事です。
本日は、ナビナビ証券の開発に携わっている@kazenomachiが担当します。
はじめに
2020年12月。
季節は冬、人々の不安を煽るCOVID-19、むやみに外出もできない世の中…
あったかいおふとん ![]() から出ない生活を夢見た私は、ブラックフライデーセールでXGIMI Haloというプロジェクターを買いました
から出ない生活を夢見た私は、ブラックフライデーセールでXGIMI Haloというプロジェクターを買いました ![]()
XGIMI HaloにはAndroid TVが搭載されており、何も接続しなくても様々なアプリで動画や音楽を再生でき、とても便利です。
動画を映すだけでも十分に便利で楽しいのですが、合間に天気や予定を確認するのに、毎回おふとん ![]() から腕を出してスマホを手に取るのは煩わしいなと感じました。
から腕を出してスマホを手に取るのは煩わしいなと感じました。
そこで、時計などのダッシュボードを表示するAndroid TVアプリを作りたいと思ったので自分で開発をしてみました。
Androidアプリを作ったことのない私が、どのように開発を進めたかを書き記したいと思います。
今回作ったもの
時計、現在の天気、今日の予定一覧を表示するダッシュボードを作りました。
一枚の画面に情報を表示するだけのとてもシンプルなアプリです。
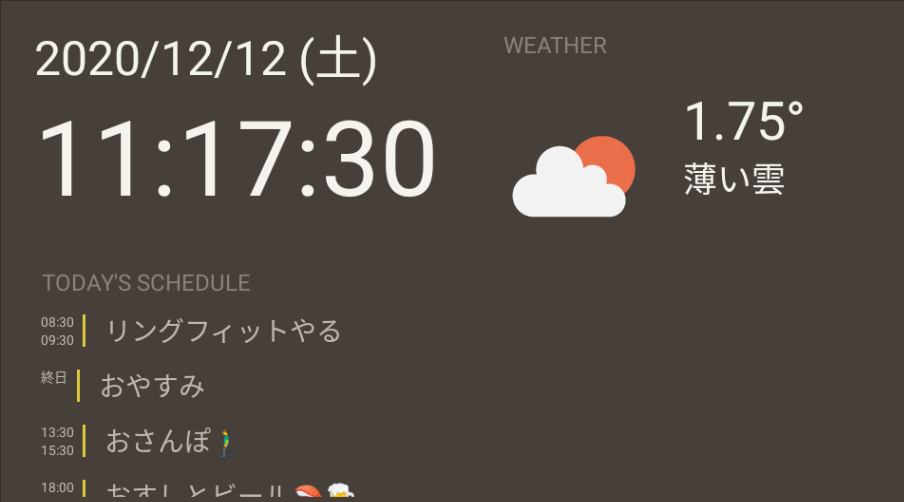
実際にスクリーンに映すとこんな感じです!
(およそ90インチの大画面に映っています)
今回書いたソースコードはGitHubに公開しています。
開発準備
以下の環境で開発を行います。
Android Studioのインストール方法は別の記事に書きました。
ChromebookにAndroid Studioをインストールして日本語化する
開発環境
- Pixelbook Go (Core i5)
- Chrome OS (86.0.4240.199)
- Linuxインストール済み (Debian GNU/Linux 10 (buster))
- Android Studio (4.1.1 for Chrome OS)
プロジェクトを作成し、画面を表示する
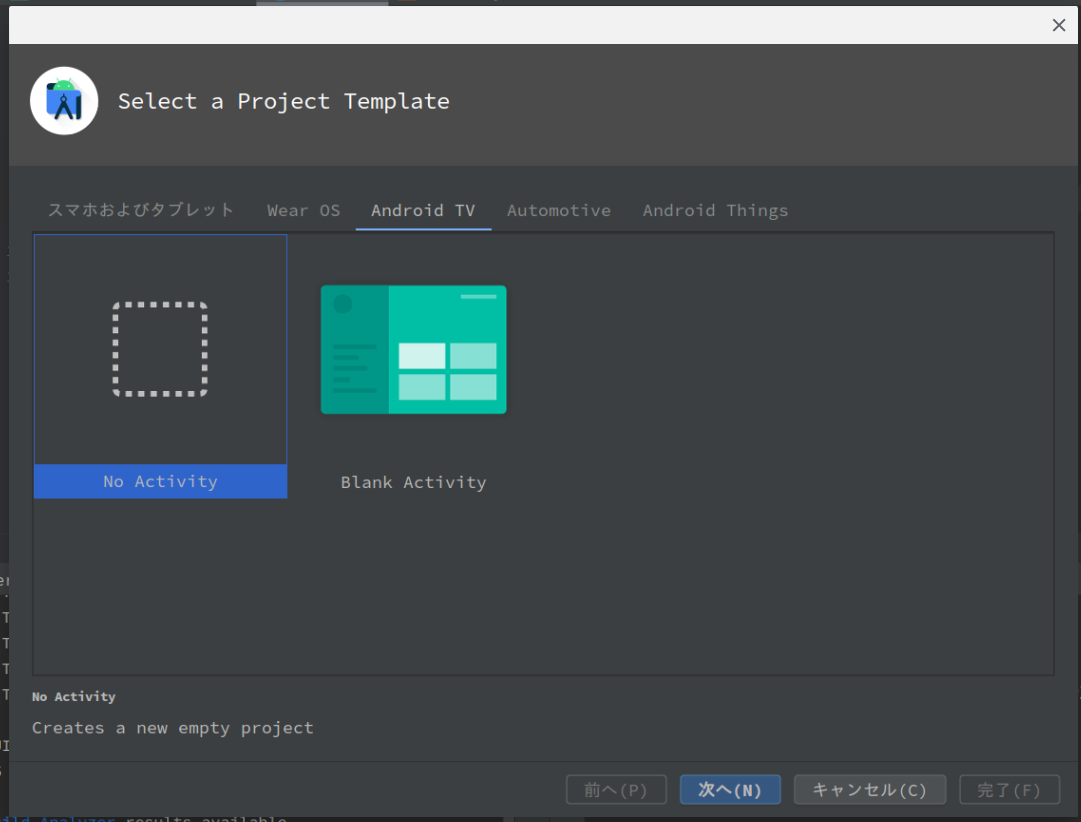
Android Studioを開いて、プロジェクトを作成します。
プロジェクトのテンプレートで、「Android TV」タブの「No Activity」を選択します。
(Blank Activityも選択してみましたが、最初から多くの画面がありリッチな感じで私には難しくて諦めました)
(日本語化したら文字化けしてしまいましたが)プロジェクト名や保存先などを指定します。
デフォルトで言語は「Kotlin」SDKは「API 21: Android 5.0 (Lollipop)」が選択されていたので、そのまま「完了」を押下してみました。

(余談ですが、私のSpotifyのMy Top Songs 2020で宇多田ヒカルの「Time」が3位だったのでTimeにしてみました。いい曲です。)
ここまでできたら、新しいプロジェクトが開きます。
まずは、メイン画面を作成します。
左側のペインで右クリックをして、新規 > アクティビティー > 空のアクティビティー を選択します。
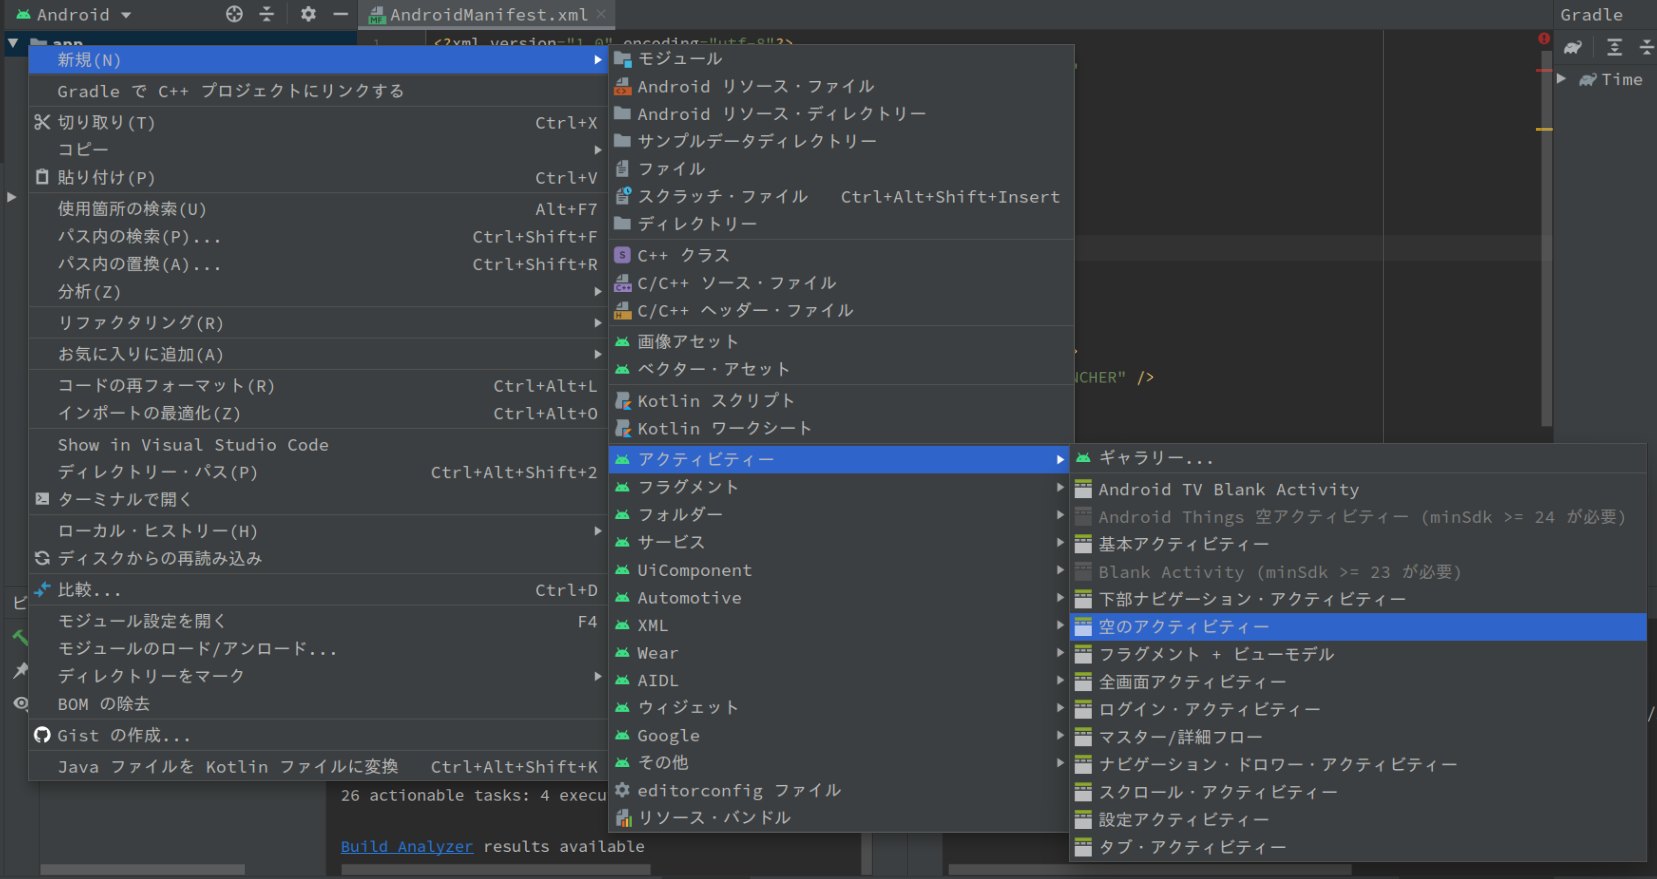
色々ファイルができるので、以下のように編集しました。
(事前にpackage名をcom.example〜からio.github.kazenomachi.timeに変更しています。)
<?xml version="1.0" encoding="utf-8"?>
<manifest xmlns:android="http://schemas.android.com/apk/res/android"
    package="io.github.kazenomachi.time">

    <application
        android:allowBackup="true"
        android:icon="@mipmap/ic_launcher"
        android:label="@string/app_name"
        android:supportsRtl="true"
        android:theme="@style/Theme.Time">
        <activity android:name=".TimeActivity">
            <!-- intent-filterを追加 -->
            <intent-filter>
                <action android:name="android.intent.action.MAIN" />
                <category android:name="android.intent.category.LAUNCHER" />
            </intent-filter>
        </activity>
    </application>

</manifest>
package io.github.kazenomachi.time

import android.app.Activity
import android.os.Bundle

class TimeActivity : Activity() {
    override fun onCreate(savedInstanceState: Bundle?) {
        super.onCreate(savedInstanceState)
        setContentView(R.layout.activity_time)
    }
}
<?xml version="1.0" encoding="utf-8"?>
<androidx.constraintlayout.widget.ConstraintLayout xmlns:android="http://schemas.android.com/apk/res/android"
xmlns:app="http://schemas.android.com/apk/res-auto"
xmlns:tools="http://schemas.android.com/tools"
android:layout_width="match_parent"
android:layout_height="match_parent"
tools:context=".TimeActivity">
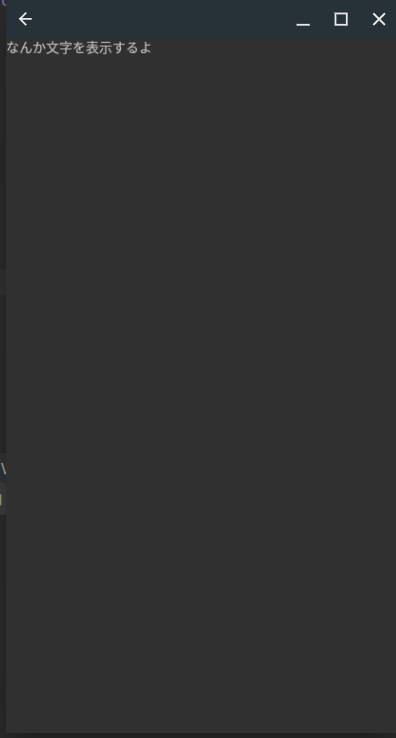
<!-- 文字を表示してみる -->
<TextView
android:id="@+id/textView"
android:layout_width="wrap_content"
android:layout_height="wrap_content"
android:text="なんか文字を表示するよ"
tools:layout_editor_absoluteX="310dp"
tools:layout_editor_absoluteY="164dp" />
</androidx.constraintlayout.widget.ConstraintLayout>
これで早速実行してみましょう。
画面右上で「Virtual Device」を選択して、実行ボタンを押下します。
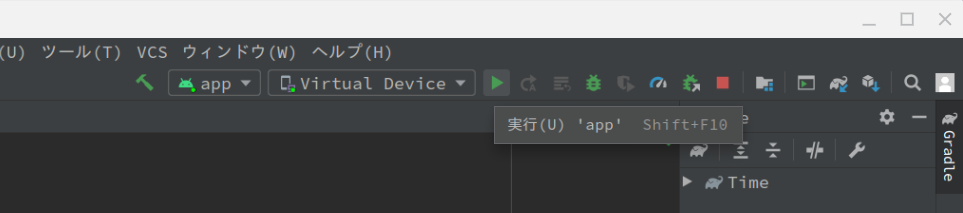
しばらく待ってビルドが完了すると、無事にエミュレータが起動して文字が表示されました!!!わーい
プロジェクターに映して(おふとんから出ずに)デバッグする
せっかくなので、実機を使って(あったかいおふとん ![]() から出ずに)デバッグしてみましょう。
から出ずに)デバッグしてみましょう。
Android TVの開発者向けオプションを設定
以下の通りに実行します。
https://developer.android.com/training/tv/start/start?hl=ja#run
まずは、USBでPCをプロジェクターに接続します。
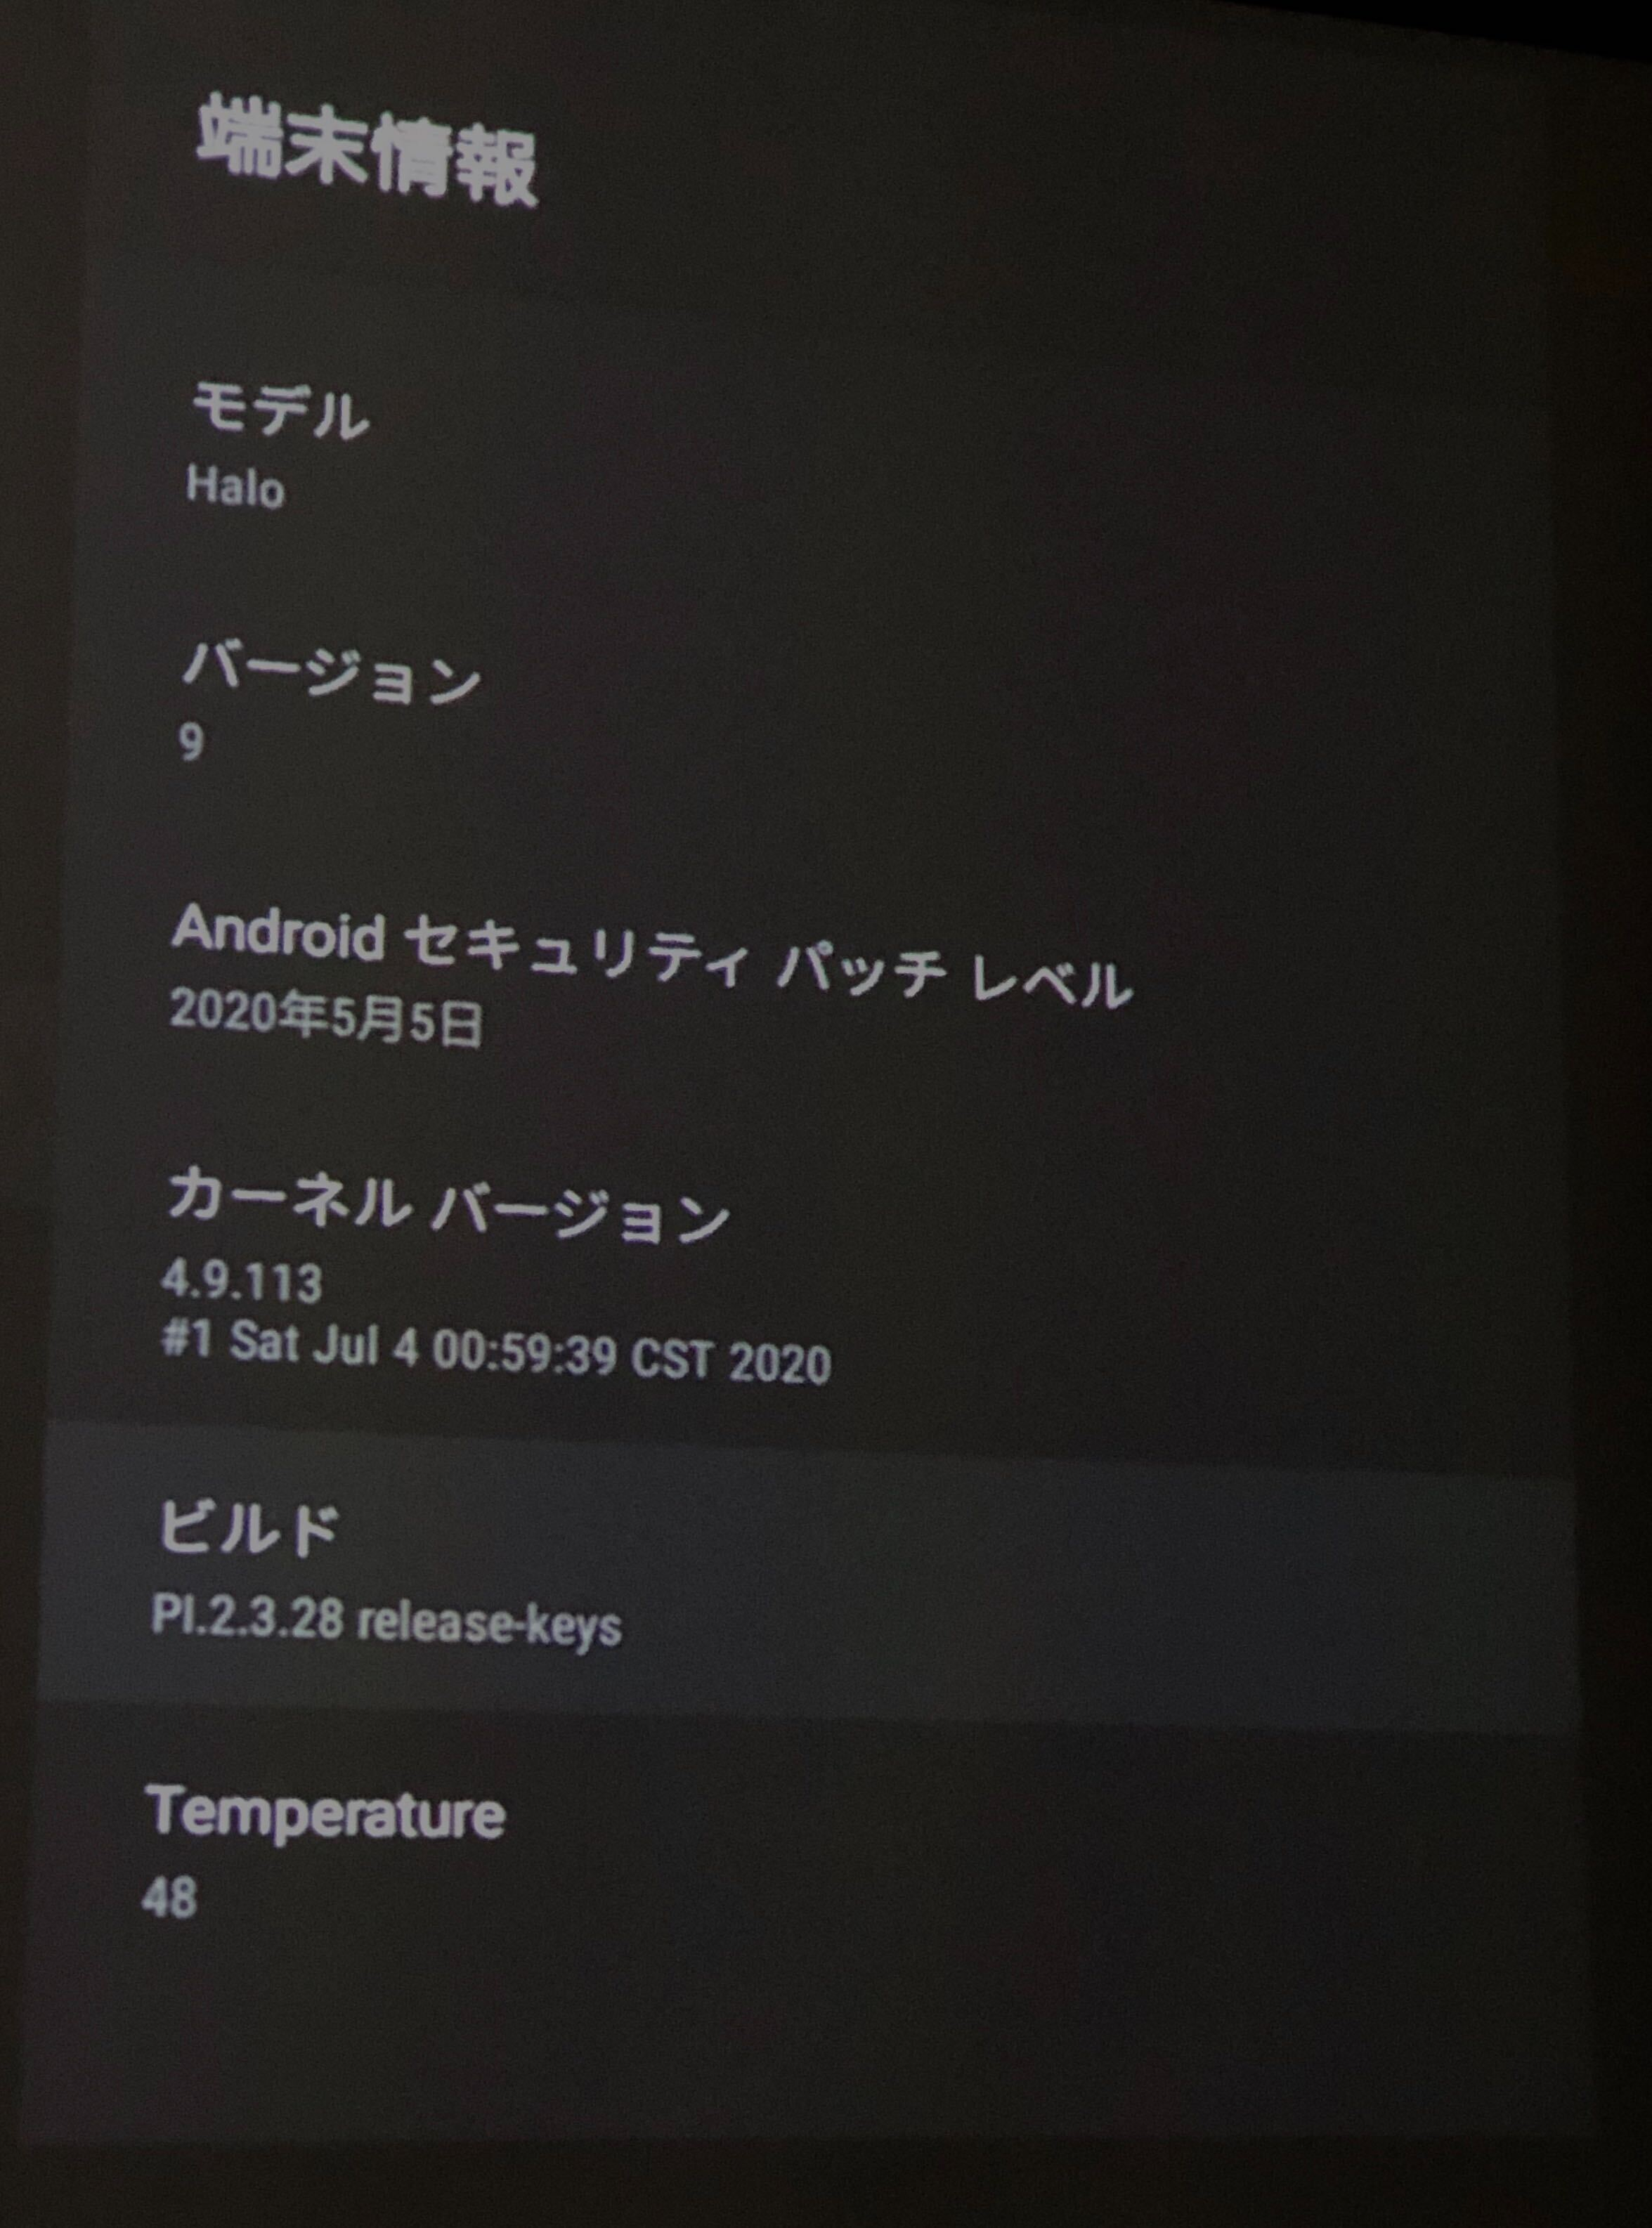
Android TV側で、「設定」を開き、「デバイス設定」を選択します。
「端末情報」を選択し、「ビルド」を連打します。
そのうち「開発者向けオプションが有効になりました」と表示されると思います。
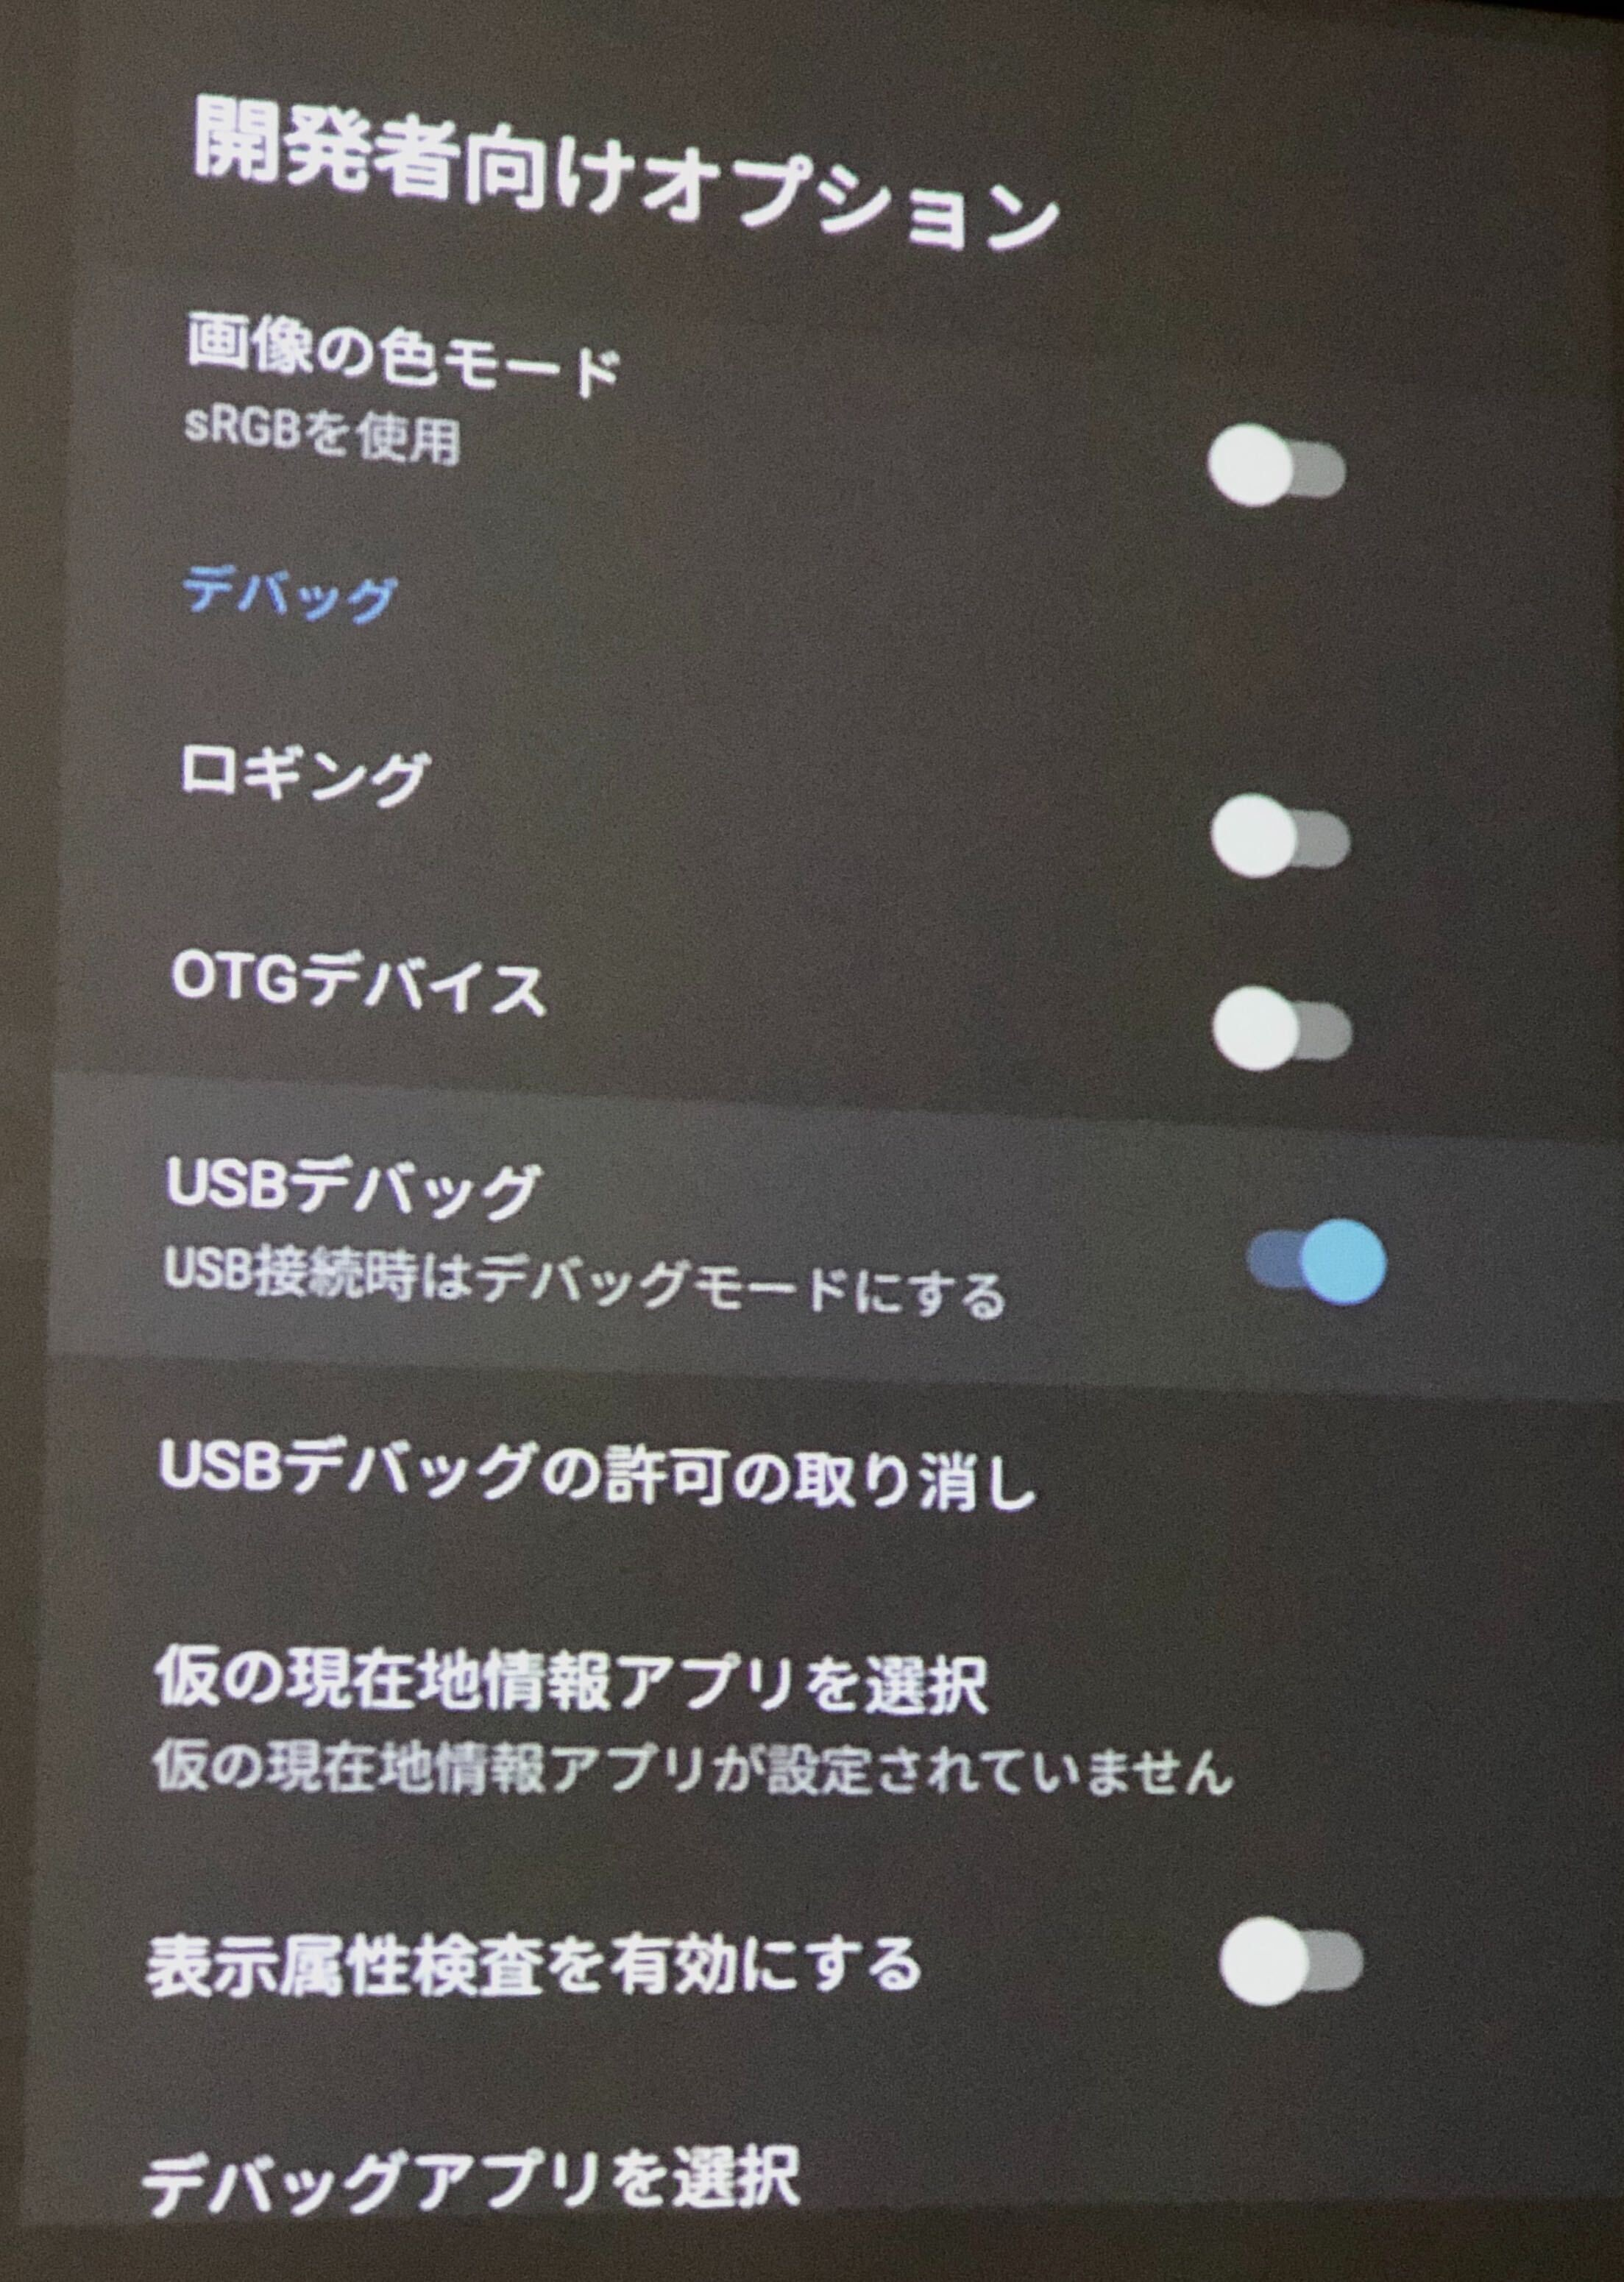
「デバイス設定」に戻って、「開発者向けオプション」を選択し、「デバッグ」項目の「USBデバッグ」を有効にします。
Chrome OSのADBデバッグを有効にする
Chrome OS側で、ADBデバッグを有効にしておく必要があります。
以下に記載の手順でできます。
adbをインストールして、Android TV(実機)に接続する
Chrome OS側で、adbをインストールします。
$ sudo apt install adb
次に、実機のIPアドレスを確認して、接続します。
実機にUSBを接続した状態で、adb connectします。
$ adb connect [実機のIPアドレス]
接続を終了するときは、adb disconnectで切断できます。
$ adb disconnect [実機のIPアドレス]
adb connectした状態で、Android StudioのRunning devicesの選択項目を見ると、実機が選択できるようになっています!
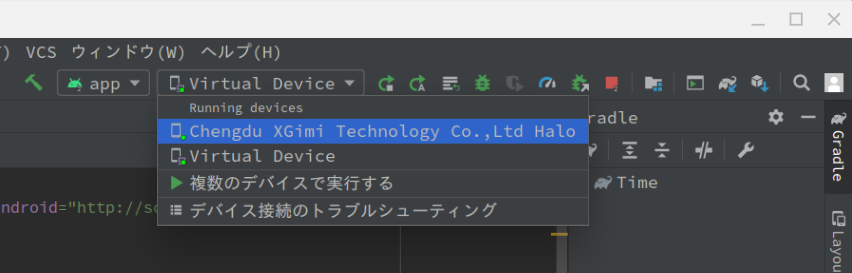
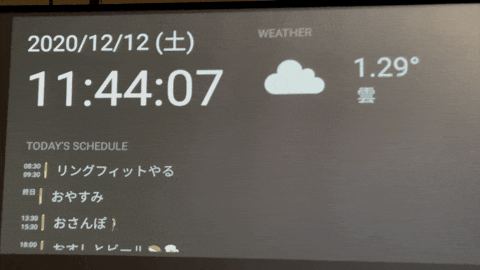
早速、実機で実行してみましょう。
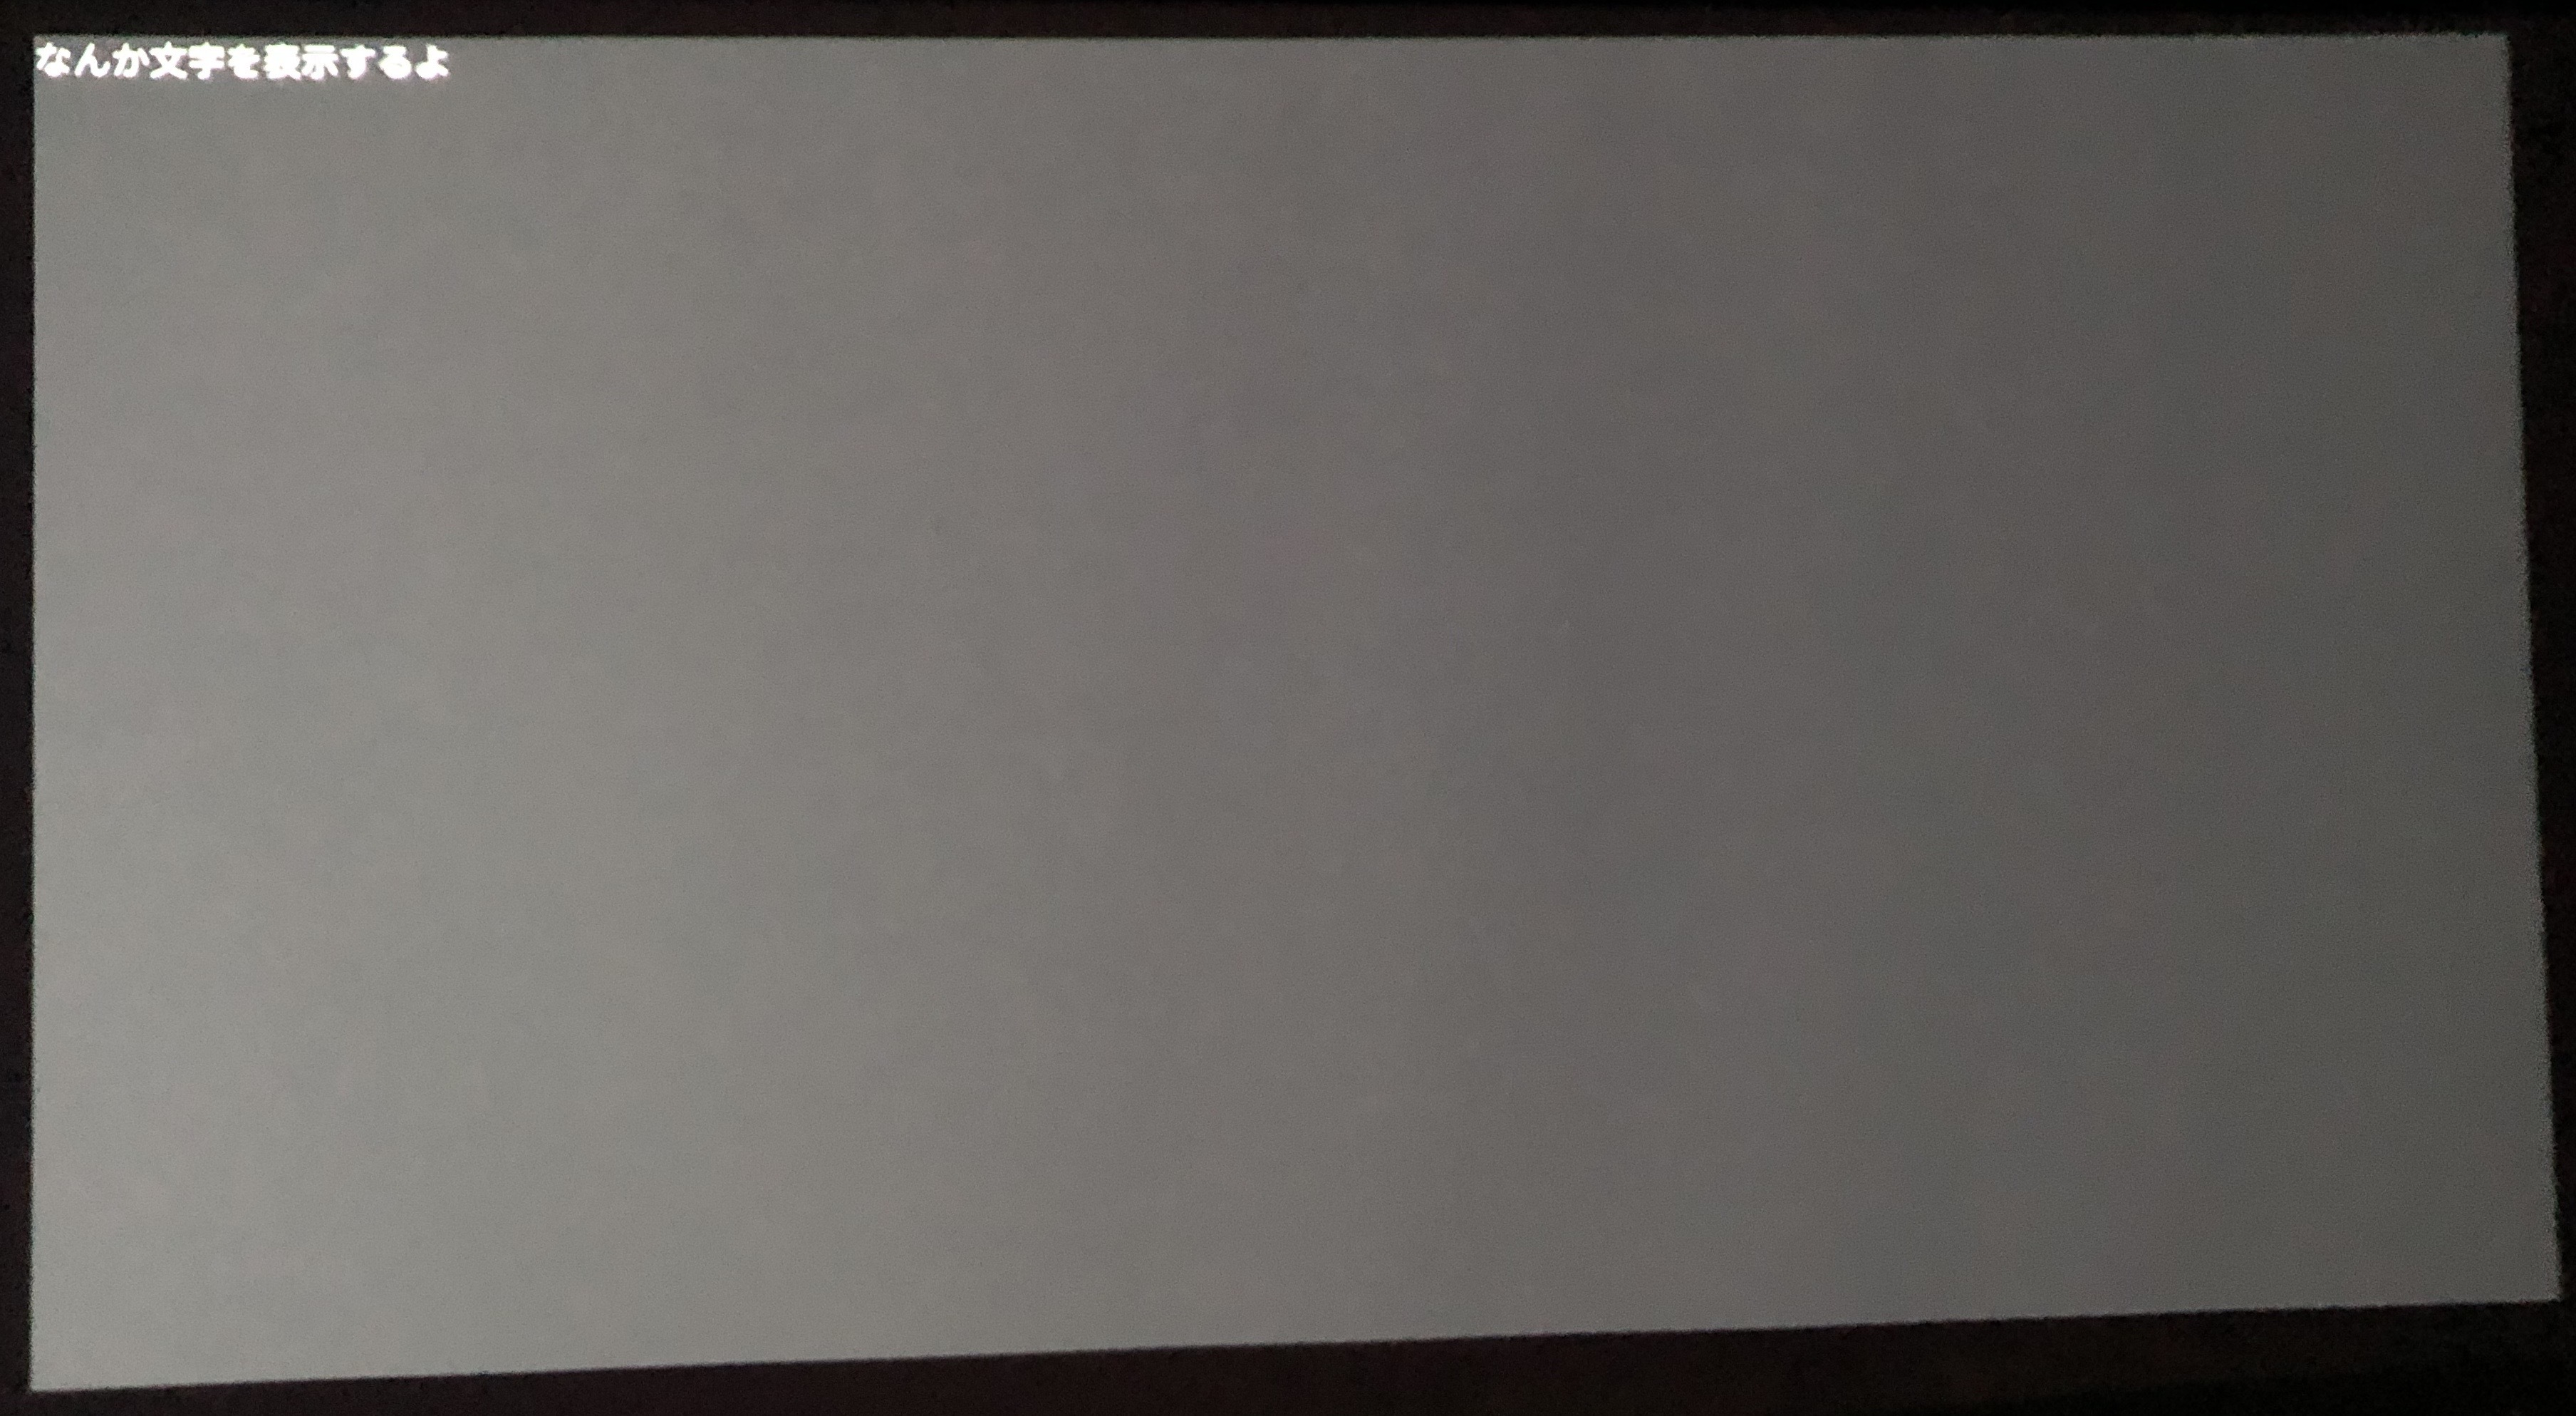
映りました!!![]()
(文字ちっっちゃ!!!!!!!)
これであったかいおふとん ![]() から出ずにデバッグできる環境が整いました。
から出ずにデバッグできる環境が整いました。
メイン画面に時計を表示する
先ほど作成したメイン画面に、時計を表示してみたいと思います ![]()
画面上に、「日付」と「時刻」を表示できるようにします。
src/main/res/values/strings.xmlに、表示する文字列を追加します。
<resources>
    <string name="app_name">Time</string>
    <string name="date_format">yyyy/MM/dd</string>
    <string name="time_format">kk:mm:ss</string>
</resources>
src/main/res/layout/activity_time.xmlを開き、TextViewを追加します。
先程追加した、@string/dateと@string/timeの文字列を表示するようにします。
レイアウトはデザインタブで色々触ってみましたが、よくわかりませんでした。。
(けっこう難しいです)
まずは表示できるようにしたいので適当にパーツを作っていきます。
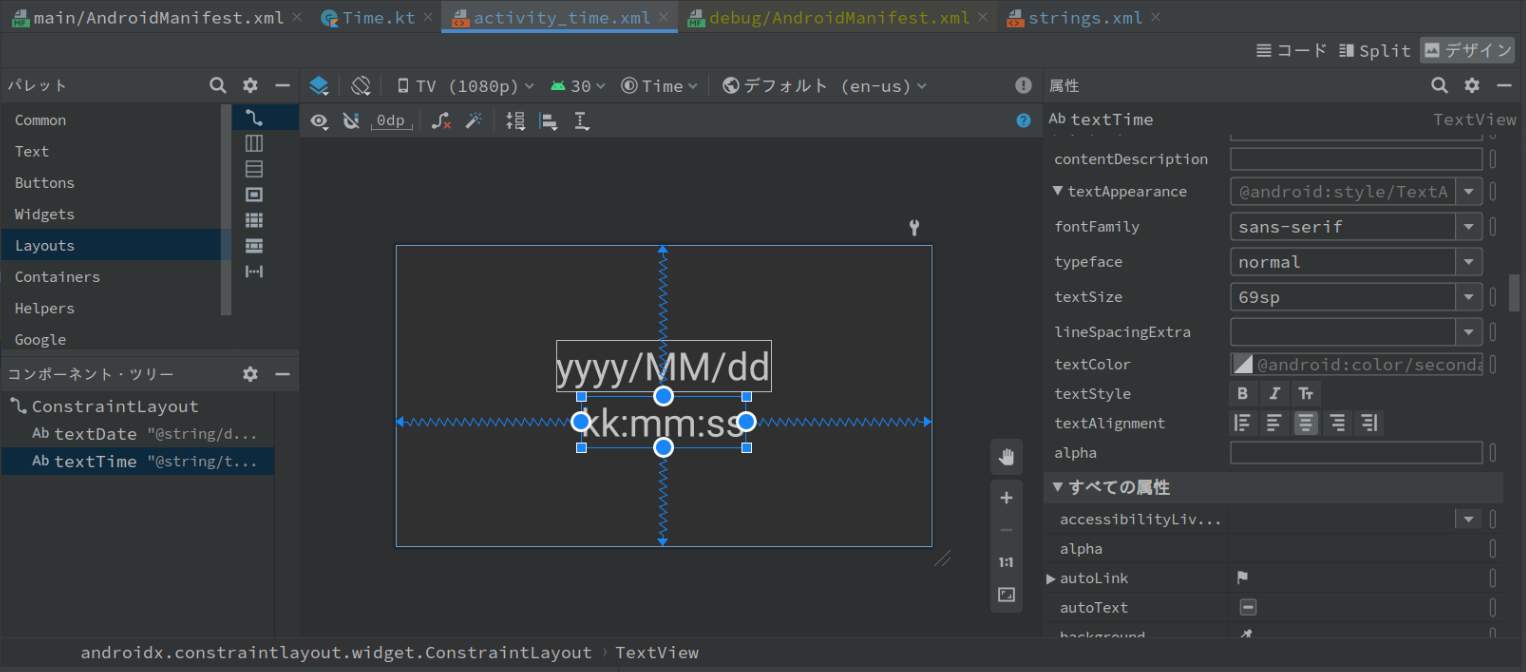
コードは以下のようになりました。
<?xml version="1.0" encoding="utf-8"?>
<androidx.constraintlayout.widget.ConstraintLayout xmlns:android="http://schemas.android.com/apk/res/android"
    xmlns:app="http://schemas.android.com/apk/res-auto"
    xmlns:tools="http://schemas.android.com/tools"
    android:layout_width="match_parent"
    android:layout_height="match_parent"
    tools:context=".TimeActivity">

    <TextView
        android:id="@+id/textDate"
        android:layout_width="wrap_content"
        android:layout_height="wrap_content"
        android:layout_marginStart="451dp"
        android:layout_marginTop="142dp"
        android:layout_marginEnd="451dp"
        android:text="@string/date_format"
        android:textAlignment="center"
        android:textSize="69sp"
        android:typeface="normal"
        app:layout_constraintBottom_toTopOf="@+id/textTime"
        app:layout_constraintEnd_toEndOf="parent"
        app:layout_constraintStart_toStartOf="parent"
        app:layout_constraintTop_toTopOf="parent"
        app:layout_constraintVertical_bias="0.756" />

    <TextView
        android:id="@+id/textTime"
        android:layout_width="wrap_content"
        android:layout_height="wrap_content"
        android:text="@string/time_format"
        android:textAlignment="center"
        android:textSize="69sp"
        android:typeface="normal"
        app:layout_constraintBottom_toBottomOf="parent"
        app:layout_constraintEnd_toEndOf="parent"
        app:layout_constraintStart_toStartOf="parent"
        app:layout_constraintTop_toTopOf="parent"
        app:layout_constraintVertical_bias="0.604" />
</androidx.constraintlayout.widget.ConstraintLayout>
次に、TimeActivity.ktを以下のように変更して、上記で作成した@+id/textDateと@+id/textTimeの文字を更新するようにします。
class TimeActivity : Activity() {
    override fun onCreate(savedInstanceState: Bundle?) {
        super.onCreate(savedInstanceState)
        setContentView(R.layout.activity_time)

        // 時計
        setTimer()
    }

    private fun setTimer() {
        // メインスレッドでHandlerのインスタンスを生成しておく
        val mainHandler: Handler = Handler(Looper.getMainLooper());

        // 1秒ごとに時間を更新する
        timer("clock", period=1000) {
            // mainHandler(UI Thread)にテキストの更新を投げる
            mainHandler.post(Runnable() {
                // 現在日時を取得
                val date = Date()
                // textDateに表示する日付を更新
                findViewById<TextView>(R.id.textDate).text = DateFormat.format(getString(R.string.date_format), date).toString()
                // textTimeに表示する時刻を更新
                findViewById<TextView>(R.id.textTime).text = DateFormat.format(getString(R.string.time_format), date).toString()
            })
        }
    }
}
これで実行してみると、時計が表示されました ![]()

天気を表示する

OpenWeatherMapのAPIから、現在の天気を取得して表示してみたいと思います。
事前にアカウントを作成し、APIキーを取得しておきます。
まずは、APIにアクセスするための関数を定義します。
private fun fetch(url: URL, headers: Map<String, String> = mapOf()): String {
    // 受け取ったURLに接続する
    val connection = url.openConnection() as HttpURLConnection
    headers.forEach { (k, v) -> connection.setRequestProperty(k, v) }
    connection.connect()

    // 1行ずつ取得して文字列を返す
    val reader = BufferedReader(InputStreamReader(connection.inputStream))
    val buffer = StringBuffer()
    var line: String?
    while (true) {
        line = reader.readLine()
        if (line == null) break
        buffer.append(line)
    }
    return buffer.toString()
}
次に、APIを叩いて文字列を変更する処理を作っていきます。
APIを叩くとJSONが返ってくるので、parseして取得した文字列を、先程の時計の実装と同様、TextViewに置き換えるようにします。
private fun setCurrentWeather(mainHandler: Handler) {
    val apiKey = "APIキーを入れるよ" // イケてないけどとりあえず
    // 大阪市の緯度、経度
    val latitude = "34.6937"
    val longitude = "135.5021"
    val url = URL("https://api.openweathermap.org/data/2.5/onecall?lat=$latitude&lon=$longitude&exclude=minutely,hourly&appid=$apiKey&lang=ja&units=metric")

    val executor: ExecutorService = Executors.newSingleThreadExecutor()
    executor.execute(Runnable() {
        // OpenWeatherMapのOne Call APIを叩いて、天気を取得する
        val result = fetch(url)
        val resultJSON = JSONObject(result)

        mainHandler.post(Runnable() {
            // 現在の天気
            val current = resultJSON.getJSONObject("current")
            // 現在の気温
            val currentTemp = current.getString("temp")
            // 取得した気温をビューのテキストに表示する
            findViewById<TextView>(R.id.currentTemp).text = "$currentTemp℃"
        })
    })
}
OpenWeatherMapでは、天気のアイコンも配信されています。
Picassoというライブラリを使って、配信されているアイコンを取得し、画面に表示しようと思います。
PicassoはREADMEに記載のとおり、Gradleでインストールを行いました。
ソースコードを以下のように編集し、アイコンを表示できるようにします。
ついでに、日本語の現在の天気も表示できるようにしました。
private fun setCurrentWeather(mainHandler: Handler) {
    val apiKey = "APIキーを入れるよ"
    // 大阪市の緯度、経度
    val latitude = "34.6937"
    val longitude = "135.5021"
    val url = URL("https://api.openweathermap.org/data/2.5/onecall?lat=$latitude&lon=$longitude&exclude=minutely,hourly&appid=$apiKey&lang=ja&units=metric")

    // 5分ごとに現在の天気を更新する
    timer("clock", period=1000 * 60 * 5) {
        val executor: ExecutorService = Executors.newSingleThreadExecutor()
        executor.execute(Runnable() {
            // OpenWeatherMapのOne Call APIを叩いて、天気を取得する
            val result = fetch(url)
            val resultJSON = JSONObject(result)

            mainHandler.post(Runnable() {
                // 現在の天気
                val current = resultJSON.getJSONObject("current")
                val weather = current.getJSONArray("weather").getJSONObject(0)

                // 現在の天気を表すアイコン
                val currentWeatherIcon = weather.getString("icon")
                val imgView: ImageView = findViewById(R.id.currentWeatherIcon)
                setWeatherIcon(currentWeatherIcon, imgView)

                // 現在の天気(日本語)
                val currentWeatherDescription = weather.getString("description")
                findViewById<TextView>(R.id.currentWeather).text = currentWeatherDescription

                // 現在の気温
                val currentTemp = current.getString("temp")
                findViewById<TextView>(R.id.currentTemp).text = "$currentTemp℃"
            })
        })
    }
}

private fun setWeatherIcon(weather: String, imgView: ImageView) {
    // OpenWeatherMapのWeather iconsを取得し、表示する
    val fileName = "$weather@4x.png"
    val url = "https://openweathermap.org/img/wn/$fileName"

    // 指定したURLの画像に置き換える
    Picasso.get().load(url).into(imgView)
}
さいごに、上記で指定した内容を画面に反映します。
activity_time.xmlに、以下のコンポーネントを追加すると、天気が表示されるようになります!
    <!-- タイトル -->
    <TextView
        android:id="@+id/textView"
        android:layout_width="wrap_content"
        android:layout_height="wrap_content"
        android:layout_marginStart="68dp"
        android:layout_marginTop="4dp"
        android:text="WEATHER"
        android:textAlignment="viewStart"
        android:textColor="#8A817C"
        android:textSize="24sp"
        app:layout_constraintStart_toEndOf="@+id/textTime"
        app:layout_constraintTop_toTopOf="@+id/textDate" />

    <!-- 天気アイコン -->
    <ImageView
        android:id="@+id/currentWeatherIcon"
        android:layout_width="200dp"
        android:layout_height="wrap_content"
        android:scaleType="centerCrop"
        app:layout_constraintBottom_toBottomOf="parent"
        app:layout_constraintEnd_toEndOf="parent"
        app:layout_constraintHorizontal_bias="0.142"
        app:layout_constraintStart_toEndOf="@+id/textTime"
        app:layout_constraintTop_toBottomOf="@+id/textView"
        app:layout_constraintVertical_bias="0.084" />

    <!-- 気温 -->
    <TextView
        android:id="@+id/currentTemp"
        android:layout_width="wrap_content"
        android:layout_height="wrap_content"
        android:textAlignment="viewStart"
        android:textColor="#F4F3EE"
        android:textSize="56sp"
        app:layout_constraintBottom_toBottomOf="parent"
        app:layout_constraintEnd_toEndOf="parent"
        app:layout_constraintHorizontal_bias="0.126"
        app:layout_constraintStart_toEndOf="@+id/currentWeatherIcon"
        app:layout_constraintTop_toTopOf="parent"
        app:layout_constraintVertical_bias="0.192" />

    <!-- 現在の天気 -->
    <TextView
        android:id="@+id/currentWeather"
        android:layout_width="wrap_content"
        android:layout_height="wrap_content"
        android:textAlignment="viewStart"
        android:textColor="#F4F3EE"
        android:textSize="36sp"
        app:layout_constraintBottom_toBottomOf="parent"
        app:layout_constraintEnd_toEndOf="parent"
        app:layout_constraintHorizontal_bias="0.108"
        app:layout_constraintStart_toEndOf="@+id/currentWeatherIcon"
        app:layout_constraintTop_toBottomOf="@+id/currentTemp"
        app:layout_constraintVertical_bias="0.0" />
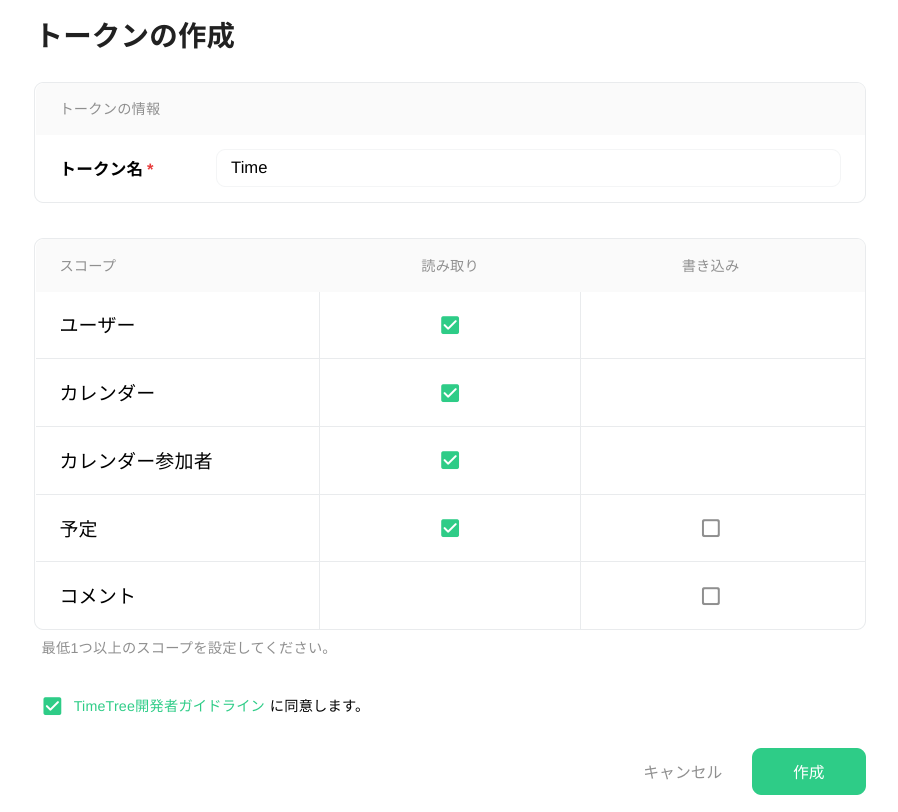
TimeTreeの予定を表示する
TimeTree APIのPersonal access token(個人でAPIを試すことを目的としたアクセストークン)を使って予定を表示してみようと思います。
今回は予定の書き込みはしないので、読み取り権限のみのトークンを作成しました。
APIのトークンを作成したら、早速予定を取得してみたいと思います。
class TimeActivity : Activity() {
    override fun onCreate(savedInstanceState: Bundle?) {
        super.onCreate(savedInstanceState)
        setContentView(R.layout.activity_time)

        // メインスレッドでHandlerのインスタンスを生成しておく
        val mainHandler: Handler = Handler(Looper.getMainLooper());

        // 時計
        setTimer(mainHandler)
        // 天気
        setCurrentWeather(mainHandler)
        // 予定を追加する
        setSchedule(mainHandler)
    }

    // 以下を追加
    private fun setSchedule(mainHandler: Handler) {
        val timeTreeApiKey = "APIキーを指定するよ"
        val timeTreeCalendarId = "カレンダーのIDを指定するよ"
        // 1日分の予定を取得するようパラメータを指定
        val url = URL("https://timetreeapis.com/calendars/$timeTreeCalendarId/upcoming_events?timezone=Asia/Tokyo&days=1&include=creator,label,attendees")
        val headers: Map<String, String> = mapOf(
                Pair("Accept", "application/vnd.timetree.v1+json"),
                Pair( "Authorization", "Bearer $timeTreeApiKey")
        )

        val executor: ExecutorService = Executors.newSingleThreadExecutor()
        executor.execute(Runnable() {
            val result = fetch(url, headers)
            val resultJSON = JSONObject(result)
            val results = resultJSON.getJSONArray("data")

            var schedules: ArrayList<Schedule> = ArrayList()

            for (i in 0 until results.length()) {
                val schedule = results.getJSONObject(i)
                val attributes = schedule.getJSONObject("attributes")

                // 予定のタイトル
                val title = attributes.getString("title")
                // 終日予定かどうか
                val allDay = attributes.getBoolean("all_day")
                // 開始日時
                val startAt = attributes.getString("start_at")
                // 終了日時
                val endAt = attributes.getString("end_at")

                // 開始日時、終了日時のフォーマットをHH:mmの形式にする
                val dateFormat = SimpleDateFormat("yyyy-MM-dd'T'HH:mm:ss.SSS'Z'")
                dateFormat.setTimeZone(TimeZone.getTimeZone("UTC"))
                val timeFormat = SimpleDateFormat("HH:mm")
                timeFormat.setTimeZone(TimeZone.getTimeZone("Asia/Tokyo"))
                val startTime: String? = timeFormat.format(dateFormat.parse(startAt)).toString()
                val endTime: String? = timeFormat.format(dateFormat.parse(endAt)).toString()

                // Scheduleのデータクラスを作成し、schedulesのArrayListに追加する
                schedules.add(Schedule(title, startTime, endTime, allDay))
            }
        })
    }
予定のデータクラスも作成しておきます。
data class Schedule(val title: String, val startTime: String?, val endTime: String?, val allDay: Boolean)
上記で取得した予定を画面に表示したいのですが、予定は他の項目と違い、表示する項目数が決まっていません。
そのため、今までのようにTextViewの文字を置き換えるという方法ではなく、RecyclerViewというウィジェットを使って予定を表示します。
RecyclerViewは少し難しい概念で挫折しかけたのですが、こちらの動画を見て概念を理解できました。
Android Kotlin RecyclerView Tutorial
(この記事ではRecyclerViewについて詳しく解説はしないので、最初に見ておくと分かりやすいかもしれません)
まずは、レイアウトにRecyclerViewを追加します。
<TextView
    android:id="@+id/todaySchedule"
    android:layout_width="wrap_content"
    android:layout_height="wrap_content"
    android:layout_marginStart="44dp"
    android:text="TODAY'S SCHEDULE"
    android:textAlignment="viewStart"
    android:textColor="#8A817C"
    android:textSize="24sp"
    app:layout_constraintBottom_toBottomOf="parent"
    app:layout_constraintEnd_toEndOf="parent"
    app:layout_constraintHorizontal_bias="0.0"
    app:layout_constraintStart_toStartOf="parent"
    app:layout_constraintTop_toBottomOf="@+id/textTime"
    app:layout_constraintVertical_bias="0.167" />

<androidx.recyclerview.widget.RecyclerView
    android:id="@+id/schedulesView"
    android:layout_width="982dp"
    android:layout_height="204dp"
    android:layout_marginVertical="10dp"
    app:layout_constraintBottom_toBottomOf="parent"
    app:layout_constraintEnd_toEndOf="parent"
    app:layout_constraintHorizontal_bias="0.0"
    app:layout_constraintStart_toStartOf="parent"
    app:layout_constraintTop_toBottomOf="@+id/todaySchedule"
    app:layout_constraintVertical_bias="0.558" />
リスト内に表示する子項目のレイアウトも追加します。
<?xml version="1.0" encoding="utf-8"?>
<androidx.constraintlayout.widget.ConstraintLayout
    xmlns:android="http://schemas.android.com/apk/res/android"
    xmlns:app="http://schemas.android.com/apk/res-auto"
    xmlns:tools="http://schemas.android.com/tools"
    android:layout_width="match_parent"
    android:layout_height="wrap_content"
    android:paddingHorizontal="42dp"
    android:paddingVertical="10dp"
    android:focusable="true">

    <TextView
        android:id="@+id/startTime"
        android:layout_width="wrap_content"
        android:layout_height="wrap_content"
        android:textColor="#BCB8B1"
        android:textSize="14sp"
        app:layout_constraintBottom_toBottomOf="parent"
        app:layout_constraintEnd_toEndOf="parent"
        app:layout_constraintHorizontal_bias="0.0"
        app:layout_constraintStart_toStartOf="parent"
        app:layout_constraintTop_toTopOf="parent"
        app:layout_constraintVertical_bias="0.0" />

    <TextView
        android:id="@+id/endTime"
        android:layout_width="wrap_content"
        android:layout_height="wrap_content"
        android:textColor="#BCB8B1"
        android:textSize="14sp"
        app:layout_constraintBottom_toBottomOf="parent"
        app:layout_constraintEnd_toEndOf="parent"
        app:layout_constraintHorizontal_bias="0.0"
        app:layout_constraintStart_toStartOf="parent"
        app:layout_constraintTop_toBottomOf="@+id/startTime"
        app:layout_constraintVertical_bias="1.0" />

    <View
        android:id="@+id/verticalLine"
        android:layout_width="3dp"
        android:layout_height="34sp"
        android:background="#E0CA3C"
        android:layout_marginVertical="0dp"
        app:layout_constraintBottom_toBottomOf="parent"
        app:layout_constraintEnd_toEndOf="parent"
        app:layout_constraintHorizontal_bias="0.011"
        app:layout_constraintStart_toEndOf="@+id/startTime"
        app:layout_constraintTop_toTopOf="parent" />

    <TextView
        android:id="@+id/title"
        android:layout_width="wrap_content"
        android:layout_height="wrap_content"
        android:textAlignment="viewStart"
        android:textColor="#BCB8B1"
        android:textSize="28sp"
        android:layout_marginLeft="20dp"
        app:layout_constraintBottom_toBottomOf="parent"
        app:layout_constraintEnd_toEndOf="parent"
        app:layout_constraintHorizontal_bias="0.0"
        app:layout_constraintStart_toEndOf="@+id/verticalLine"
        app:layout_constraintTop_toTopOf="parent"
        app:layout_constraintVertical_bias="1.0" />

</androidx.constraintlayout.widget.ConstraintLayout>
TimeActivity.ktで追加したsetSchedule()内で、上記で追加したRecyclerViewを読み込んで、Adapterを設定します。
private fun setSchedule(mainHandler: Handler) {
    // 〜省略〜

    val executor: ExecutorService = Executors.newSingleThreadExecutor()
    executor.execute(Runnable() {
        // 〜省略〜

        for (i in 0 until results.length()) {
            // 〜省略〜
        }

        // 以下を追加
        mainHandler.post(Runnable() {
            findViewById<RecyclerView>(R.id.schedulesView).also { recyclerView: RecyclerView ->
                recyclerView.adapter = SchedulesAdapter(this, schedules)
                recyclerView.layoutManager = LinearLayoutManager(this)
            }
        })
    })
}
Adapterは以下のように作成します。
class SchedulesAdapter(private val context: Context, private val schedules: ArrayList<Schedule>) : RecyclerView.Adapter<SchedulesAdapter.SchedulesViewHolder>() {
    class SchedulesViewHolder(view: View) : RecyclerView.ViewHolder(view) {
        // 反映するコンポーネントをViewHolderに定義する
        val startTime: TextView = view.findViewById(R.id.startTime)
        val endTime: TextView = view.findViewById(R.id.endTime)
        val title: TextView = view.findViewById(R.id.title)
    }

    // ViewHolderを作る
    override fun onCreateViewHolder(parent: ViewGroup, viewType: Int): SchedulesViewHolder =
        SchedulesViewHolder(LayoutInflater.from(parent.context).inflate(R.layout.schedule, parent, false))

    // 表示する項目数を返す
    override fun getItemCount(): Int = schedules.size

    // 1つの項目に表示する内容を定義する
    override fun onBindViewHolder(holder: SchedulesViewHolder, position: Int) {
        // 予定のタイトル
        holder.title.text = schedules[position].title
        if (schedules[position].allDay) {
            // 終日予定の場合
            holder.startTime.text = "終日"
            holder.endTime.text = ""
            holder.endTime.visibility = View.INVISIBLE
        } else {
            // 開始時刻、終了時刻が指定されている予定の場合
            holder.startTime.text = schedules[position].startTime
            holder.endTime.text = schedules[position].endTime
        }
    }
}
ここまでできたら、画面上に予定が表示されます!
開発したアプリを実機にインストールして使う
最後に、今回開発したアプリを実機にインストールできるようにします。
ビルドしてAPKファイルを作成し、インストールする流れは通常のAndroidアプリと同じです。
方法は色々ありますが、私はadbコマンドでインストールしました。
私の場合、これだけではホーム画面に表示されず、詰まってしまいました。
確認したところ、インテントフィルタの指定が誤っていたようなので、以下の通り修正したところ、無事にホーム画面にアプリが表示されるようになりました!
- <category android:name="android.intent.category.LAUNCHER" />
+ <category android:name="android.intent.category.LEANBACK_LAUNCHER" />
(公式ガイドの一番最初にしっかり書いてありましたが完全に見落としていました![]() )
)
https://developer.android.com/training/tv/start/start?hl=ja
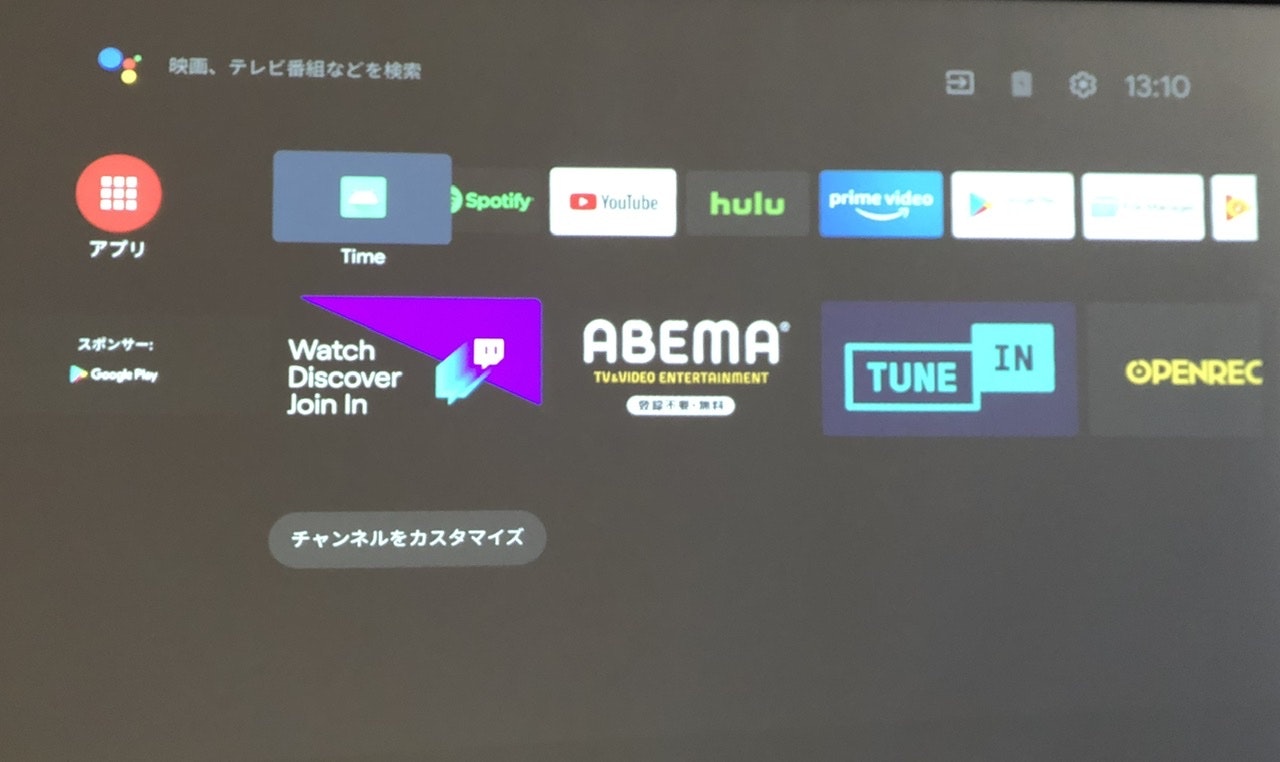
今回はアイコンを作っていないのですが、アイコンを作ればこの画面にも反映されます。
さいごに
普段はRailsでWebのバックエンドの開発をしており、アプリ開発は未知の世界でした。
でも、想像していたよりも難しくなく、楽しく開発できました。
レイアウト周りが少し難しく感じましたが、もう少し理解が進んだらもっとおもしろいアプリを開発できそうです。
今回書いたソースコードはGitHubに公開しています。
https://github.com/kazenomachi/Time
皆さんもこの冬、自分だけのダッシュボードを作ってみてはいかがでしょうか ![]()
プロジェクターは生活を豊かにするので、自分へのクリスマスプレゼントにおすすめです ![]()
![]()
この記事を書くにあたり、あったかいおふとん ![]() で開発を行い、執筆しました。
で開発を行い、執筆しました。
あまりあったかいおふとん ![]() から出ない生活を送っていると、体を痛めるので、時々運動することをおすすめします。
から出ない生活を送っていると、体を痛めるので、時々運動することをおすすめします。
私は肩と腰を痛めました。