概要
以前、↑のような記事を書いた自分ですが、あれから色々勉強した結果、より快適なデプロイ環境を作る事ができたので復習がてらメモ書きしていきたいと思います。
環境
- Ruby on Rails
- Nginx
- MySQL
- Terraform
- Amazon ECS(Fargate)
- GitHub Actions
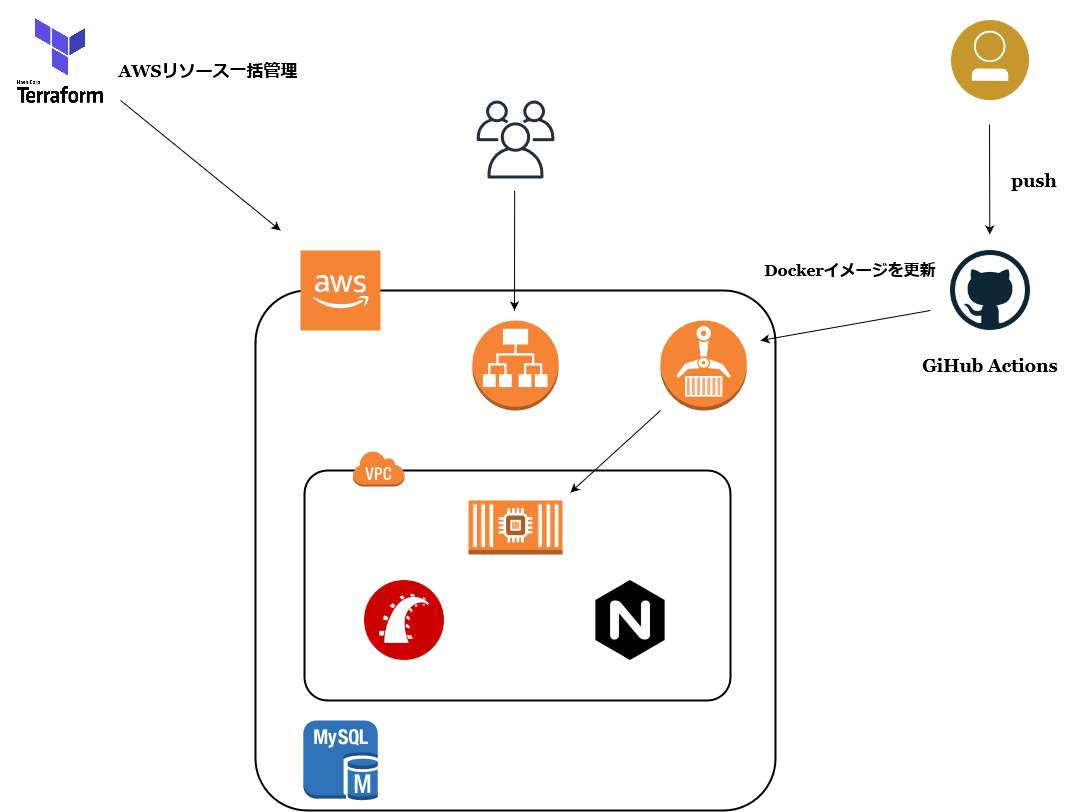
全体の流れとしては、Ruby on Railsで簡単なアプリを作り、Terraformでリソース一式を調達してAmazon ECSにデプロイ。その後はGitHub ActionsでCI/CD環境を構築し、自動でビルド・デプロイが走るようにします。
Ruby on Rails
まず最初に、デプロイするための簡単なアプリケーションを作っていきましょう。今回はRuby2.6系 × Rails6でちゃちゃっと済ませます。
ディレクトリを作成
$ mkdir sample
$ cd sample
各種ファイルを作成
$ mkdir nginx
$ touch nginx/Dockerfile nginx/nginx.conf docker-compose.yml Dockerfile Gemfile Gemfile.lock
最終的に次のような構成になればOKです。
sample
├─ nginx
  ├─ Dockerfile
  ├─ nginx.conf
├─ docker-compose.yml
├─ Dockerfile
├─ Gemfile
├─ Gemfile.lock
FROM nginx:1.15.8

RUN rm -f /etc/nginx/conf.d/*

ADD nginx.conf /etc/nginx/conf.d/sample.conf
CMD /usr/sbin/nginx -g 'daemon off;' -c /etc/nginx/nginx.conf
upstream sample {
  server unix:///sample/tmp/sockets/puma.sock;
}

server {
  listen 80;
  server_name localhost;

  access_log /var/log/nginx/access.log;
  error_log  /var/log/nginx/error.log;

  root /sample/public;

  client_max_body_size 100m;
  error_page 404             /404.html;
  error_page 505 502 503 504 /500.html;
  try_files  $uri/index.html $uri @sample;
  keepalive_timeout 5;

  location @sample {
    proxy_set_header X-Real-IP $remote_addr;
    proxy_set_header X-Forwarded-For $proxy_add_x_forwarded_for;
    proxy_set_header Host $http_host;
    proxy_pass http://sample;
  }
}
version: "3"
services:
  web:
    build:
      context: .
    command: bundle exec puma -C config/puma.rb
    volumes:
      - .:/sample
      - public-data:/sample/public
      - tmp-data:/sample/tmp
      - log-data:/sample/log
    depends_on:
      - db
  db:
    image: mysql:8.0
    environment:
      MYSQL_ROOT_PASSWORD: password
    ports:
      - '3306:3306'
    command: --default-authentication-plugin=mysql_native_password
    volumes:
      - db-data:/var/lib/mysql
  nginx:
    build:
      context: nginx
    volumes:
      - public-data:/sample/public
      - tmp-data:/sample/tmp
    ports:
      - 80:80
    depends_on:
      - web
volumes:
  public-data:
  tmp-data:
  log-data:
  db-data:
FROM ruby:2.6.6
ENV LANG C.UTF-8
RUN apt-get update -qq && apt-get install -y build-essential libpq-dev nodejs

RUN curl -sL https://deb.nodesource.com/setup_8.x | bash - && \
apt-get install nodejs

RUN apt-get update && apt-get install -y curl apt-transport-https wget && \
curl -sS https://dl.yarnpkg.com/debian/pubkey.gpg | apt-key add - && \
echo "deb https://dl.yarnpkg.com/debian/ stable main" | tee /etc/apt/sources.list.d/yarn.list && \
apt-get update && apt-get install -y yarn

ENV APP_PATH /sample

RUN mkdir $APP_PATH
WORKDIR $APP_PATH

ADD Gemfile $APP_PATH/Gemfile
ADD Gemfile.lock $APP_PATH/Gemfile.lock

RUN gem install bundler:2.1.4
RUN bundle install

ADD . $APP_PATH

RUN mkdir -p tmp/sockets
source "https://rubygems.org"
gem "rails", "~>6"
# 空欄のままでOK
Railsプロジェクトを作成
おなじみの「rails new」でサクッとプロジェクトを作成します。
$ docker-compose run web rails new . --force --no-deps --database=mysql --skip-test --webpacker
Gemfileが更新されたので再度ビルド。
$ docker-compose build
./config/puma.rbを編集
threads_count = ENV.fetch("RAILS_MAX_THREADS") { 5 }.to_i
threads threads_count, threads_count
port        ENV.fetch("PORT") { 3000 }
environment ENV.fetch("RAILS_ENV") { "development" }
plugin :tmp_restart

app_root = File.expand_path("../..", __FILE__)
bind "unix://#{app_root}/tmp/sockets/puma.sock"

stdout_redirect "#{app_root}/log/puma.stdout.log", "#{app_root}/log/puma.stderr.log", true
./config/database.ymlを編集
default: &default
  adapter: mysql2
  encoding: utf8mb4
  pool: <%= ENV.fetch("RAILS_MAX_THREADS") { 5 } %>
  username: root
  password: password # デフォルトだと空欄になっているはず
  host: db # デフォルトだとlocalhostになっているはず

development:
  <<: *default
  database: myapp_development

test:
  <<: *default
  database: myapp_test

production:
  <<: *default
  database: <%= ENV["DATABASE_NAME"] %>
  username: <%= ENV["DATABASE_USERNAME"] %>
  password: <%= ENV["DATABASE_PASSWORD"] %>
  host: <%= ENV["DATABASE_HOST"] %>
データベースを作成。
$ docker-compose run web rails db:create
動作確認
コンテナを起動。
$ docker-compose up -d
http://localhost にアクセスしていつもの画面が表示されればOK。

Todoアプリを作成
scaffoldコマンドを使って簡単なTodoアプリを作りましょう。
$ docker-compose run web rails g scaffold todo content:text
$ docker-compose run web rails db:migrate
Rails.application.routes.draw do
  root to: "todos#index"
  resources :todos
end
routes.rbを↑のように変更し、再度 http://localhost にアクセスしてください。
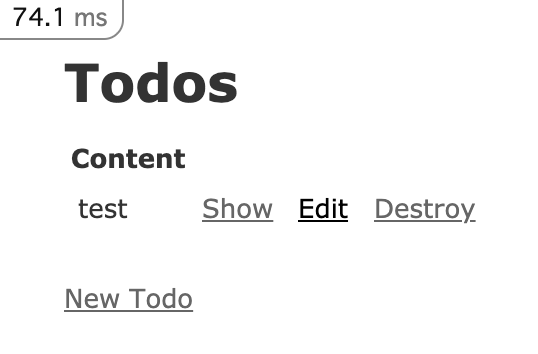
こんな感じでTodoアプリができていれば成功です。
Terraform
次はTerraformでAWSリソース一式のプロビジョニングを行います。
ディレクトリを作成
インフラ部分のコードをどのように運用するかは好みによって違うと思いますが、個人的には別リポジトリに分けた方が管理しやすいと思うので、今回は分離しておきます。
$ mkdir sample-infra
$ cd sample-infra
各種ファイルを作成
数が多くて面倒なので、シェルスクリプトなどで一気に作成したいところです。
$ cat > prepare.sh << EOS
# !/bin/bash

touch terraform.tfvars
touch variables.tf
touch provider.tf
touch subnet.tf
touch security_group.tf
touch route_table.tf
touch internet_gateway.tf
touch rds.tf
touch s3.tf
touch vpc.tf
touch ecr.tf
touch ecs.tf
touch cloudwatch_logs.tf
touch alb.tf
mkdir task-definitions
touch task-definitions/app-nginx.json
EOS
実行しましょう。
$ sh prepare.sh
最終的に次のような構成になっていればOKです。
sample-infra
├─ task-defnitions
  ├─ app-nginx.json
├─ alb.tf
├─ cloudwatch_logs.tf
├─ ecr.tf
├─ ecs.tf
├─ internet_gateway.tf
├─ prepare.sh
├─ provider.tf
├─ rds.tf
├─ route_table.tf
├─ s3.tf
├─ security_group,.tf
├─ subnet.tf
├─ terraform.tfvars
├─ vpc.tf
環境変数
aws_access_key    = "AWSアクセスキー"
aws_secret_key    = "AWSシークレットキー"
aws_account_id    = "AWSアカウントID"
database_name     = "sample_app_production"
database_username = "root"
database_password = "password"
variable "aws_access_key" {}
variable "aws_secret_key" {}
variable "aws_account_id" {}
variable "database_name" {}
variable "database_username" {}
variable "database_password" {}

# 作成するリソースのプレフィックス
variable "r_prefix" {
  default = "sample"
}
プロバイダ
provider "aws" {
  access_key = "${var.aws_access_key}"
  secret_key = "${var.aws_secret_key}"
  region  = "ap-northeast-1"
}
ネットワーク
resource "aws_vpc" "sample_vpc" {
  cidr_block           = "10.0.0.0/16"
  instance_tenancy     = "default"
  enable_dns_hostnames = true
  enable_dns_support   = true

  tags = {
    Name = "${var.r_prefix}-vpc"
  }
}
resource "aws_subnet" "sample_public_subnet_1a" {
  vpc_id                  = "${aws_vpc.sample_vpc.id}"
  cidr_block              = "10.0.0.0/24"
  availability_zone       = "ap-northeast-1a"
  map_public_ip_on_launch = true

  tags = {
    Name = "${var.r_prefix}-public-subnet-1a"
  }
}

resource "aws_subnet" "sample_public_subnet_1c" {
  vpc_id                  = "${aws_vpc.sample_vpc.id}"
  cidr_block              = "10.0.1.0/24"
  availability_zone       = "ap-northeast-1c"
  map_public_ip_on_launch = true

  tags = {
    Name = "${var.r_prefix}-public-subnet-1c"
  }
}
resource "aws_internet_gateway" "sample_igw" {
  vpc_id = "${aws_vpc.sample_vpc.id}"

  tags = {
    Name = "${var.r_prefix}-igw"
  }
}
resource "aws_route_table" "sample_public_rt" {
  vpc_id = "${aws_vpc.sample_vpc.id}"

  route {
    cidr_block = "0.0.0.0/0"
    gateway_id = "${aws_internet_gateway.sample_igw.id}"
  }

  tags = {
    Name = "${var.r_prefix}-public-rt"
  }
}

resource "aws_route_table_association" "sample_public_subnet_1a_rt_assoc" {
  subnet_id      = "${aws_subnet.sample_public_subnet_1a.id}"
  route_table_id = "${aws_route_table.sample_public_rt.id}"
}

resource "aws_route_table_association" "public_1c_rt_assoc" {
  subnet_id      = "${aws_subnet.sample_public_subnet_1c.id}"
  route_table_id = "${aws_route_table.sample_public_rt.id}"
}
セキュリティグループ
# アプリ全体用
resource "aws_security_group" "sample_sg_app" {
  name        = "${var.r_prefix}-sg-app"
  description = "${var.r_prefix}-sg-app"
  vpc_id      = "${aws_vpc.sample_vpc.id}"

  ingress {
    from_port   = 80
    to_port     = 80
    protocol    = "tcp"
    cidr_blocks = ["0.0.0.0/0"]
  }

  egress {
    from_port   = 0
    to_port     = 0
    protocol    = "-1"
    cidr_blocks = ["0.0.0.0/0"]
  }

  tags = {
    Name = "${var.r_prefix}-sg-app"
  }
}

# ロードバランサー用
resource "aws_security_group" "sample_sg_alb" {
  name        = "${var.r_prefix}-sg-alb"
  description = "${var.r_prefix}-sg-alb"
  vpc_id      = "${aws_vpc.sample_vpc.id}"

  ingress {
    from_port   = 80
    to_port     = 80
    protocol    = "tcp"
    cidr_blocks = ["0.0.0.0/0"]
  }

  egress {
    from_port   = 0
    to_port     = 0
    protocol    = "-1"
    cidr_blocks = ["0.0.0.0/0"]
  }

  tags = {
    Name = "${var.r_prefix}-sg-alb"
  }
}

# データベース用
resource "aws_security_group" "sample_sg_db" {
  name        = "${var.r_prefix}-sg-db"
  description = "${var.r_prefix}-sg-db"
  vpc_id      = "${aws_vpc.sample_vpc.id}"

  ingress {
    from_port   = 3306
    to_port     = 3306
    protocol    = "tcp"
    cidr_blocks = ["0.0.0.0/0"]
  }

  egress {
    from_port   = 0
    to_port     = 0
    protocol    = "-1"
    cidr_blocks = ["0.0.0.0/0"]
  }

  tags = {
    Name = "${var.r_prefix}-sg-db"
  }
}
ロードバランサー
resource "aws_alb" "sample_alb" {
  name                       = "${var.r_prefix}-alb"
  security_groups            = [aws_security_group.sample_sg_alb.id]

  subnets                    = [
    "${aws_subnet.sample_public_subnet_1a.id}",
    "${aws_subnet.sample_public_subnet_1c.id}"
  ]

  internal                   = false
  enable_deletion_protection = false

  access_logs {
    bucket  = "${aws_s3_bucket.sample_alb_logs.bucket}"
  }
}

resource "aws_alb_target_group" "sample_alb_tg" {
  name                 = "${var.r_prefix}-alb-tg"
  port                 = 80
  depends_on           = [aws_alb.sample_alb]
  target_type          = "ip"
  protocol             = "HTTP"
  vpc_id               = "${aws_vpc.sample_vpc.id}"
  deregistration_delay = 15

  health_check {
    interval            = 30
    path                = "/"
    port                = "traffic-port"
    protocol            = "HTTP"
    timeout             = 5
    unhealthy_threshold = 2
    matcher             = 200
  }
}

resource "aws_alb_listener" "sample_alb_listener" {
  port              = "80"
  protocol          = "HTTP"

  load_balancer_arn = "${aws_alb.sample_alb.arn}"

  default_action {
    target_group_arn = "${aws_alb_target_group.sample_alb_tg.arn}"
    type             = "forward"
  }
}

resource "aws_alb_listener_rule" "sample_alb_listener_rule" {
  depends_on         = [aws_alb_target_group.sample_alb_tg]
  listener_arn       = "${aws_alb_listener.sample_alb_listener.arn}"
  priority           = 100

  action {
    type             = "forward"
    target_group_arn = "${aws_alb_target_group.sample_alb_tg.arn}"
  }

  condition {
    path_pattern {
      values = ["/"]
    }
  }
}
RDS
resource "aws_db_subnet_group" "sample_db_subnet_group" {
  name        = "${var.r_prefix}-db-subnet-group"
  description = "${var.r_prefix}-db-subnet-group"
  subnet_ids  = [
    aws_subnet.sample_public_subnet_1a.id,
    aws_subnet.sample_public_subnet_1c.id
  ]

  tags = {
    Name = "${var.r_prefix}-db-subnet-group"
  }
}

resource "aws_db_instance" "sample_db" {
  identifier          = "${var.r_prefix}-db"
  engine              = "mysql"
  engine_version      = "8.0.20"
  instance_class      = "db.t2.micro"
  allocated_storage   = 20
  storage_type        = "gp2"
  name                = "${var.database_name}"
  username            = "${var.database_username}"
  password            = "${var.database_password}"
  port                = 3306
  multi_az            = true
  skip_final_snapshot = true

  vpc_security_group_ids = [aws_security_group.sample_sg_db.id]
  db_subnet_group_name   = "${aws_db_subnet_group.sample_db_subnet_group.name}"
}
S3
resource "aws_s3_bucket" "sample_alb_logs" {
  bucket = "${var.r_prefix}-20210401-alb-logs" # S3バケット名はグローバルで一意である必要があるので、適当に日付などを付けて差別化を図ると良いかも。
}
CloudWatch Logs
resource "aws_cloudwatch_log_group" "sample_log_group" {
  name = "/ecs/sample"
}
ECR
# App
resource "aws_ecr_repository" "sample_app" {
  name                 = "${var.r_prefix}-app"
  image_tag_mutability = "MUTABLE"

  image_scanning_configuration {
    scan_on_push = true
  }
}

resource "aws_ecr_lifecycle_policy" "sample_app_lifecycle_policy" {
  repository = "${aws_ecr_repository.sample_app.name}"

  policy = <<EOF
  {
    "rules": [
      {
        "rulePriority": 1,
        "description": "Delete images when count is more than 500",
        "selection": {
          "tagStatus": "any",
          "countType": "imageCountMoreThan",
          "countNumber": 500
        },
        "action": {
          "type": "expire"
        }
      }
    ]
  }
EOF
}

# Nginx
resource "aws_ecr_repository" "sample_nginx" {
  name = "${var.r_prefix}-nginx"
  image_tag_mutability = "MUTABLE"

  image_scanning_configuration {
    scan_on_push = true
  }
}
ECS
resource "aws_ecs_cluster" "sample_cluster" {
  name = "${var.r_prefix}-cluster"
}

resource "aws_ecs_task_definition" "sample_app_nginx" {
  family                   = "sample-app"
  requires_compatibilities = ["FARGATE"]
  network_mode             = "awsvpc" # Fargateを使う場合は「awsvpc」で固定
  task_role_arn            = "arn:aws:iam::${var.aws_account_id}:role/ecsTaskExecutionRole"
  execution_role_arn       = "arn:aws:iam::${var.aws_account_id}:role/ecsTaskExecutionRole"
  cpu                      = 512
  memory                   = 1024
  container_definitions    = "${file("./task-definitions/app-nginx.json")}"
}

resource "aws_ecs_service" "sample_service" {
  cluster                            = "${aws_ecs_cluster.sample_cluster.id}"
  launch_type                        = "FARGATE"
  deployment_minimum_healthy_percent = 100
  deployment_maximum_percent         = 200
  name                               = "sample-service"
  task_definition                    = "${aws_ecs_task_definition.sample_app_nginx.arn}"
  desired_count                      = 1 # 常に1つのタスクが稼働する状態にする

  lifecycle {
    ignore_changes = [desired_count, task_definition]
  }

  load_balancer {
    target_group_arn = "${aws_alb_target_group.sample_alb_tg.arn}"
    container_name   = "nginx"
    container_port   = 80
  }

  network_configuration {
    subnets          = [
      aws_subnet.sample_public_subnet_1a.id,
      aws_subnet.sample_public_subnet_1c.id
    ]
    security_groups  = [
      aws_security_group.sample_sg_app.id,
      aws_security_group.sample_sg_db.id
    ]
    assign_public_ip = "true"
  }
}
ECRリポジトリを作成
まず最初にECRリポジトリを作成します。
$ terraform apply -target={aws_ecr_repository.sample_app,aws_ecr_lifecycle_policy.sample_app_lifecycle_policy,aws_ecr_repository.sample_nginx}
ECRリポジトリにDockerイメージをプッシュ
作成されたECRリポジトリ(app、nginx)に各Dockerイメージをプッシュしていきましょう。
ログイン
$ aws ecr get-login-password --region ap-northeast-1 | docker login --username AWS --password-stdin <AWSアカウントID>.dkr.ecr.ap-northeast-1.amazonaws.com
app
※次のコマンドは「sample」リポジトリの下で叩いてください。
$ mkdir ecs
$ touch ecs/Dockerfile
FROM ruby:2.6.6
ENV LANG C.UTF-8
RUN apt-get update -qq && apt-get install -y build-essential libpq-dev nodejs

RUN curl -sL https://deb.nodesource.com/setup_8.x | bash - && \
apt-get install nodejs

RUN apt-get update && apt-get install -y curl apt-transport-https wget && \
curl -sS https://dl.yarnpkg.com/debian/pubkey.gpg | apt-key add - && \
echo "deb https://dl.yarnpkg.com/debian/ stable main" | tee /etc/apt/sources.list.d/yarn.list && \
apt-get update && apt-get install -y yarn

ENV APP_PATH /sample

RUN mkdir $APP_PATH
WORKDIR $APP_PATH

ADD Gemfile $APP_PATH/Gemfile
ADD Gemfile.lock $APP_PATH/Gemfile.lock

RUN gem install bundler:2.1.4
RUN bundle install

ADD . $APP_PATH

# Nginxと通信を行うための準備
RUN mkdir -p tmp/sockets
RUN mkdir -p tmp/pids

VOLUME $APP_PATH/public
VOLUME $APP_PATH/tmp

RUN yarn install --check-files
RUN SECRET_KEY_BASE=placeholder bundle exec rails assets:precompile
本番用のDockerfile(./ecs/Dockerfile)が準備できたら、そちらを元にビルドします。
$ docker build -f ./ecs/Dockerfile . -t sample-app
本番用のDockerイメージのビルドが終わったら、下記コマンドでECRリポジトリへプッシュしてください。
$ docker tag sample-app:latest <AWSアカウントID>.dkr.ecr.ap-northeast-1.amazonaws.com/sample-app:latest
$ docker push <AWSアカウントID>.dkr.ecr.ap-northeast-1.amazonaws.com/sample-app:latest
※この辺のコマンドは各リポジトリ内にも記載されているのでそちらを参照しても大丈夫です。
nginx
※次のコマンドは「sample」リポジトリの下で叩いてください。
$ cd nginx
$ docker build -f ./Dockerfile . -t sample-nginx
$ docker tag sample-nginx:latest <AWSアカウントID>.dkr.ecr.ap-northeast-1.amazonaws.com/sample-nginx:latest
$ docker push <AWSアカウントID>.dkr.ecr.ap-northeast-1.amazonaws.com/sample-nginx:latest
各リポジトリへのDockerイメージプッシュが終わったら、それぞれのリポジトリURIをメモっておきましょう。(後で使います。)
RDSを作成
RDSは作成にかなりの時間がかかるので、なるべく早めに作成しておくと後が楽です。
$ terraform apply -target={aws_db_subnet_group.sample_db_subnet_group,aws_db_instance.sample_db}
長い場合は15分以上かかるので、気長に待っててください。
デプロイ
大体の準備ができたので、いよいよデプロイです。
先ほど作成したECRリポジトリのURLやRDSのエンドポイントといった情報をタスク定義(./task-definitions/app-nginx)の中に当てはめていってください。
[
  {
    "name": "app",
    "image": "<ECRリポジトリのURI(sample-app)>",
    "logConfiguration": {
      "logDriver": "awslogs",
      "options": {
        "awslogs-group": "/ecs/sample",
        "awslogs-region": "ap-northeast-1",
        "awslogs-stream-prefix": "production"
      }
    },
    "environment": [
      {
        "name": "DATABASE_HOST",
        "value": "<RDSのエンドポイント>"
      },
      {
        "name": "DATABASE_NAME",
        "value": "sample_app_production"
      },
      {
        "name": "DATABASE_PASSWORD",
        "value": "password"
      },
      {
        "name": "DATABASE_USERNAME",
        "value": "root"
      },
      {
        "name": "RAILS_ENV",
        "value": "production"
      },
      {
        "name": "RAILS_MASTER_KEY",
        "value": "<先ほど作ったRailsアプリのmaster.key>"
      },
      {
        "name": "TZ",
        "value": "Japan"
      }
    ],
    "command": [
      "bash",
      "-c",
      "bundle exec rails db:migrate && bundle exec rails assets:precompile && bundle exec puma -C config/puma.rb"
    ],
    "workingDirectory": "/sample",
    "essential": true
  },
  {
    "name": "nginx",
    "image": "<ECRリポジトリのURI(sample-nginx)>",
    "logConfiguration": {
      "logDriver": "awslogs",
      "secretOptions": null,
      "options": {
        "awslogs-group": "/ecs/sample",
        "awslogs-region": "ap-northeast-1",
        "awslogs-stream-prefix": "production"
      }
    },
    "portMappings": [
      {
        "protocol": "tcp",
        "containerPort": 80
      }
    ],
    "workingDirectory": "/sample",
    "volumesFrom": [
      {
        "sourceContainer": "app",
        "readOnly": false
      }
    ],
    "essential": true
  }
]
これで全ての準備が完了したので、
$ terraform apply
を実行してください。
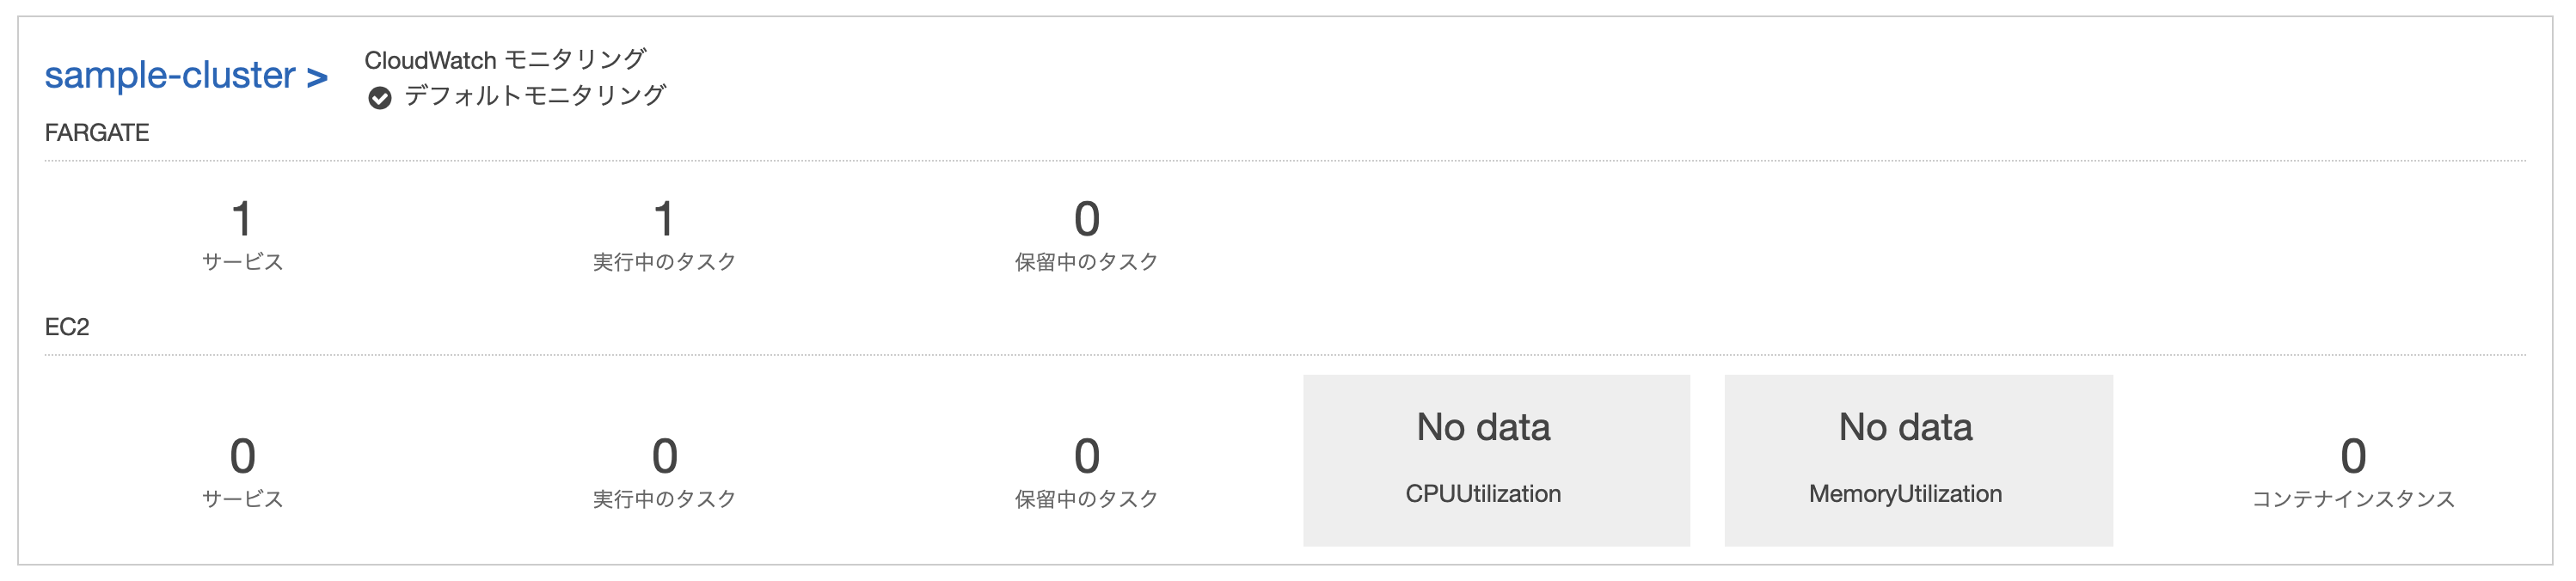
AWSコンソール画面から「Elastic Container Service」→「クラスター」と進み、サービス:1、実行中のタスク:1となっていれば成功です。
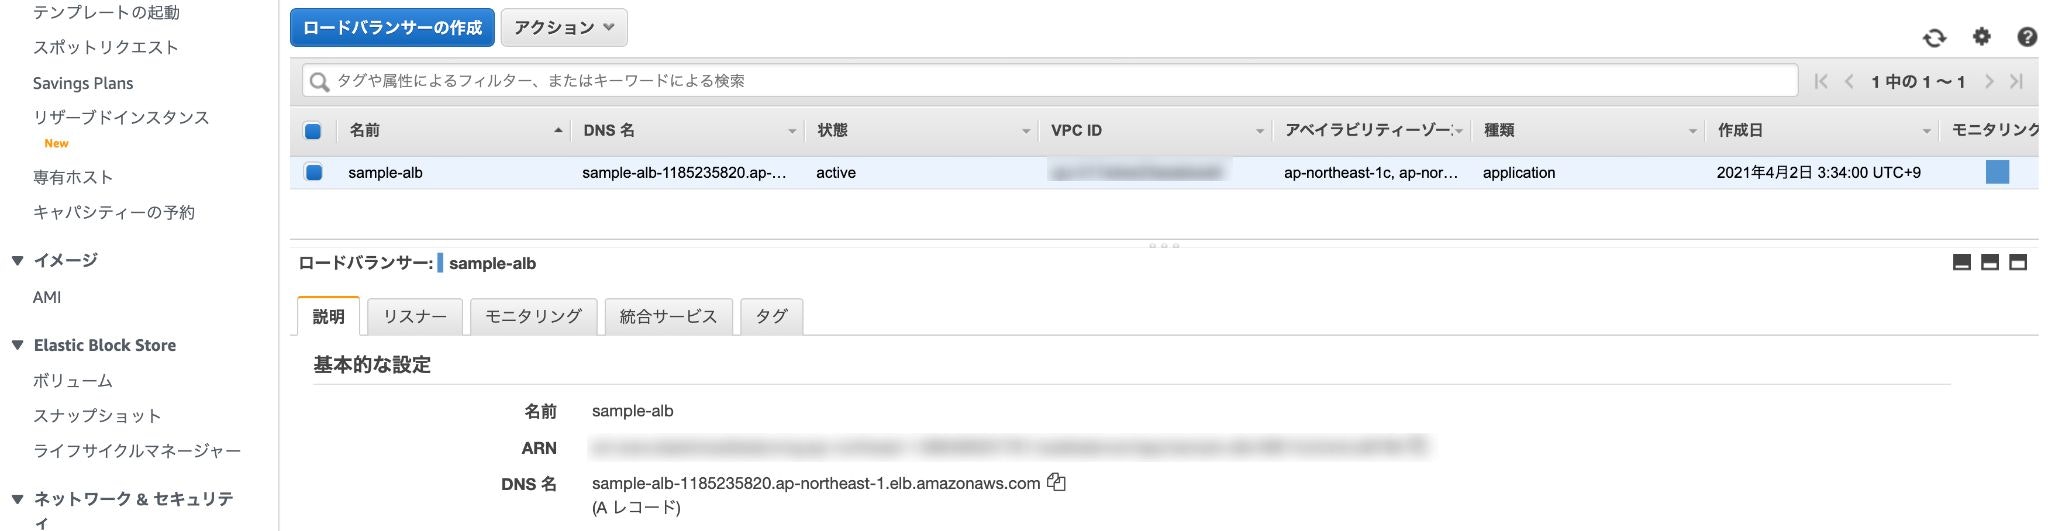
作成されたロードバランサーのDNS名にアクセスすると、冒頭で作ったRailsアプリがデプロイできているはず。もし不具合などあった場合はCloudWatchにログが出力されているはずなのでそちらからデバッグしてください。
GitHub Actions
最後に、GitHub Actionsを使って特定のブランチ(master、developなど)にプッシュされた際、自動でビルド&デプロイが走るようにしましょう。これができれば、後は開発者はコードを書く事だけに集中すれば良いので非常に楽になります。

GitHubリポジトリの上部メニューにあるヤツですね。
各種設定ファイルを作成
GitHub Actionsを作動させるために必要なファイルがいくつかあるので作成します。
$ mkdir .github
$ mkdir .github/workflows
$ touch .github/workflows/aws.yml ecs/task-definition.json
on:
  push: # 指定したブランチにpushされた際に実行
    branches: [ master, develop ]

name: Deploy to Amazon ECS

jobs:
  deploy:
    name: Deploy
    runs-on: ubuntu-latest
    environment: production

    steps:
    - name: Checkout
      uses: actions/checkout@v2

    - name: Configure AWS credentials
      uses: aws-actions/configure-aws-credentials@v1
      with:
        aws-access-key-id: ${{ secrets.AWS_ACCESS_KEY_ID }}
        aws-secret-access-key: ${{ secrets.AWS_SECRET_ACCESS_KEY }}
        aws-region: ap-northeast-1

    - name: Login to Amazon ECR
      id: login-ecr
      uses: aws-actions/amazon-ecr-login@v1

    - name: Build, tag, and push image to Amazon ECR
      id: build-image
      env:
        ECR_REGISTRY: ${{ steps.login-ecr.outputs.registry }}
        ECR_REPOSITORY: sample-app # ECRリポジトリ名
        IMAGE_TAG: ${{ github.sha }}
      run: |
        docker build -f ecs/Dockerfile . -t $ECR_REGISTRY/$ECR_REPOSITORY:$IMAGE_TAG
        docker push $ECR_REGISTRY/$ECR_REPOSITORY:$IMAGE_TAG
        echo "::set-output name=image::$ECR_REGISTRY/$ECR_REPOSITORY:$IMAGE_TAG"

    - name: Fill in the new image ID in the Amazon ECS task definition
      id: task-def
      uses: aws-actions/amazon-ecs-render-task-definition@v1
      with:
        task-definition: ecs/task-definition.json
        container-name: app # appコンテナを指定
        image: ${{ steps.build-image.outputs.image }}

    - name: Deploy Amazon ECS task definition
      uses: aws-actions/amazon-ecs-deploy-task-definition@v1
      with:
        task-definition: ${{ steps.task-def.outputs.task-definition }}
        service: sample-service
        cluster: sample-cluster
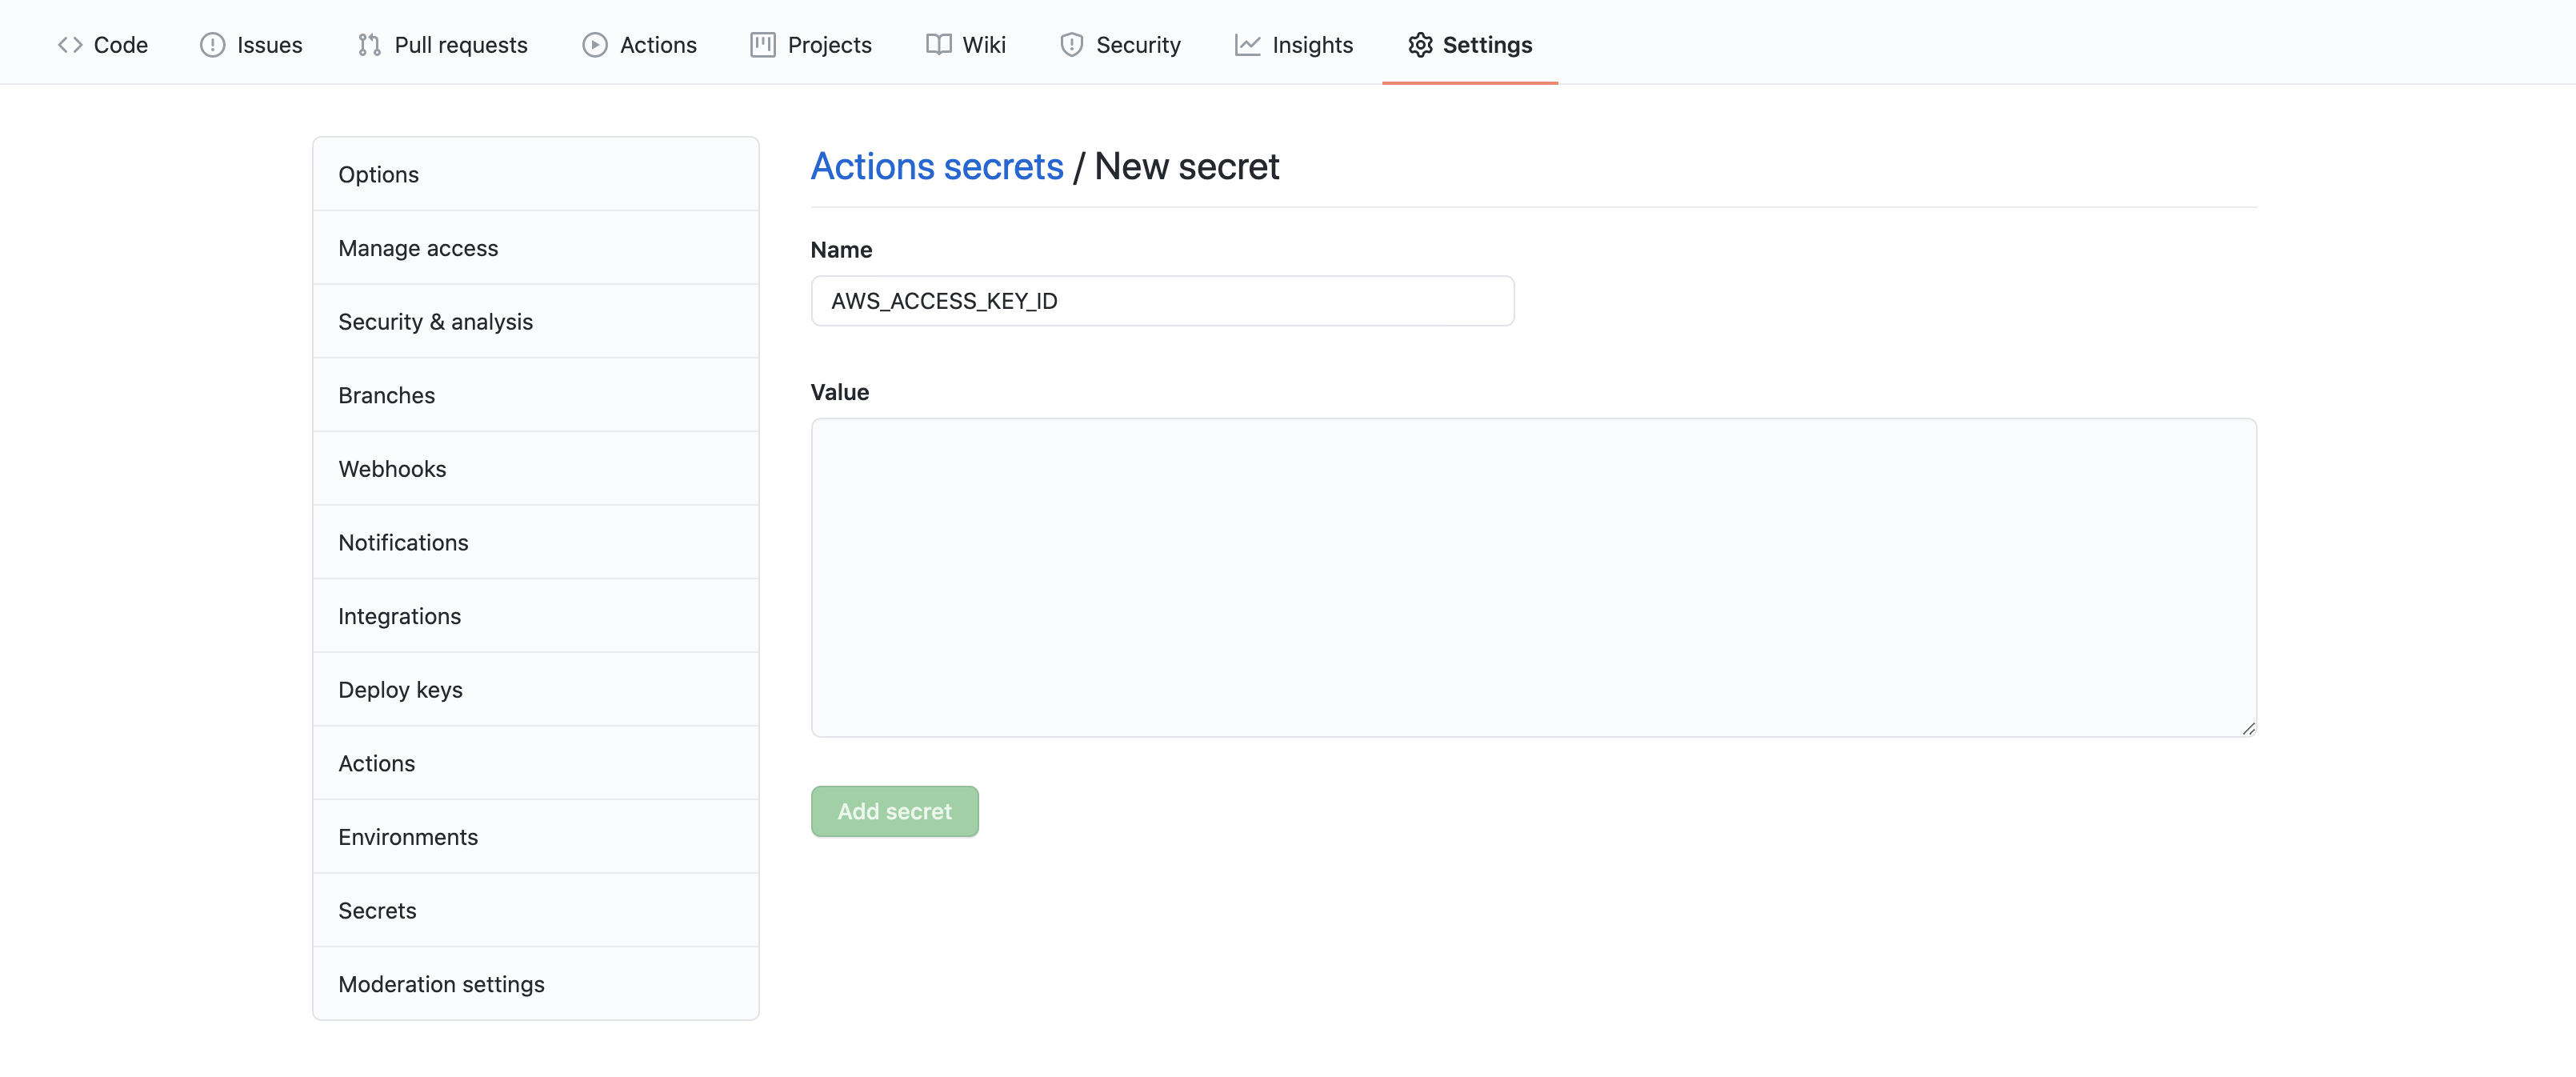
- AWS_ACCESS_KEY_ID
- AWS_SECRET_ACCESS_KEY
これら環境変数に関してはあらかじめGitHubリポジトリの「settings」→「secret」から登録しておきましょう。
{
  "ipcMode": null,
  "executionRoleArn": "arn:aws:iam::<AWSアカウントID>:role/ecsTaskExecutionRole",
  "containerDefinitions": [
    {
      "dnsSearchDomains": null,
      "environmentFiles": null,
      "logConfiguration": {
        "logDriver": "awslogs",
        "secretOptions": null,
        "options": {
          "awslogs-group": "/ecs/sample",
          "awslogs-region": "ap-northeast-1",
          "awslogs-stream-prefix": "production"
        }
      },
      "entryPoint": null,
      "portMappings": [],
      "command": [
        "bash",
        "-c",
        "bundle exec rails db:migrate && bundle exec rails assets:precompile && bundle exec puma -C config/puma.rb"
      ],
      "linuxParameters": null,
      "cpu": 0,
      "environment": [
        {
          "name": "DATABASE_HOST",
          "value": "<RDSのエンドポイント>"
        },
        {
          "name": "DATABASE_NAME",
          "value": "sample_app_production"
        },
        {
          "name": "DATABASE_PASSWORD",
          "value": "password"
        },
        {
          "name": "DATABASE_USERNAME",
          "value": "root"
        },
        {
          "name": "RAILS_ENV",
          "value": "production"
        },
        {
          "name": "RAILS_MASTER_KEY",
          "value": "<Railsアプリのmaster.key>"
        },
        {
          "name": "TZ",
          "value": "Japan"
        }
      ],
      "resourceRequirements": null,
      "ulimits": null,
      "dnsServers": null,
      "mountPoints": [],
      "workingDirectory": "/sample",
      "secrets": null,
      "dockerSecurityOptions": null,
      "memory": null,
      "memoryReservation": null,
      "volumesFrom": [],
      "stopTimeout": null,
      "image": "<ECRのリポジトリURL(sample-app)>",
      "startTimeout": null,
      "firelensConfiguration": null,
      "dependsOn": null,
      "disableNetworking": null,
      "interactive": null,
      "healthCheck": null,
      "essential": true,
      "links": null,
      "hostname": null,
      "extraHosts": null,
      "pseudoTerminal": null,
      "user": null,
      "readonlyRootFilesystem": null,
      "dockerLabels": null,
      "systemControls": null,
      "privileged": null,
      "name": "app"
    },
    {
      "dnsSearchDomains": null,
      "environmentFiles": null,
      "logConfiguration": {
        "logDriver": "awslogs",
        "secretOptions": null,
        "options": {
          "awslogs-group": "/ecs/sample",
          "awslogs-region": "ap-northeast-1",
          "awslogs-stream-prefix": "production"
        }
      },
      "entryPoint": null,
      "portMappings": [
        {
          "hostPort": 80,
          "protocol": "tcp",
          "containerPort": 80
        }
      ],
      "command": null,
      "linuxParameters": null,
      "cpu": 0,
      "environment": [],
      "resourceRequirements": null,
      "ulimits": null,
      "dnsServers": null,
      "mountPoints": [],
      "workingDirectory": "/sample",
      "secrets": null,
      "dockerSecurityOptions": null,
      "memory": null,
      "memoryReservation": null,
      "volumesFrom": [
        {
          "sourceContainer": "app",
          "readOnly": false
        }
      ],
      "stopTimeout": null,
      "image": "<ECRのリポジトリURI(sample-nginx)>",
      "startTimeout": null,
      "firelensConfiguration": null,
      "dependsOn": null,
      "disableNetworking": null,
      "interactive": null,
      "healthCheck": null,
      "essential": true,
      "links": null,
      "hostname": null,
      "extraHosts": null,
      "pseudoTerminal": null,
      "user": null,
      "readonlyRootFilesystem": null,
      "dockerLabels": null,
      "systemControls": null,
      "privileged": null,
      "name": "nginx"
    }
  ],
  "placementConstraints": [],
  "memory": "1024",
  "taskRoleArn": "arn:aws:iam::<AWSアカウントID>:role/ecsTaskExecutionRole",
  "family": "sample-app",
  "pidMode": null,
  "requiresCompatibilities": [
    "FARGATE"
  ],
  "networkMode": "awsvpc",
  "cpu": "512",
  "inferenceAccelerators": null,
  "proxyConfiguration": null,
  "volumes": []
}
適当にトップページの文言を変更
自動でデプロイまで行われた事がわかるように、トップページの文言を少しいじっておきます。
<p id="notice"><%= notice %></p>
<h1>Todos</h1>
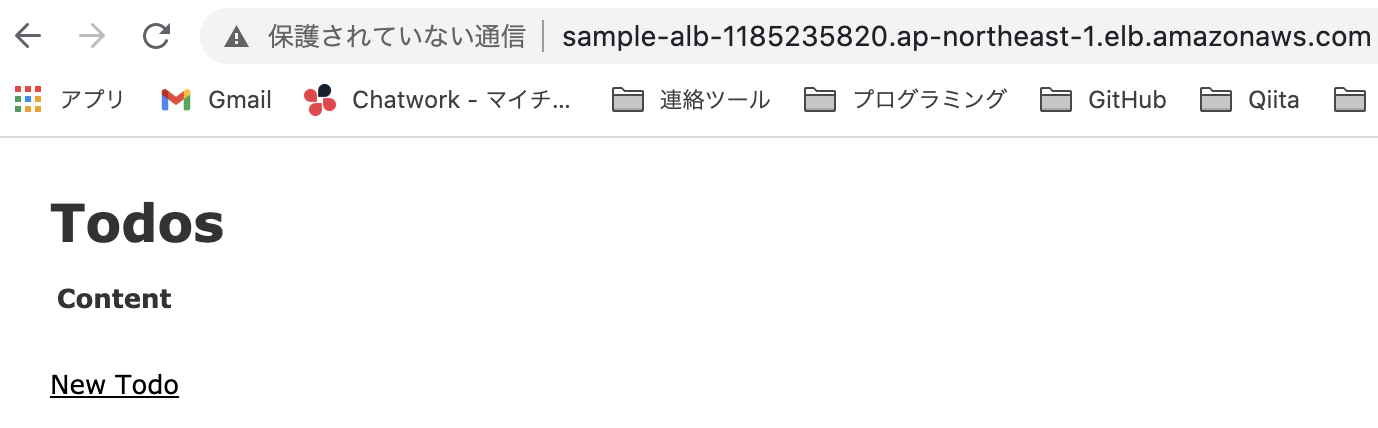
<p>Succeeded in auto deployment using GitHub Actions!!</p> # 追加
<table>
<thead>
<tr>
<th>Content</th>
<th colspan="3"></th>
</tr>
</thead>
<tbody>
<% @todos.each do |todo| %>
<tr>
<td><%= todo.content %></td>
<td><%= link_to 'Show', todo %></td>
<td><%= link_to 'Edit', edit_todo_path(todo) %></td>
<td><%= link_to 'Destroy', todo, method: :delete, data: { confirm: 'Are you sure?' } %></td>
</tr>
<% end %>
</tbody>
</table>
<br>
<%= link_to 'New Todo', new_todo_path %>
masterブランチもしくはdevelopブランチへプッシュ
$ git add .
$ git commit -m "Add GitHub Actions"
$ git push origin <master or develop>
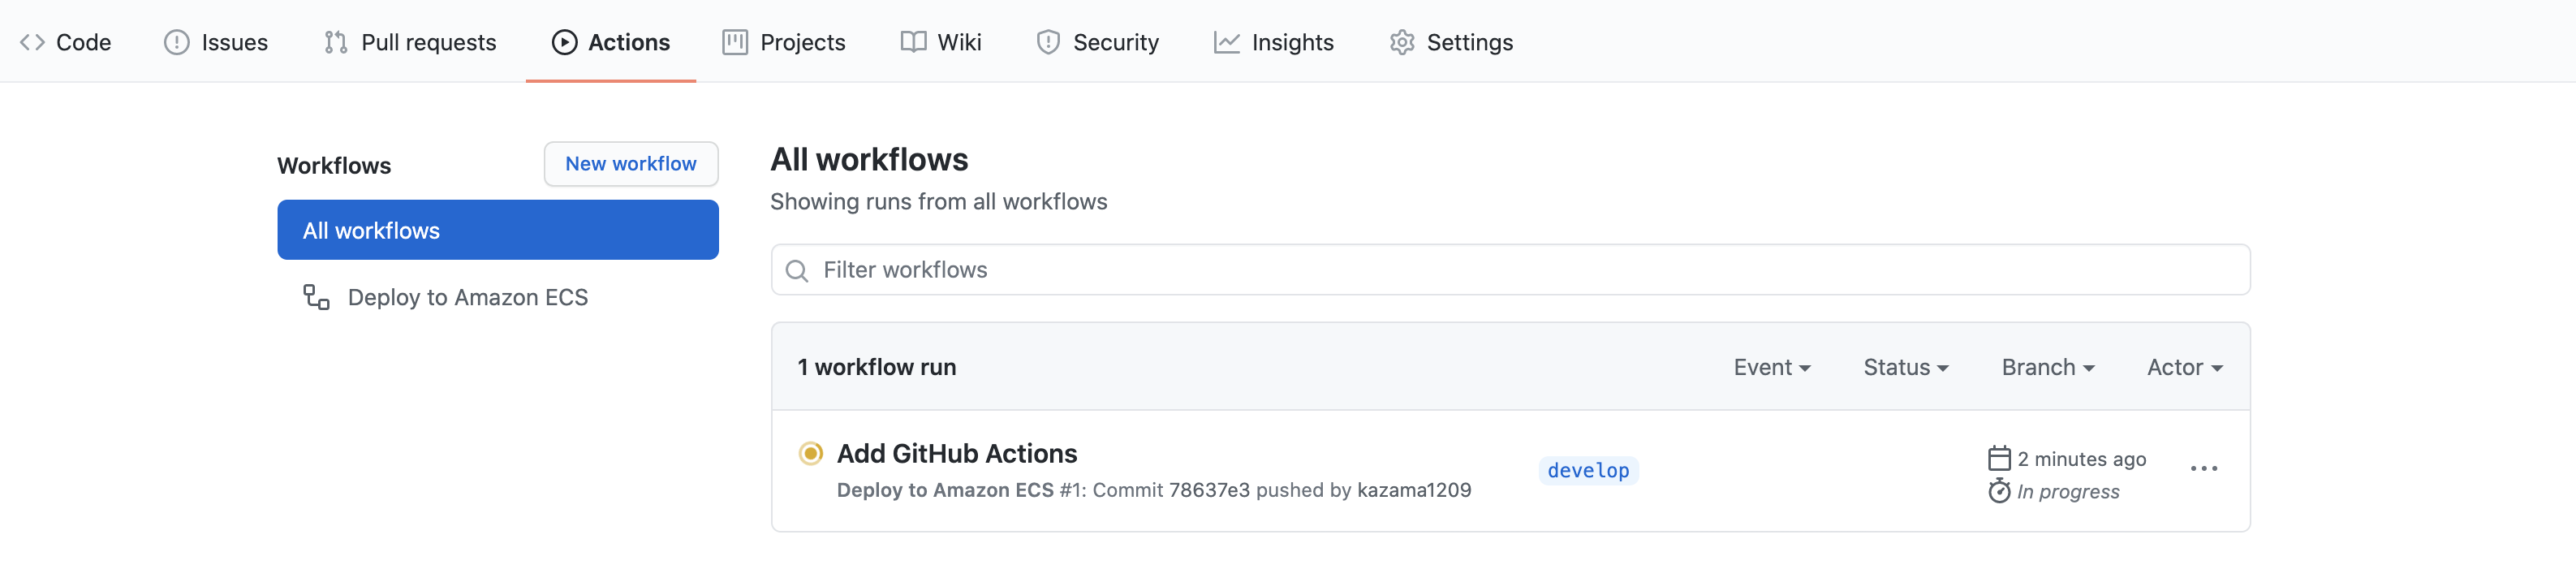
GitHubリポジトリの「Actions」を開き、こんな感じで処理が走り始めればひとまずOKです。
全てのフローが無事通る事を祈りましょう。(本当はRspecなどのテストを挟んだ方がプロセスとしては望ましそうですが、尺的に今回は割愛させていただきました。)
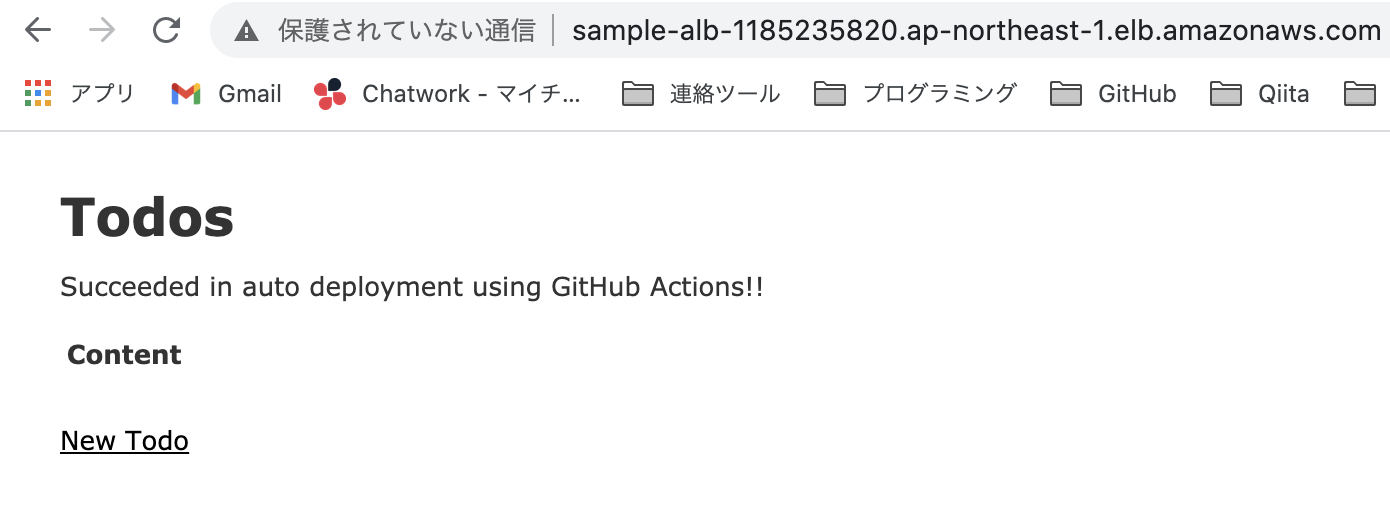
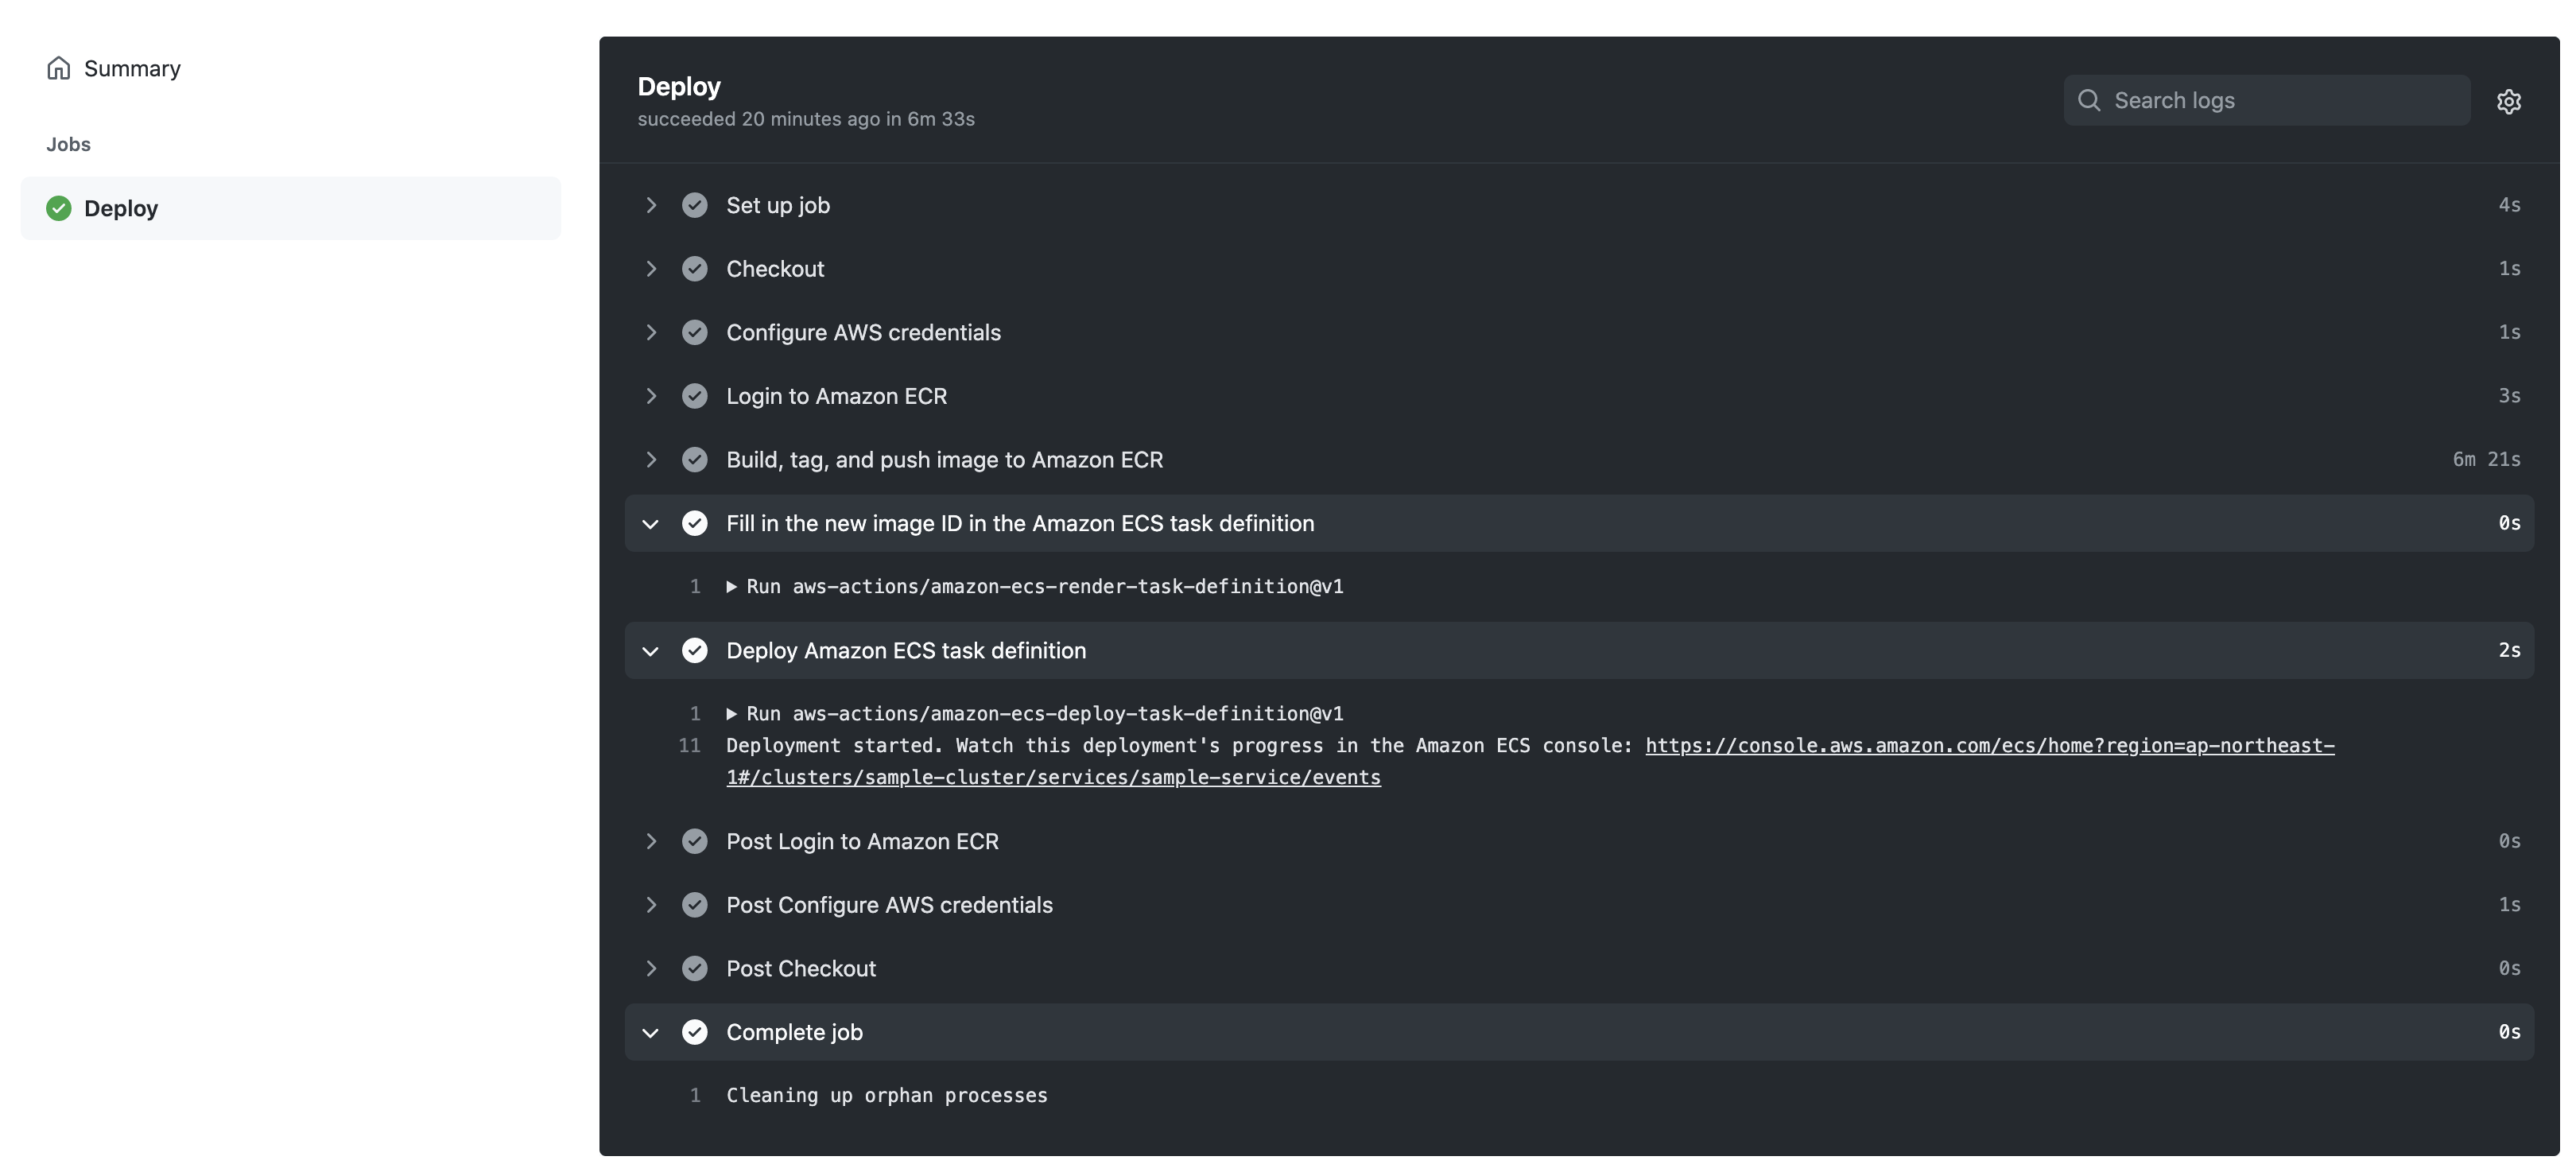
デプロイ完了後、しばらくすると先ほどの変更分が反映されているのを確認できました。これで無事CI/CD環境の構築に成功です。
あとがき
お疲れ様でした!デプロイの際にAWSコンソール画面からぽちぽちする必要が無くなり、一括でリソースの作成&削除ができるようになったので、だいぶ管理しやすくなったと思います。
手順通りに進めて上手くいかない箇所などがあればコメント蘭なのでご報告いただけると幸いです。