概要
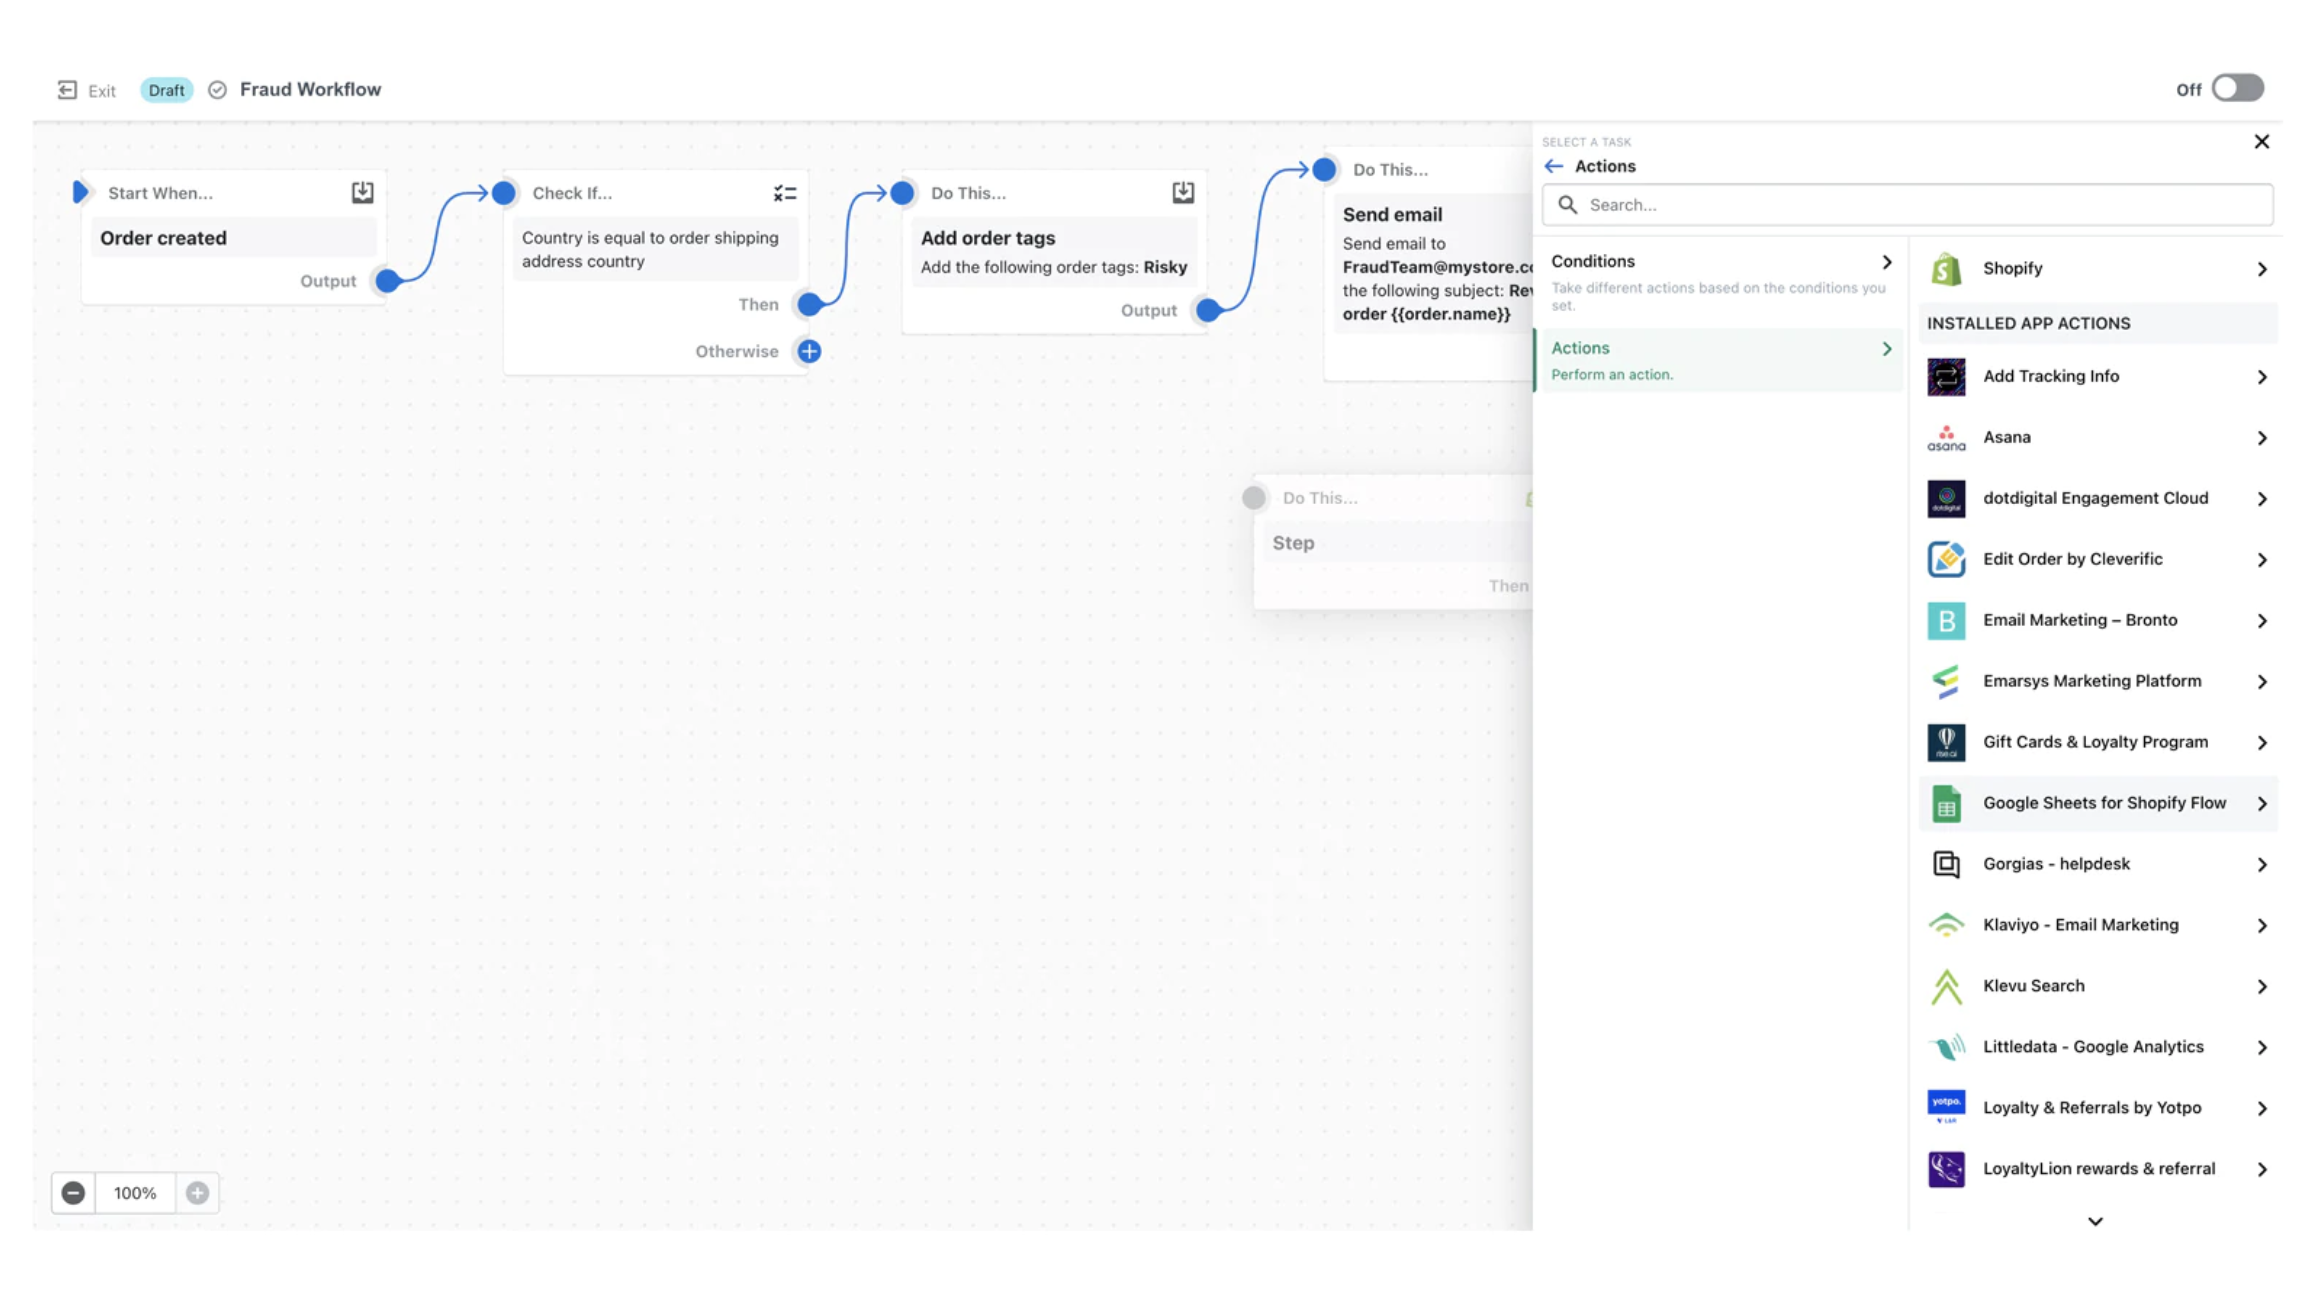
Shopify Flowとは
Shopify のエンタープライズプラン「Shopify Plus」 を利用すると使えるようになるオートメーション機能。Shopify で構築した自身のストア上における顧客の行動をトリガーに様々なアクションを自動で行ってくれる。
Trigger → Condition → Action
- Trigger(トリガー)
- ワークフローを開始させるイベント
- Condition(条件)
- アクションを実行するかどうかの条件
- Action(アクション)
- 条件が満たされた時に行われる内容
・ ある商品の在庫数が◯個以下になった際に Slack 通知を飛ばす
・ ○円以上の買い物をした顧客に対して特別なタグを付与する
・ 顧客が新規登録されるたびにそのデータをスプレッドシートに記録する
この Shopify Flow を回し始めるには「トリガー」と呼ばれるきっかけが必要になるのですが、Shopify が標準で用意しているトリガーは基本的にストア上の顧客行動が対象となっているため、それ以外の要因で引き金を引く事が難しくなっています。
もちろん、特に奇を衒った事をしようとしなければそれでも十分だと思いますが、個人的に「外部からちょこっと API を叩くだけで任意に起動できるトリガーを作れないかなぁ」みたいな要望があったため、色々調べてみました。
結果、なんとかなりそうな方法があったので紹介してみたいと思います。
API 経由でワークフローを回す事ができるようになれば、Shopify ストアとは別の自社アプリ内などに組み込んで色々と連携が捗ったり運用の幅が広がるかもしれません。
カスタムアプリを作成
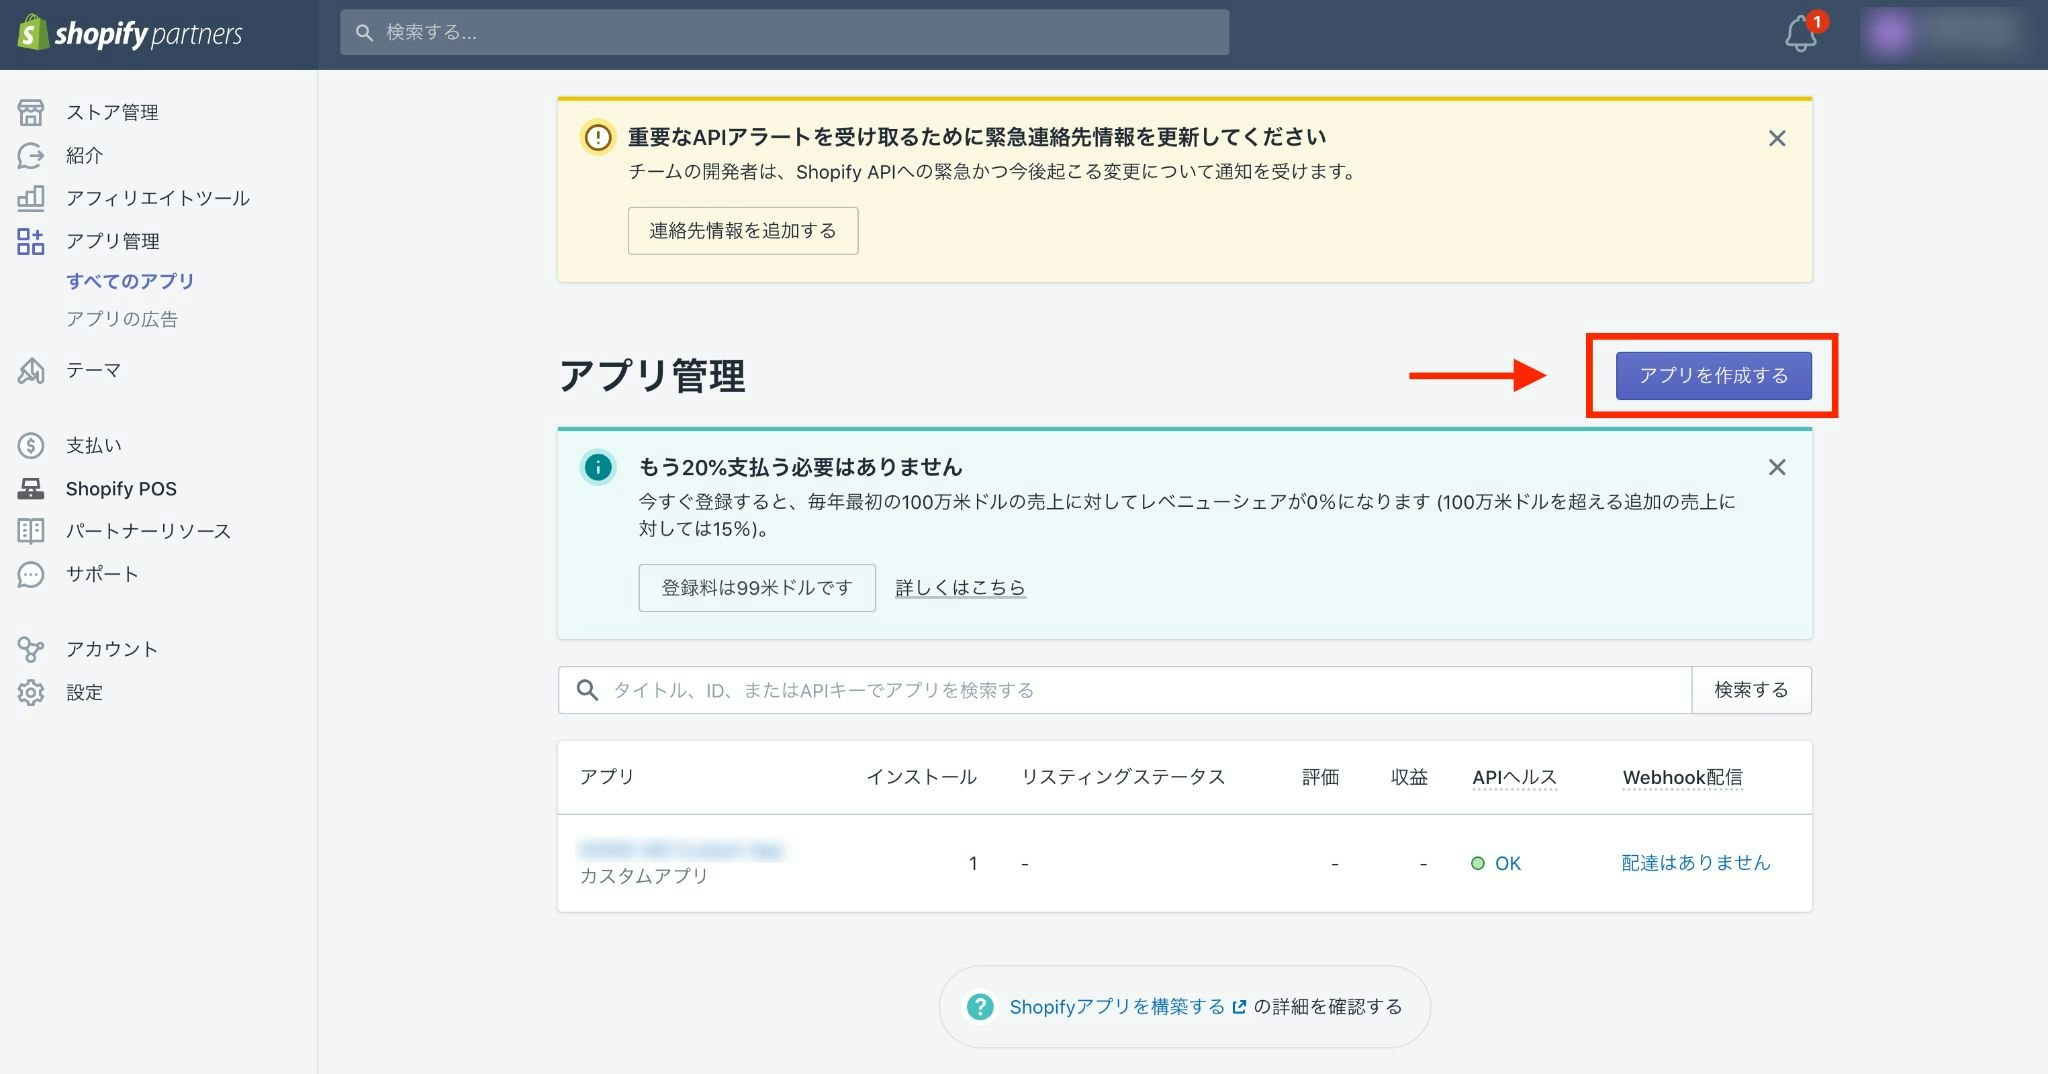
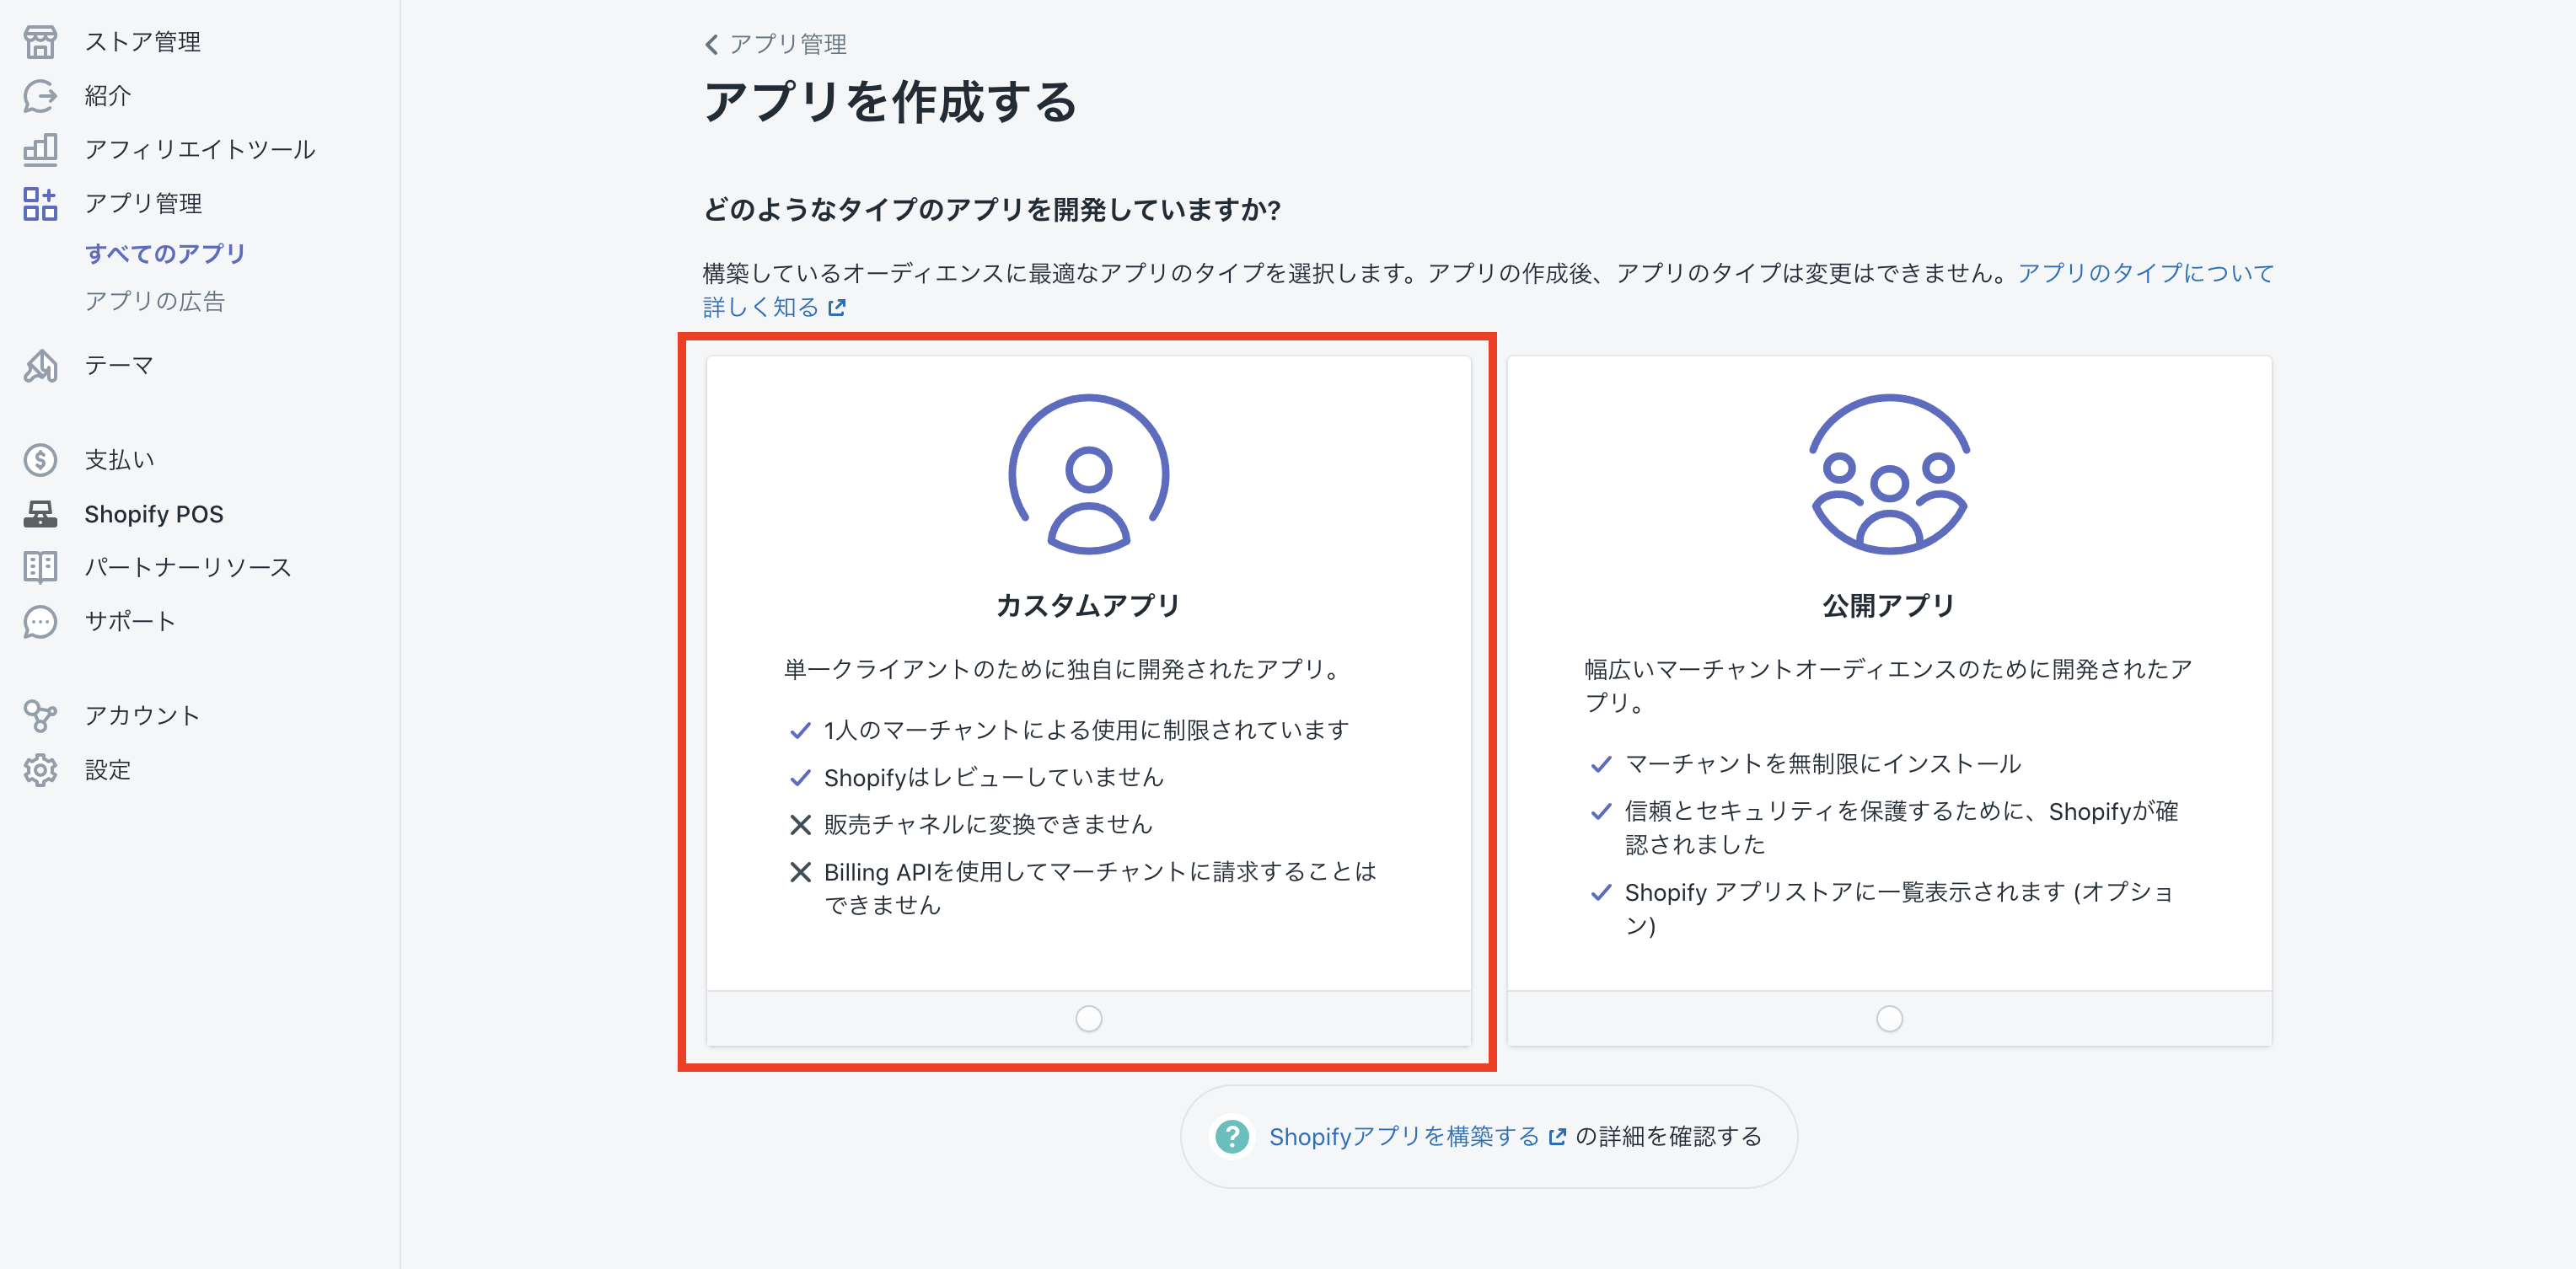
Shopify Parnters のダッシュボードに入り、「アプリ管理」→「すべてのアプリ」へと進み、「アプリを作成する」ボタンをクリックします。
- カスタムアプリ
- 公開アプリ
の2種類ありますが、今回は「カスタムアプリ」の方を選択してください。
- 一般設定
- アプリ名
- 任意
- アプリURL
- https://localhost (後ほど変更)
- アプリ名
- リダイレクトURL
- https://localhost (後ほど変更)
諸々入力したら、右上の「アプリを作成」ボタンをクリックしましょう。
トリガーを作成
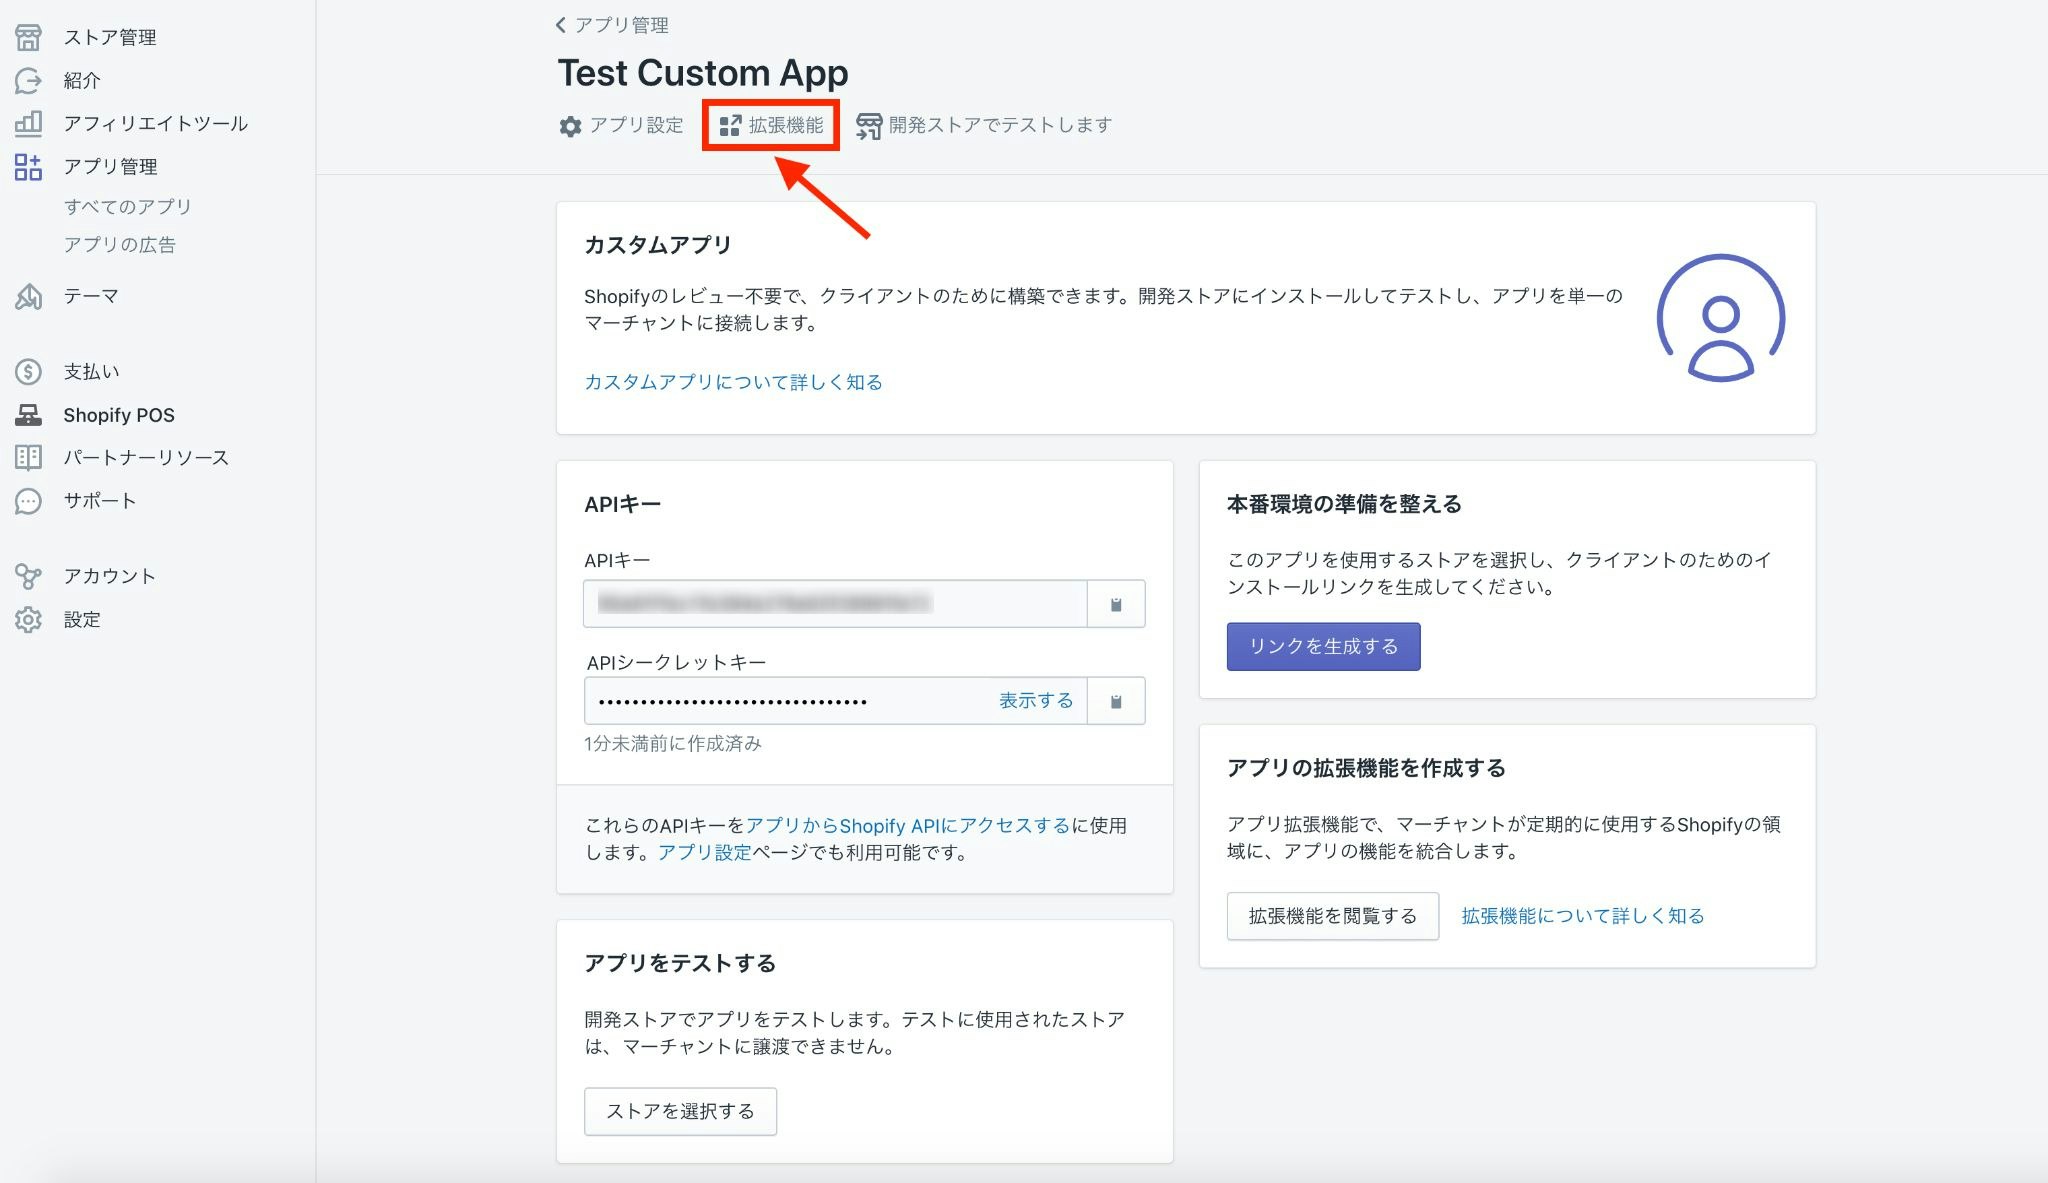
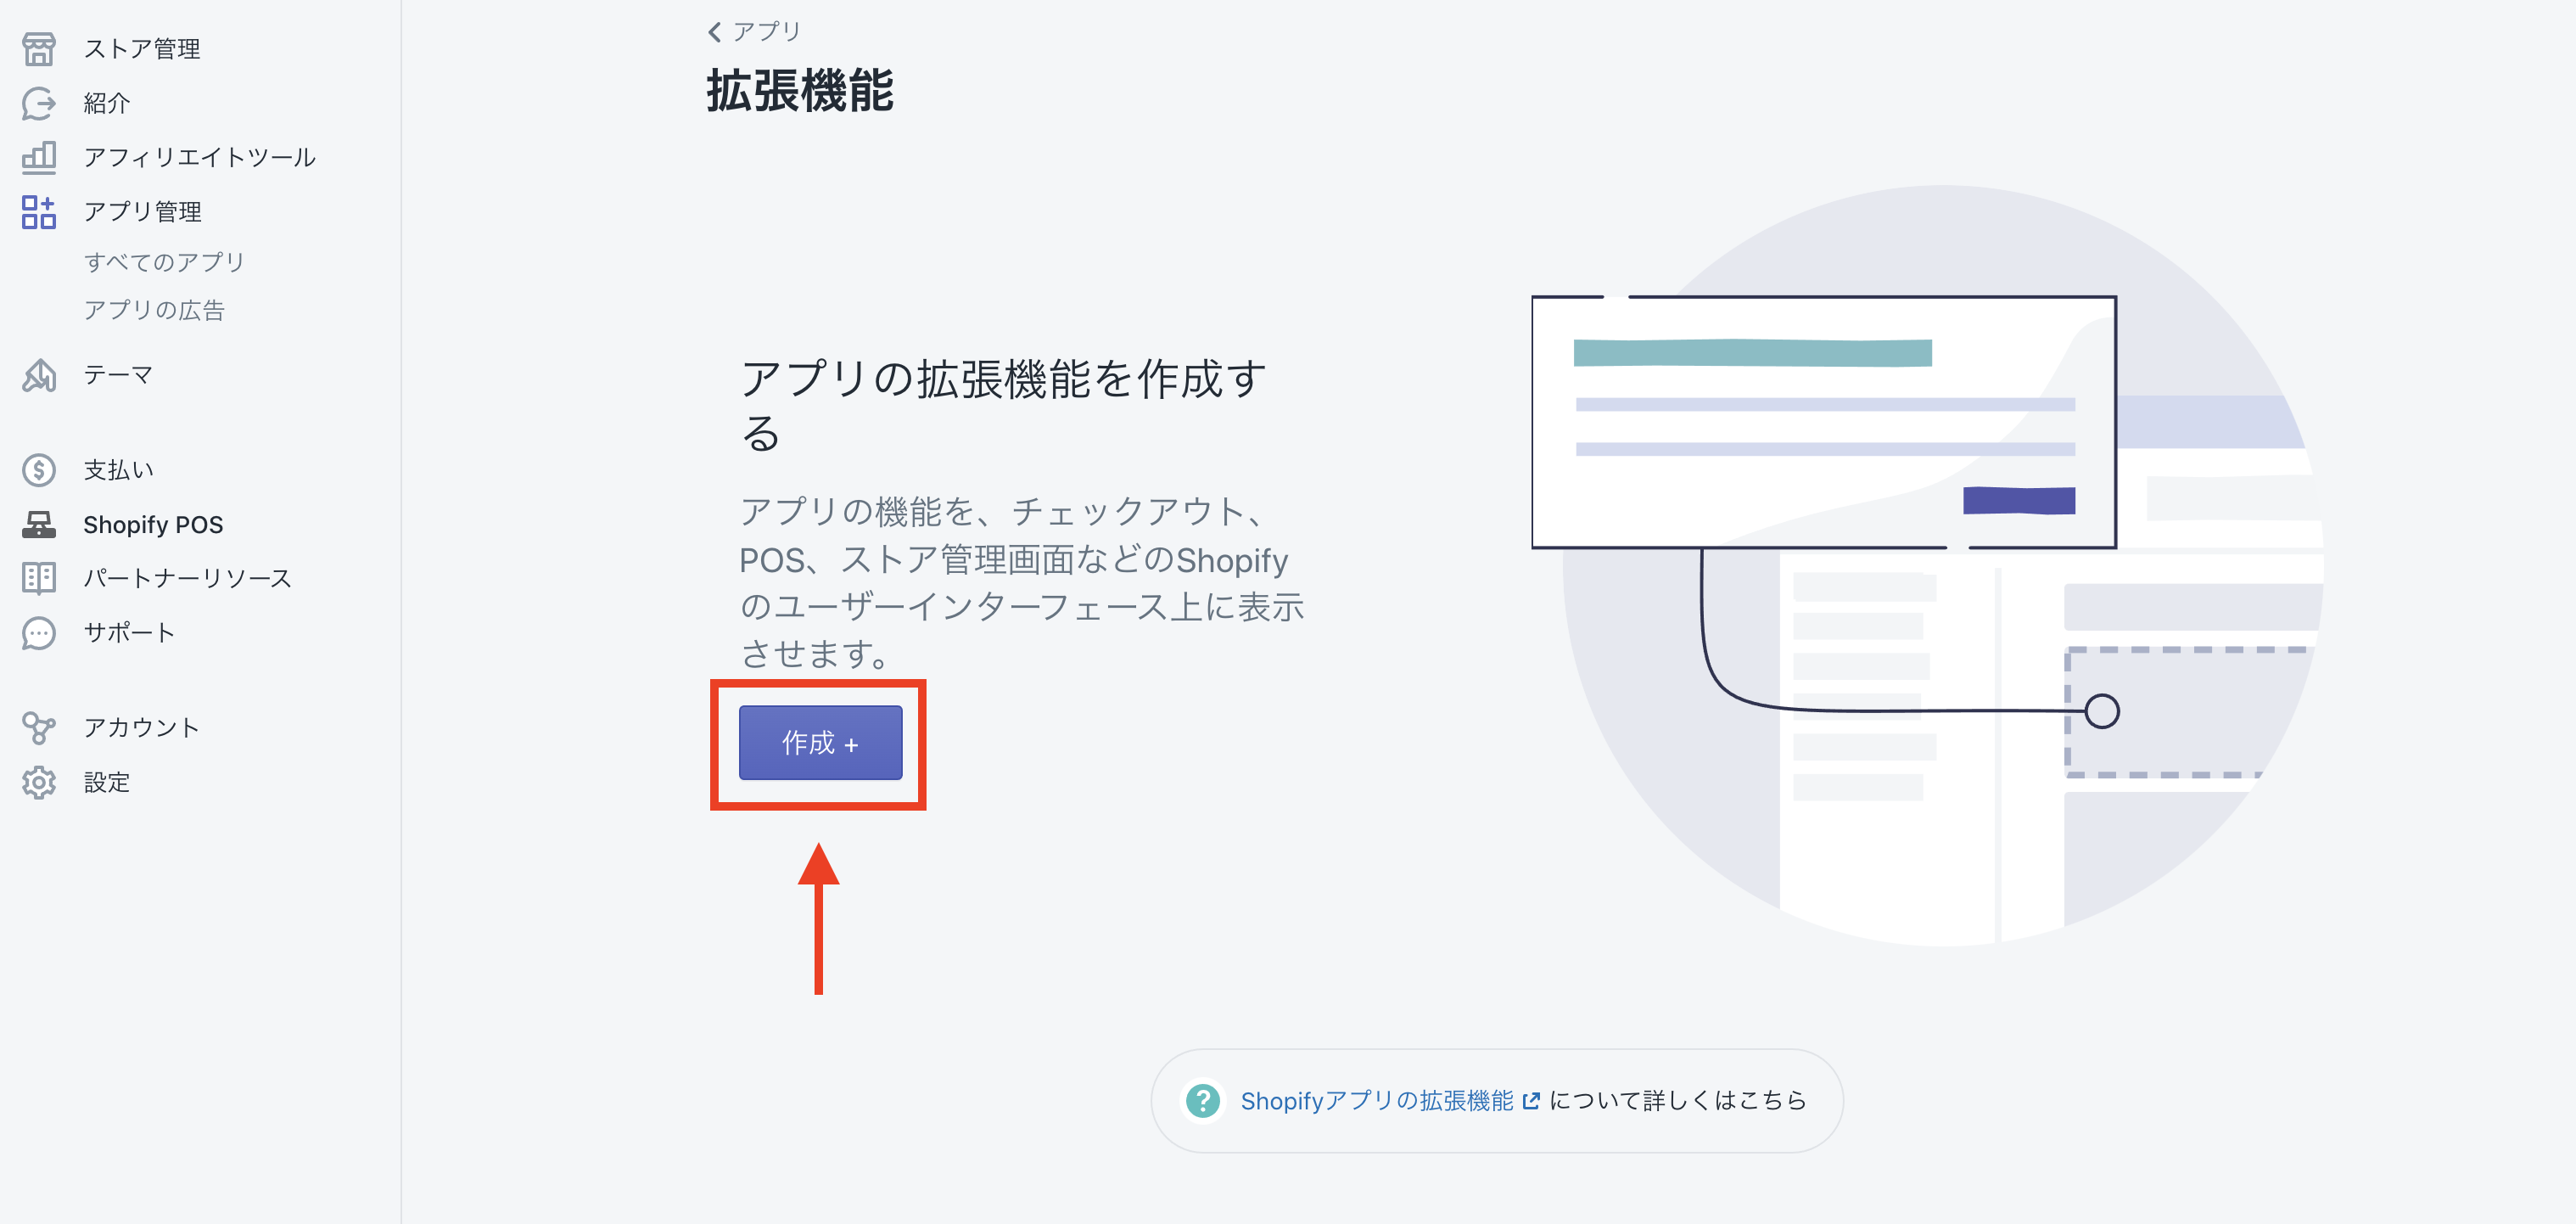
カスタムアプリの作成に成功するとアプリ詳細画面に飛ぶはずなので、「拡張機能」という部分をクリックしてください。
「作成+」をクリック。
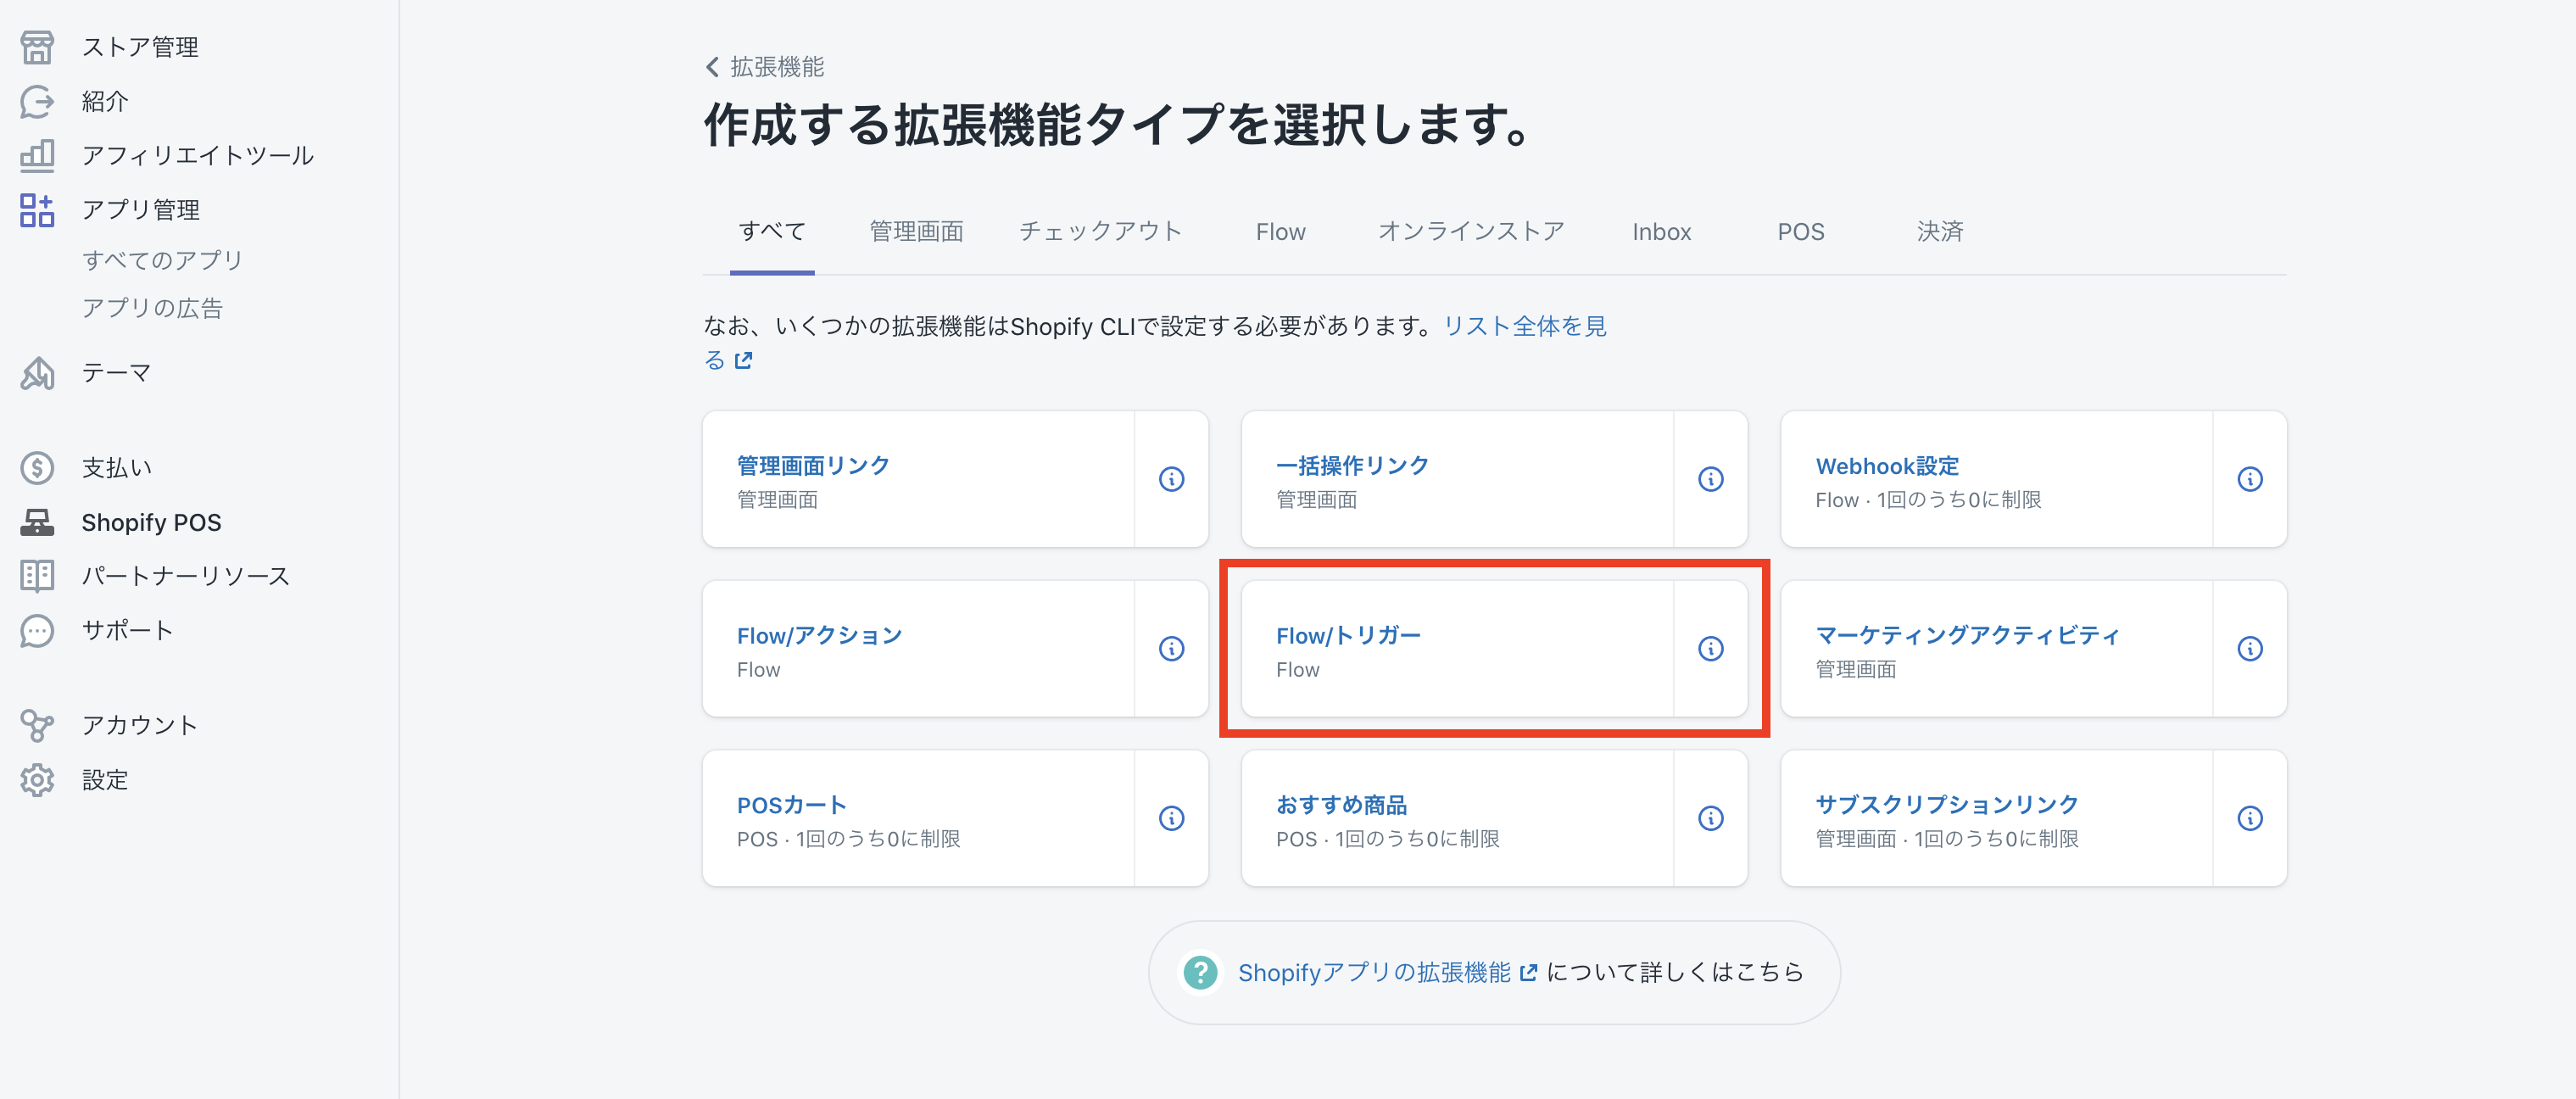
拡張機能タイプは「Flow/トリガー」を選択してください。
適当な名前をつけて「Save」
トリガーの設定を行うために「Working draft」をクリック。
- トリガーのタイトル
- 任意
- トリガーの説明
- 任意
- プロパティ
- お客様
プロパティについては、デフォルトの状態だと
- お客様
- 注文
- 商品
といった3種類が用意されており、Trigger 起動時のリクエストに
- customer_id
- order_id
- product_id
を含める事で Action 実行時に shopify 上のオブジェクトを参照する事ができます。
https://shopify.dev/apps/flow/triggers#shopify-properties
When you create a trigger, you add the properties that your trigger sends to Shopify Flow. You can add a custom property or a predefined Shopify property.
Shopify property lets you send the identifier of a Shopify resource to Shopify Flow. Merchants can then use the entire resource in their conditions and actions. You can add one of each Shopify property to a trigger:
For example, your trigger sends a customer ID to Shopify Flow. The merchant can create a condition that checks the customer's total spend amount. In their action, the merchant can include the template variables for customers (such as {{customer.email}}).
設定が済んだら右上の「Create version」をクリックし、「Minor version」を選択して「Create」
作成が完了したら、「Publish」をクリックしましょう。
アクセストークンを取得 & ストアにインストール
諸々の準備が整ったので、自身のストアに先ほど作ったカスタムアプリをインストールしていきます。
と、その前に、カスタムアプリと通信を行うためのアクセストークンを取得しなければなりません。
アクセストークンの取得方法は色々ありますが、今回は
- Ruby
- Ruby on Rails
- ngrok
を使って Web サーバーを準備し、そこで取得していきます。
各種ディレクトリ & ファイルを作成
$ mkdir shopify-access-token-getter && cd shopify-access-token-getter
$ touch Dockerfile docker-compose.yml entrypoint.sh Gemfile Gemfile.lock
FROM ruby:3.0

RUN curl https://deb.nodesource.com/setup_14.x | bash

RUN curl -sS https://dl.yarnpkg.com/debian/pubkey.gpg | apt-key add - \
    && echo "deb https://dl.yarnpkg.com/debian/ stable main" | tee /etc/apt/sources.list.d/yarn.list

RUN apt-get update -qq && apt-get install -y build-essential libpq-dev nodejs yarn

ENV APP_PATH /myapp

RUN mkdir $APP_PATH
WORKDIR $APP_PATH

COPY Gemfile $APP_PATH/Gemfile
COPY Gemfile.lock $APP_PATH/Gemfile.lock
RUN bundle install

COPY . $APP_PATH

COPY entrypoint.sh /usr/bin/
RUN chmod +x /usr/bin/entrypoint.sh
ENTRYPOINT ["entrypoint.sh"]
EXPOSE 3000

CMD ["rails", "server", "-b", "0.0.0.0"]
version: "3"
services:
  db:
    image: mysql:5.7
    environment:
      MYSQL_ROOT_PASSWORD: password
    volumes:
      - mysql-data:/var/lib/mysql
      - /tmp/dockerdir:/etc/mysql/conf.d/
    ports:
      - 4306:3306
  api:
    build:
      context: .
      dockerfile: Dockerfile
    command: bash -c "rm -f tmp/pids/server.pid && bundle exec rails s -p 3000 -b '0.0.0.0'"
    volumes:
      - .:/myapp
      - ./vendor/bundle:/myapp/vendor/bundle
    environment:
      TZ: Asia/Tokyo
      RAILS_ENV: development
    ports:
      - "3000:3000"
    depends_on:
      - db
volumes:
  mysql-data:
#!/bin/bash
set -e

# Remove a potentially pre-existing server.pid for Rails.
rm -f /myapp/tmp/pids/server.pid

# Then exec the container's main process (what's set as CMD in the Dockerfile).
exec "$@"
# frozen_string_literal: true

source "https://rubygems.org"

git_source(:github) {|repo_name| "https://github.com/#{repo_name}" }

gem "rails", "~> 6"
# 空欄でOK
rails new
APIモードで作成します。
$ docker-compose run api rails new . --force --no-deps -d mysql --api
database.ymlを編集
デフォルトの状態だとデータベースとの接続ができないので「database.yml」の一部を書き換えます。
default: &default
  adapter: mysql2
  encoding: utf8mb4
  pool: <%= ENV.fetch("RAILS_MAX_THREADS") { 5 } %>
  username: root
  password: password # デフォルトだと空欄になっているはずなので変更
  host: db # デフォルトだとlocalhostになっているはずなので変更

development:
  <<: *default
  database: myapp_development

test:
  <<: *default
  database: myapp_test

production:
  <<: *default
  database: <%= ENV["DATABASE_NAME"] %>
  username: <%= ENV["DATABASE_USERNAME"] %>
  password: <%= ENV["DATABASE_PASSWORD"] %>
コンテナを起動 & データベースを作成
$ docker-compose build
$ docker-compose up
$ docker-compose run api bundle exec rails db:create
localhost:3000 にアクセス
localhost:3000 にアクセスしてウェルカムページが表示されればOKです。
ngrok を起動
# 追記
config.hosts << ".ngrok.io"
$ ngrok http 3000
https:// を割り当てるために上記コマンドで起動します。
アクセストークン取得用の処理を記述
gem "faraday"
$ docker-compose build
HTTP クライアントの「faraday」をインストールしてきましょう。
$ docker-compose run api bundle exec rails g controller api/shopify
class Api::ShopifyController < ApplicationController
  def auth
    shop = params[:shop]
    client_id = "CUSTOM_APP_API_KEY" # カスタムアプリの API キー
    scope = "write_customers,read_customers"
    redirect_uri = "https://************.ngrok.io/api/shopify/token" # ngrok で起動したサーバーの URL
    state = SecureRandom.random_bytes(16)

    query = {
      client_id: client_id,
      scope: scope,
      redirect_uri: redirect_uri,
      state: state
    }.to_query

    url = "https://#{shop}/admin/oauth/authorize?#{query}"

    redirect_to url
  end

  def token
    shop = params[:shop]
    code = params[:code]

    client_id = "CUSTOM_APP_API_KEY"            # カスタムアプリの API キー
    client_secret = "CUSTOM_APP_API_SECRET_KEY" # カスタムアプリの API シークレットキー

    res = Faraday.post("https://#{shop}/admin/oauth/access_token",
      client_id: client_id,
      client_secret: client_secret,
      code: code
    )

    p res.body
  end
end
アクセストークン取得用の処理をコントローラーに書いていきます。
ルーティングを定義
Rails.application.routes.draw do
  get "api/shopify/auth", to: "api/shopify#auth"
  get "api/shopify/token", to: "api/shopify#token"
end
これで
- https://************.ngrok.io/api/shopify/auth
- https://************.ngrok.io/api/shopify/token
にアクセスした際に先ほど定義した処理が走るようになりました。
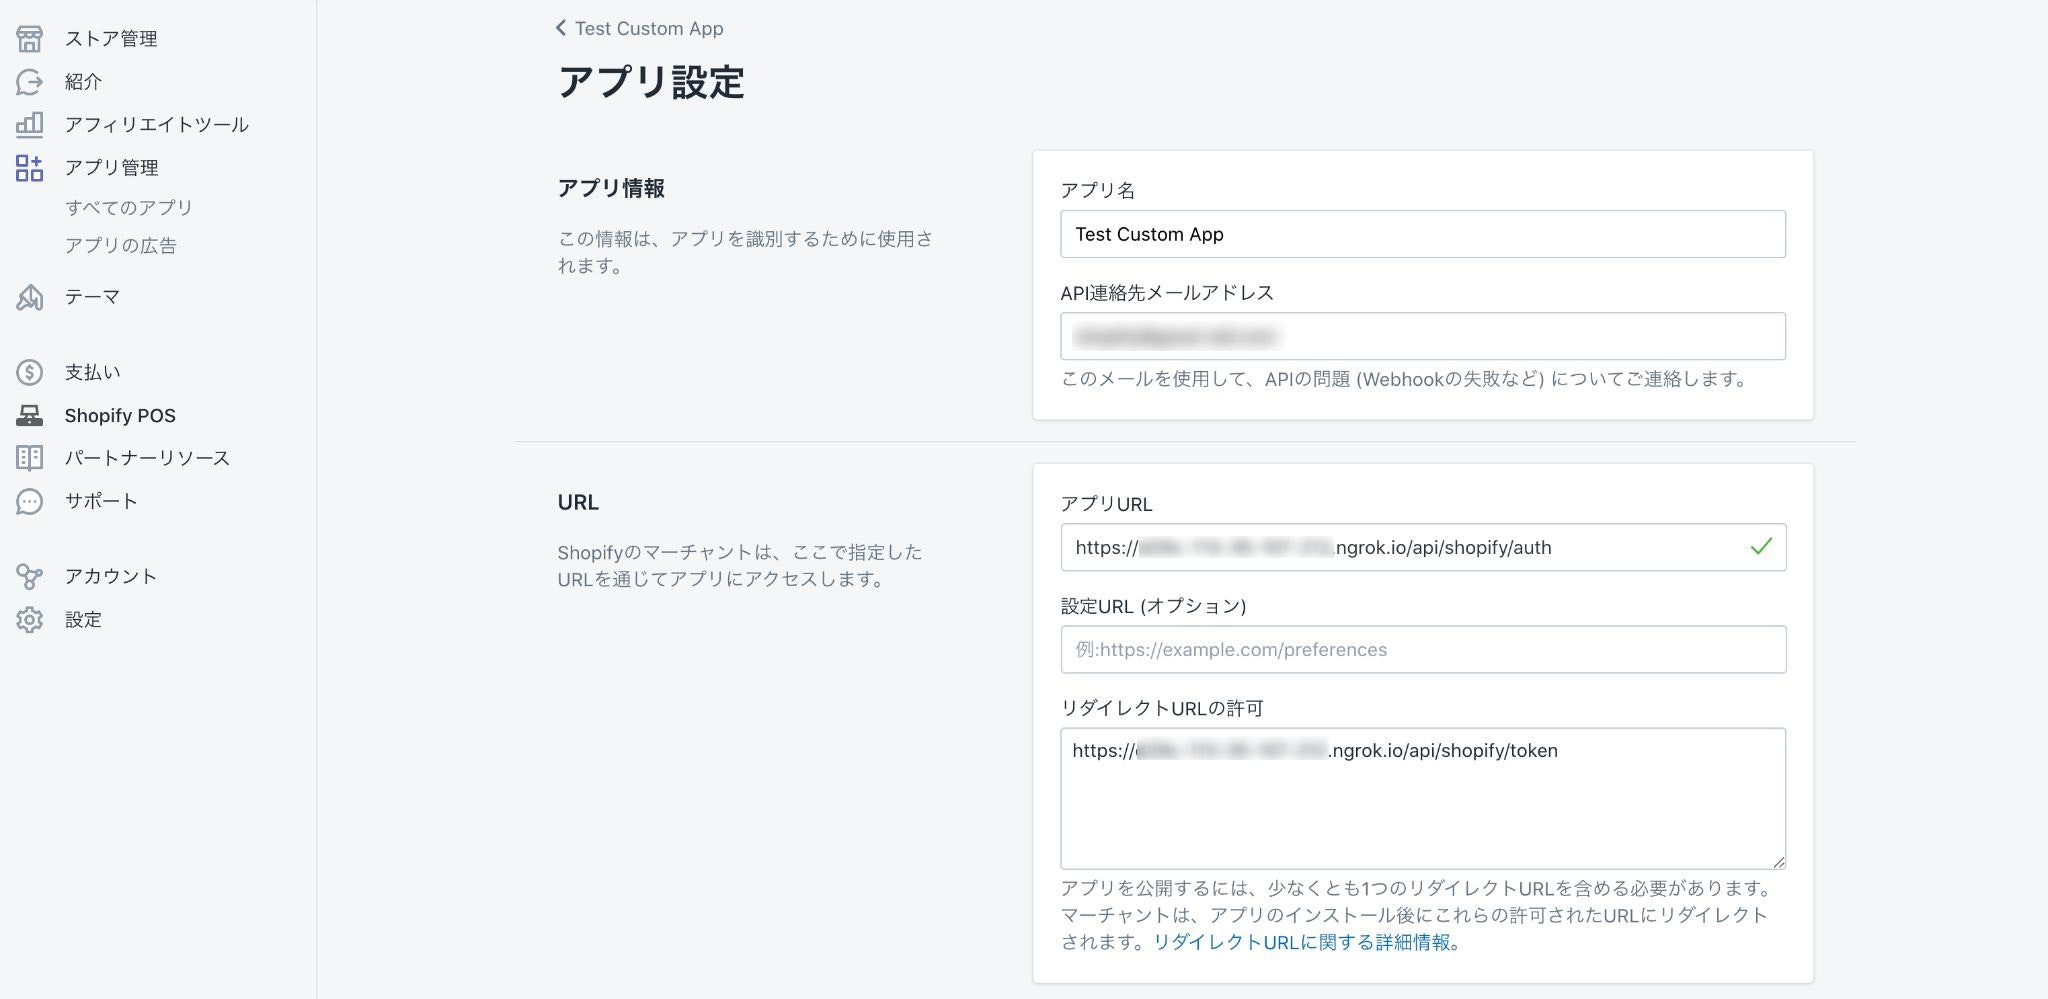
アプリ URL & リダイレクト URL を変更
「https://localhost/」 で暫定的に埋めていた
- アプリ URL
- リダイレクト URL
を先ほど立ち上げた Web サーバーのものに置き換えます。
- アプリ URL
- https://**************.ngrok.io/api/shopify/auth
- リダイレクト URL
- https://**************.ngrok.io/api/shopify/token
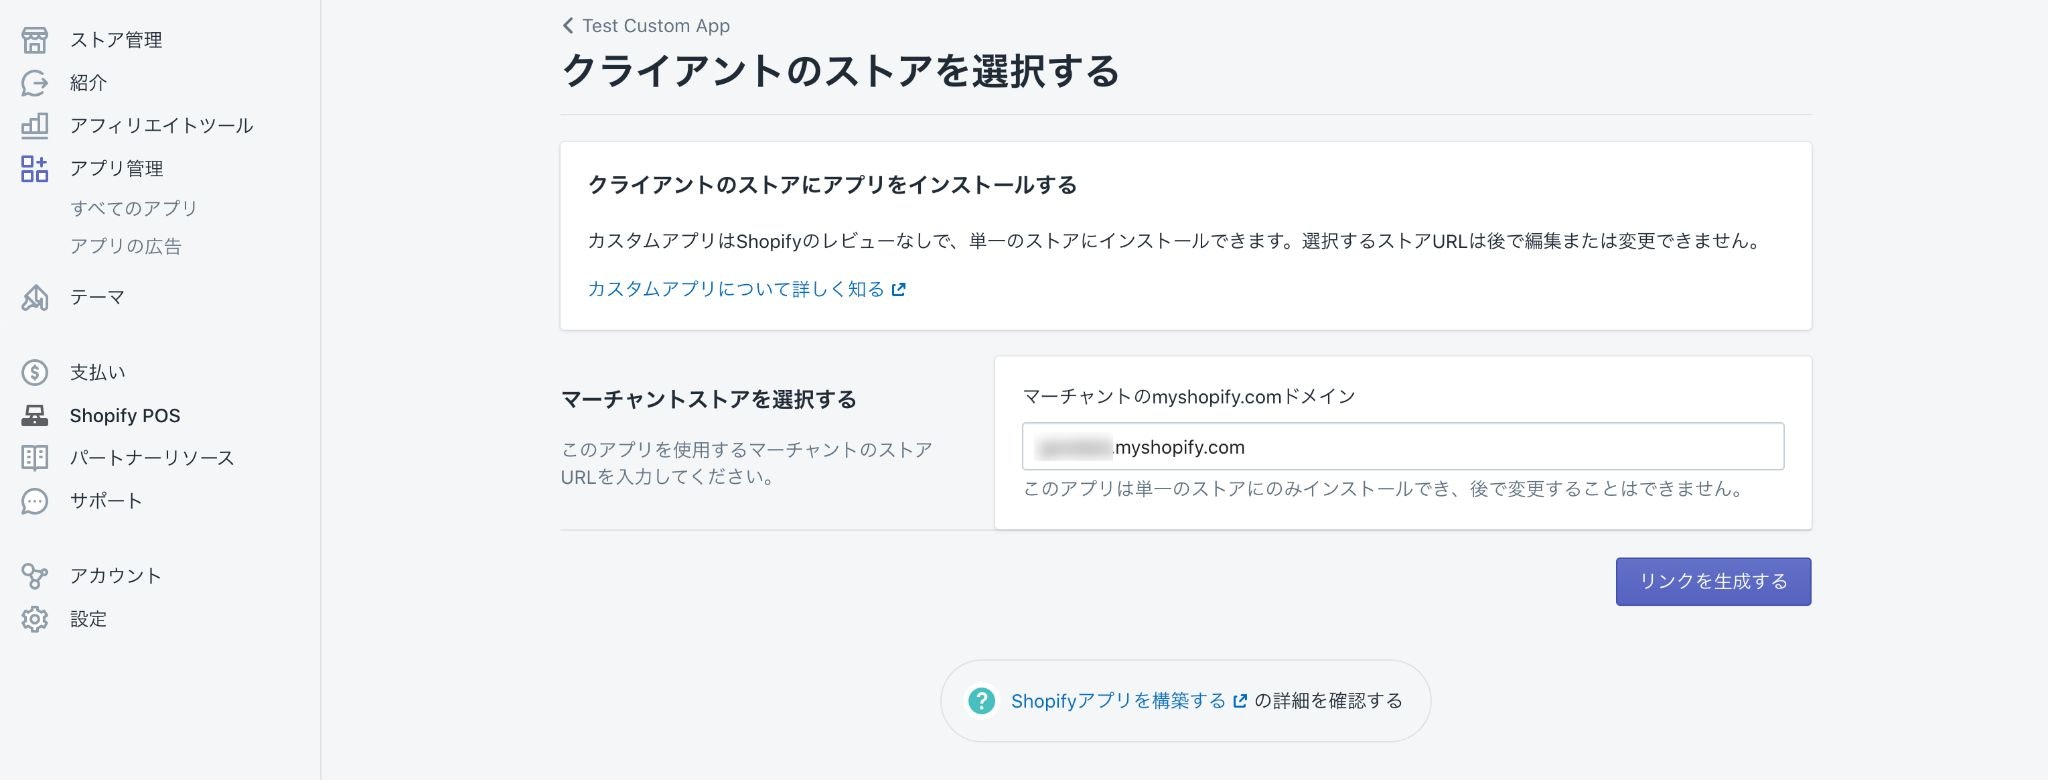
インストールリンクを作成
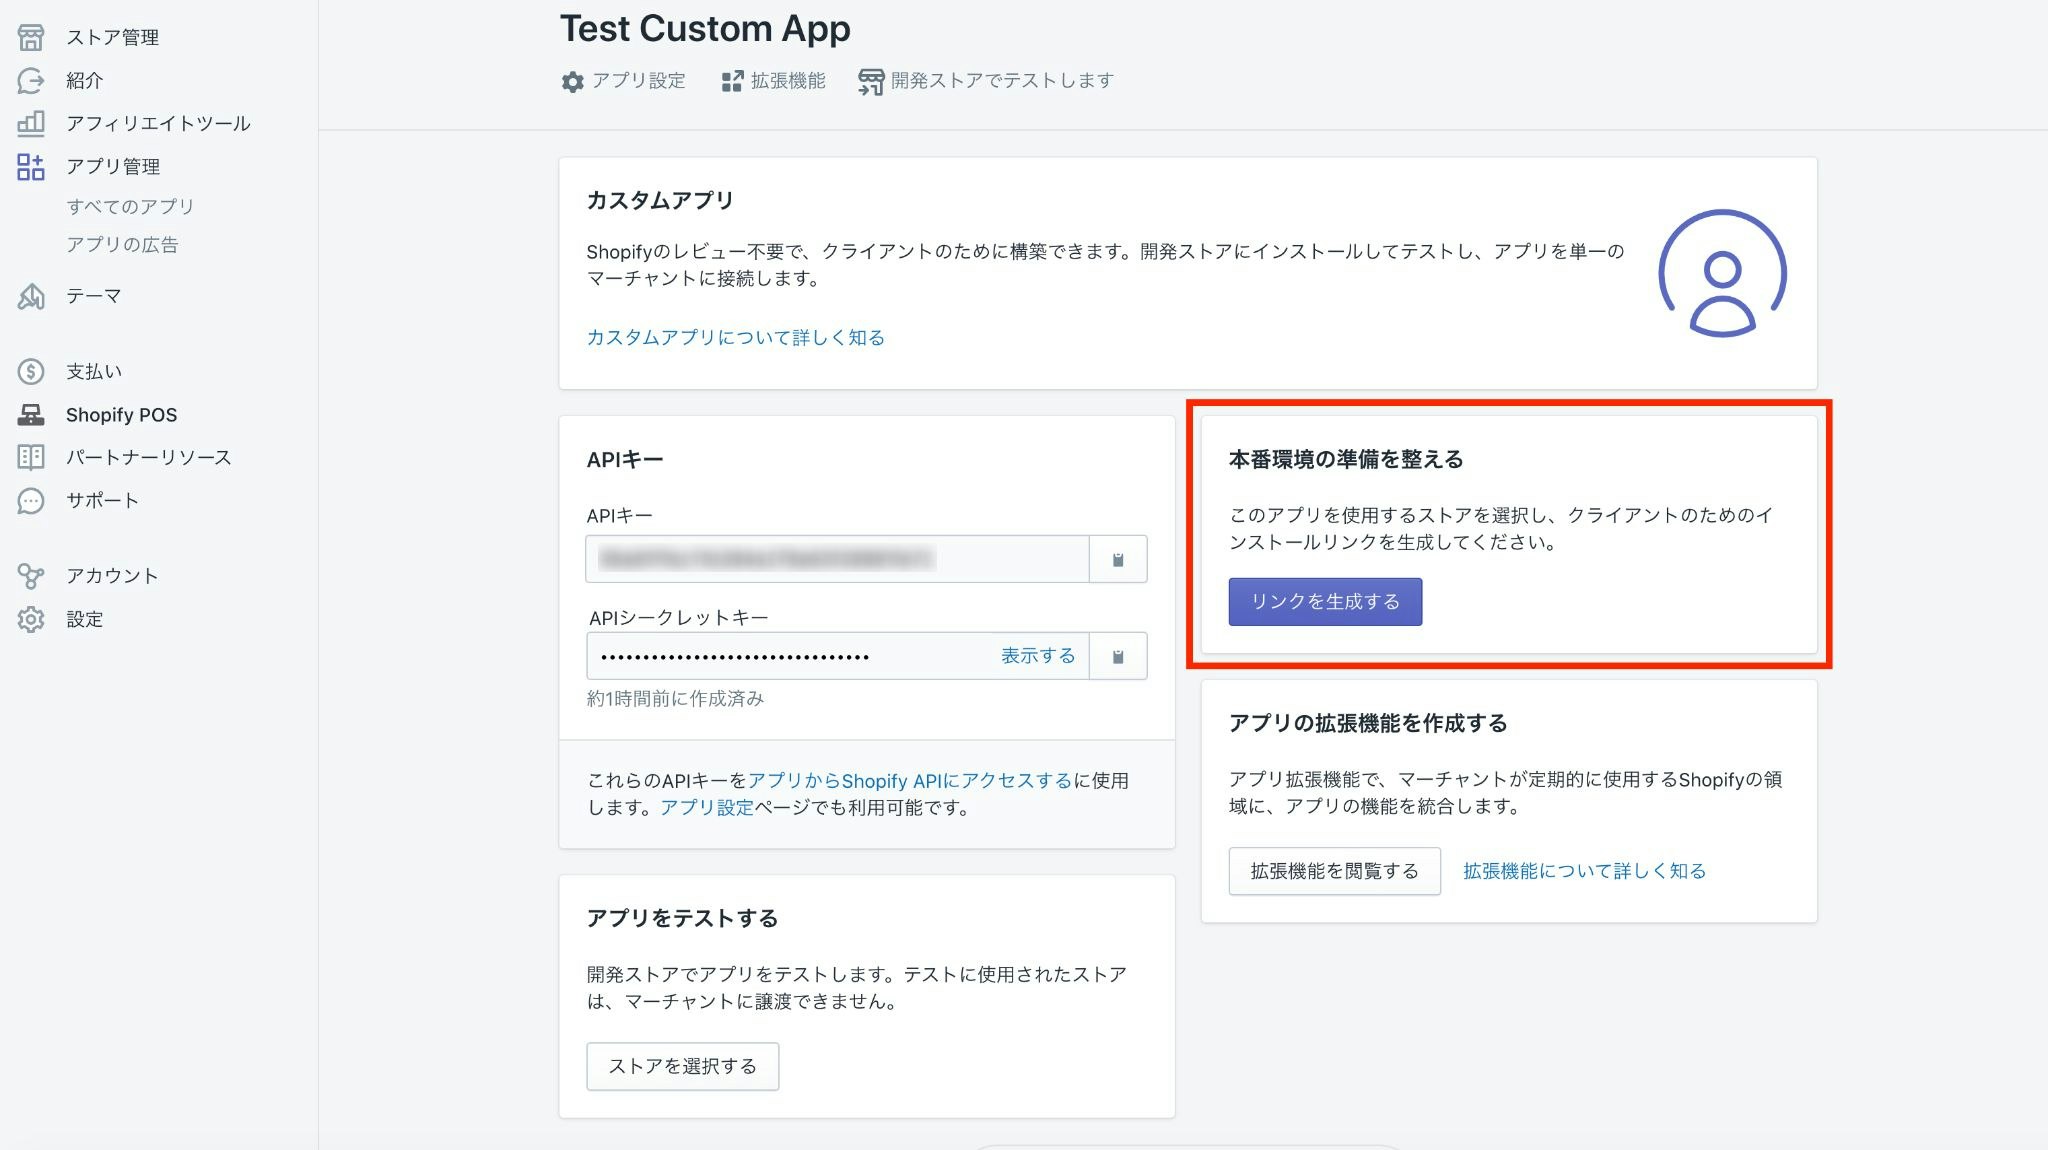
諸々の準備ができたので、いよいよカスタムアプリをストアにインストールしていきます。
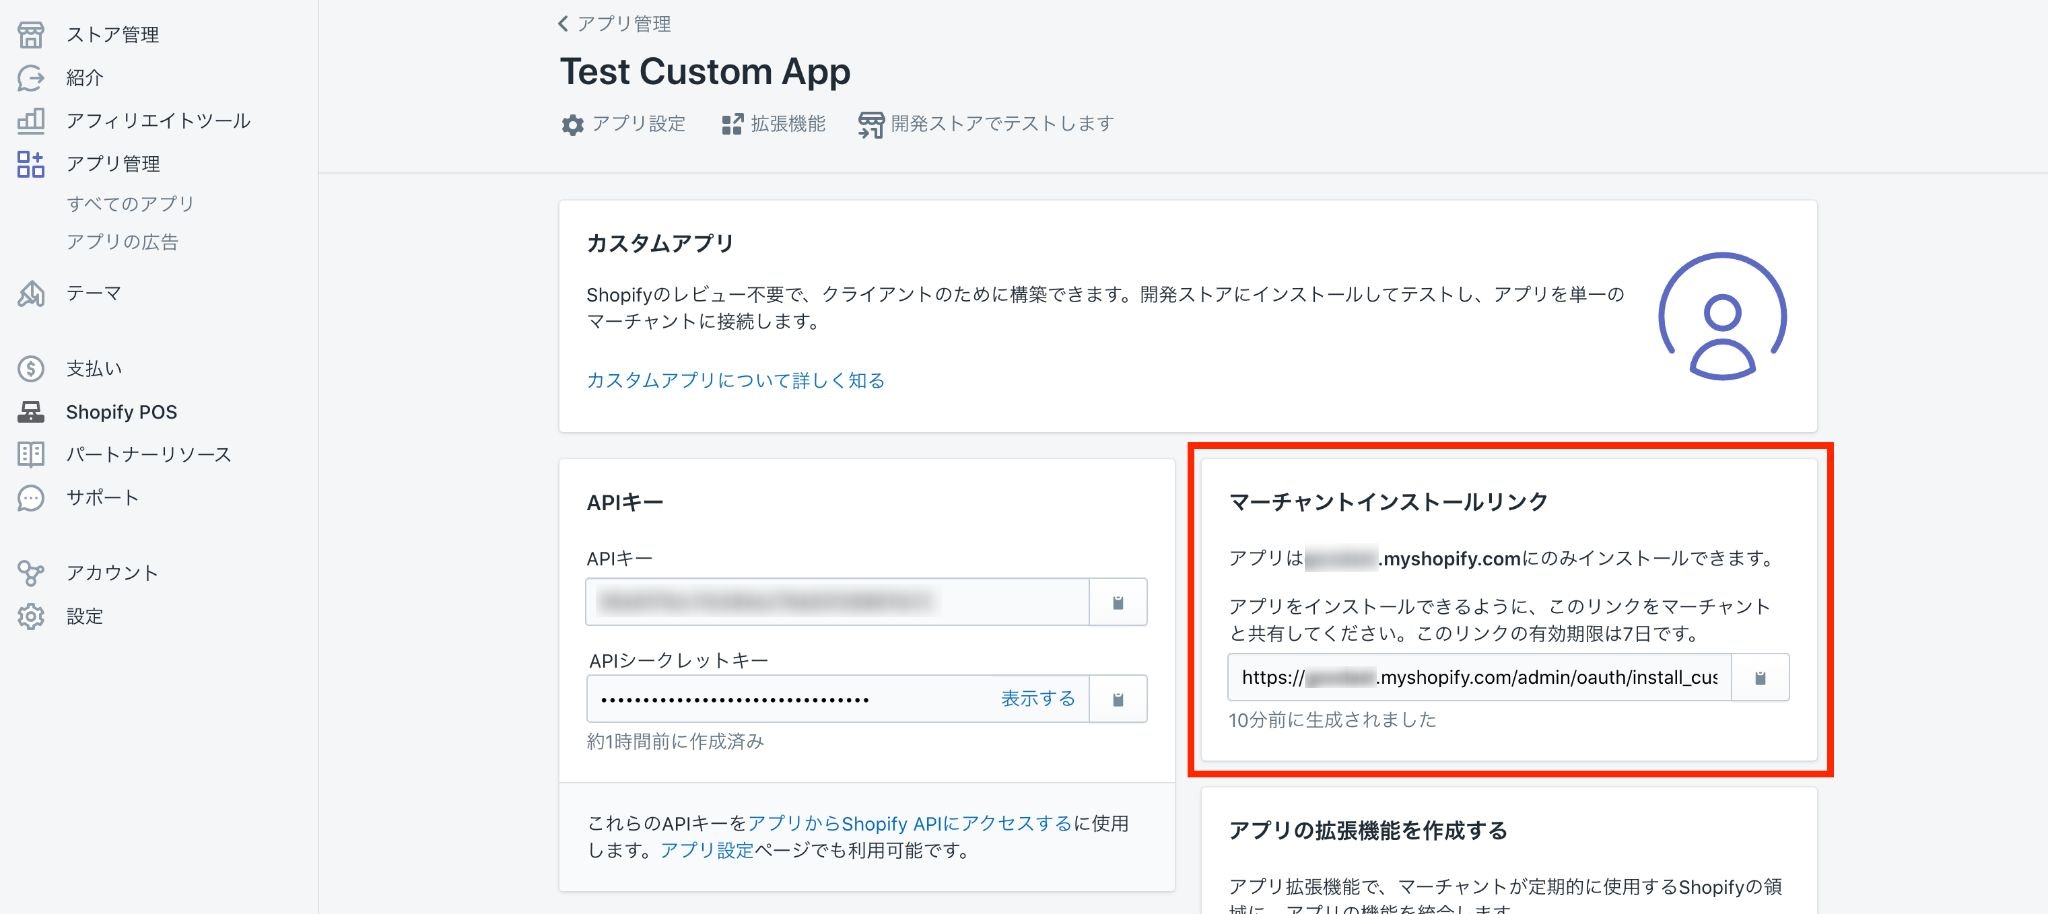
インストール先のストアドメインを入力し、「リンクを生成する」をクリックしてください。
あとは生成されたリンクをコピーし、アドレスバーにペーストしてアクセスしてみましょう。
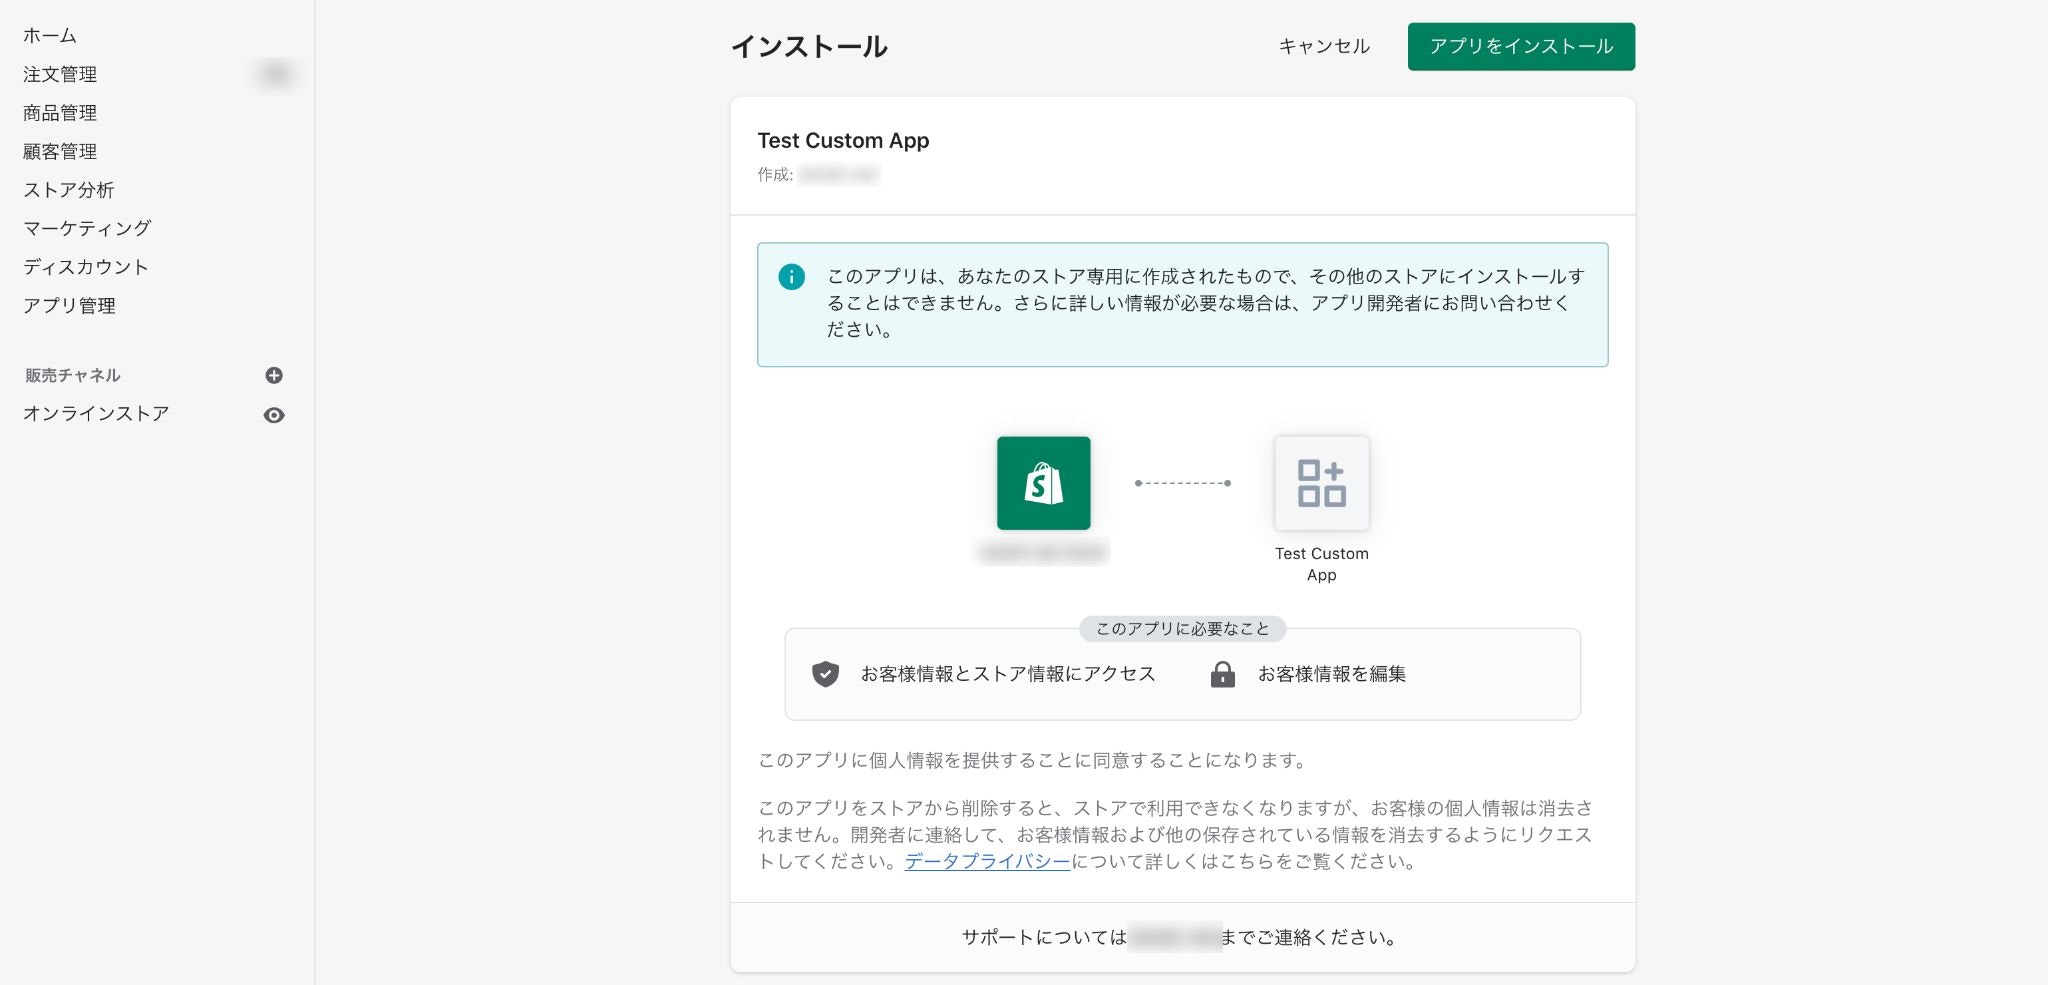
上手くいけばこんな感じのインストール画面が出てくるので、右上の「アプリをインストール」をクリック。
インストールが完了したら、アプリケーションのログを見てみましょう。
"{\"access_token\":\"shpca_********************\",\"scope\":\"write_customers\"}"
shpca_が接頭辞として付いている文字列がアクセストークンなので、メモに控えておいてください。
ワークフローを作成
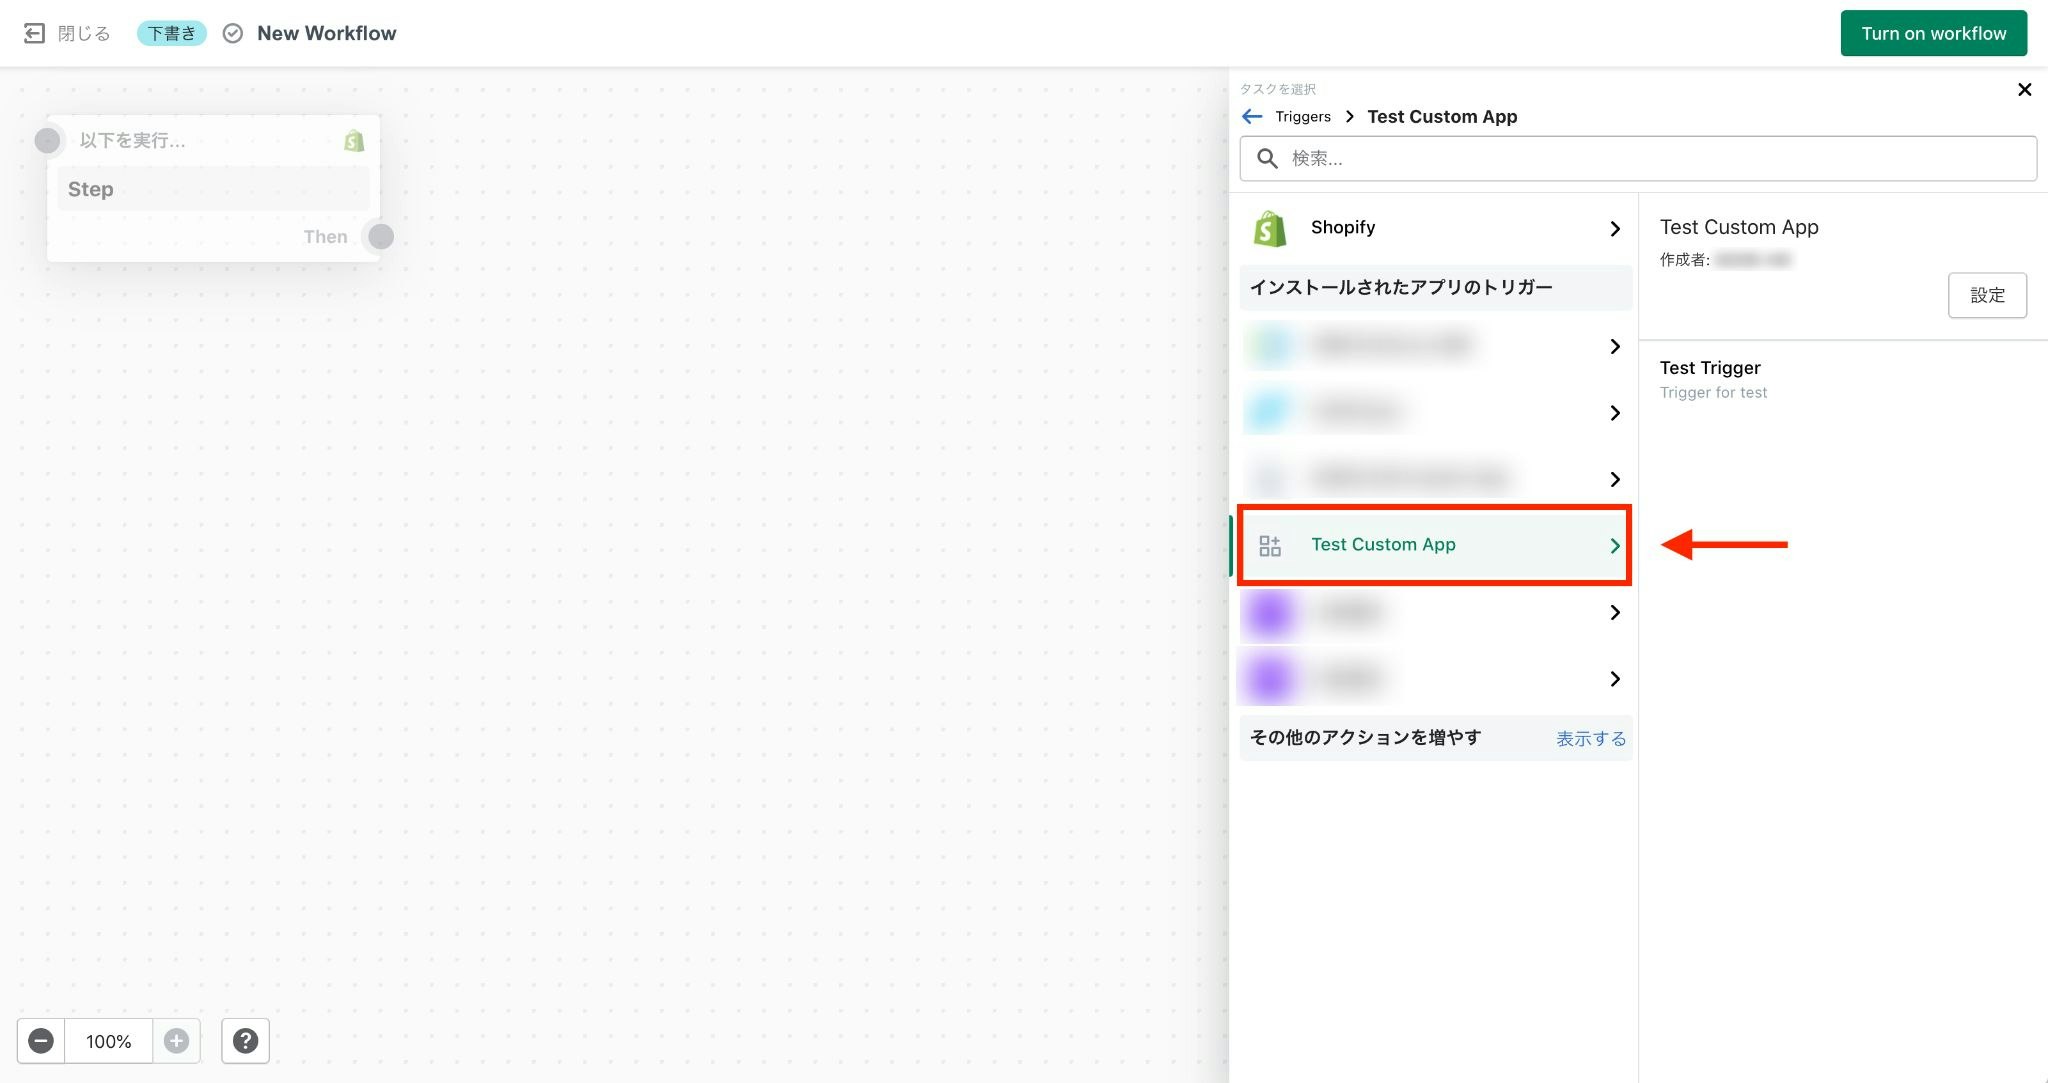
ストアにカスタムアプリをインストールできたら、ワークフローを作成します。
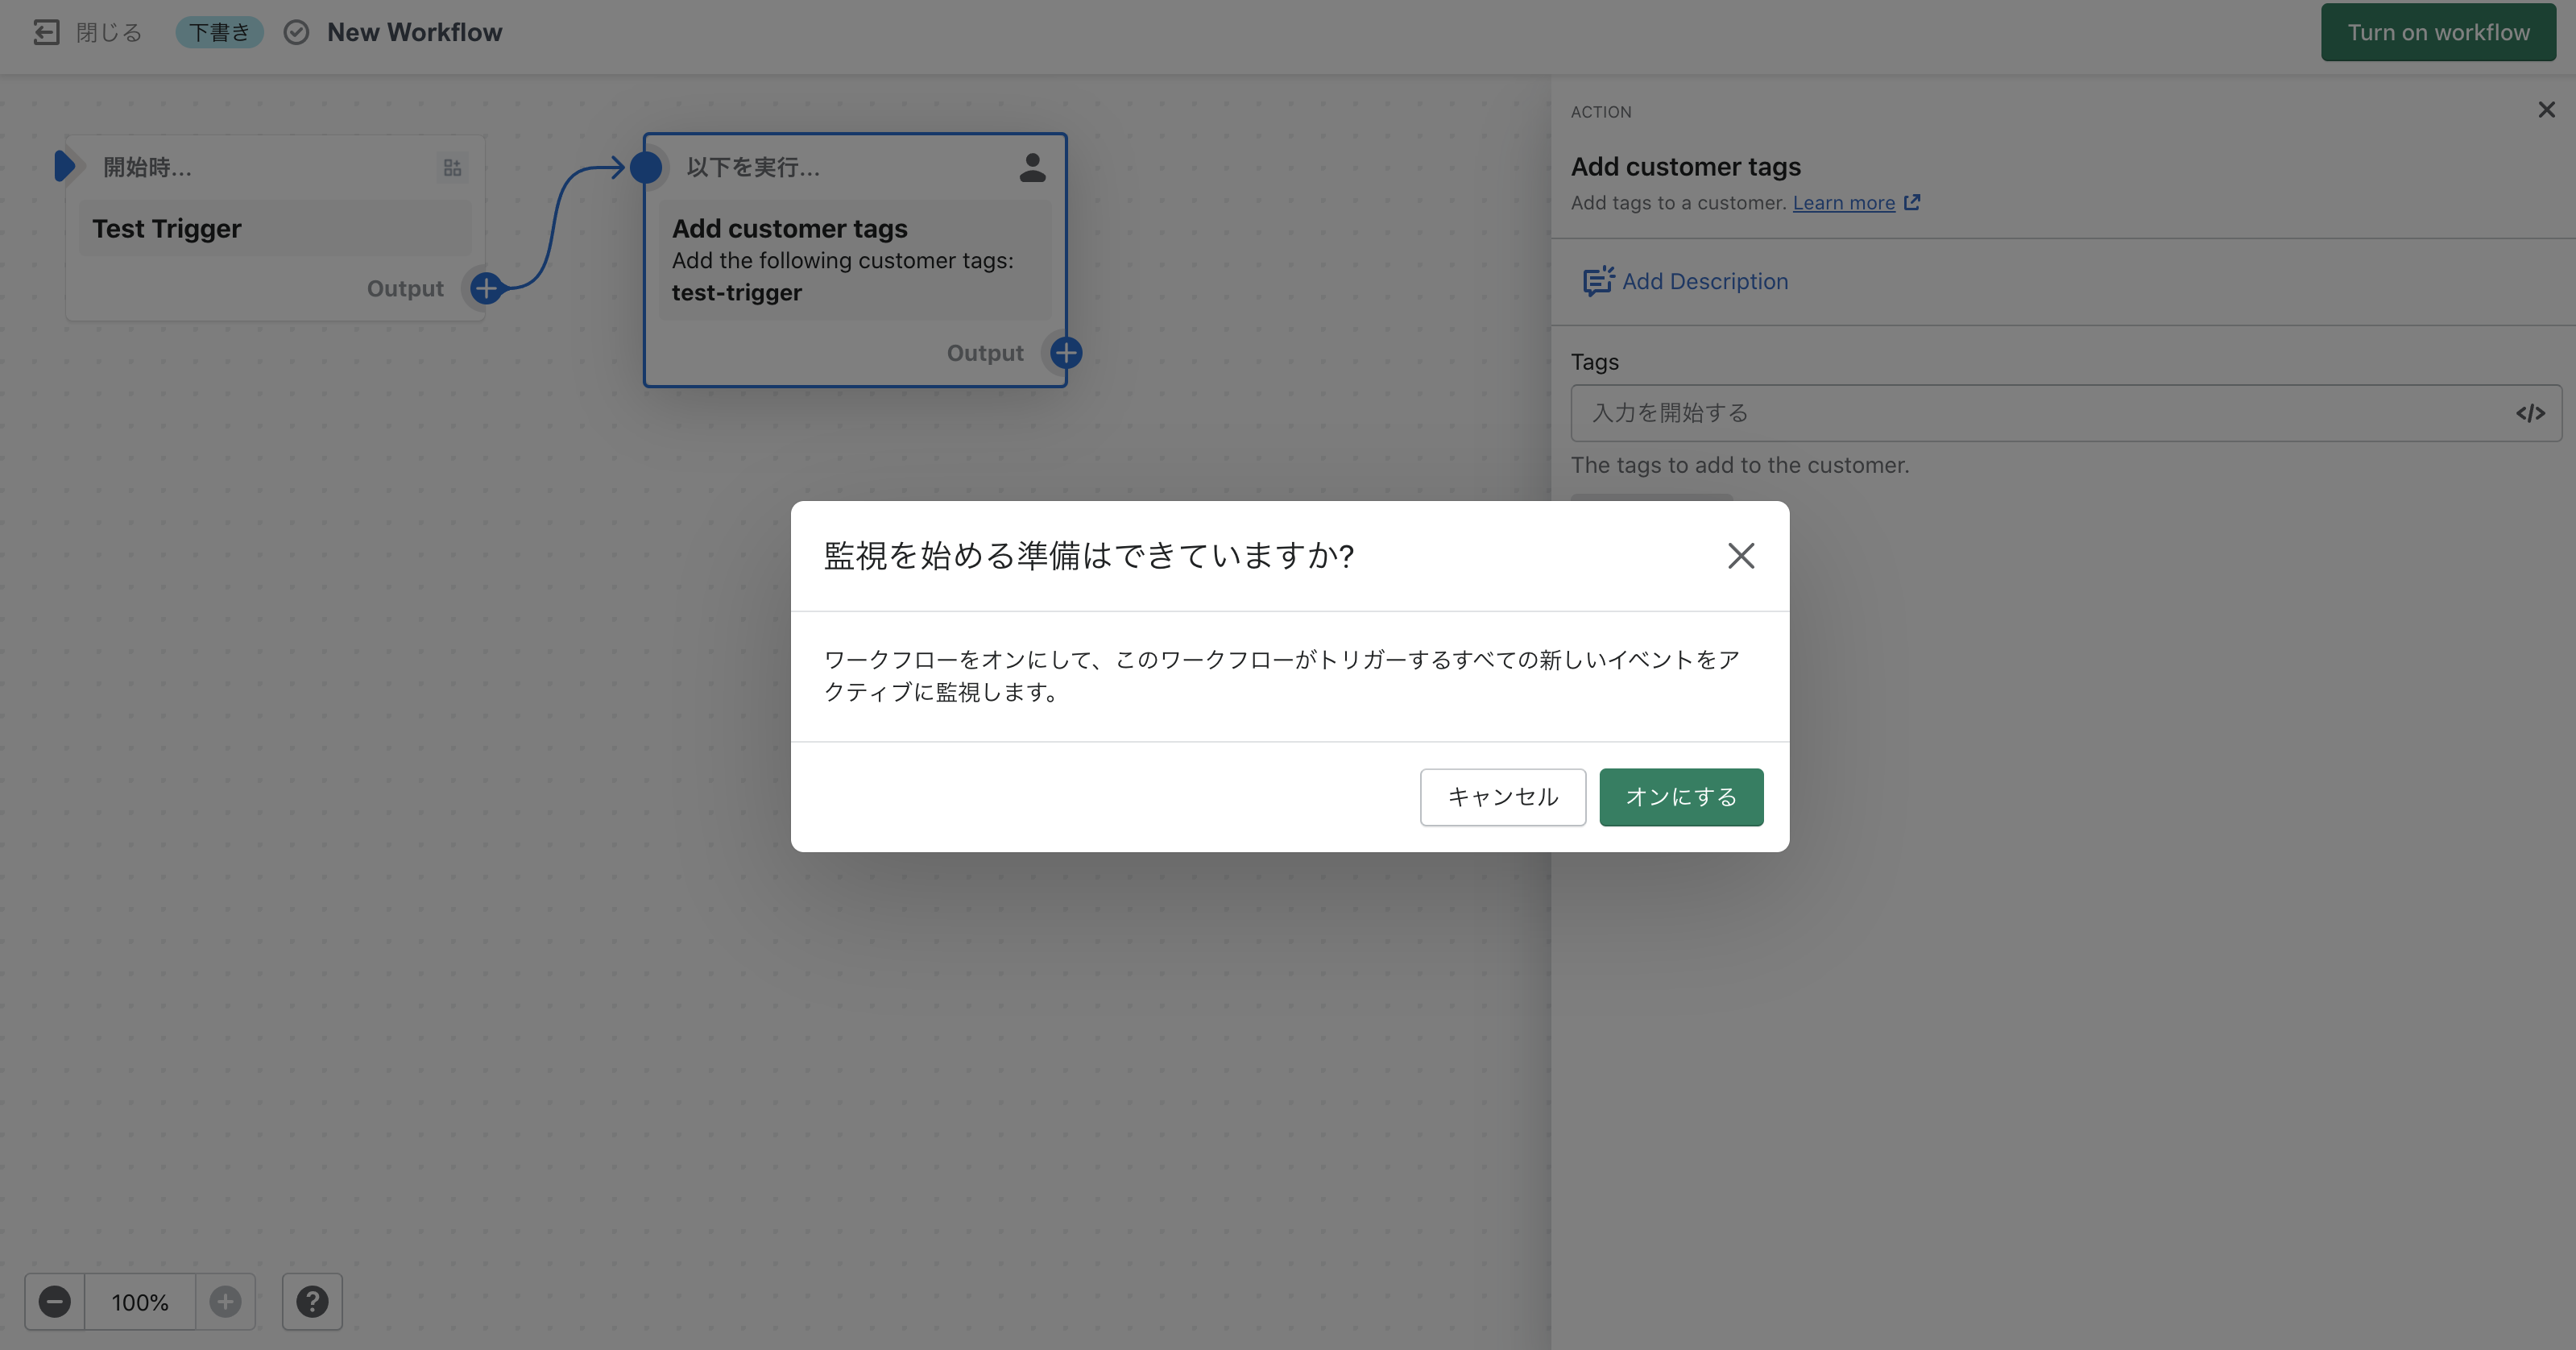
ワークフロー作成画面が開いたら、トリガーとして先ほど作成したカスタムアプリから「Test Trigger」を選択してください。
次に、アクションとして「Add customer tags」を開き
- test-trigger
適当な文字列を入力。
トリガーとアクションの設定が終わったら、右上の「Turn on workflow」からワークフローを稼働させ始めます。(条件(Condition)は今回割愛しました)
動作確認
curl -X POST "https://*******.myshopify.com/admin/api/2022-04/graphql.json" \
-H "Content-Type: application/graphql" \
-H "X-Shopify-Access-Token: shpca_******************************" \
-d '
mutation {
  flowTriggerReceive(body: "{
    \"trigger_id\": \"**********-****-****-****-**********\",
    \"properties\": {
      \"customer_id\": *****************
    }
  }") {
    userErrors {
      field,
      message
    }
  }
}'
- *******.myshopify.com
- 自身のストアドメイン
- X-Shopify-Access-Token
- 事前に取得したアクセストークン
- trigger_id
- トリガーID
- customer_id
- 対象の顧客ID
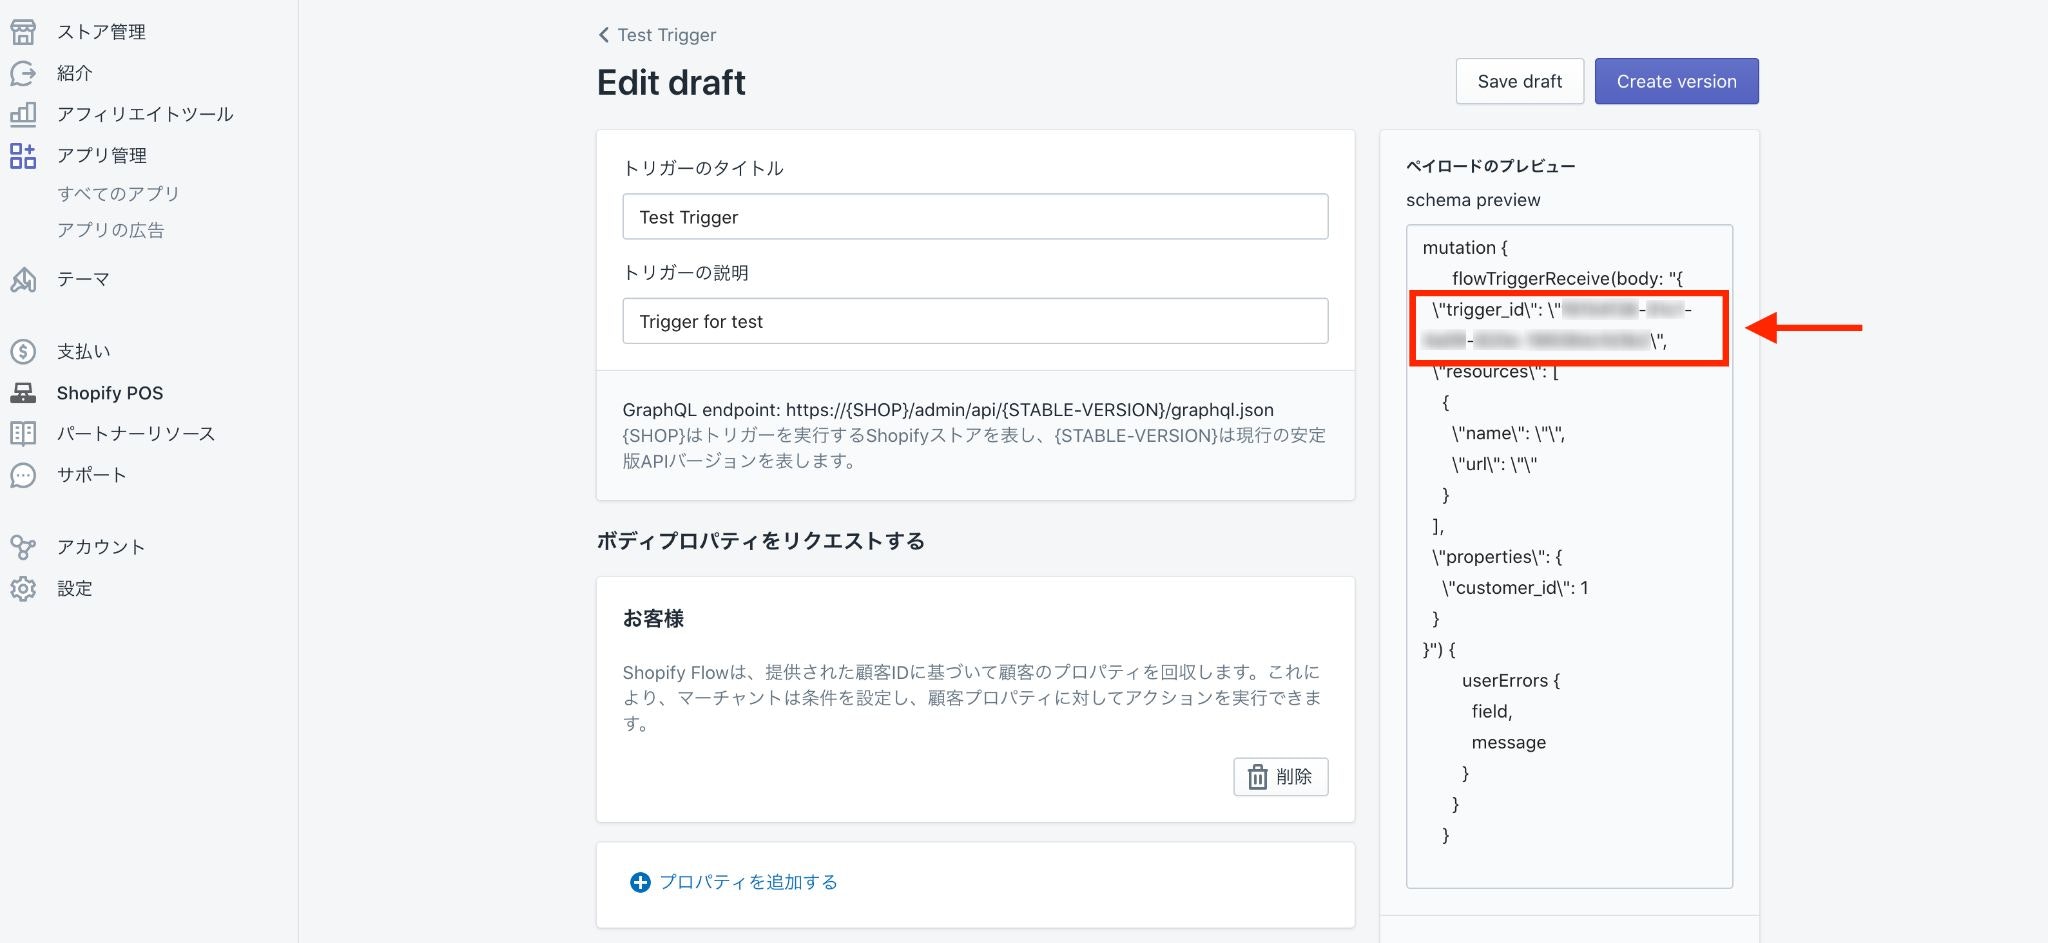
トリガーIDについては、「カスタムアプリ」→「拡張機能」→「Test Trigger」→「Edit draft」を開き、ペイロードのプレビュー という部分を確認してください。
上記 Curl コマンドを実行し、
{
	"data": {
		"flowTriggerReceive": {
			"userErrors": []
		}
	},
	"extensions": {
		"cost": {
			"requestedQueryCost": 1,
			"actualQueryCost": 1,
			"throttleStatus": {
				"maximumAvailable": 2000,
				"currentlyAvailable": 1999,
				"restoreRate": 100
			}
		}
	}
}
こんな感じのレスポンスが返って来ればOKです。
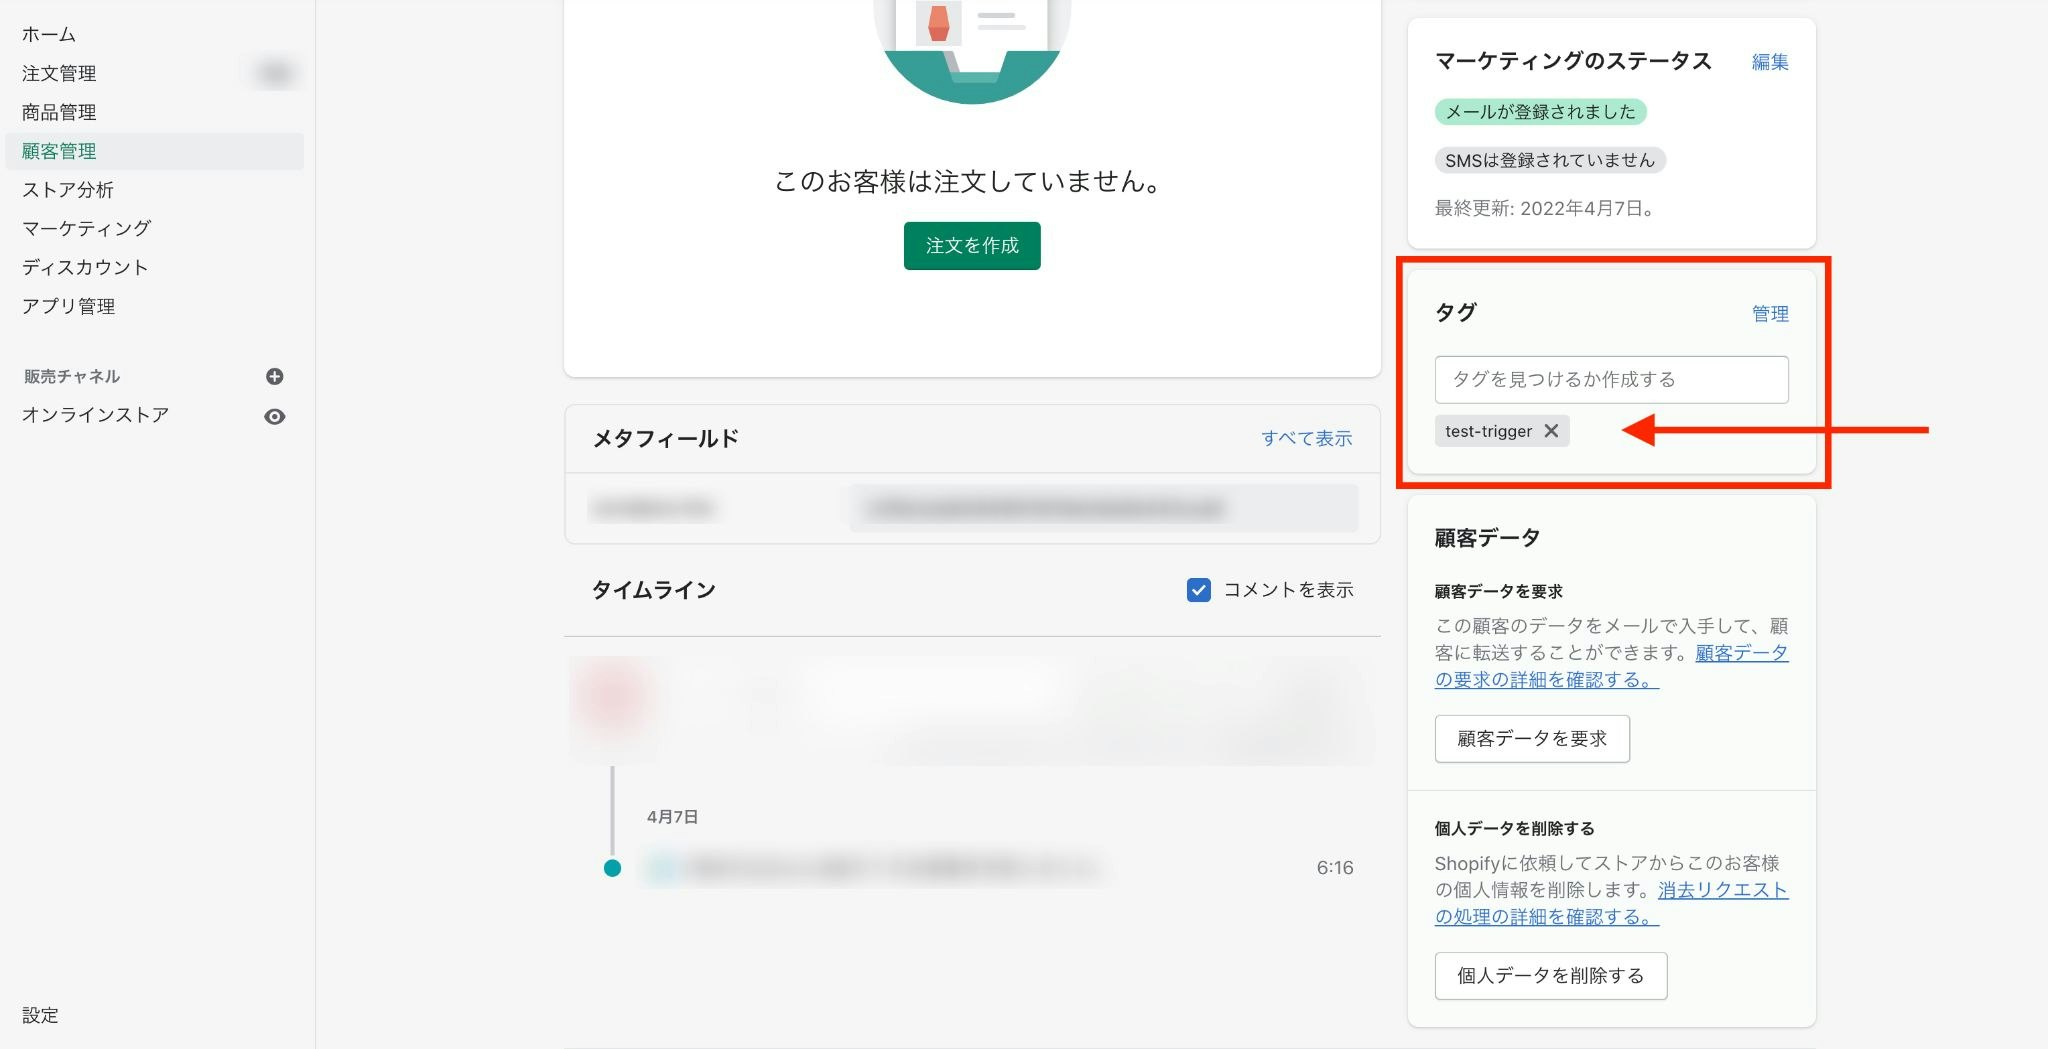
customer_id で指定した顧客情報も確認してみてください。「test-trigger」というタグが付与されているはず。
これで API 経由で Shopify Flow を起動させる事に成功しました。
あとがき
以上、Shopify Flow のトリガーを自作してみました。
API 経由で起動できる事から、Shopify ストア以外の場所でも何かしらのアクションを起こせるようになり、活用の幅が広がりそうな気がします。
