はじめに
この記事は「その2. Access Token / Refresh Tokenによる認証機能の実装」に続けて書いています。
目的
自社のFileMaker CloudデータベースにWebからアクセスするためのAPIを作成する必要があり,そのために勉強したことの備忘録として step by step で作成の過程を書いていきます。想定する読者はjavascriptを触ったことはあるけれども,本格的なバックエンド開発の経験は無い,というような方です。
この記事では
- Access Tokenを用いた認証・認可ミドルウェアの実装
- ユーザ情報の読み出し・編集・削除といった基本的な機能の実装
までを行います。
開発環境
node v14.17.4
npm 6.14.14
Step 1. 認証・認可ミドルウェアの実装
ユーザ情報の読み出しや編集,削除には当然ながら認証・認可処理が必要となる。例えば,
- ユーザ作成(サインアップ)は認証なしで可能
- 自分のユーザ情報の読み出し・編集・削除は認証された登録ユーザであれば可能
- 他人のユーザ情報の読み出し・編集・削除はアドミニストレータのみに認可
といった形での認証・認可処理が考えられる。
前の記事でAccess Tokenの発行機能を実装した。Access Tokenはユーザ名とパスワードによる認証を通った場合に発行されるので,正しいAccess Tokenが送信されているかにより認証処理が可能となる。あわせて,Access Tokenのペイロードとしてそのユーザの権限情報(一般ユーザ/管理ユーザ/アドミニストレータ)を載せていれば,Access Token内に適切な権限情報を持っているかにより認可処理が可能になる。
認証・認可の機能は多くのエンドポイントで共通に利用するものなのでミドルウェアとして実装するが,複数のルーティングファイルで使用できるよう,モジュール化しておこう。
1-1. 認証・認可ミドルウェアの作成
新たに/middlewares/ディレクトリを作成し,その中にauth.jsファイルを作成する。
/* モジュール */
require('dotenv').config()
const jwt = require('jsonwebtoken')
const CustomError = require('../my_modules/customerror')

/* 定数定義 */
const jwtSecret = process.env.JWT_SECRET

/* ミドルウェア定義 */
/* Access Tokenによる認証 */
verifyToken = (req, res, next) => {
    const token = req.headers['x-access-token']
    if (!token) return next(new CustomError('No access token provided.', 400))
    jwt.verify(token, jwtSecret, (err, decoded) => {
        if (err) return next(new CustomError('Unauthorized: ' + err.message + '.', 401))
        req.userId = decoded.id
        req.userPrivilege = decoded.privilege
        next()
    })
}

/* 管理ユーザ以上の認可 */
masterAndUp = (req, res, next) => {
    if (req.userPrivilege < 1) return next(new CustomError('Forbidden. Access is permitted for master or admin users only.', 403))
    next()
}

/* アドミニストレータのみの認可 */
adminOnly = (req, res, next) => {
    if (req.userPrivilege < 2) return next(new CustomError('Forbidden. Access is permitted for admin users only.', 403))
    next()
}

module.exports = { verifyToken, masterAndUp, adminOnly }
モジュールとしては環境変数を扱うためのdotenv,JWTを扱うためのjsonwebtokenおよび前の記事で作成したステータスコード情報を持つカスタムエラーを生成するためのcustomerrorを読み込んでいる。次にJWTの検証に必要な共通鍵文字列を.envから定数に読み込んでいる。
ではまず認証ミドルウェアから見ていこう。
verifyToken = (req, res, next) => {
    const token = req.headers['x-access-token']
    if (!token) return next(new CustomError('No access token provided.', 400))
    jwt.verify(token, jwtSecret, (err, decoded) => {
        if (err) return next(new CustomError('Unauthorized: ' + err.message + '.', 401))
        req.userId = decoded.id
        req.userPrivilege = decoded.privilege
        next()
    })
}
まずreq.headers['x-access-token']で,リクエストヘッダのうちX-Access-Tokenとして送信されたトークン情報を定数tokenに代入している。もしトークンが送信されていなければnullとなるため,その場合には400エラーを返している。
何らかのトークンが送信されていれば,次にその検証を行う。検証はjwt.verify( トークン, 鍵文字列, コールバック関数( エラー, デコードされたペイロード ) )の形で行える。エラーが発生した場合には401エラーを返し,そうでなければデコードされたペイロードのidおよびprivilegeをreqオブジェクトの情報として追加している。これにより,続く認可ミドルウェアやその後のエンドポイント機能でこれらの情報を利用することができる。
最後にnext()で次のミドルウェアへ処理を渡している。
次に認可ミドルウェア。
masterAndUp = (req, res, next) => {
    if (req.userPrivilege < 1) return next(new CustomError('Forbidden. Access is permitted for master or admin users only.', 403))
    next()
}

adminOnly = (req, res, next) => {
    if (req.userPrivilege < 2) return next(new CustomError('Forbidden. Access is permitted for admin users only.', 403))
    next()
}
こちらは非常に簡単。先の認証ミドルウェアで認証を通過していればreqオブジェクトに権限情報が追加されているので,これを評価して認可が与えられない権限であれば403エラーを返している。
最後に,作成したミドルウェアをまとめてモジュール内容として出力している。
module.exports = { verifyToken, masterAndUp, adminOnly }
1-2. 認証・認可ミドルウェアの利用
それでは実際に今作ったミドルウェアを利用してみよう。試しにserver.jsでミドルウェアを読み込んだ上,次のようにそれぞれの認証・認可に応じたエンドポイントを作成してみる。
/* ミドルウェアの読み込み */
const { verifyToken, masterAndUp, adminOnly } = require('./middlewares/auth')

/* 認証のみのルート */
app.get('/user_only', verifyToken, (req, res, next) => {
  res.send('Hello, user!')
})

/* 認証+管理ユーザ以上の認可 */
app.get('/master_and_up', verifyToken, masterAndUp, (req, res, next) => {
  res.send('Hello, master! ...or could be an admin?')
})

/* 認証+アドミニストレータのみの認可 */
app.get('/admin_only', verifyToken, adminOnly, (req, res, next) => {
  res.send('Hello, admin!')
})
ルート処理に認証・認可を追加する場合は,コールバック関数の前で認証・認可ミドルウェアを呼び出す。例えば認証ミドルウェアを設定しなければ
[エンドポイントへのアクセス] → [コールバック関数の実行]
というように全てのアクセスに対しコールバック関数が実行されるが,認証ミドルウェアを追加することで
[エンドポイントへのアクセス] → [認証ミドルウェアによる処理] → [コールバック関数の実行]
というようにコールバック関数が実行される前に認証処理を割り込ませることができる。さらにミドルウェアによる処理は何個でも直列に連続していけるので,認証だけでなく認可もしたい場合には
[エンドポイントへのアクセス] → [認証ミドルウェア] → [認可ミドルウェア] → [コールバック関数の実行]
という形にすればよい。
例えば以下の/users_onlyエンドポイントへのアクセスは,verifyTokenミドルウェアによる認証処理のみでアクセスが可能となっている。
app.get('/user_only', verifyToken, (req, res, next) => {
  res.send('Hello, user!')
})
試しにPostmanを使ってアクセスしてみる。まずはAccess Tokenなしでアクセスしてみると,
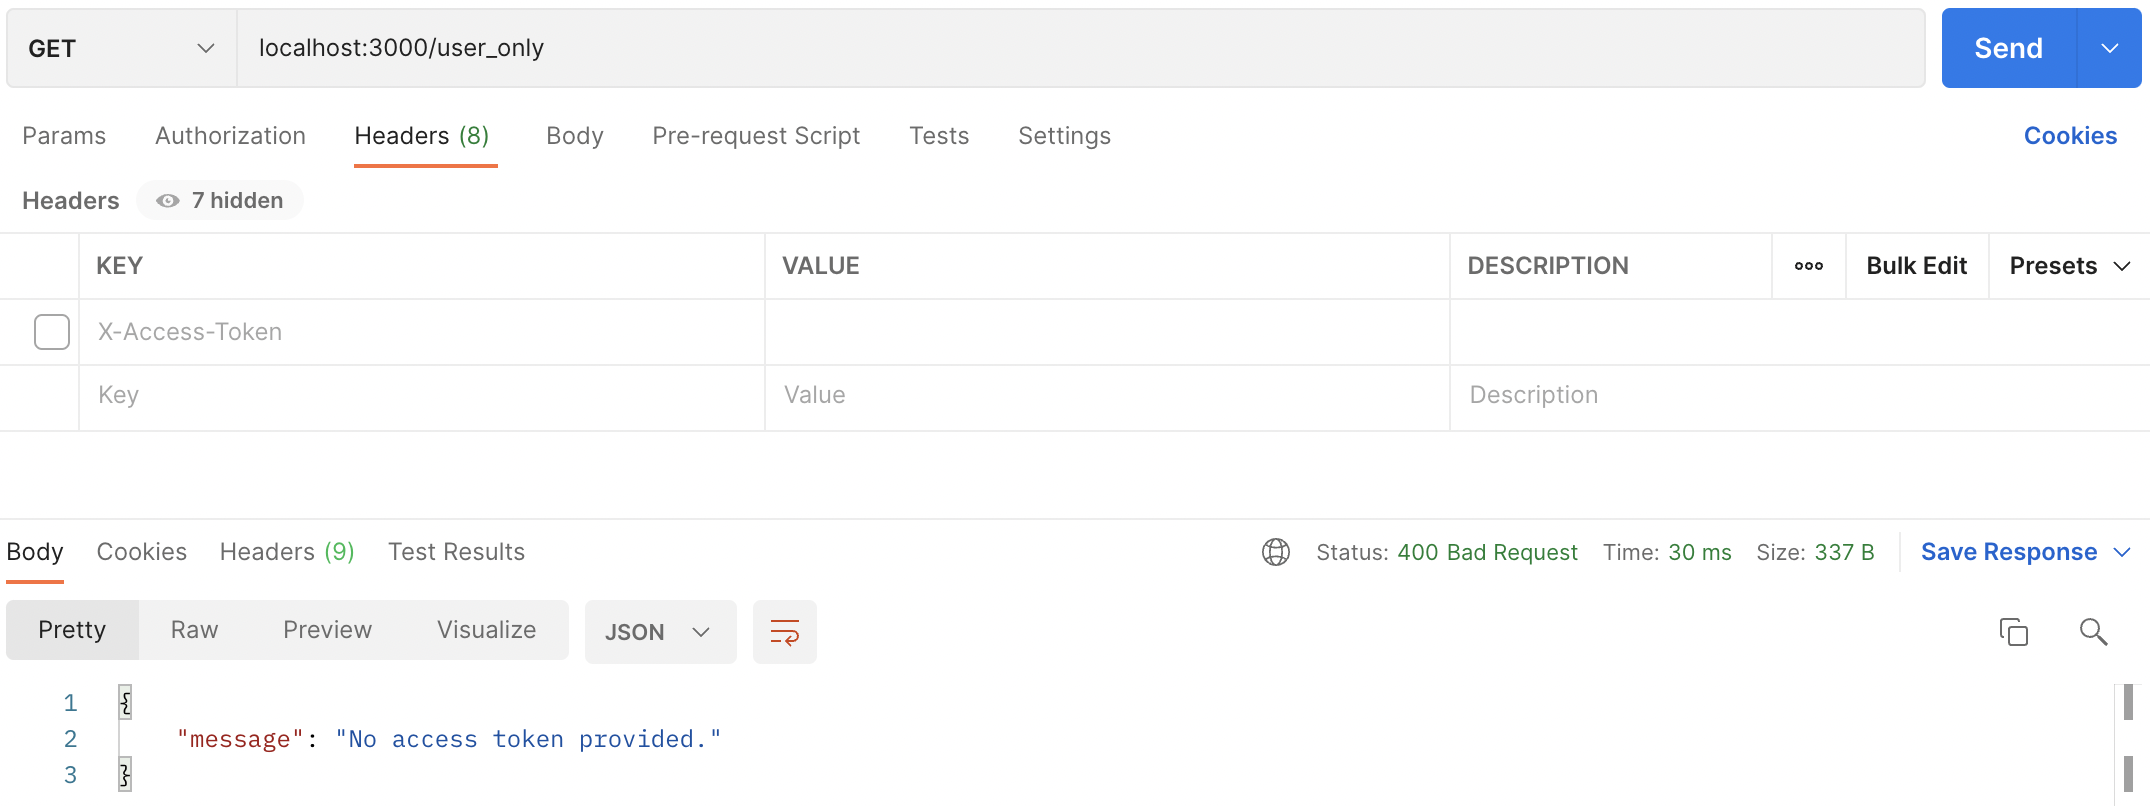
400エラーが返っている。
では,X-Access-Tokenとして適当な文字列を送ってみると,
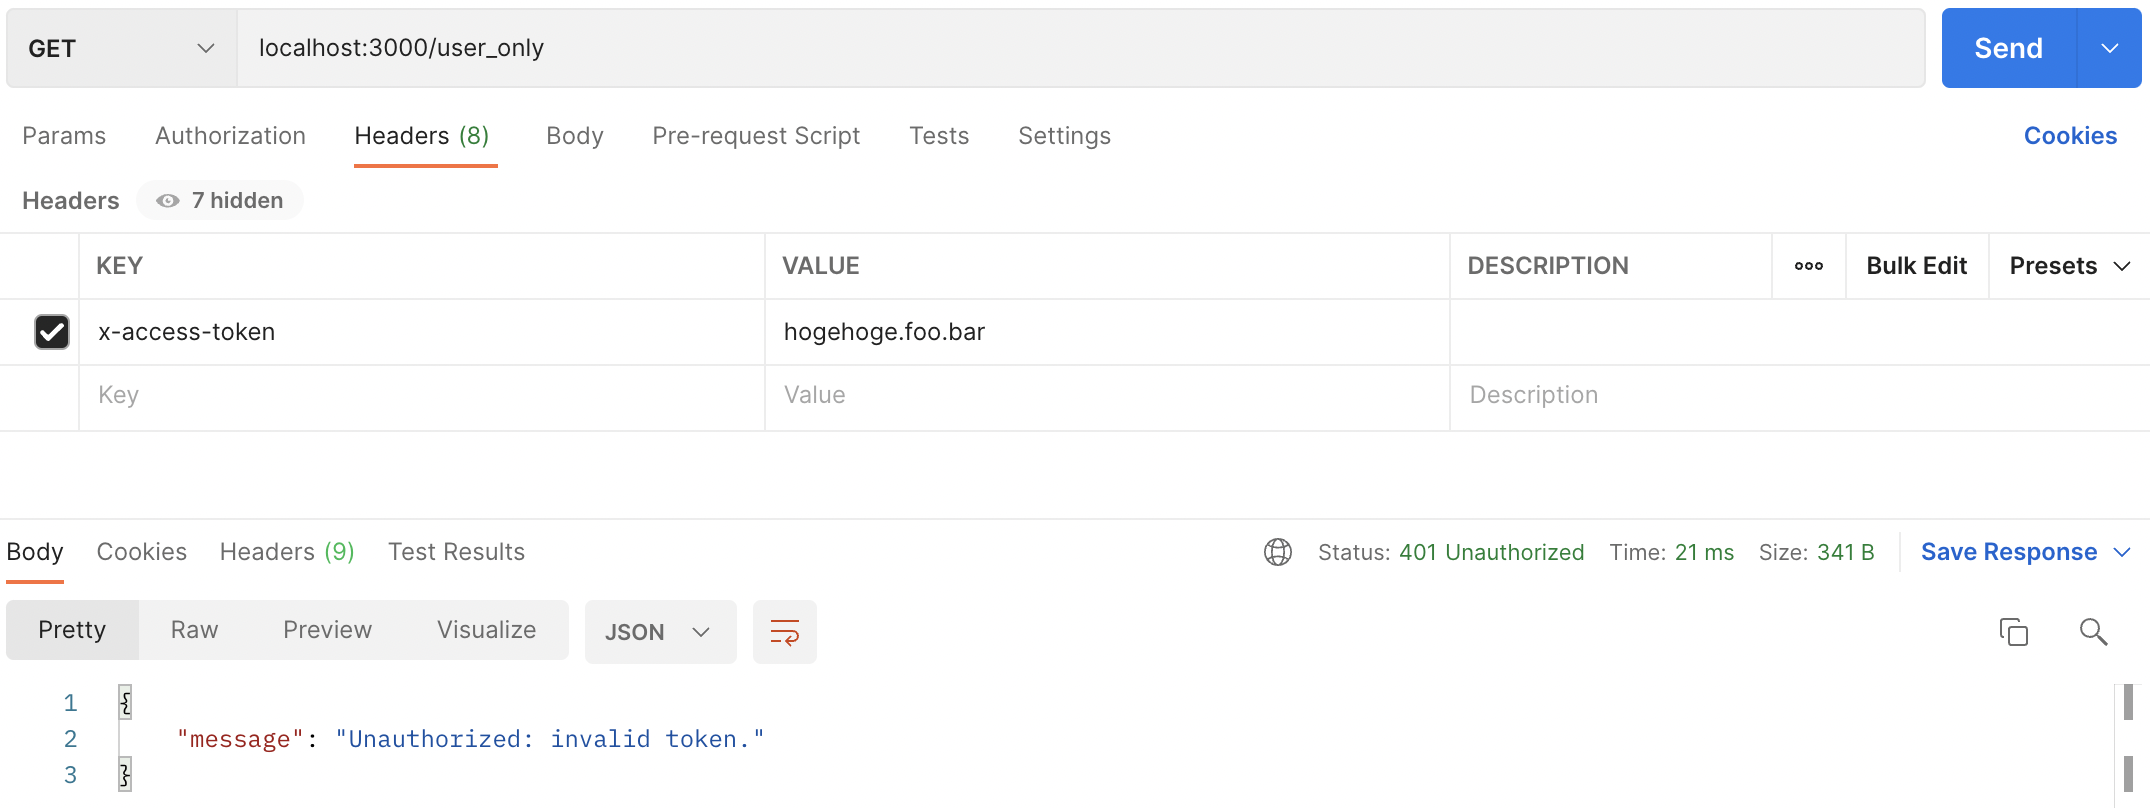
401エラーが返っている。
ログインで得られた正しいAccess Tokenを送れば,
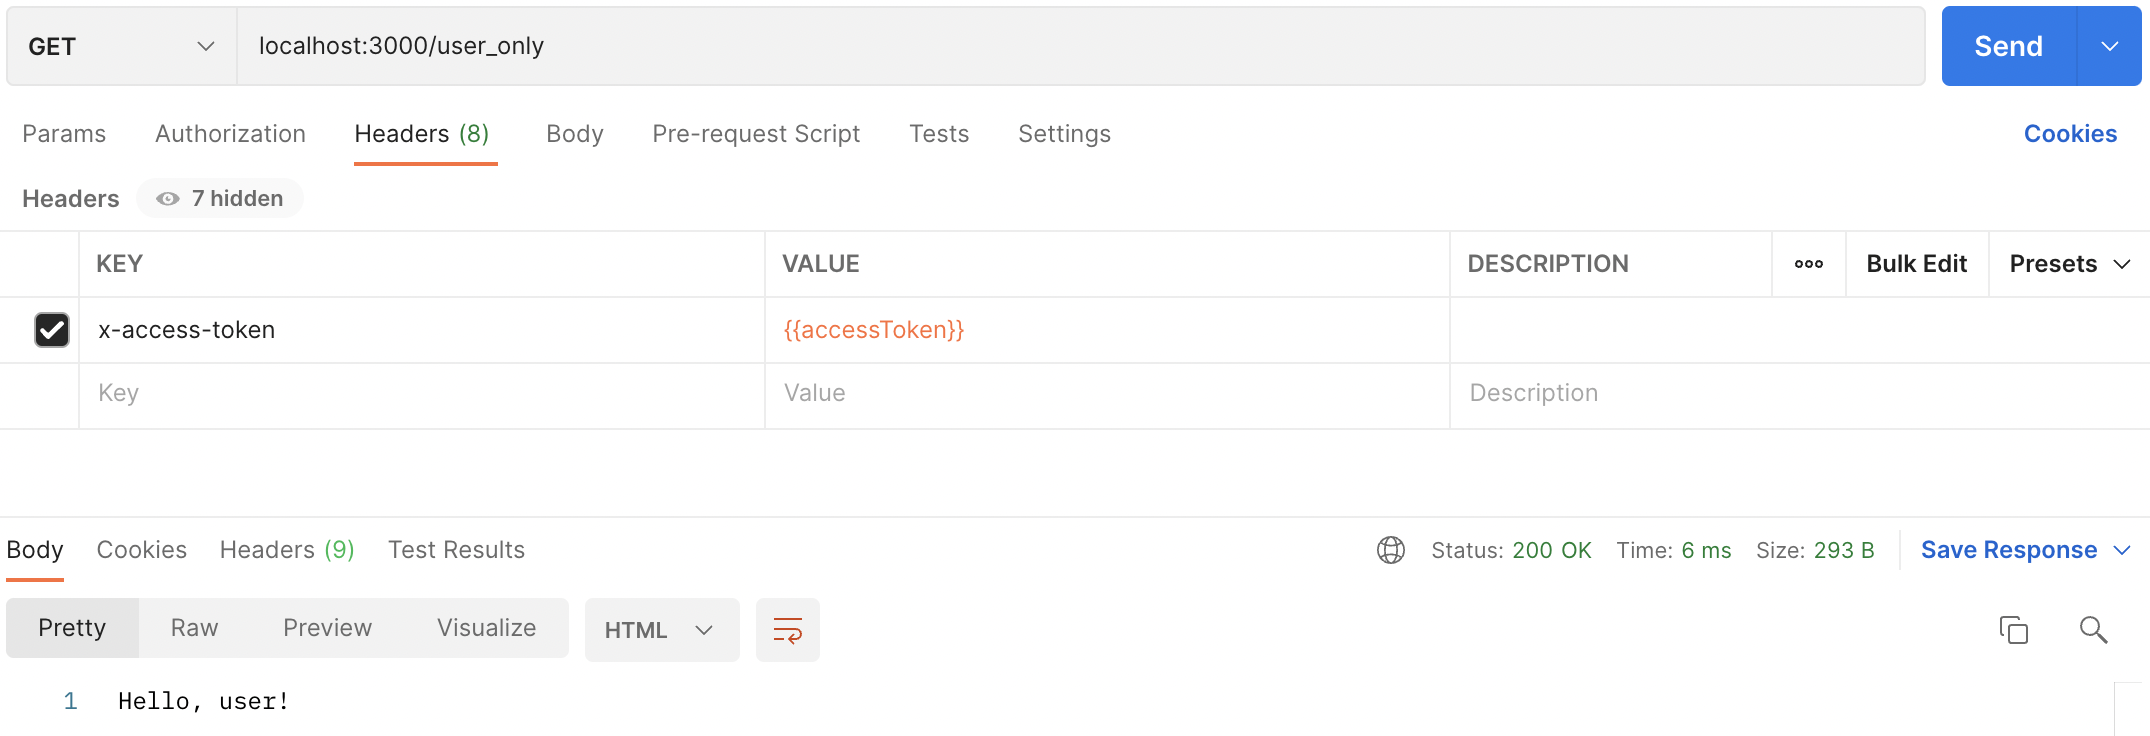
コールバック関数に処理が移り,200 OKとともに正しいコンテンツが返されている。
次の/master_and_upエンドポイントへのアクセスはverifyTokenミドルウェアによる認証処理に続けてmasterAndUpによる認可処理が入り,その後にコールバック関数が呼ばれている。
app.get('/master_and_up', verifyToken, masterAndUp, (req, res, next) => {
  res.send('Hello, master! ...or could be an admin?')
})
試しに一般ユーザ(privilege = 0)のアカウントでログインし,得られたAccess Tokenでアクセスしてみると
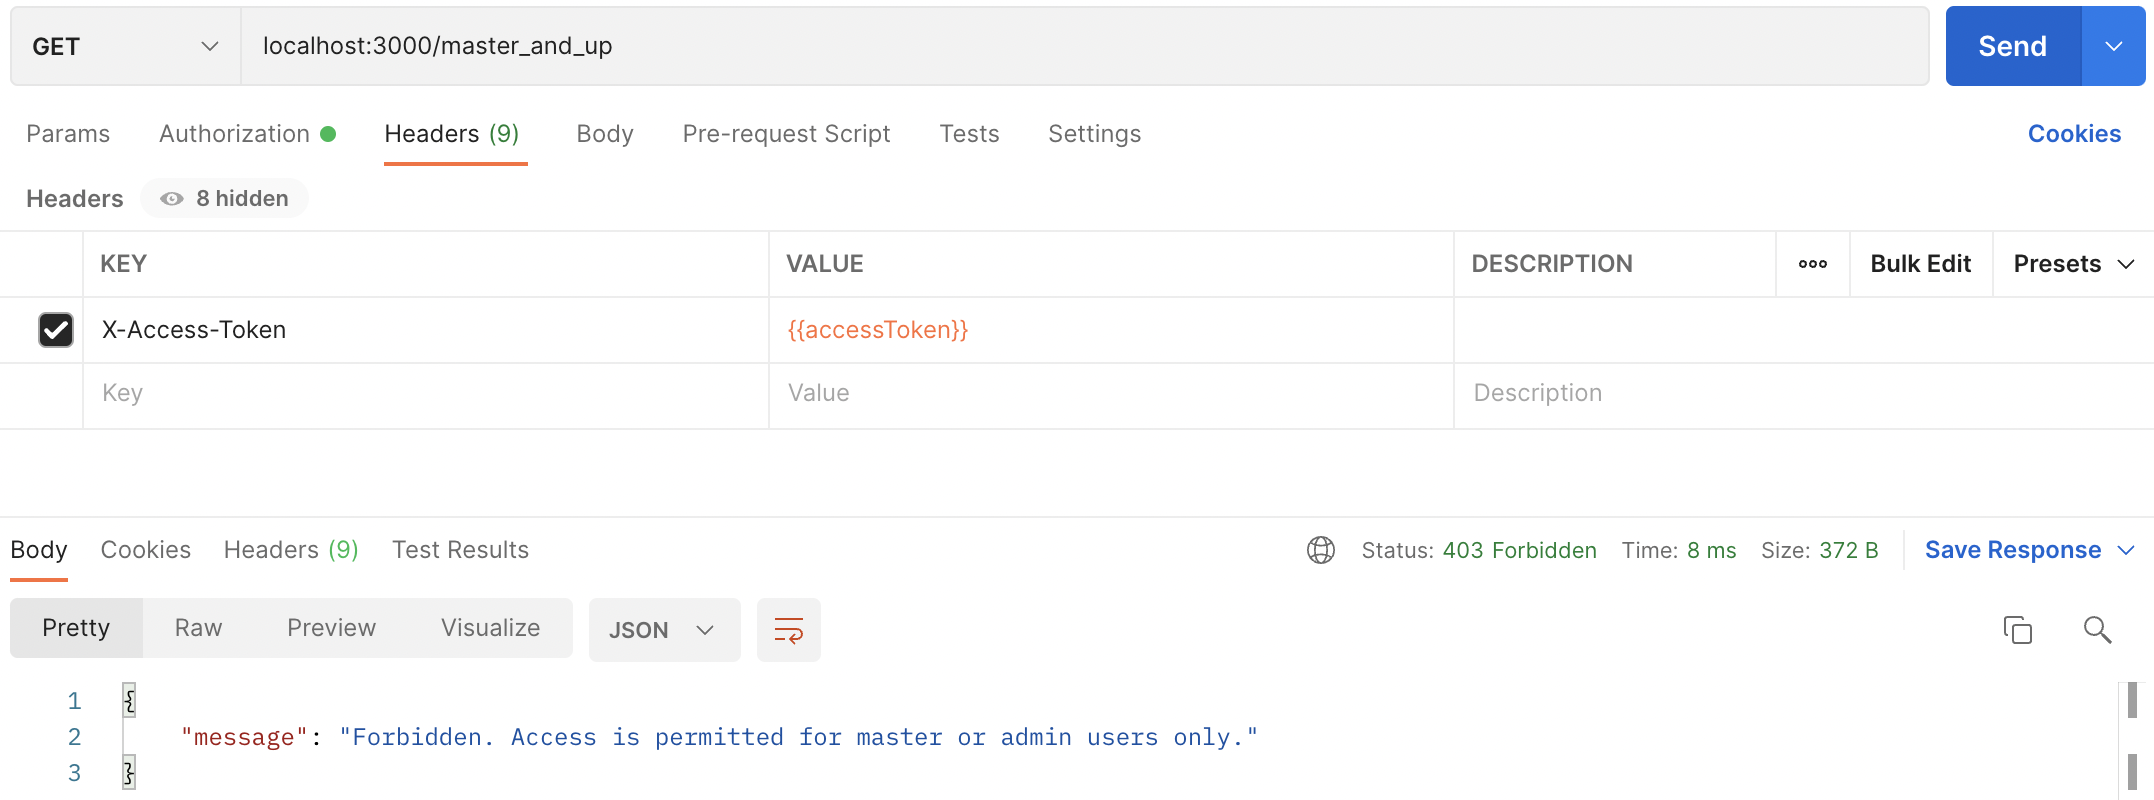
403エラーが返ってアクセスできないことがわかる。
管理者ユーザ(privilege = 1)のアカウントでログインして得たAccess Tokenでアクセスすれば
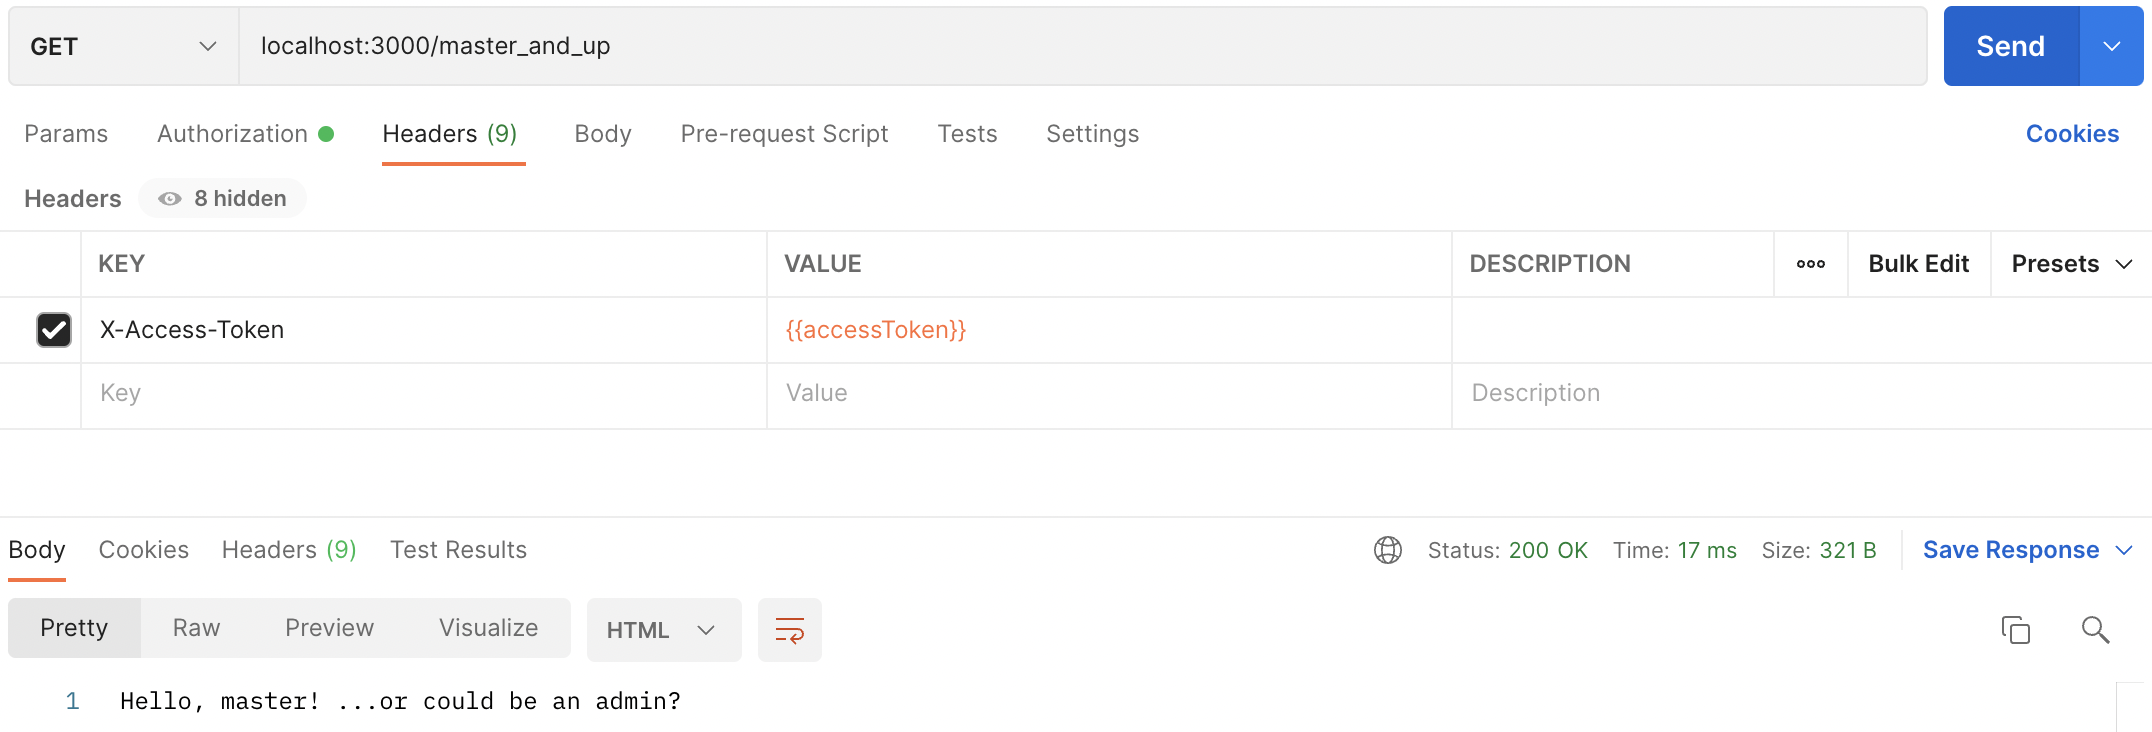
アクセスが可能となっている。
Step 2. ユーザ情報操作機能の実装
それでは実際にユーザ情報操作のためのエンドポイントを実装していく。
2-1. ユーザ情報の取得
ユーザIDを元に,ユーザ情報を取得する。Access Tokenによる認証を必要とし,アドミニストレータ以外は自分の情報のみ取得可能,アドミニストレータは全てのユーザ情報を取得可能とする。
仕様
Method/end-point
GET /users/(userId)
Request Headers
X-Access-Token : 有効なAccess Token
Status Code
200 OK : 正常にユーザ情報が返された
401 Unauthorized : 認証エラー(Access Tokenが不正もしくは失効している)
403 Forbidden : 認可エラー(ユーザ情報を取得する権限が無い)
404 Not Found : 該当するユーザが存在しない
500 Internal Server Error : サーバ処理異常
Response JSON object
id (string) : 主キー
email (string) : メールアドレス
privilege (integer) : 権限
username (string) : ユーザ名
updatedAt (string) : ユーザ更新日時
createdAt (string) : ユーザ作成日時
コード
router.get('/:id', verifyToken, (req, res, next) => {
    if (req.userPrivilege !== 2 && req.params.id !== req.userId) return next(new CustomError('You cannot get other user\'s info.', 403))
    models.User.findByPk(req.params.id)
        .then(async (userInst) => {
            if (!userInst) return next(new CustomError('User not found.', 404)) // User with given id not found.
            let resJSON = { ...userInst.dataValues }
            delete resJSON.password
            res.json(resJSON)
        }).catch((err) => {
            return next(new CustomError(err.message, 500))
        })
})
エンドポイントを指定する文字列を'/:id'とすることで,/以降の文字列をルートパラメータとして以降の処理に利用できる。ルートパラメータはreq.params内に格納される。
まずverifyTokenミドルウェアで認証処理を行ってからメインのハンドラ関数に入る。
ハンドラ関数ではまず,アドミニストレータユーザ以外が自分以外の情報を取得しようとした際にエラーを返す認可処理を行う。
if (req.userPrivilege !== 2 && req.params.id !== req.userId) return next(new CustomError('You cannot get other user\'s info.', 403))
既にverifyTokenミドルウェアを通過してきているので,req.userIdにAccess Tokenに格納されたユーザIDが,req.userPrivilegeに権限情報がそれぞれ入っている。そこで「userPrivilegeが2でない(=アドミニストレータユーザでない)」かつ「ルートパラメータとして渡されたユーザID(req.params.id)がAccess Tokenに格納されたユーザIDと異なる(=認証されたユーザ以外のユーザ情報を取得しようとしている)」場合には403エラーを返している。
認可処理を通ればユーザを検索する。
models.User.findByPk(req.params.id)
    .then(async (userInst) => {
        if (!userInst) return next(new CustomError('User not found.', 404))
        let resJSON = { ...userInst.dataValues }
        delete resJSON.password
        res.json(resJSON)
    })
findByPkは主キー項目でデータを検索するメソッド。ユーザIDはユーザモデルの主キーとしているので,これで検索が可能。もちろんfindOne({ where: { id : req.params.id } })としてもよいが,こちらの方がシンプルだろう。
ユーザが見つかればUserモデルのインスタンスが返ってくるはずなので,インスタンスがnullであれば404エラーを返し,そうでなければdataValuesをスプレッド構文で応答内容のJSONにコピーし,パスワード情報を削除して返すところはログインと一緒。
2-2. ユーザ情報の編集
ユーザIDを元に,ユーザ情報を編集する。Access Tokenによる認証を必要とし,アドミニストレータ以外は自分の情報(ユーザ権限を除く)のみ編集可能,アドミニストレータは全てのユーザ情報を編集可能とする。
なお,パスワードも変更可能となっている。
仕様
Method/end-point
PUT /users/(userId)
Request Headers
Content-type : application/JSON
X-Access-Token : 有効なAccess Token
Request Body
username (string) : ユーザ名(必須)
email (string) : メールアドレス(必須)
password (string) : パスワード(必須)
privilege (integer) : 権限(0:一般ユーザ,1:管理ユーザ,2:アドミニストレータ。1, 2以外を指定すると0となる。)
Status Code
200 OK : 正常にユーザ情報が返された
401 Unauthorized : 認証エラー(Access Tokenが不正もしくは失効している)
403 Forbidden : 認可エラー(ユーザ情報を取得する権限が無い)
404 Not Found : 該当するユーザが存在しない
500 Internal Server Error : サーバ処理異常
Response JSON object
id (string) : 主キー
email (string) : メールアドレス
privilege (integer) : 権限
username (string) : ユーザ名
updatedAt (string) : ユーザ更新日時
createdAt (string) : ユーザ作成日時
コード
router.put('/:id', verifyToken, (req, res, next) => {
    // リクエスト検証・認可処理
    if (!Object.keys(req.body).length) return next(new CustomError('Request is invalid.', 400))
    if (req.userPrivilege !== 2 && req.params.id !== req.userId) return next(new CustomError('You cannot edit other user\'s info.', 403))
    if (req.userPrivilege !== 2 && req.body.privilege) return next(new CustomError('You cannot edit your privilege.', 403))
    // データ正規化
    if (req.body.privilege && req.body.privilege !== 1 && req.body.privilege !== 2) req.body.privilege = 0
    // ユーザ検索
    models.User.findByPk(req.params.id)
        .then(async (userInst) => {
            if (!userInst) return next(new CustomError('User not found.', 404))
            // ユーザ名の重複チェック
            if (req.body.username && (req.body.username !== userInst.username)) {
                const userCount = await models.User.count({ where: { username: req.body.username } })
                if (userCount) return next(new CustomError('This username is already used.', 409))
            }
            // 更新データのセット
            if (req.body.username) userInst.set({username: req.body.username})
            if (req.body.email) userInst.set({email: req.body.email})
            if (req.body.password) userInst.set({password: bcrypt.hashSync(req.body.password, salt)})
            if (!(req.body.privilege.length === 0)) userInst.set({privilege: req.body.privilege})
            // データ保存・応答
            const updatedUser = await userInst.save()
            let resJSON = { ...updatedUser.dataValues }
            delete resJSON.password
            res.json(resJSON)
        }).catch((err) => {
            return next(new CustomError(err.message, 500))
        })
})
順番に見ていく。まずはリクエスト検証・認可処理。
if (!Object.keys(req.body).length) return next(new CustomError('Request is invalid.', 400))
if (req.userPrivilege !== 2 && req.params.id !== req.userId) return next(new CustomError('You cannot edit other user\'s info.', 403))
if (req.userPrivilege !== 2 && req.body.privilege) return next(new CustomError('You cannot edit your privilege.', 403))
3行目,アドミニストレータ以外(req.userPrivilege !== 2)の送信したリクエストボディに権限情報(req.body.privilege)が含まれている場合には403エラーを返している。(実際にはフロントエンドの設計でそもそもアドミニストレータ以外には権限情報をいじらせないはずだが,念のための実装)
ユーザ権限指定の正規化はサインアップとほぼ同じだが,サインアップの際は権限情報が無ければ0にしていたのに対し今回は権限を変更しない場合が考えられるため,新しく権限が指定されているかの判定も加えている。
if (req.body.privilege && req.body.privilege !== 1 && req.body.privilege !== 2) req.body.privilege = 0
データの正規化まで終わればユーザ検索に入る。
models.User.findByPk(req.params.id)
    .then(async (userInst) => {
        if (!userInst) return next(new CustomError('User not found.', 404))
        // ユーザ名の重複チェック
        if (req.body.username && (req.body.username !== userInst.username)) {
            const userCount = await models.User.count({ where: { username: req.body.username } })
            if (userCount) return next(new CustomError('This username is already used.', 409))
        }
findByPkで主キーidを元にユーザ検索を行い,nullで返った場合に404エラーを返すところまではユーザ情報取得と一緒。ユーザインスタンスが返ってきていれば,次にユーザ名重複のチェックを行う。
単に「指定された新しいユーザ名を持つユーザが何人いるか検索」 → 「0でなければエラーを返す」とした場合,新規ユーザ名として元のユーザ名と同じものを指定した場合にも重複エラーが返ってきてしまう。そこで,まず「ユーザ名の変更があり,かつ,ユーザ名として現在のユーザ名と異なるユーザ名が指定されている(req.body.username !== userInst.username)」かどうかを判定し,そうであればmodels.User.count({ where: { username: req.body.username } })でUserモデルからリクエストで指定されたユーザ名を持つユーザの人数(userCount)を返している。
そのうえでuserCountが1以上であれば409 Conflictエラーを返している。
エラー処理が終わればUserモデルを使用してユーザ情報の変更を行っていく。
// 更新データのセット
if (req.body.username) userInst.set({username: req.body.username})
if (req.body.email) userInst.set({email: req.body.email})
if (req.body.password) userInst.set({password: bcrypt.hashSync(req.body.password, salt)})
if (!(req.body.privilege === undefined)) userInst.set({privilege: req.body.privilege})
// データ保存・応答
const updatedUser = await userInst.save()
let resJSON = { ...updatedUser.dataValues }
delete resJSON.password
res.json(resJSON)
データの更新はRefresh Tokenの発行でやったように.set()で値をセットして.save()で保存する。ユーザ名とメールアドレスは単純だが,パスワードはハッシュ化してからセットする必要がある。
権限の更新はちょっとしたトリックが必要だ。ユーザ権限で一般ユーザは0としているがJavaScriptで0はfalsyな値なので,そのままif (req.body.privilege)としてしまうと新しいユーザ権限として0を指定していても偽と判定され,値がセットされなくなってしまう。そのため,req.body.privilegeがundefinedかどうかでユーザ権限の更新を行うかどうかを判定している。
これらデータセットが終了したら.save()で保存し,返ってきた更新後のインスタンスから応答を返す。
2-3. ユーザの削除
ユーザIDを元に,ユーザを削除する。Access Tokenによる認証を必要とし,アドミニストレータ以外は自分のみ削除可能,アドミニストレータは全てのユーザを削除可能とする。
仕様
Method/end-point
DELETE /users/(userId)
Request Headers
X-Access-Token : 有効なAccess Token
Status Code
200 OK : 正常にユーザが削除された
401 Unauthorized : 認証エラー(Access Tokenが不正もしくは失効している)
403 Forbidden : 認可エラー(ユーザを削除する権限が無い)
404 Not Found : 該当するユーザが存在しない
500 Internal Server Error : サーバ処理異常
Response JSON object
message (string) : 正常に削除されれば'User deleted.'が返る。
router.delete('/:id', verifyToken, (req, res, next) => {
    if (req.userPrivilege !== 2 && req.params.id !== req.userId) return next(new CustomError('You cannot delete other user.', 403))
    models.User.findByPk(req.params.id)
        .then(async (userInst) => {
            if (!userInst) return next(new CustomError('User not found.', 404))
            await userInst.destroy()
            res.json({ message: 'User deleted.' })
        }).catch((err) => {
            return next(new CustomError(err.message, 500))
        })
})
Access Tokenの権限情報からアドミニストレータ以外が他人を削除しようとしていた場合403エラーを返すのは編集と同じ。ユーザを検索し,見つかれば.destroy()で削除ができる。.save()と違いユーザインスタンスは返ってこないので,応答は規定のメッセージを返すようにしている。
2-4. ユーザの検索
ユーザの検索はアドミニストレータのみ行える仕様とした。username email privilegeを検索条件として指定でき,何も指定しなければ全件検索となる。また,ページネーションに利用できるよう,検索開始位置(offset)および最大返答数(limit デフォルトでは100件)を指定可能とする。
仕様
Method/end-point
POST /users/find
Request Headers
Content-type : application/JSON
X-Access-Token : 有効なAccess Token
Request Body
username (string) : ユーザ名
email (string) : メールアドレス
privilege (integer) : 権限(0:一般ユーザ,1:管理ユーザ,2:アドミニストレータ)
offset (integer) : 検索開始位置。指定なし,もしくは負値が渡された場合は0となる。
limit (integer) : 最大返答数。指定なし,もしくは0以下の値が渡された場合は100となる。
Status Code
200 OK : 正常にユーザ情報が返された
400 Bad Request : リクエストエラー
401 Unauthorized : 認証エラー(Access Tokenが不正もしくは失効している)
403 Forbidden : 認可エラー(ユーザ検索権限が無い)
500 Internal Server Error : サーバ処理異常
Response JSON object
count (integer) : 検索に合致したユーザ数
users (array) : ユーザ情報の配列
├ id (string) : 主キー
├ email (string) : メールアドレス
├ privilege (integer) : 権限
├ username (string) : ユーザ名
├ updatedAt (string) : ユーザ更新日時
└ createdAt (string) : ユーザ作成日時
コード
router.get('/', verifyToken, adminOnly, (req, res, next) => {
    // リクエストチェック
    if (req.body.offset && !Number.isInteger(req.body.offset)) return next(new CustomError('Offset should be an integer.', 400))
    if (req.body.limit && !Number.isInteger(req.body.limit)) return next(new CustomError('Limit should be an integer.', 400))
    // 検索クエリ作成
    let where = {}
    if (req.body.username) where.username = req.body.username
    if (req.body.email) where.email = req.body.email
    if (req.body.privilege !== "") where.privilege = req.body.privilege
    let query = {
        offset: (!req.body.offset || req.body.offset < 0) ? 0 : req.body.offset,
        limit: (!req.body.limit || req.body.limit < 1) ? 100 : req.body.limit
    }
    if (where !== {}) query.where = where
    // 検索
    models.User.findAndCountAll(query)
        .then((findResult) => {
            let resJSON = { count: findResult.count }
            resJSON.users = findResult.rows.map((userInst) => {
                let userJSON = { ...userInst.dataValues }
                delete userJSON.password
                return userJSON
            })
            res.json(resJSON)
        }).catch((err) => {
            return next(new CustomError(err.message, 500))
        })
})
アドミニストレータのみがアクセス可能なので,verifyTokenとadminOnlyの2つのミドルウェアを通してからメインのハンドラ関数に処理を渡している。
ハンドラ関数では,まずリクエストボディに入ってくる属性のうち,offsetとlimitのチェックを行う。この2つはMySQLに渡す検索条件のパラメータなので,間違った型のデータだとエラーの元になるためだ。
if (req.body.offset && !Number.isInteger(req.body.offset)) return next(new CustomError('Offset should be an integer.', 400))
if (req.body.limit && !Number.isInteger(req.body.limit)) return next(new CustomError('Limit should be an integer.', 400))
それぞれリクエストに含まれているかと,整数値であるかをチェックし,合致しなければ400エラーを返している。
チェックが通れば次に検索クエリを作成する。
let where = {}
if (req.body.username) where.username = req.body.username
if (req.body.email) where.email = req.body.email
if (req.body.privilege !== "") where.privilege = req.body.privilege
let query = {
    offset: (!req.body.offset || req.body.offset < 0) ? 0 : req.body.offset,
    limit: (!req.body.limit || req.body.limit < 1) ? 100 : req.body.limit
}
if (where !== {}) query.where = where
まず空のオブジェクトwhereを作成し,username email privilegeがそれぞれ渡されていればそれぞれwhereに値をセットしている。
次にqueryオブジェクトにoffset limitの値をセットしているが,リクエストで値が指定されていないか,もしくは意味の無い値(offsetは負値,limitは0と負値)であった場合にはデフォルト値(0および100)を設定する。
最後にwhereに何らかの値がセットされていればqueryに加えてできあがり。このオブジェクトを元に検索を行う。
models.User.findAndCountAll(query)
    .then((findResult) => {
        let resJSON = { count: findResult.count }
        resJSON.users = findResult.rows.map((userInst) => {
            let userJSON = { ...userInst.dataValues }
            delete userJSON.password
            return userJSON
        })
        res.json(resJSON)
    })
検索した結果はfindResultに入ることになるが,次のような構造のオブジェクトとして返ってくる。
{
  count : データ個数,
  rows : [
    {
      (ユーザインスタンスオブジェクト)
    },
    {
      (ユーザインスタンスオブジェクト)
    },
      .
      .
      .
    {
      (ユーザインスタンスオブジェクト)
    }
  ]
}
応答のJSONを作成する際は,これまでと同様ユーザのパスワードハッシュを除いたものにしなければならない。そこで,ユーザインスタンスの配列に対し.map()を用いて各ユーザインスタンスごとにパスワードハッシュ情報を取り除いたJSONを返し,これを応答JSONのuser配列として格納している。
まとめ
ここまででユーザ情報に関する基本的なCRUD(Create, Read, Update, Delete)のエンドポイントを一通り作成してきました。アドミニストレータがユーザの追加や変更,削除を管理するタイプのサービスであれば,多くの場合これらのエンドポイントが実装されていれば十分だと考えられます。
しかし,ユーザに自由にサインアップをさせるタイプのより開かれたサービスだと,悪意あるサインアップ要求への対処や,パスワードリセットのためにメールを用いた処理が必要になってきます。これについては項を改めて見ていきたいと思います。