最近仕事では、php製のAPI+nextjsのフロントエンドアプリのような構成がほとんどなのですが、秋以降にネイティブアプリのAPIのみを開発する案件が進みそうな感じです。api+フロントの構成であれば開発者の手元のdocker環境で開発を進めるのでその中にswagger-uiのコンテナを入れてAPI仕様を確認できるようにしているのですが、ネイティブアプリの開発者にAPI仕様を見るためだけにdocker環境を立ち上げてもらうのもちょっと気が引けます。
ということで、最近めちゃめちゃお気に入りなAzure Static WebAppsには、デフォルトで認証機能が組み込まれているので、この機能を使ってAPI仕様を公開できないか試してみた結果をまとめました。
swagger-ui配布用の設定
普段は公式のswagger-ui の dockerイメージ を使っているのですが、今回は静的なサイトとして構築する必要があるので、 swagger-ui-dist というnpmパッケージで配布されているswagger-uiの配信用のファイルを使用して環境を作ります。
適当なディレクトリで例えば以下のようにswagger-ui-distを追加します。
$ mkdir swagger-ui-demo
$ cd swagger-ui-demo
$ yarn init
$ yarn add swagger-ui-dist
staticwebapp.config.jsonの作成
認証やroutingの設定は staticwebapp.config.json というファイルで指定しますので以下のような内容で作成してください。
今回は公開対象はエンジニアなので、githubでの認証のみ有効にします。
{
    "routes": [
        {
            "route": "/",
            "allowedRoles": ["reader"]
        },
        {
            "route": "/login",
            "rewrite": "/.auth/login/github"
        },
        {
            "route": "/.auth/login/twitter",
            "statusCode": 404
        },
        {
            "route": "/logout",
            "redirect": "/.auth/logout"
        }
    ],
    "responseOverrides": {
        "401": {
            "redirect": "/login",
            "statusCode": 302
        }
    }
}
ビルドの設定
bin/build に以下の内容を入れて実行権をつけておきます
# !/bin/sh

if [ ! -d "$SOURCE_DIR/OUT" ];then
    mkdir $SOURCE_DIR/out
fi

curl -OL https://petstore.swagger.io/v2/swagger.json --output swagger.json
cp node_modules/swagger-ui-dist/* $SOURCE_DIR/out/
cp swagger.json $SOURCE_DIR/out/
cp staticwebapp.config.json $SOURCE_DIR/out/
sed -i "s|https://petstore.swagger.io/v2/swagger.json|swagger.json|g" $SOURCE_DIR/out/index.html
$ chmod +x bin/build
このビルドスクリプトでは、サンプル用の https://petstore.swagger.io/v2/swagger.json をダウンロードして、サーバ内の swagger.json を参照するように設定しています。また、先ほど作成した staticwebapp.config.json も out ディレクトリにコピーしています。
実際に利用する場合は、自身のサービス用に作成した swagger.json を out ディレクトリにコピーするようにすれば良いかと思います。
ビルドスクリプトを実行できるよう package.json に以下を追加します。
...
  "scripts": {
    "build": "./bin/build"
  },
...
最後に、.gitignore を以下の内容で作成し、全てのファイルをcommitします。これで準備完了です。
.DS_Store
/node_modules
/out
Azure Static WebAppsの設定
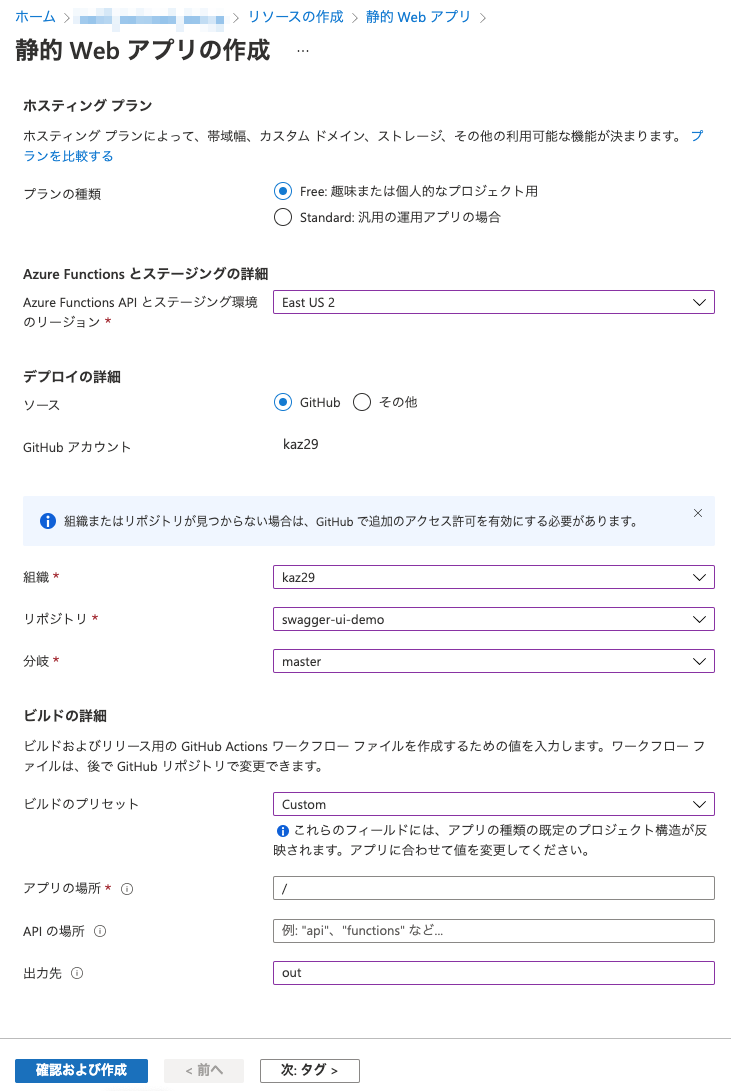
リポジトリの準備ができたので、Azure PortalからStatic Web Appを作成します。
参考のためにスクリーンショットを貼っておきますが、Build Presetsを Customに、 Output location を out に設定してください。
利用者の招待
利用者を登録するには Azure Portal上の ロール管理 で招待用のリンクを作成します。今回はロールには reader を指定しています。
作成された 招待リンク を利用者に送付してください。招待リンクにアクセスすると、以下のような認証画面が表示されます。
ログインが完了すると、いつものswagger-uiが表示されるはずです。
まとめ
いかがでしたでしょうか、Azure Static Web Appを利用すればとても簡単に公開先を限定してswagger-uiのAPI仕様を公開することができました。
参考になれば嬉しいです。


