Arduino用のGSMライブラリ TinyGSM をarduino UNO + SIM7500JC の組み合わせでテストしました。
機器構成
| 名称 | 型名 | メーカー |
|---|---|---|
| マイコンボード | Arduino UNO | Arduino |
| SIM7500JC拡張ボード | NS-SIM7500-0101 | Next Step |
| SIMカード | Plan-D | SORACOM |

TinyGSMはこちらで配布されています vshymanskyy/TinyGSM
Arduino IDEへのインストールは ライブラリマネージャ の検索窓に TynyGPS と入力してリストアップされる
[TynyGPS] を選択してインストールするか、先程のGithubのページから .zip ファイルをダウンロードしてzipファイルをインストールします。
また ArduinoHttpClient も使用しますのでこちらも同様にインストールして下さい。
TinyGSMがサポートしているモデム(モジュール)
SIMCom SIM800 series (SIM800A, SIM800C, SIM800L, SIM800H, SIM808, SIM868)
SIMCom SIM900 series (SIM900A, SIM900D, SIM908, SIM968)
SIMCom WCDMA/HSPA/HSPA+ Modules (SIM5360, SIM5320, SIM5300E, SIM5300E/A)
SIMCom LTE Modules (SIM7100E, SIM7500E, SIM7500A, SIM7600C, SIM7600E)
SIMCom SIM7000E/A/G CAT-M1/NB-IoT Module
AI-Thinker A6, A6C, A7, A20
ESP8266 (AT commands interface, similar to GSM modems)
Digi XBee WiFi and Cellular (using XBee command mode)
Neoway M590
u-blox 2G, 3G, 4G, and LTE Cat1 Cellular Modems (many modules including LEON-G100, LISA-U2xx, SARA-G3xx, SARA-U2xx, TOBY-L2xx, LARA-R2xx, MPCI-L2xx)
u-blox LTE-M/NB-IoT Modems (SARA-R4xx, SARA-N4xx, but NOT SARA-N2xx)
Sequans Monarch LTE Cat M1/NB1 (VZM20Q)
Quectel BG96
Quectel M95
Quectel MC60 (alpha)
SIM7500JCはありませんが SIM7500E, SIM7500A があります。
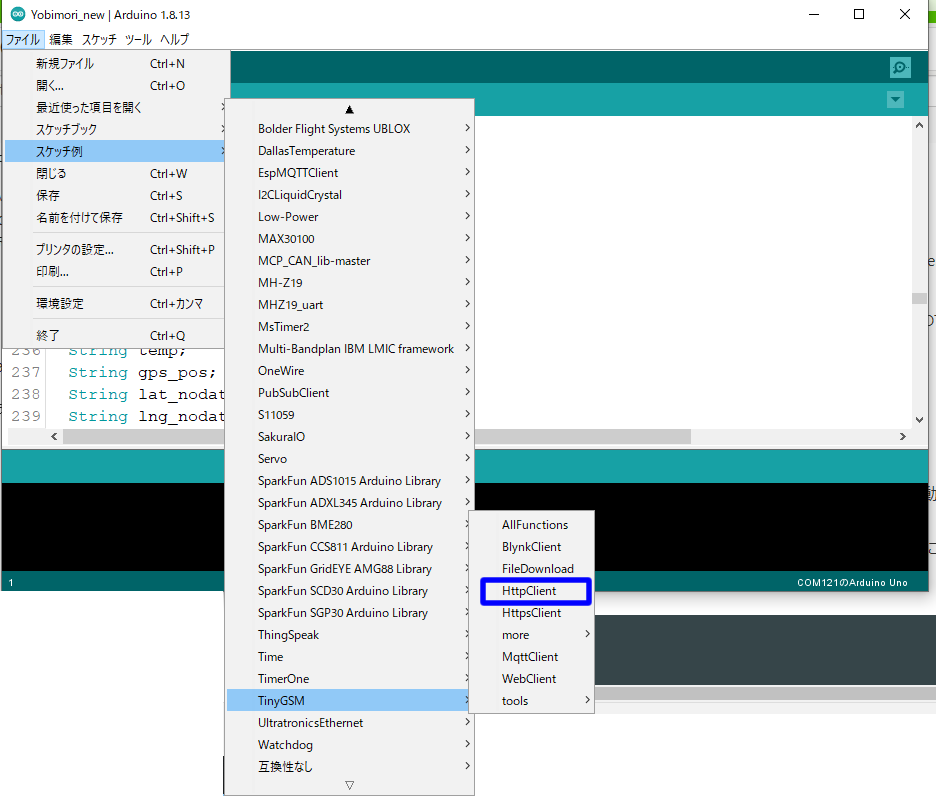
TinyGSMライブラリをインストールすると スケッチの例 の中に TinyGSM のグループが出来ますのでその中から
HttpClient を開きます。
ソースコードの変更箇所
モジュールの選択箇所で TINY_GSM_MODEM_SIM7600 を選択します
(SIM7600とSIM7500のATコマンドは共通です。)
// Select your modem:
// #define TINY_GSM_MODEM_SIM800
// #define TINY_GSM_MODEM_SIM808
// #define TINY_GSM_MODEM_SIM868
// #define TINY_GSM_MODEM_SIM900
// #define TINY_GSM_MODEM_SIM7000
// #define TINY_GSM_MODEM_SIM5360
# define TINY_GSM_MODEM_SIM7600
// #define TINY_GSM_MODEM_UBLOX
// #define TINY_GSM_MODEM_SARAR4
// #define TINY_GSM_MODEM_M95
// #define TINY_GSM_MODEM_BG96
// #define TINY_GSM_MODEM_A6
// #define TINY_GSM_MODEM_A7
// #define TINY_GSM_MODEM_M590
// #define TINY_GSM_MODEM_MC60
// #define TINY_GSM_MODEM_MC60E
// #define TINY_GSM_MODEM_ESP8266
// #define TINY_GSM_MODEM_XBEE
// #define TINY_GSM_MODEM_SEQUANS_MONARCH
モデムと接続するシリアルポートの選択
今回はArduino UNOのソフトウェアシリアルで コントロールしますので
#define SerialAT Serial1 をコメントにして
// #include
// SoftwareSerial SerialAT(8, 7); // RX, TX
の2行のコメントを解除します。
// Set serial for AT commands (to the module)
// Use Hardware Serial on Mega, Leonardo, Micro
// #define SerialAT Serial1

// or Software Serial on Uno, Nano
# include <SoftwareSerial.h>
SoftwareSerial SerialAT(8, 7); // RX, TX
APNの設定
今回 SORACOMのIoT SIM(Plan-D)のSIMカードを使いましたのでAPINの設定を以下のようにします。
// Your GPRS credentials, if any
const char apn[]  = "soracom.io";
const char gprsUser[] = "sora";
const char gprsPass[] = "sora";
** モジュールのEnable設定**
SIM7500はモジュールをEnableにするために PWRKEYピンにローパルスを加える必要があるために
その記述を追加します。(今回使用の環境ではArduino unoの12ピンをPWRKEYピンに接続しています)
  // !!!!!!!!!!!
  // Set your reset, enable, power pins here
  pinMode(12, OUTPUT);
  digitalWrite(12, HIGH);
  delay(500);
  digitalWrite(12, LOW);
  // !!!!!!!!!!!
ボーレーの設定
Arduino UNOとSIM7500JCの通信のボーレートを設定します。
標準では自動判別の関数が呼ばれていますがこれだとうまく動かないのと Arduino UNOのソフトウェアーシリアルでは4800bpsまでしか動かなかったので4800bps固定に書き換えます。
(ESP32のハードウェアシリアルを使えばもっと高速で通信出来ると思います。)
  // Set GSM module baud rate
  // TinyGsmAutoBaud(SerialAT, GSM_AUTOBAUD_MIN, GSM_AUTOBAUD_MAX);
  SerialAT.begin(4800);
以下は4800bpsと9600bpsでの動作の違いです。
9600bpsではサーバーからのレスポンスを受け取れていません。
ボーレート4800bps
Wait...
Initializing modem...
[7517] ### Unhandled:
Modem Info:
Waiting for network... success
Network connected
Connecting to soracom.io success
GPRS connected
Performing HTTP GET request... Response status code: 200
Response Headers:
    Server : nginx/1.10.3 (Ubuntu)
    Date : Thu, 31 Dec 2020 05:20:26 GMT
    Content-Type : text/plain; charset=UTF-8
    Content-Length : 121
    Connection : close
    X-DNS-Prefetch-Control : off
    X-Frame-Options : SAMEORIGIN
    Strict-Transport-Security : max-age=15552000; includeSubDomains
    X-Download-Options : noopen
    X-Content-Type-Options : nosniff
    X-XSS-Protection : 1; mode=block
    Accept-Ranges : bytes
    Cache-Control : public, max-age=0
    Last-Modified : Wed, 27 Sep 2017 09:03:12 GMT
    ETag : W/"79-15ec2936080"
Content length is: 121
Response:

  _____            _____  _____  _____
    |  | |\ | \_/ |  ___ |_____ |  |  |
    |  | | \|  |  |_____| _____||  |  |


Body length is: 121
[14531] ### Unhandled:
Server disconnected
ボーレート9600bps
Wait...
Initializing modem...
[7515] ### Unhandled:
Modem Info:
Waiting for network... success
Network connected
Connecting to soracom.io success
GPRS connected
Performing HTTP GET request...
Modemのイニシャライズ関係の処理をコメントアウト
ここをコメントアウトにします。そうしないと止まってしまいます。
  // Restart takes quite some time
  // To skip it, call init() instead of restart()
  // SerialMon.println("Initializing modem...");
  // modem.restart();
  // modem.init();

  //  String modemInfo = modem.getModemInfo();
  //  SerialMon.print("Modem Info: ");
  //  SerialMon.println(modemInfo);
いかが変更を加えた最終的なプログラムです。
/**************************************************************
 *
 * This sketch connects to a website and downloads a page.
 * It can be used to perform HTTP/RESTful API calls.
 *
 * For this example, you need to install ArduinoHttpClient library:
 *   https://github.com/arduino-libraries/ArduinoHttpClient
 *   or from http://librarymanager/all#ArduinoHttpClient
 *
 * TinyGSM Getting Started guide:
 *   https://tiny.cc/tinygsm-readme
 *
 * For more HTTP API examples, see ArduinoHttpClient library
 *
 * NOTE: This example may NOT work with the XBee because the
 * HttpClient library does not empty to serial buffer fast enough
 * and the buffer overflow causes the HttpClient library to stall.
 * Boards with faster processors may work, 8MHz boards will not.
 **************************************************************/

// Select your modem:
// #define TINY_GSM_MODEM_SIM800
// #define TINY_GSM_MODEM_SIM808
// #define TINY_GSM_MODEM_SIM868
// #define TINY_GSM_MODEM_SIM900
// #define TINY_GSM_MODEM_SIM7000
// #define TINY_GSM_MODEM_SIM5360
# define TINY_GSM_MODEM_SIM7600
// #define TINY_GSM_MODEM_UBLOX
// #define TINY_GSM_MODEM_SARAR4
// #define TINY_GSM_MODEM_M95
// #define TINY_GSM_MODEM_BG96
// #define TINY_GSM_MODEM_A6
// #define TINY_GSM_MODEM_A7
// #define TINY_GSM_MODEM_M590
// #define TINY_GSM_MODEM_MC60
// #define TINY_GSM_MODEM_MC60E
// #define TINY_GSM_MODEM_ESP8266
// #define TINY_GSM_MODEM_XBEE
// #define TINY_GSM_MODEM_SEQUANS_MONARCH

// Set serial for debug console (to the Serial Monitor, default speed 115200)
# define SerialMon Serial

// Set serial for AT commands (to the module)
// Use Hardware Serial on Mega, Leonardo, Micro
// #define SerialAT Serial1

// or Software Serial on Uno, Nano
# include <SoftwareSerial.h>
SoftwareSerial SerialAT(8, 7); // RX, TX

// Increase RX buffer to capture the entire response
// Chips without internal buffering (A6/A7, ESP8266, M590)
// need enough space in the buffer for the entire response
// else data will be lost (and the http library will fail).
# if !defined(TINY_GSM_RX_BUFFER)
# define TINY_GSM_RX_BUFFER 650
# endif

// See all AT commands, if wanted
// #define DUMP_AT_COMMANDS

// Define the serial console for debug prints, if needed
# define TINY_GSM_DEBUG SerialMon
// #define LOGGING  // <- Logging is for the HTTP library

// Range to attempt to autobaud
# define GSM_AUTOBAUD_MIN 9600
# define GSM_AUTOBAUD_MAX 115200

// Add a reception delay - may be needed for a fast processor at a slow baud rate
// #define TINY_GSM_YIELD() { delay(2); }

// Define how you're planning to connect to the internet
# define TINY_GSM_USE_GPRS true
# define TINY_GSM_USE_WIFI false

// set GSM PIN, if any
# define GSM_PIN ""

// Your GPRS credentials, if any
const char apn[]  = "soracom.io";
const char gprsUser[] = "sora";
const char gprsPass[] = "sora";

// Your WiFi connection credentials, if applicable
const char wifiSSID[]  = "YourSSID";
const char wifiPass[]  = "YourWiFiPass";

// Server details
const char server[] = "vsh.pp.ua";
const char resource[] = "/TinyGSM/logo.txt";
const int  port = 80;

# include <TinyGsmClient.h>
# include <ArduinoHttpClient.h>

// Just in case someone defined the wrong thing..
# if TINY_GSM_USE_GPRS && not defined TINY_GSM_MODEM_HAS_GPRS
# undef TINY_GSM_USE_GPRS
# undef TINY_GSM_USE_WIFI
# define TINY_GSM_USE_GPRS false
# define TINY_GSM_USE_WIFI true
# endif
# if TINY_GSM_USE_WIFI && not defined TINY_GSM_MODEM_HAS_WIFI
# undef TINY_GSM_USE_GPRS
# undef TINY_GSM_USE_WIFI
# define TINY_GSM_USE_GPRS true
# define TINY_GSM_USE_WIFI false
# endif

# ifdef DUMP_AT_COMMANDS
  #include <StreamDebugger.h>
  StreamDebugger debugger(SerialAT, SerialMon);
  TinyGsm modem(debugger);
# else
  TinyGsm modem(SerialAT);
# endif

TinyGsmClient client(modem);
HttpClient http(client, server, port);

void setup() {
  // Set console baud rate
  SerialMon.begin(115200);
  delay(10);

  // !!!!!!!!!!!
  // Set your reset, enable, power pins here
  pinMode(12, OUTPUT);
  digitalWrite(12, HIGH);
  delay(500);
  digitalWrite(12, LOW);
  // !!!!!!!!!!!

  SerialMon.println("Wait...");

  // Set GSM module baud rate
  // TinyGsmAutoBaud(SerialAT, GSM_AUTOBAUD_MIN, GSM_AUTOBAUD_MAX);
  SerialAT.begin(4800);
  delay(6000);

  // Restart takes quite some time
  // To skip it, call init() instead of restart()
  // SerialMon.println("Initializing modem...");
  // modem.restart();
  // modem.init();

  //  String modemInfo = modem.getModemInfo();
  //  SerialMon.print("Modem Info: ");
  //  SerialMon.println(modemInfo);

# if TINY_GSM_USE_GPRS
  // Unlock your SIM card with a PIN if needed
  if ( GSM_PIN && modem.getSimStatus() != 3 ) {
    modem.simUnlock(GSM_PIN);
  }
# endif
}

void loop() {

# if TINY_GSM_USE_WIFI
  // Wifi connection parameters must be set before waiting for the network
  SerialMon.print(F("Setting SSID/password..."));
  if (!modem.networkConnect(wifiSSID, wifiPass)) {
    SerialMon.println(" fail");
    delay(10000);
    return;
  }
  SerialMon.println(" success");
# endif

# if TINY_GSM_USE_GPRS && defined TINY_GSM_MODEM_XBEE
  // The XBee must run the gprsConnect function BEFORE waiting for network!
  modem.gprsConnect(apn, gprsUser, gprsPass);
# endif

  SerialMon.print("Waiting for network...");
  if (!modem.waitForNetwork()) {
    SerialMon.println(" fail");
    delay(10000);
    return;
  }
  SerialMon.println(" success");

  if (modem.isNetworkConnected()) {
    SerialMon.println("Network connected");
  }

# if TINY_GSM_USE_GPRS
  // GPRS connection parameters are usually set after network registration
    SerialMon.print(F("Connecting to "));
    SerialMon.print(apn);
    if (!modem.gprsConnect(apn, gprsUser, gprsPass)) {
      SerialMon.println(" fail");
      delay(10000);
      return;
    }
    SerialMon.println(" success");

    if (modem.isGprsConnected()) {
      SerialMon.println("GPRS connected");
    }
# endif

  SerialMon.print(F("Performing HTTP GET request... "));
  int err = http.get(resource);
  if (err != 0) {
    SerialMon.println(F("failed to connect"));
    delay(10000);
    return;
  }

  int status = http.responseStatusCode();
  SerialMon.print(F("Response status code: "));
  SerialMon.println(status);
  if (!status) {
    delay(10000);
    return;
  }

  SerialMon.println(F("Response Headers:"));
  while (http.headerAvailable()) {
    String headerName = http.readHeaderName();
    String headerValue = http.readHeaderValue();
    SerialMon.println("    " + headerName + " : " + headerValue);
  }

  int length = http.contentLength();
  if (length >= 0) {
    SerialMon.print(F("Content length is: "));
    SerialMon.println(length);
  }
  if (http.isResponseChunked()) {
    SerialMon.println(F("The response is chunked"));
  }

  String body = http.responseBody();
  SerialMon.println(F("Response:"));
  SerialMon.println(body);

  SerialMon.print(F("Body length is: "));
  SerialMon.println(body.length());

  // Shutdown

  http.stop();
  SerialMon.println(F("Server disconnected"));

# if TINY_GSM_USE_WIFI
    modem.networkDisconnect();
    SerialMon.println(F("WiFi disconnected"));
# endif
# if TINY_GSM_USE_GPRS
    modem.gprsDisconnect();
    SerialMon.println(F("GPRS disconnected"));
# endif

  // Do nothing forevermore
  while (true) {
    delay(1000);
  }
}
細かい処理までは調べていませんが、以上の変更でSIM7500JCでHttpClientが動きました。
正常に動いた時のターミナルは先に記述した 4800bps.log のようになります。
TinyGSMにはたくさんの機能があるのでこれから色々テストしていこうと思っています。
追記
同じような変更でサンプルの
「AllFunctions」、「WebClient」も動きました。