今回の流れ
1.[自前に作成]carrierwaveの導入、tweetモデルを作る
2.複数画像投稿ができるtweet_imagesモデルを作る。
3.tweet_imagesモデルで投稿する複数画像をtweetと一緒にtweet/showのページで表示させます。
完成図
accepts_nested_attributes_forとは
ネストした属性を使用すると、親を通じて関連レコードに属性を保存できます。 デフォルトではネストされた属性の更新は無効になっており、
#accepts_nested_attributes_forクラスメソッドを使用して有効にすることができます。 ネストした属性を有効にすると、モデルに属性ライターが定義されます。
以下より抜粋↓
(https://translate.google.com/translate?hl=ja&sl=en&u=https://api.rubyonrails.org/classes/ActiveRecord/NestedAttributes/ClassMethods.html&prev=search)
私にはあまり理解できませんでした…。例を挙げて考えてみます。
サッカーチームが3つあるとします。
(サッカー少年たちの頭が割れちゃいました。申し訳ございません。)
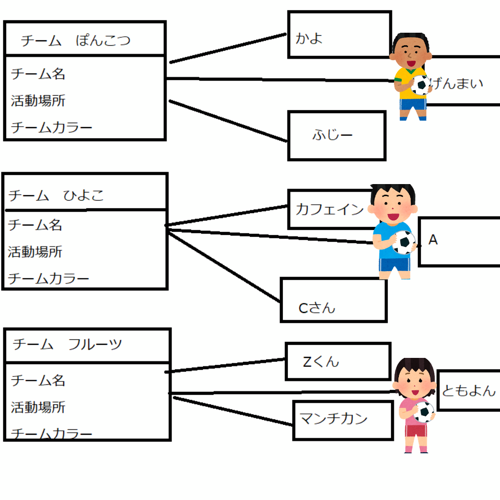
チームのモデルを「teamモデル」とすると、カラムとして、
・チーム名・活動場所・チームカラー
などを登録できます!
しかし、teamモデルのみでは、各チームのメンバー、一人一人の名前や詳細情報を登録することはできません。
そこで、accepts_nested_attributes_forメゾットの登場です。
memberモデルで複数のメンバーを登録し、accepts_nested_attributes_forメゾットで
teamモデルと紐づければ、各チームのメンバーを登録できます!
では、さっそく本題を始めます。
自前にcarrierwaveの導入と、tweetモデルを作っておいた前提で進みます。
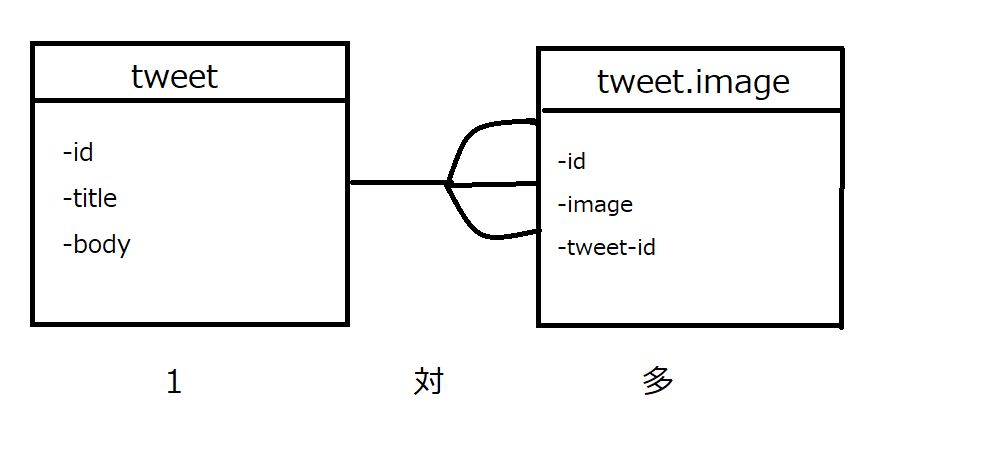
tweet_imagesのdbを作る
rails g model TweetImage
class CreateTweetImages < ActiveRecord::Migration[5.1]
  def change
    create_table :tweet_images do |t|
      t.string :image
      t.integer :tweet_id
      t.timestamps
    end
  end
end
rails db:migrate
モデルを作る
 #追加
 has_many :tweet_images, :dependent => :destroy
 accepts_nested_attributes_for :tweet_images, allow_destroy: true
class TweetImage < ApplicationRecord
  mount_uploader :image, ImageUploader
  belongs_to :tweet
end
コントローラを編集
  def new
    @tweet = Tweet.new
#追加。今回は一度に3枚投稿したいので、3timesとしました。
    3.times{@tweet.tweet_images.build}
  end

  def show
#追加
    @tweet_images = @tweet.tweet_images
    @tweet_image = TweetImage.new
  end

  private
  def tweet_params
#追加
    params.require(:tweet).permit(:body, :image, :title, :url, :area, :means, :description, tweet_images_attributes: [:image])
  end
end
ルーティング
#追加
  resources :tweets do
    resources :tweet_images
view
tweetのshowページで表示させます。
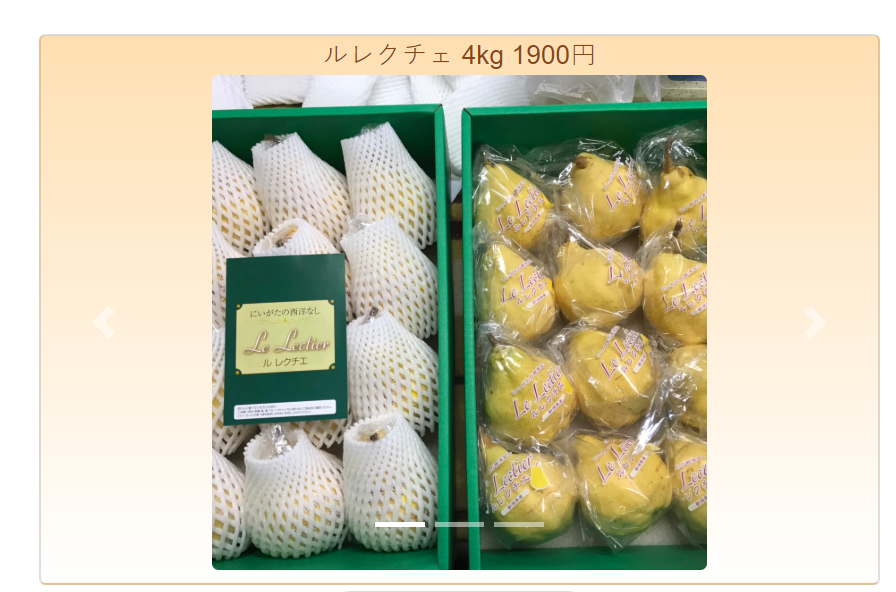
今回は、bootstrapのカルーセルを使って表示させました。
<body>
<div class="container">
<%= form_for(@tweet, :url => { controller:'tweets', action:'create'},class:"form-horizontal")do |f| %>
#省略
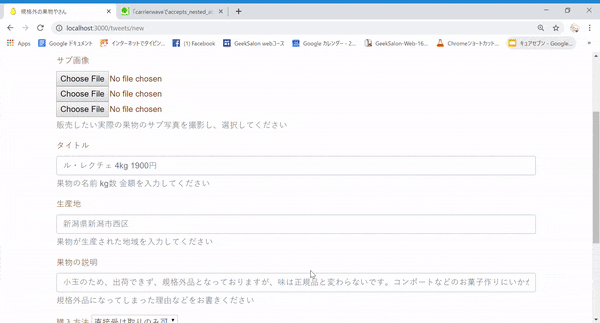
<div class="form-group">
<%= f.label :サブ画像 %>
<%= f.fields_for :tweet_images do |i| %>
<%= i.file_field :image, class:"form-control-file" %>
<% end %>
<span id="help8" class="form-text text-muted">
販売したい実際の果物のサブ写真を撮影し、選択してください
</span>
</div>
#省略
<div class="action">
<%= f.submit "送信", class: "btn-gradient-radius" %>
</div>
<% end %>
<a class="link_option", href="/tweets/index">戻る</a>
</div>
</body>
      <div class="card cont pb-2 mb-1">
          <%= @tweet.title %><br>
          <div id="carouselexample" class="carousel slide" data-ride="carousel" style="width:300px, height:300px" data-interval="2000">
            <ol class="carousel-indicators">
              <li data-target="#carouselexample" data-slide-to="0" class="active"></li>
              <li data-target="#carouselexample" data-slide-to="1"></li>
              <li data-target="#carouselexample" data-slide-to="2"></li>
            </ol>

            <div class="carousel-inner">
              <div class="carousel-item active">
                <%= image_tag @tweet_images[0].image.to_s,width:300,height:300,class: "tweet_image rounded" %>
              </div>
              <div class="carousel-item">
                <%= image_tag @tweet_images[1].image.to_s,width:300,height:300,class: "tweet_image rounded" %>
              </div>
              <div class="carousel-item">
                <%= image_tag @tweet_images[2].image.to_s,width:300,height:300,class: "tweet_image rounded" %>
              </div>
            </div>


            <a class="carousel-control-prev" href="#carouselexample" data-slide="prev">
              <span class="carousel-control-prev-icon" aria-hidden="true"></span>
              <span class="sr-only">Previous</span>
            </a>

            <!-- 次の画像へ進むための矢印ポインタ -->
            <a class="carousel-control-next" href="#carouselexample" data-slide="next">
              <span class="carousel-control-next-icon" aria-hidden="true"></span>
              <span class="sr-only">Next</span>
            </a>
          </div>
        </div>
ただ単に表示させたい場合は、
 <% @tweet_images.each do |t| %>
 <%= image_tag t.image.to_s,width:300,height:300%>
 <% end %>
と書けば表示できます!
なにか質問やミスがありましたら、コメント頂けると嬉しいです!
見ていただき、ありがとうございました。
参考にさせていただいた記事
(https://qiita.com/sinagaki58/items/a0d59cc41c6824bb5f67)
(https://qiita.com/shizuma/items/5bfcf6c1e855b959e135)