はじめに
JUCE Advent Calendar 2017 5日目 初めての参加になります。 kawaです。
今回は JUCEライブラリの中にある Colour クラスにについて調べてみました。
間違っている部分はコメント欄にてご教授いただけると嬉しいです。
( JUCE v5.11 でこの記事を書いています。)
Colour クラス の生成方法
- juce::Colour クラスを作成する方法に juce::Colour クラスのコンストラクタを使用する方法
-
juce::Colour クラスの
static関数から生成する方法 - juce::Colours を使って生成する方法
おおまかに3種類あるようです。
1. juce::Colour のコンストラクタを使って生成する方法
※ オーバーロード関数の引数が豊富なので、明確にするために引数にキャストを付けています。
// r,g,b値から生成する
Colours col_red            = juce::Colour ((uint8) 255 , (uint8)   0, (uint8) 0 ); // r,g,b
// r,g,b,a値 から生成する
Colours col_greenWithAlpha = juce::Colour ((uint8)    0, (uint8) 255, (uint8) 0 , (float) 0.5f );

// HSB の値からColourクラスを生成する。
juce::Colour col_red             = juce::Colour( 0.0f // hue  0.0f ~ 1.0f ( 0.0度 ~ 360.0度
                                               , 1.0f // saturation
                                               , 1.0f // brightness
                                               , 1.0f // alpha
                                               );
2. Colour クラスのstatic関数から生成する方法
Colour col_black  = juce::Colour::fromRGB ( (uint8)   0, (uint8)   0, (uint8) 0);
Colour col_white  = juce::Colour::fromRGBA( (uint8) 255, (uint8) 255, (uint8) 255,(uint8)255);
Colour col_red    = juce::Colour::fromHSV ( 0.0f   // hue
                                          , 1.0f   // saturation
                                          , 1.0f   // brightness
                                          , 1.0f); // alpha
3. juce::Colours を使って生成する方法
// namesapce juce::Colours 内で宣言されている。
juce::Colour col_white     = juce::Colours::white;
juce::Colour col_blue      = juce::Colours::blue;
juce::Colour col_lightblue = juce::Colours::lightblue;
juce::Colours で定義されてある Colour について
juce_Colours.h に 書いてあるので、 覗いてみたところ
file : juce_Colours.h
static JUCE_API const Colour  aliceblue
static JUCE_API const Colour  antiquewhite
static JUCE_API const Colour  aqua
static JUCE_API const Colour  aquamarine
static JUCE_API const Colour  azure
static JUCE_API const Colour  beige
static JUCE_API const Colour  bisque
......
// 省略
......
static JUCE_API const Colour  wheat
static JUCE_API const Colour  whitesmoke
static JUCE_API const Colour  yellowgreen
HTML のcssで使われている カラーの名前に対応しているようです。
CSSのカラーについて
HTML Color Names
[ https://www.w3schools.com/colors/colors_names.asp ]

上記Link先の ColorName の部分が juce::Colours::*** の名前と同じになっているので、
色の見本としてを探す時に役に立つと思います。
Colour クラスの主な関数
// 取得関数
uint8  getRed        () const noexcept
uint8  getGreen      () const noexcept
uint8  getBlue       () const noexcept
uint8  getAlpha      () const noexcept
float  getHue        () const noexcept
float  getSaturation () const noexcept
float  getBrightness () const noexcept
void   getHSB        ( float &hue, float &saturation, float &brightness) const noexcept

//
juce::Colour brighter       (float amountBrighter=0.4f ) const noexcept
juce::Colour darker         (float amountDarker=0.4f   ) const noexcept
juce::Colour withAlpha      (float newAlpha            ) const noexcept
juce::Colour withSaturation (float newSaturation       ) const noexcept
juce::Colour withBrightness (float newBrightness       ) const noexcept
juce::Colour withRotatedHue (float amountToRotate      ) const noexcept
ざっくりと書き出してみました。取得関数もカラークラスとしてRGBの値を取得できるのはもちろん、HSBの値も取得できるのは便利だなと思います。「段階的なグラデーションを作りたい」場合はHSBで色を扱えるのはかなり便利だったりします。 darker() , brighter() も微妙な調節を行う時に便利です。
改めてJUCEライブラリの設計にはいつもすごいなと感心しています。使う側、使いやすさを考えてあるように感じます。
// aliceblue カラーを暗くしたカラークラスを生成
auto col_A= juce::Colours::aliceblue.darker();

// violet カラーの明るさと透明度を変更したカラークラスを作成
auto col_B= juce::Colours::violet.brighter().withAlpha(0.8f);

// ... 描画
実際に使ってみた
1. darker()、brighter()を試してみた。

//=============================================================================
void MainContentComponent::paint (Graphics& g)
{
    const auto bounds = this->getLocalBounds();
    //=========================================================================
    if ( g.clipRegionIntersects( bounds ) == false )
        return;
    //=========================================================================
    const int w = bounds.getWidth();
    const int h = bounds.getHeight();
    //=========================================================================
    const auto col = juce::Colours::lightgreen;
    //=========================================================================

    const int oneBarWidth = w / 3;
    int x = 0;
    //=========================================================================
    g.setColour( col.darker(0.8) ); //darker()で暗くする
    g.fillRect( juce::Rectangle<int>( x, 0, oneBarWidth, h ) );
    //=========================================================================
    x += oneBarWidth;
    g.setColour( col ); // 基準の色
    g.fillRect( juce::Rectangle<int>( x, 0, oneBarWidth, h ) );
    //=========================================================================
    x += oneBarWidth;
    g.setColour( col.brighter(0.8) ); //brighter()で明るくする
    g.fillRect( juce::Rectangle<int>( x, 0, oneBarWidth, h ) );
    //=========================================================================

    // 文字描画
    //=========================================================================
    g.setFont   ( Font (60.0f));
    g.setColour ( Colours::white);
    g.drawText  ( "Hello World!", getLocalBounds(), Justification::centred, true);
    //=========================================================================
}
2.背景をHSBで塗りつぶしてみた

//=============================================================================
void MainContentComponent::paint (Graphics& g)
{
    const auto bounds = this->getLocalBounds();
    //=========================================================================
    if ( g.clipRegionIntersects( bounds ) == false )
        return;
    //=========================================================================
    const int   w = bounds.getWidth();
    const int   h = bounds.getHeight();
    //=========================================================================
    const int   barNum = 12;                    // 縦のラインの数
    const int   oneBarWidth = w / barNum;       // ひとつのラインの横幅
    //=========================================================================
    const float hueMove  = 270.0f / 360.0f;     // hueの全体の変位量 (0.0f~1.0f )
    const float deltaHue = hueMove / barNum;    // 一つあたりhueの変位量
    int x = 0;
    //=========================================================================
    for ( int i = 0; i < barNum;++i)
    {
        auto col = juce::Colour( deltaHue * i // hue 0.0f ~1.0f
                               , 1.0f         // saturation
                               , 1.0f         // brightness
                               , 1.0f         // alpha
                               );
        //=====================================================================
        g.setColour( col );
        g.fillRect( juce::Rectangle<int>( x, 0, oneBarWidth, h ) );
        //=====================================================================
        x += oneBarWidth;
    }
    //=========================================================================
    g.setFont   ( Font (40.0f));
    g.setColour ( Colours::white);
    g.drawText  ( "Hello World!", getLocalBounds(), Justification::centred, true);
    //=========================================================================
}
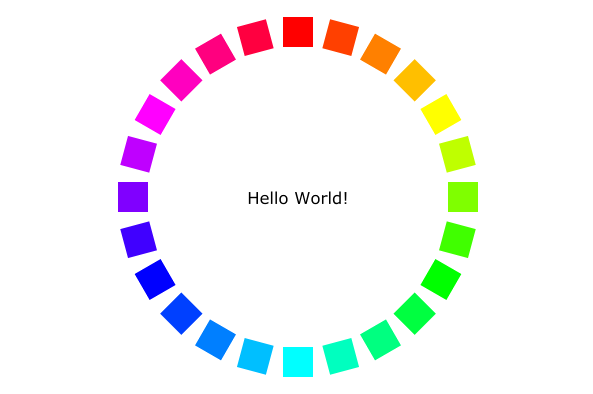
3. 色相環を描画してみた

//=============================================================================
void MainContentComponent::paint (Graphics& g)
{
    const auto bounds = this->getLocalBounds();
    //=========================================================================
    if ( g.clipRegionIntersects( bounds ) == false )
        return;
    //=========================================================================
    g.fillAll( juce::Colours::white );
    //=========================================================================
    const int  w  = bounds.getWidth();
    const int  h  = bounds.getHeight();
    const int  cx = bounds.getCentreX();
    const int  cy = bounds.getCentreY();
    //=========================================================================
    auto boxRect = juce::Rectangle<int>( cx-15, cy*0.1, 30, 30 );
    //=========================================================================
    for ( int i = 0; i < 24; ++i )
    {
        //=====================================================================
        auto matrix2d = AffineTransform::rotation( juce::degreesToRadians( 360.0f / 24.0f *i)
                                                 , cx
                                                 , cy );
        //=====================================================================
        juce::Path p;
        p.addRectangle  ( boxRect );
        p.applyTransform( matrix2d );
        //=====================================================================
        auto col = juce::Colour( 1.0f/24.0f * i // hue 0.0f ~1.0f
                               , 1.0f         // saturation
                               , 1.0f         // brightness
                               , 1.0f         // alpha
                               );
        //=====================================================================
        g.setColour( col );
        g.fillPath( p );
    }
    //=========================================================================
    g.setFont   ( Font (20.0f));
    g.setColour ( Colours::black);
    g.drawText  ( "Hello World!", getLocalBounds(), Justification::centred, true);
    //=========================================================================
}
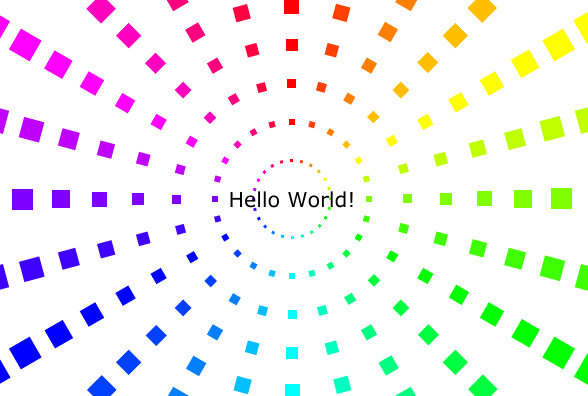
4. 色相環の描画を繰り返してみた

//=============================================================================
void MainContentComponent::paint (Graphics& g)
{
   const auto bounds = this->getLocalBounds();
   //=========================================================================
   if ( g.clipRegionIntersects( bounds ) == false )
       return;
   //=========================================================================
   g.fillAll( juce::Colours::white );
   //=========================================================================
   const int  cx = bounds.getCentreX();
   const int  cy = bounds.getCentreY();
   //=========================================================================

   //=========================================================================
   auto drawFunc = [&]( const juce::Rectangle<int>& baseRect
                      , const float& scale
                      , const int& pivotX
                      , const int& pivotY  )
   {
       for ( int i = 0; i < 24; ++i )
       {
           //=================================================================
           auto matrix2d = AffineTransform::rotation( juce::degreesToRadians( 360.0f / 24.0f *i)
                                                    , pivotX // pivot x
                                                    , pivotY // pivot y
                                                    );
           //=================================================================
           juce::Path p;
           p.addRectangle  ( baseRect );
           p.applyTransform( matrix2d.scaled( scale,scale,pivotX,pivotY) );
           //=================================================================
           auto col = juce::Colour( 1.0f/24.0f * i // hue 0.0f ~1.0f
                                  , 1.0f           // saturation
                                  , 1.0f           // brightness
                                  , 1.0f           // alpha
                                  );
           //=================================================================
           g.setColour( col );
           g.fillPath( p );
       }
   };
   //=========================================================================

   //=========================================================================
   for (int i = 0; i < 10;i++)
   {
       const double ratio = i / 10.0;
       const double size  = 30 * ratio;
       //=====================================================================
       drawFunc( juce::Rectangle<int>( cx - ( size * 0.5 )
                                     , cy - ( cy * 2 * ratio )
                                     , size
                                     , size
                                     ),1, cx, cy );
   }
   //=========================================================================
   // 文字描画 省略
}
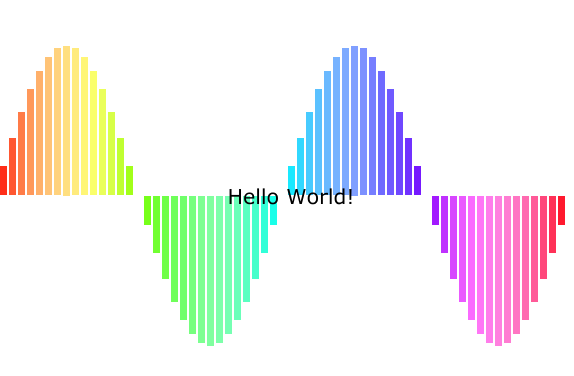
5. サイン波を棒グラフで描画してみた

//=============================================================================
void MainContentComponent::paint (Graphics& g)
{
    const auto bounds = this->getLocalBounds();
    //=========================================================================
    if ( g.clipRegionIntersects( bounds ) == false )
        return;
    //=========================================================================
    g.fillAll( juce::Colours::white );
    //=========================================================================
    const int cx = bounds.getCentreX();
    const int cy = bounds.getCentreY();
    //=========================================================================
    const int barNum = 64;
    const int oneBarWidth = bounds.getWidth() / barNum;
    const int height2 = cy * 0.75;
    int x = 0;
    //=========================================================================

    //=========================================================================
    for ( int i = 0; i < barNum;++i)
    {
        float val  = std::sin( juce::degreesToRadians( (720.0f / barNum) * i ) );
        float val2 = val * height2;
        //=====================================================================

        //=====================================================================
        g.setColour( juce::Colour( 1.0f / barNum * i         // hue
                                 , 1.0f - std::abs(val)*0.5  // saturation
                                 , 1.0f                      // brightness
                                 , 1.0f )                    // alpha
                   );
        //=====================================================================
        if( val >= 0.0)
            g.fillRect( juce::Rectangle<int>( x, cy - val2, oneBarWidth-2, val2 ) );
        else
            g.fillRect( juce::Rectangle<int>( x, cy       , oneBarWidth-2, std::abs( val2 ) ) );
        //=====================================================================
        x += oneBarWidth;
    }
    //=========================================================================
    g.setFont   ( Font (25.0f));
    g.setColour ( Colours::black);
    g.drawText  ( "Hello World!", getLocalBounds(), Justification::centred, true);
    //=========================================================================
}
6. 文字をカラフルにしてみた

//=============================================================================
void MainContentComponent::paint (Graphics& g)
{
    const auto bounds = this->getLocalBounds();
    //=========================================================================
    if ( g.clipRegionIntersects( bounds ) == false )
        return;
    //=========================================================================
    g.fillAll( juce::Colours::white );
    //=========================================================================
    const int w  = bounds.getWidth();
    const int h  = bounds.getHeight();
    const int cx = bounds.getCentreX();
    const int cy = bounds.getCentreY();
    //=========================================================================
    const juce::Font f ( 45.0f );
    g.setFont ( f );
    //=========================================================================
    const StringArray textArray = {"H","e","l","l","o"," "
                                  ,"J","U","C","E"," "
                                  ,"W","o","r","l","d" ,"!"};
    const String text = "Hello JUCE World!";
    //=========================================================================
    int i = 0;
    auto rect = juce::Rectangle<int>( cx-f.getStringWidth(text)/2
                                    , cy-f.getHeight() +f.getDescent()
                                    , 1, f.getHeight() );
    for (const auto& str : textArray  )
    {
        g.setColour( juce::Colour( 1.0f /textArray.size() *  i    // hue
                                 , 1.0f                           // saturation
                                 , 1.0f                           // brightness
                                 , 1.0f )                         // alpha
                   );
        //=====================================================================

        rect.setWidth( f.getStringWidth( str ) );
        //=====================================================================
        if (   i == 1 ) // e
        {
            g.saveState();    // 記憶
            // アフィン変換を使って回転させる
            g.addTransform( juce::AffineTransform::rotation( juce::degreesToRadians( -45.0f )
                                                           , rect.getCentreX()
                                                           , rect.getCentreY()
                                                           )
                          );
            g.drawText  ( str , rect , Justification::left, false);
            g.restoreState(); // 復帰
            //=================================================================
            rect.translate(  f.getStringWidth( str )+5, 0 );
        }
        else
        {
            g.drawText( str, rect, Justification::left, false );
            rect.translate(  f.getStringWidth( str ), 0 );
        }
        //=====================================================================
        ++i;
    }
    //=========================================================================
    for ( int i = 0; i < 10;++i)
    {
        //=====================================================================
        g.setColour( juce::Colour( 1.0f / 10 * i  // hue
                                 , 1.0f           // saturation
                                 , 1.0f           // brightness
                                 , 1.0f )         // alpha
                   );
        //=====================================================================
        const int size = ( w * 0.5) / 10.0 ;
        g.fillRect( juce::Rectangle<int>( w * 0.25 + size * i , cy+10
                                        , size , size ).reduced(10,10) );
    }
    //=========================================================================
}
結び
少し長くなってしまいました。
もしも、間違っている部分がありましたら、コメント欄にて教えていただけると嬉しいです。
カラー以外にもGUIの各部品を配置するときに超便利な Rectangleクラス があります。こちらもいつか機会があれば書いてみたいと思っています。
12月5日。すっかり冬の季節です。
それでは、明日のAogiri-m2dさんへバトンタッチ!
ありがとうございました!