はじめに
JUCE Advent Calendar 2017 8日目 二回目の参加になります。 kawaです。
今回はJUCEライブラリにこっそりついてくる BinaryBuilder について調べてみました。
間違っている部分はコメント欄にてご教授いただけると嬉しいです。
( JUCE v5.11 でこの記事を書いています。)
Binary Builderとは?
- 画像やフォント、リソースファイルをバイナリデータとしてC++ソースに出力するコンソールアプリ。
リソースファイルをバイナリソースにする方法は Projucer アプリでも可能。
今回は ProJucer を使わずに BinaryBuilder を使用してみたいと思います。
Binary Builder の準備
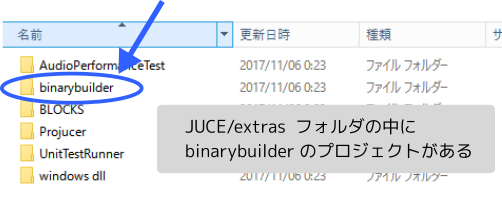
Binary BuilderのプロジェクトファイルはJUCEの extras フォルダにこっそり入っています。
プロジェクトファイルを使ってコンパイルを終えたところ。
使い方の説明
Binary Builder はコンソールアプリなので、
コマンドプロンプト、ターミナル の中で使用していきます。
$binaryBuilder sourceDirectory destDirectory (targetClassName)
第1引数 : バイナリにしたいファイルをまとめたフォルダのディレクトリ
第2引数 : 出力するディレクトリの場所 (ディレクトリが存在しない場合はエラーが出るようです。)
第3引数 : 出力するソースファイルの名前
ヘルプは-helpオプションで表示できるようです。
Buinary Builderを使ってみた
テスト用として あらかじめ TestResource フォルダの中に猫画像を3枚 、そして出力先の OutPut フォルダを準備して実行してみました。
$binaryBuilder TestResource OutPut TestResource
第1引数 : TestResource : バイナリソースにしたいフォルダパス
第2引数 : OutPut : 出力先のフォルダパス
第3引数 : TestResource : 出力するソースの名前
[画像] OutPutフォルダの中身

/* (Auto-generated binary data file). */

# pragma once

namespace TestResource
{
    extern const char*  img_koma_01_jpg;               // 1枚目の画像のデータ
    const int           img_koma_01_jpgSize = 87341;   // 1枚目の画像のデータのサイズ

    extern const char*  img_koma_02_jpg;               // 2枚目の画像のデータ
    const int           img_koma_02_jpgSize = 126548;  // 2枚目の画像のデータのサイズ

    extern const char*  img_koma_03_jpg;               // 3枚目の画像のデータ
    const int           img_koma_03_jpgSize = 87332;   // 3枚目の画像のデータのサイズ

}
無事にOutPutフォルダに出力できているようです。ソースの中身を見てみると3枚分の画像のデータが書き出されていました。
実際にJUCEの中で使ってみたいと思います。
実際にいろいろ使ってみた
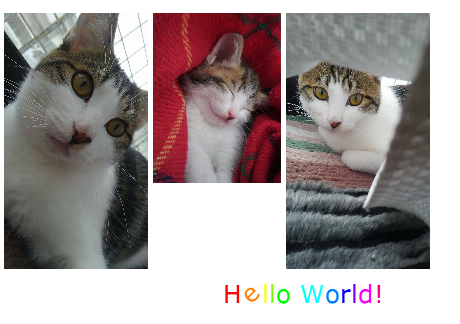
1. 画像を埋め込んでみた
// 1枚目 : Binary Builder を使って出力したソースと
// ImageCacheクラスを経由してImageクラスを作成
this->m_img1 = juce::ImageCache::getFromMemory( TestResource::img_koma_01_jpg         // データ(1枚目)
                                              , TestResource::img_koma_01_jpgSize  ); // サイズ(1枚目)
this->m_img1 = m_img1.rescaled( m_img1.getWidth()  * 0.2
                              , m_img1.getHeight() * 0.2 ); // 画像が大きかったので縮小

// 2枚目
this->m_img2 = juce::ImageCache::getFromMemory( TestResource::img_koma_02_jpg         // データ(2枚目)
                                              , TestResource::img_koma_02_jpgSize  ); // サイズ(2枚目)
this->m_img2 = m_img2.rescaled( m_img2.getWidth()  * 0.2
                              , m_img2.getHeight() * 0.2 ); // rescale

// 3枚目 省略 ...

//=============================================================================
// 描画するとき
// g.drawImageAt( m_img1 , x ,y , false );
// x += m_img1.getWidth() + 5; //margin 5 2枚目の座標
// ....
2. フォントを埋め込んでみた
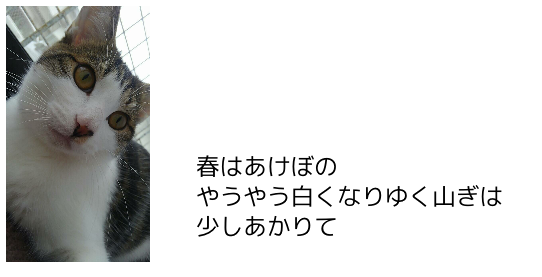
今度はフォントを BinaryBuilder でC++ソースにして、日本語を表示してみました。
//=========================================================================
// ソースファイル自体をUTF-8(BOMありで保存しておく。)
juce::String text = JUCE_T( "春はあけぼの\nやうやう白くなりゆく山ぎは\n少しあかりて" );
//=========================================================================

// Binary Builder を使って出力したソースと
// TypeFaceクラスを経由してFontクラスを作成
this->m_font1 = juce::Font( juce::Typeface::createSystemTypefaceFor( TestResource::VLGothicRegular_ttf          // データ ( フォント)
                                                                   , TestResource::VLGothicRegular_ttfSize ) ); // サイズ ( フォント)
this->m_font1.setHeight( 40.0f ); //フォントのサイズ変更

//=========================================================================
// 描画するとき
// g.setFont ( this->m_font1 );
// g.drawFittedText( text ...
- 細かい部分は未検証ですが、もしも読み込んだフォントで表示できない場合は
Regular体 を含むフォントで試してみると解決するかもしれないです。
使用したフォント
-
VL Gothic フォント
https://osdn.net/projects/vlgothic/ -
ロゴたいぷゴシック
http://www.fontna.com/blog/1226/
3. zipファイルを埋め込んでみた
ふと、zipファイルも埋め込んで解凍できるかもしれない。と気になって試してみました。
//=========================================================================
// あらかじめBinary Builder を使って出力したソースと
// MemoryInputStream を経由して ZipFileクラスを作成。
juce::MemoryInputStream stream ( TestResource::test_zip      // データ
                               , TestResource::test_zipSize  // サイズ
                               , false );
juce::ZipFile zip( stream ); // ZipFile クラスをInputStreamクラスから作成
//=========================================================================

const int totalEntryNum = zip.getNumEntries();//zipファイル内のすべてのエントリー数を取得
for ( int i = 0; i < totalEntryNum; ++i)
{
    const juce::ZipFile::ZipEntry* entry = zip.getEntry( i );
    DBG( entry->filename  ); // ファイル名をコンソールに出力。( デバッグ表示用
}
//=========================================================================
img_koma_01.jpg
img_koma_02.jpg
img_koma_03.jpg
makuranosousi.txt
VL-Gothic-Regular.ttf
無事に埋め込んだzipファイルを読み込んでいるようです。
( zipファイルの中に猫画像とフォント、サンプルテキストを入れてみました。)
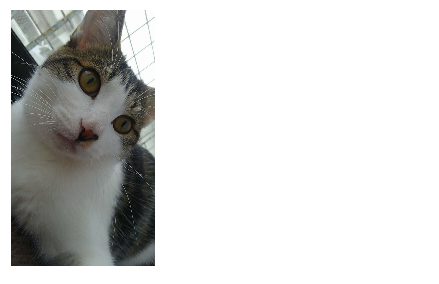
4. zipファイルから画像を表示してみた
今度は、zipファイルの中にある画像の表示について調べてみました。
//=============================================================================
// MemoryInputStream を経由して ZipFileクラスを作成。
juce::MemoryInputStream stream ( TestResource::test_zip     // データ
                               , TestResource::test_zipSize // サイズ
                               , false);
juce::ZipFile zip( stream );
//=============================================================================

// zipファイルのインデックスを zip内のファイルパスから取得。
const int targetZipEntryIndex = zip.getIndexOfFileName( "img_koma_01.jpg" );
//=============================================================================
if( targetZipEntryIndex != -1) // ファイルが見つかった場合.
{
    // 画像 を InputStreamクラス、MemoryBlock クラスを経由して Imageクラス を作成
    juce::ScopedPointer<juce::InputStream> inputStream = zip.createStreamForEntry( targetZipEntryIndex );
    juce::MemoryBlock memoryBlock;
    inputStream->readIntoMemoryBlock( memoryBlock );
    this->m_img = juce::ImageCache::getFromMemory( memoryBlock.getData()    // データ
                                                 , memoryBlock.getSize() ); // サイズ
    //=========================================================================
    this->m_img = m_img.rescaled( m_img.getWidth() *0.2, m_img.getHeight() *0.2 );// rescale
}

//=============================================================================
// 描画する時
// g.drawImageAt( m_img, 10, 10, false );
5. zipファイルからフォントを使ってみた
画像が表示できるなら、きっとzipファイルの中にあるフォントも読み込めるはず、と調べてみました。
//=========================================================================
// MemoryInputStream クラスを作成して ZipFileクラスを作成。
juce::MemoryInputStream stream ( TestResource::test_zip      // データ
                               , TestResource::test_zipSize  // サイズ
                               , false);
juce::ZipFile zip( stream );
//=========================================================================

// 猫画像部分 省略
//=========================================================================
const int targetTextIndex = zip.getIndexOfFileName( "makuranosousi.txt" );     // テキストファイル
const int targetFontIndex = zip.getIndexOfFileName( "VL-Gothic-Regular.ttf" ); // フォントファイル
//=========================================================================
if (  targetTextIndex != -1
   && targetFontIndex != -1 )
{
    // サンプルテキストとして InputStreamクラス、MemoryBlockクラスを経由して Stringクラス を作成
    //=====================================================================
    juce::ScopedPointer<juce::InputStream> inputStream_txt = zip.createStreamForEntry( targetTextIndex );
    juce::MemoryBlock memoryBlock_txt;
    inputStream_txt->readIntoMemoryBlock( memoryBlock_txt );
    this->m_drawText = memoryBlock_txt.toString();
    //=====================================================================

    // 日本語フォントを InputStreamクラス、MemoryBlock クラスを経由して Fontクラス を作成
    juce::ScopedPointer<juce::InputStream> inputStream_font = zip.createStreamForEntry( targetFontIndex );
    juce::MemoryBlock memoryBlock_font;
    inputStream_font->readIntoMemoryBlock( memoryBlock_font );
    this->m_font = juce::Font( juce::Typeface::createSystemTypefaceFor( memoryBlock_font.getData()
                                                                      , memoryBlock_font.getSize() ));
    this->m_font.setHeight( 30.f ); // フォントサイズ
    //=====================================================================
}

// 描画 するとき
//=========================================================================
// g.setColour( juce::Colours::black );
// g.setFont  ( m_font );
// g.drawFittedText( m_drawText , ....
//=========================================================================
結び
もしも内容に間違いがありましたら、コメント欄にて教えていただけると嬉しいです。
JUCEライブラリを扱っていると、やっぱり「なるほど~」と納得する部分があります。
僕も見習いたいと思っています。
この投稿が公開される日は12月8日。そろそろ年賀状に取り掛かりたい、と思いつつ・・時間は過ぎていくのでした。
よい年末をお過ごしください。
それでは、明日の Astellon さんへバトンタッチ。
ありがとうございました!
