VueでWebComponentsを使いアプリケーションを作ったことを書きたいと思います。
以下は、GitHubになります。
https://github.com/monkick/vue-polymer-metronome
画面

はじめに
はじめに、WebComponentsについてですが、WebComponents.orgより翻訳された、滝口さんの記事から引用しますと以下の通りになります。
Web componentsは、WebページやWebアプリケーションの中で新たに、再利用可能でカプセル化された独自のHTMLタグを作成するためのWebプラットフォームのAPIです。
独自に作成したコンポーネントやウィジェットは、Web componentsの標準をベースに構築されているので、あらゆるモダンブラウザ上で動作するでしょう。
また、HTMLと連動して動作するどんなJavascriptライブラリやフレームワークとも併用できます。
私のメトロノームの紹介
次に、今回作ったアプリケーションを紹介致します。
デモを動かせる環境を用意すればよかったのですが、すみません。ございません。
どうしてもと思われる方は、Checkout後にReadmeを参考されるか、VueCLIで作っておりますので、いつもの感じで立ち上げて下さい。
メトロノームとは、wikiから引用すると以下の通りになります。
一定の間隔で音を刻み、楽器を演奏あるいは練習する際にテンポを合わせるために使う音楽用具である。
私の作ったアプリケーションでは、以下の機能を要しております。
テンポを設定する機能
ビートを設定する機能
サウンドを設定する機能
音量を設定する機能
設計に関してですが、設計図としては以下の通りになっております。
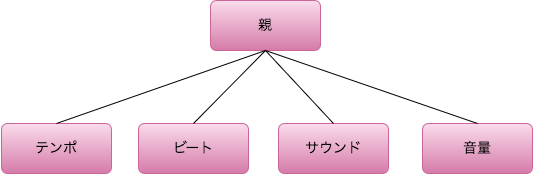
親コンポーネントは、機能を備えた子コンポーネントを持っております。
子コンポーネントで設定された変数は、親を経由して必要なところに渡される作りにしております。
コードですと以下のような感じです。
<template>
    <main class="main-wrapper">
        <ul class="grid">
            <li>
                <metronome-tempo :tempo="tempo" @change="changeTempo"></metronome-tempo>
            </li>
            <li>
                <metronome-beat :beat="beat" @change="changeBeat"></metronome-beat>
            </li>
            <li>
                <metronome-sound :sound="sound" @change="changeSound"></metronome-sound>
            </li>
            <li>
                <metronome-volume :volume="volume" @change="changeVolume"></metronome-volume>
            </li>
            <li class="width-full-mobile">
                <metronome-play :tempo="tempo" :beat="beat" :sound="soundFile" :volume="volume"></metronome-play>
            </li>
        </ul>
    </main>
</template>

<script>
    export default {
        name      : 'Metronome',
        data () {
            return {
                tempo    : 120,
                sound    : 1,
                beat     : 4,
                volume   : 5,
                soundFile: '',
            }
        },
        components: {
            'metronome-tempo' : () => import('./Metronome/Tempo.vue'),
            'metronome-beat'  : () => import('./Metronome/Beat.vue'),
            'metronome-sound' : () => import('./Metronome/Sound.vue'),
            'metronome-volume': () => import('./Metronome/Volume.vue'),
            'metronome-play'  : () => import('./Metronome/Play.vue')
        }
    }
</script>
音を鳴らしている部分は、metronome-playコンポーネントで行っております。
this.$data.interval = setInterval (() => {
  count % this.beat === 0 ? this._playBeat () : this._playTempo ();
  this.$data.beatCount = count;
  count++;
}, 60 * 1000 / this.tempo);
上記ように、setIntervalを使って音を出すタイミングを計っております。故に1音だけの大変短く収録されたものを使ってお入ります。音を出す方法としては、Web Audio APIを使っております。
WebComponentsを使った箇所について
今回はUI部分をWebComponents化しております。故にVueJSでは、変数の管理と音の再生処理を行い、テンポの上げ下げなどの変数を変更する部分は、WebComponentsで行うようにしました。
WebComponents化するにあたり、WebComponentsを作る上で最適なライブラリであるPolymer https://www.polymer-project.org/を使用しました。
こちらは、テンポなどを設定するWebComponentsになります。
<link rel="import" href="../bower_components/polymer/polymer-element.html">
<link rel="import" href="../bower_components/paper-slider/paper-slider.html">
<link rel="import" href="./mtrm_button_play.html">
...
<dom-module id="mtrm-component">
    <template>
        <style>
            ...
        </style>

        <mtrm-card>
            <div class="wrapper">
                <!-- title -->
                <template is="dom-if" if="{{!isTypePlay}}">
                    <div class="title">[[title]]</div>
                </template>
                <!-- /title -->

                <!-- display -->
                <template is="dom-if" if="{{!isTypePlay}}">
                    ...
                </template>
                <!-- /display -->

                ...

            </div>
        </mtrm-card>
    </template>
    <script>
        class MtrmComponent extends Polymer.Element {
            static get is () { return 'mtrm-component'; }

            static get properties () {
                return {
                    title : {
                        type: String,
                    },
                    ...
                };
            }

            ...
        }

        window.customElements.define (MtrmComponent.is, MtrmComponent);
    </script>
</dim-module>
結構、Vueのコンポネートと書き方が似ていると思います。
このように作ったWebComponentsを使うためには、index.htmlのHeaderで読み込ませる必要があります。
<!DOCTYPE html>
<html>
  <head>
    ...

    <!-- web components -->
    <link rel="import" href="static/bower_components/iron-flex-layout/iron-flex-layout.html">
    <link rel="import" href="static/web_components/mtrm_header.html">
    <link rel="import" href="static/web_components/mtrm_component.html">
読み込ませると、WebComponentで設定した名前でHTMLタグのように使うことが出来ます。
<template>
    <mtrm-component :title="title" :params="serializeTempos" :val="tempo" type="slider" @change="change"></mtrm-component>
</template>
<script>
    export default {
        props   : {
            tempo: {
                type: Number,
            },
        },
        name    : 'MetronomeTempo',
        data () {
            return {
                title : 'TEMPO',
                tempos: {
                    min : 1,
                    max : 255,
                    step: 1
                }
            }
        },
        computed: {
            serializeTempos: function () {
                return JSON.stringify (this.tempos);
            }
        },
        methods : {
            change: function (val) {
                const value = val.detail.value;
                if (value) {
                    this.$emit ('change', value);
                }
            }
        },
    }
</script>
上記は、VueJSのコンポーネントでWebComponentsを実際に使っているようです。<div>などの普段のHTMLタグと同じ感覚で<mtrm-component>を使っていることがわかると思います。
ポイントとして、
        data () {
            return {
                title : 'TEMPO',
                tempos: {
                    min : 1,
                    max : 255,
                    step: 1
                }
            }
        },
上記のように、<mtrm-component>のパラメーターにテンポ設定情報を渡すためのオブジェクトを作っているのですが、オブジェクトをパラメーターで渡すことは出来ませんので、以下のようにシリアライズすることがポイントです。
        computed: {
            serializeTempos: function () {
                return JSON.stringify (this.tempos);
            }
        },
また、WebComponentsからイベントを受け取る際は、渡される値は、以下のようにdetailキーの下に渡される様になっておりますのでご注意下さい。
            change: function (val) {
                const value = val.detail.value;
                if (value) {
                    this.$emit ('change', value);
                }
            }
私のメトロノームアプリケーションは、現在VueJS版の他にも、Angular版、Polymer版を作っております。また、今後React版も作る予定です。そうした場合に、各機能をWebComponents化しておくことで、プラットフォームが違っても、部品の再利用が可能になり構築するのが楽になります。
私のメトロノームアプリケーションでは、UI部品は全てWebComponents、変数の管理部分は各FWで行なうような思想で作っております。
もうひとつ、WebComponentsを使う魅力としては、WebComponents.orgには沢山のWebComponentsが公開されております。それを使えるというのも大きな魅力と思います。
ありがとうございました。
走り書きで、読みづらく申し訳ございません