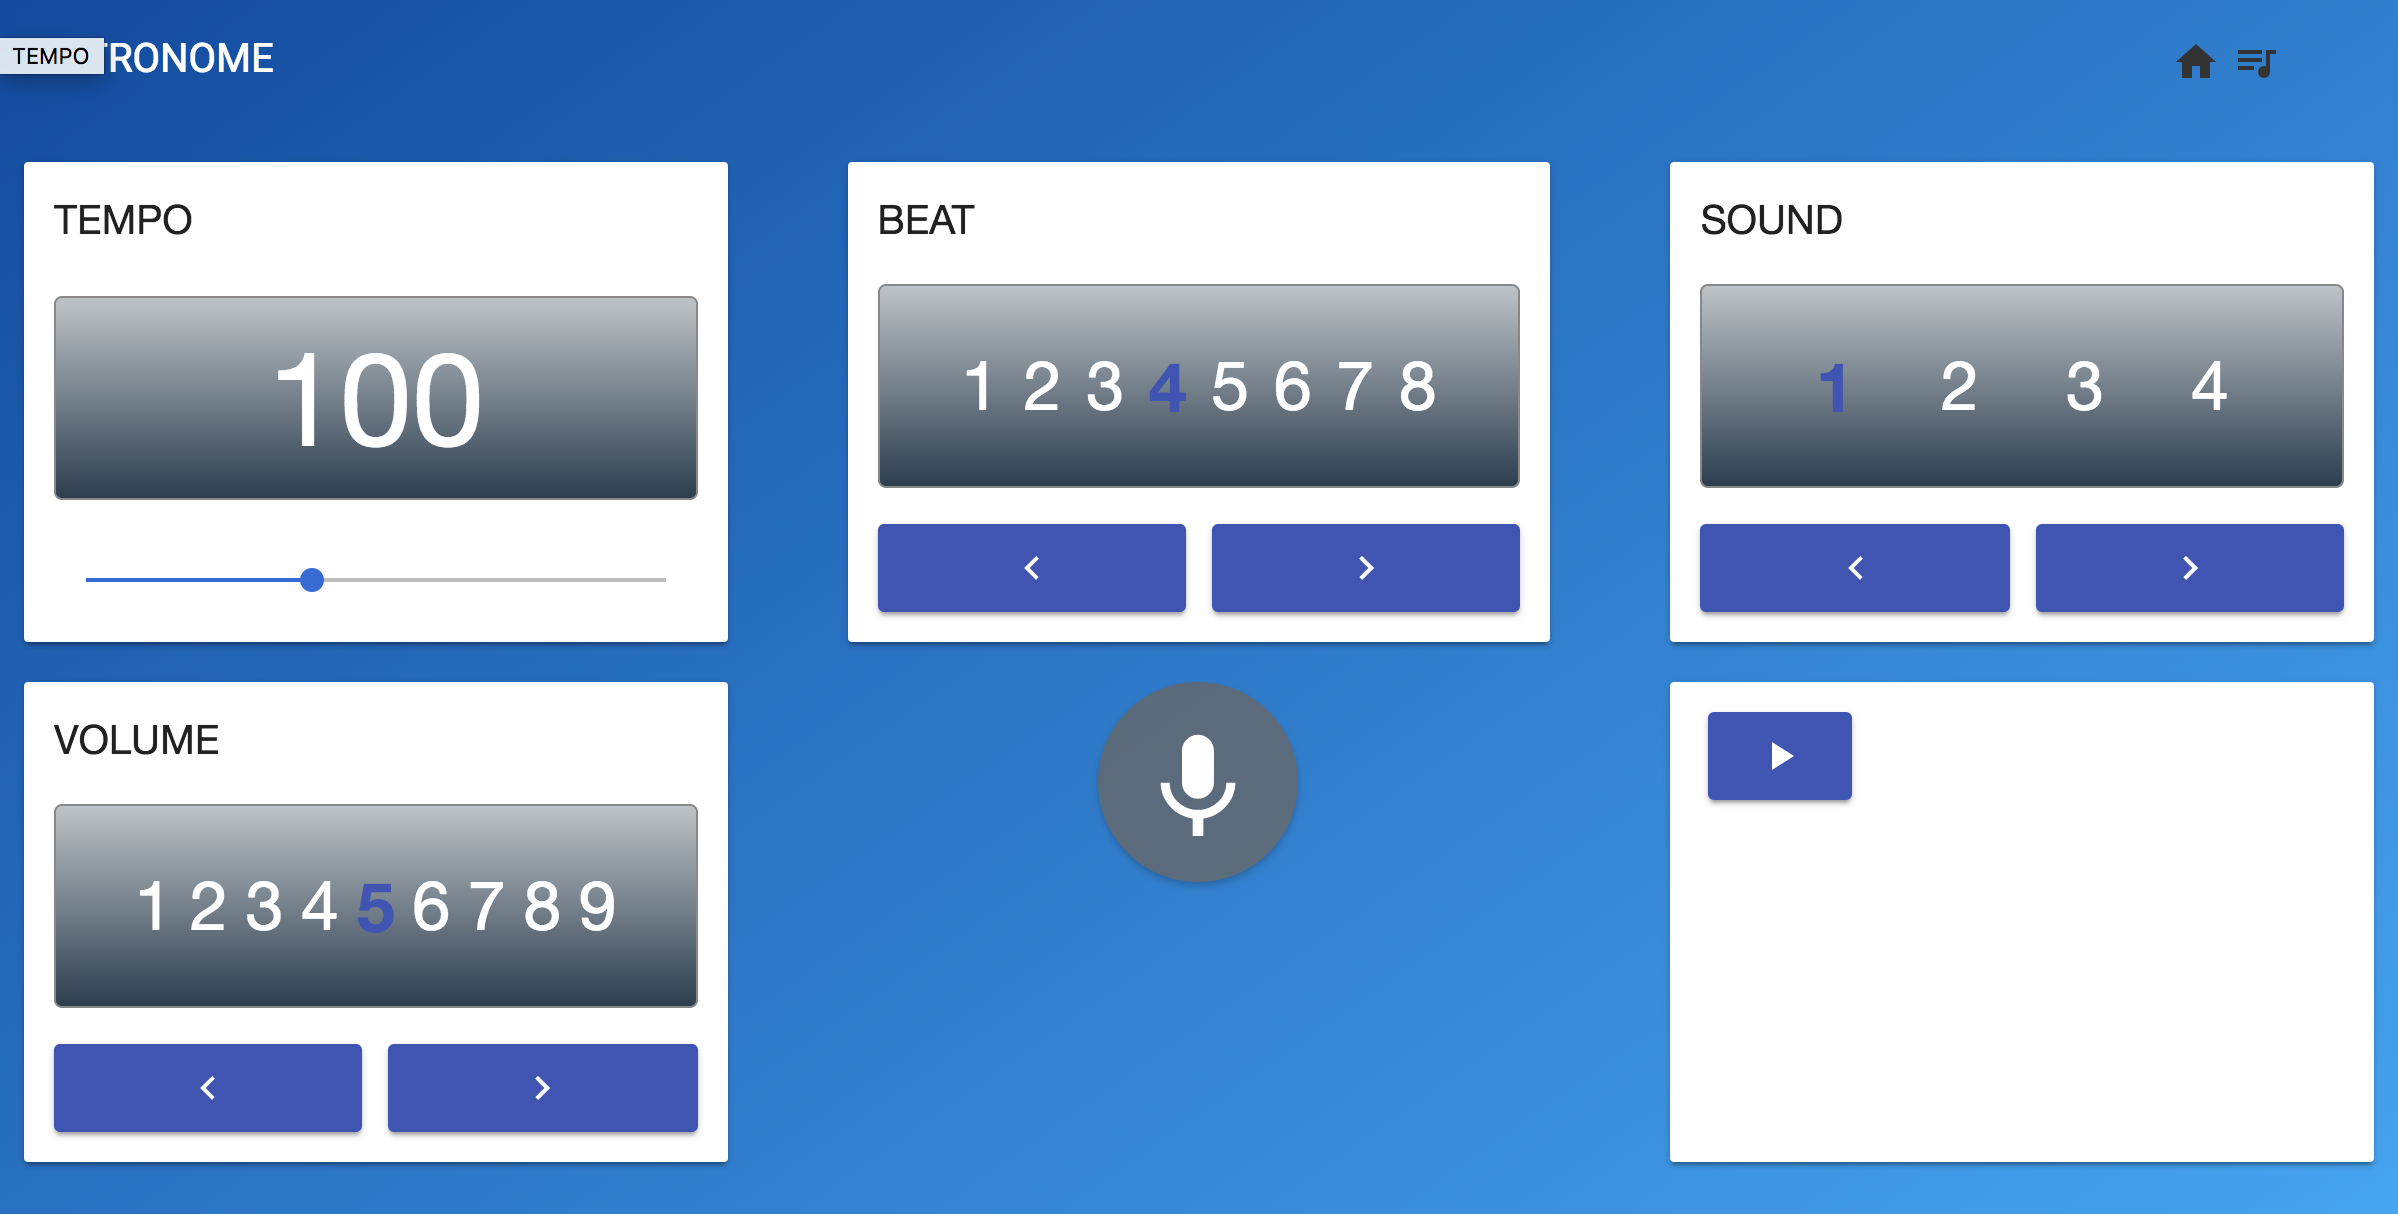
この記事では、主にAngularのコントリビューターであるlacoさん主催イベント、ng-sakeで毎回発表させていただいている。メトロノームを使ってAngular x WebComponentsについて書かせて頂きます。
メトロノームについて
wikiから引用すると以下の通りになります。
一定の間隔で音を刻み、楽器を演奏あるいは練習する際にテンポを合わせるために使う音楽用具である。
メトロノームを作ったきっかけ
数年前に参加した、ng-japan主催のハッカソンにて「Angularを活かしつつ、会場が沸くサービスを考えていました」、そして思いついたのがメトロノームだったのです。その時に作ったものを、LTをする毎に書き直していきました。数えていませんが既に10近いバージョン違いのメトロノームが存在します。
Web Componentsについて
はじめに、WebComponentsについてですが、WebComponents.orgより翻訳された、滝口さんの記事から引用しますと以下の通りになります。
Web componentsは、WebページやWebアプリケーションの中で新たに、再利用可能でカプセル化された独自のHTMLタグを作成するためのWebプラットフォームのAPIです。
独自に作成したコンポーネントやウィジェットは、Web componentsの標準をベースに構築されているので、あらゆるモダンブラウザ上で動作するでしょう。
また、HTMLと連動して動作するどんなJavascriptライブラリやフレームワークとも併用できます。
Web Componentsを導入したきっかけ
メトロノームを作り出したのがAngualr2が広まってきた頃で、Angularのバージョンが変わる度にコンポーネントを作り直しておりました。また、個人的にVeuJSに興味を持ちVueJS版のメトロノームを作ろうと思いました。
そのような背景があり、UI部分のコンポネートについては、FWやそのバージョンに左右されないものの方が良いと思ったのが、WebComponensを導入するきっかけになります。
画面
実際に触れる環境があると良いのですが、現状は用意しておりませんので、画面だけ貼っておきます。

画面説明
画面上に見える、「TEMPO、BEAT、SOUND、etc...」などが、コンポーネントになります。この部分をWebComponents化しました。
GitHub
このバージョンのメトロノームのGitHubになります。
https://github.com/monkick/angular5-metronome
機能紹介
このバージョンのメトロノームは、以下の機能を要しております。
テンポを設定する機能
ビートを設定する機能
サウンドを設定する機能
音量を設定する機能
メトロノームを鳴らす機能
音声認識をする機能
今回は時間の都合上、ロジック部分については触れませんが、興味がございましたらリポジトリを参照して下さい。
AngularとWebComponentsの使い分け
メトロノームの場合は、stateの管理をAngular側、UI部分をWebComponents側という思想で作り始めました。WebComponents側でボタンを押されたらCustomEventを発火し、Angular側でそれを検知してstateを変更する。と言った思想になります。
※すみません、改めて出来上がったコードを見るとそうとは言えないようです…
WebComponentsをAngularで使うためにやること
app.module.tsファイルに以下を追記します。
import {CUSTOM_ELEMENTS_SCHEMA, NgModule} from '@angular/core';

...

@NgModule({

    ...

    schemas     : [CUSTOM_ELEMENTS_SCHEMA],

    ...
これを書くことで、Angular内で定義されていないCustomElementsを使えるようになります。
WebComponentsのサンプル
私はWebComponentsを作る上で最適なライブラリであるPolymerを使用しました。
こちらは、テンポなどを設定するWebComponentsになります。
<link rel="import" href="../bower_components/polymer/polymer-element.html">
<link rel="import" href="../bower_components/paper-slider/paper-slider.html">
<link rel="import" href="./mtrm_button_play.html">
...
<dom-module id="mtrm-component">
    <template>
        <style>
            ...
        </style>

        <mtrm-card>
            <div class="wrapper">
                <!-- title -->
                <template is="dom-if" if="{{!isTypePlay}}">
                    <div class="title">[[title]]</div>
                </template>
                <!-- /title -->

                <!-- display -->
                <template is="dom-if" if="{{!isTypePlay}}">
                    ...
                </template>
                <!-- /display -->

                ...

            </div>
        </mtrm-card>
    </template>
    <script>
        class MtrmComponent extends Polymer.Element {
            static get is () { return 'mtrm-component'; }

            static get properties () {
                return {
                    title : {
                        type: String,
                    },
                    ...
                };
            }

            ...
        }

        window.customElements.define (MtrmComponent.is, MtrmComponent);
    </script>
</dim-module>
Angularになれていると、そんなに難しいとは思わないのではないでしょうか。
WebComponentsを使う
作ったWebComponentsを使うためには、Angularのコンポーネントのhtml部分で読み込ませる必要があります。
<link rel="import" href="../../../../assets/web_components/mtrm_component.html">

<h2 class="hidden">METRONOME</h2>
<div class="metronome">
    <div class="row metronome-content top">
...
読み込ませると、WebComponentsで設定した名前でHTMLタグのように使うことが出来ます。
...

        <div class="col-xs-12 col-sm-4 col-md-4 col-lg-4 column">
            <mtrm-component title="TEMPO" type="slider" params="{{tempos}}" param="{{tempo}}" (change)="changeTempo($event)"></mtrm-component>
        </div>
        <div class="col-xs-6 col-sm-4 col-md-4 col-lg-4 column">
            <mtrm-component title="BEAT" type="lifting" params="{{beats}}" param="{{beat}}" (change)="changeBeat($event)"></mtrm-component>
        </div>
        <div class="col-xs-6 col-sm-4 col-md-4 col-lg-4 column">
            <mtrm-component id="sound" title="SOUND" type="lifting" params="{{sounds}}" param="{{sound}}" (change)="changeSound($event)"></mtrm-component>
        </div>

...
上記は、Angularのコンポーネントで、実際に使っている様子です。<div>などの普段のHTMLタグと同じ感覚で<mtrm-component>を使っていることがわかると思います。
使う上での注意点
注意点としては、
        this.tempo       = 100;
        this.tempos      = JSON.stringify({
            min : 1,
            max : 255,
            step: 1,
        });
上記のように、<mtrm-component>のパラメーターに、テンポ設定情報を渡すためのオブジェクトを作っているのですが、オブジェクトをパラメーターで渡すことは出来ませんので、JSON.stringify()を使ってシリアライズすることがポイントです。
また、WebComponentsからイベントを受け取る際は、渡される値は、以下のようにdetailキーの下に渡される様になっておりますのでご注意下さい。
    changeTempo(val) {
        const value = val.detail.value;
        if (value) {
            this.tempo       = value;
            this.play_params = JSON.stringify([
                {tempo             : this.tempo,
                    beat           : this.beat,
                    sound_file     : this.getSoundFile(this.sounds, this.sound),
                    sound_file_beat: this.getSoundFile(this.sounds, 2),
                    volume         : this.volume
                }
            ]);
        }
    }
まとめ
私のメトロノームアプリケーションは、現在Angular版の他にも、VueJS版、Polymer版を作っております。また、今後React版も作る予定です。そうした場合に、各機能をWebComponents化しておくことで、プラットフォームが違っても、部品の再利用が可能になり構築するのが楽になります。
もうひとつ、WebComponentsを使う魅力としては、WebComponents.orgには沢山のWebComponentsが公開されております。それを使えるというのも大きな魅力と思います。
ありがとうございました。
走り書きで、読みづらく申し訳ございません