プロジェクト作成
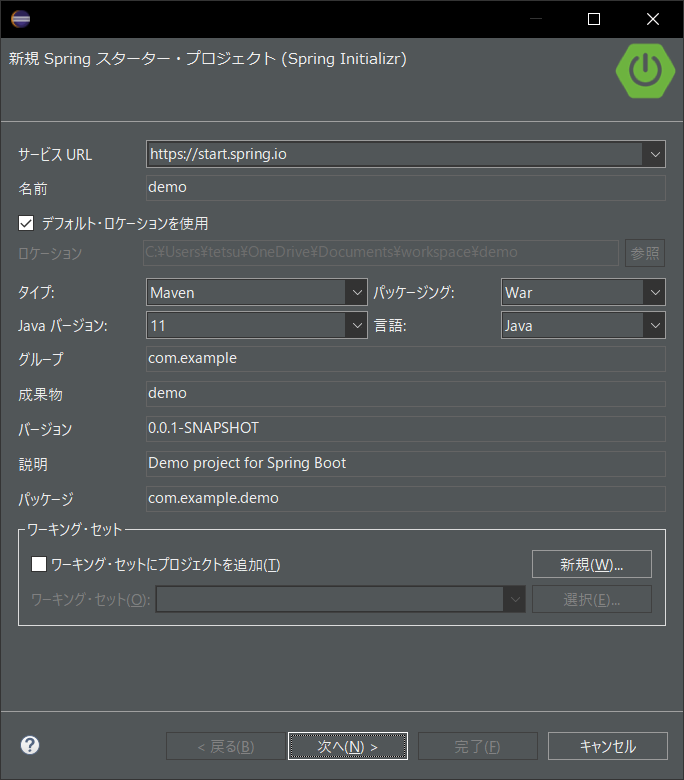
プロジェクトの作成

名前:プロジェクト名
タイプ:ビルドツールの選択
パッケージング:jarかwarから選択
Javaバージョン:バージョン選択
言語:プログラミング言語の選択
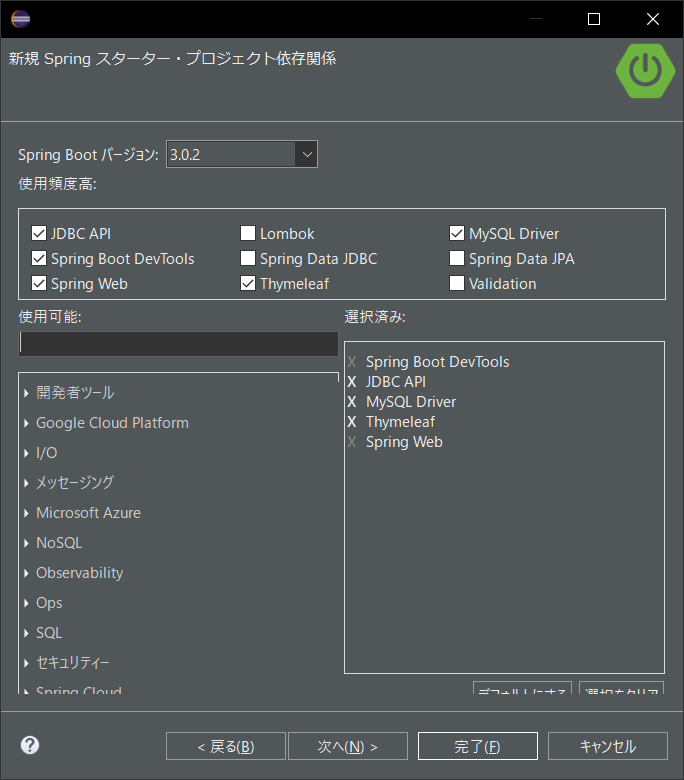
次に使用するライブラリの選択。

Spring Boot DevTools:サーバーを再起動しなくてもコードの修正が反映される。
JDBC API:Javaからデータベースを操作するインターフェイス
MySQL Driver:MySQLへの接続ドライバ
Thymeleaf:ビューを作成するためのテンプレートエンジン
Spring Web:WEBアプリを構築するためのスターター
pom.xml
追加したライブラリの依存関係が記載される。
ここに手書きで書いて追加もできる。
<?xml version="1.0" encoding="UTF-8"?>
<project xmlns="http://maven.apache.org/POM/4.0.0" xmlns:xsi="http://www.w3.org/2001/XMLSchema-instance"
	xsi:schemaLocation="http://maven.apache.org/POM/4.0.0 https://maven.apache.org/xsd/maven-4.0.0.xsd">
	<modelVersion>4.0.0</modelVersion>
	<parent>
		<groupId>org.springframework.boot</groupId>
		<artifactId>spring-boot-starter-parent</artifactId>
		<version>3.0.2</version>
		<relativePath/> <!-- lookup parent from repository -->
	</parent>
	<groupId>com.example</groupId>
	<artifactId>demo</artifactId>
	<version>0.0.1-SNAPSHOT</version>
	<packaging>war</packaging>
	<name>demo</name>
	<description>Demo project for Spring Boot</description>
	<properties>
		<java.version>17</java.version>
	</properties>
	<dependencies>
		<dependency>
			<groupId>org.springframework.boot</groupId>
			<artifactId>spring-boot-starter-jdbc</artifactId>
		</dependency>
		<dependency>
			<groupId>org.springframework.boot</groupId>
			<artifactId>spring-boot-starter-thymeleaf</artifactId>
		</dependency>
		<dependency>
			<groupId>org.springframework.boot</groupId>
			<artifactId>spring-boot-starter-web</artifactId>
		</dependency>

		<dependency>
			<groupId>org.springframework.boot</groupId>
			<artifactId>spring-boot-devtools</artifactId>
			<scope>runtime</scope>
			<optional>true</optional>
		</dependency>
		<dependency>
			<groupId>com.mysql</groupId>
			<artifactId>mysql-connector-j</artifactId>
			<scope>runtime</scope>
		</dependency>
		<dependency>
			<groupId>org.springframework.boot</groupId>
			<artifactId>spring-boot-starter-tomcat</artifactId>
			<scope>provided</scope>
		</dependency>
		<dependency>
			<groupId>org.springframework.boot</groupId>
			<artifactId>spring-boot-starter-test</artifactId>
			<scope>test</scope>
		</dependency>
	</dependencies>

	<build>
		<plugins>
			<plugin>
				<groupId>org.springframework.boot</groupId>
				<artifactId>spring-boot-maven-plugin</artifactId>
			</plugin>
		</plugins>
	</build>

</project>
application.properties
DBの接続情報を記載する。
spring.datasource.url=jdbc:mysql://localhost:3306/demo
spring.datasource.username=kawai
spring.datasource.password=abcdefg
spring.datasource.driver-class-name=com.mysql.cj.jdbc.Driver
spring.datasource.sql-script-encoding=utf-8
接続先DB名、ユーザ名、パスワードの設定をする。
web.xml
Tomcatのデプロイメント記述子である。
ここではウェルカムページの設定や、エラーページ、リクエストパターンの設定ができる。
今までは、どんなリクエストのURLにどのclassを紐づけるのかここで設定していたようですが、新しいJavaではその設定が不要になったようです。
<?xml version="1.0" encoding="UTF-8"?>
<web-app xmlns:xsi="http://www.w3.org/2001/XMLSchema-instance"
    xmlns="http://xmlns.jcp.org/xml/ns/javaee"
    xsi:schemaLocation="http://xmlns.jcp.org/xml/ns/javaee http://xmlns.jcp.org/xml/ns/javaee/web-app_3_1.xsd"
    id="WebApp_ID"
    version="3.1">

<!-- 1)ウェルカムページ
    <welcome-file-list>
        <welcome-file>index.html</welcome-file>
    </welcome-file-list>
    -->

    <!-- 2)エラーページ
    <error-page>
        <error-code>404</error-code>
        <location>/index.html</location>
    </error-page>
    <error-page>
        <error-code>500</error-code>
        <location>/index.html</location>
    </error-page>
    -->

    <!-- 3)文字コードのエンコード -->
    <filter>
        <filter-name>CharacterEncodingFilter</filter-name>
        <filter-class>org.springframework.web.filter.CharacterEncodingFilter</filter-class>
        <init-param>
            <param-name>encoding</param-name>
            <param-value>UTF-8</param-value>
        </init-param>
        <init-param>
            <param-name>forceEncoding</param-name>
            <param-value>true</param-value>
        </init-param>
    </filter>
    <filter-mapping>
        <filter-name>CharacterEncodingFilter</filter-name>
        <url-pattern>/*</url-pattern>
    </filter-mapping>


    <!-- 4)Spring MVCの設定 -->
    <servlet>
        <servlet-name>dispatcherServlet</servlet-name>
        <servlet-class>org.springframework.web.servlet.DispatcherServlet</servlet-class>
        <init-param>
            <param-name>contextConfigLocation</param-name>
            <!-- Spring-MVC設定ファイルを指定するー -->
            <param-value>/WEB-INF/applicationContext.xml</param-value>
        </init-param>
        <load-on-startup>1</load-on-startup>
    </servlet>

    <!-- 5)リクエストパターン指定、コントローラをマッピングする -->
    <servlet-mapping>
        <servlet-name>dispatcherServlet</servlet-name>
        <url-pattern>/</url-pattern>
    </servlet-mapping>

</web-app>
1) ウェルカムページ
URL末尾がディレクトリだけを指定してきた場合に表示するページの設定。
2) エラーページ
HTTPステータスに対して、ページの設定を行います。
これを設定することで自分で用意したエラーページに遷移させることができます。
3) 文字コードのエンコード
viewを作成するときの文字コードと同じ文字コードをここで設定する。
これをやらないと文字化けの原因になる。
4) Spring MVCの設定
TomcatにSpringMVCを使うことの宣言?
SpringMVCの設定ファイル名を設定する。
5) リクエストパターン指定
リクエストパターンの指定ができる。
ここで特に指定する必要はないが、すべてのリクエストを受け入れるのは良くないので指定するのがいい。
applicationContext.xml
<beans>で始まり</beans>で完了する。
<?xml version="1.0" encoding="UTF-8"?>
<beans xmlns="http://www.springframework.org/schema/beans"
    xmlns:xsi="http://www.w3.org/2001/XMLSchema-instance"
    xmlns:aop="http://www.springframework.org/schema/aop"
    xmlns:context="http://www.springframework.org/schema/context"
    xmlns:mvc="http://www.springframework.org/schema/mvc"
    xsi:schemaLocation="
        http://www.springframework.org/schema/beans
        http://www.springframework.org/schema/beans/spring-beans.xsd
        http://www.springframework.org/schema/aop
        http://www.springframework.org/schema/aop/spring-aop.xsd
        http://mybatis.org/schema/mybatis-spring
        http://mybatis.org/schema/mybatis-spring.xsd
        http://www.springframework.org/schema/mvc
        http://www.springframework.org/schema/mvc/spring-mvc.xsd
        http://www.springframework.org/schema/context
        http://www.springframework.org/schema/context/spring-context.xsd
        ">

    <!-- @Controllerなどのアノテーションを有効にするためのおまじない -->
    <!--  //@RestControllerを使わなければこちらで問題ない
    <mvc:annotation-driven />
    -->
    <!--  //@RestController 406エラー対策 -->
    <mvc:annotation-driven content-negotiation-manager="contentNegotiationManager"/>
    <bean id="contentNegotiationManager" class="org.springframework.web.accept.ContentNegotiationManagerFactoryBean">
        <!-- Turn off working out content type based on URL file extension, should fall back to looking at the Accept headers -->
        <property name="favorPathExtension" value="false" />
        <property name="ignoreAcceptHeader" value="false" />
    </bean>

    <!-- @Autowiredステレオタイプアノテーションを有効にするためのおまじない -->
    <!-- enable autowire -->
    <context:annotation-config />
    <!-- コンポーネントスキャンのおまじない -->
    <context:component-scan base-package="controller"/>

    <!--AspectJ 使用宣言 -->
     <aop:aspectj-autoproxy />

    <!--
        //////////////////////////////////////////////////
        // ここからは、 thymeleafを使用するための定義
        //////////////////////////////////////////////////
     -->
    <!-- Thymeleaf テンプレートリゾルバの設定 -->
    <bean id="templateResolver" class="org.thymeleaf.spring4.templateresolver.SpringResourceTemplateResolver">
<!--  //2.x系はこちらでも動く
    <bean id="templateResolver" class="org.thymeleaf.templateresolver.ServletContextTemplateResolver">
-->
        <!-- テンプレートファイルのrootパス(webapp以下)-->
        <property name="prefix" value="/WEB-INF/templates" />
        <!-- テンプレートファイルの拡張子 -->
        <property name="suffix" value=".html" />
        <!-- DocType はHTML5 決まりごと(HTML4では動きません!) -->
        <property name="templateMode" value="HTML5" />
        <property name="cacheable" value="false" />
    </bean>

    <!-- Thymeleafテンプレートエンジンの設定 -->
    <bean id="templateEngine" class="org.thymeleaf.spring4.SpringTemplateEngine">
        <!-- 上で定義した templateResolverに依存する -->
        <property name="templateResolver" ref="templateResolver" />
    </bean>

    <!-- Thymeleaf View Resolverの設定 -->
    <bean class="org.thymeleaf.spring4.view.ThymeleafViewResolver">
        <!-- 上で定義したtemplateEngineに依存する -->
        <property name="templateEngine" ref="templateEngine" />
        <!-- 文字エンコードを指定(無いと、文字化けが発生する) -->
        <property name="characterEncoding" value="UTF-8" />
    </bean>

</beans>
1) Spring bean宣言
使用するbean定義を記述する。
2) アノテーション有効化
Spring-MVCで利用する@Controllerなどのアノテーションを有効化するための記述。
3) @Autowired有効化
これを宣言しないとクラスのDIができない
4) コンポーネントスキャン宣言
コンポーネントをスキャンして、DIするための宣言部。
ここで宣言していないパッケージ改装にクラスを作っても、Spring-MVCはDIしてくれない。
5) Thymeleaf設定
prefixはテンプレートファイルを格納する場所を指定する。「/」だとwebapp配下を示す。
suffixはテンプレートファイルの拡張子を指定する。「html」を指定した場合、prefix配下に存在するhtmlをテンプレートファイルとして判断される。
Controllerの作成
package com.example.demo.controller;

import org.springframework.stereotype.Controller;
import org.springframework.ui.Model;
import org.springframework.web.bind.annotation.GetMapping;
import org.springframework.web.bind.annotation.RequestMapping;

@Controller
@RequestMapping("/demo")
public class DemoController {

	@GetMapping("/top")
	public String demoTop(Model model) {
		return "demo/index";
	}
}
Controllerを準備します。
@Controllerアノテーションをつけることで、コントローラーとして認識されます。
コンポーネントスキャンでDIコンテナに登録されるようです。
@RequestMapping
どのURLに対してどのメソッドが処理を実行するか定義できる。
ここでは/demoを指定している。複数指定も可能。
また、method=GETでアクセス方法を指定できる。
@GetMapping
RequestMappingのmethod=GETと同義。
PostMappingとすると、Postもできる。
おそらくどちらの記載でもよい。
Viewの作成
Thymeleafで記載する。
<html xmlns:th="http://www.thymeleaf.org">
htmlに上記を記載すると使用可能となる。
<!DOCTYPE html>
<html xmlns:th="http://www.thymeleaf.org">
<head>
<meta charset="UTF-8">
<title>DEMO</title>
</head>
<body>
	<h1 th:text=こんにちは。demoです。></h1>
</body>
</html>
動作確認
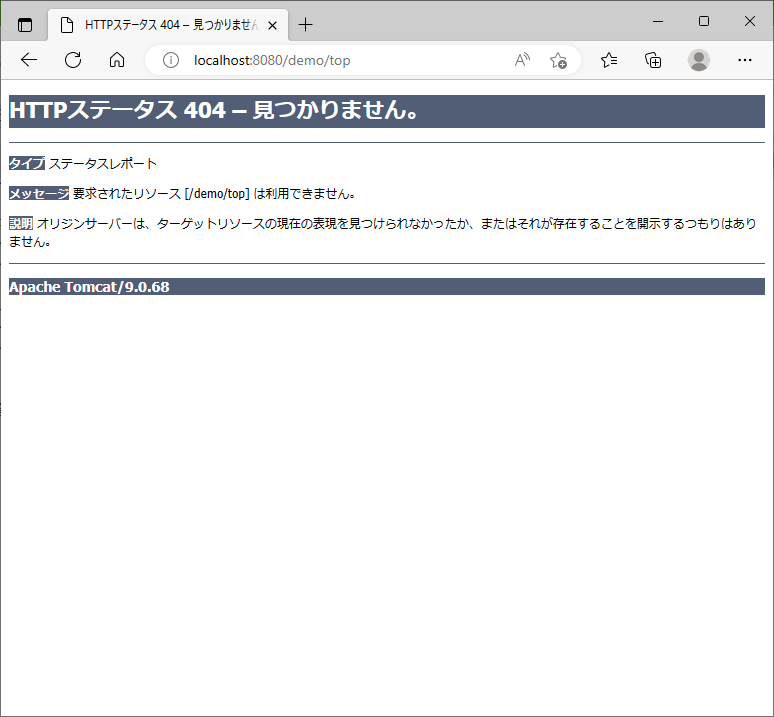
うーん、、、アクセスできませんでした。
設定ファイルをいろいろといじっているのでどこがおかしいか正直検討がつかないです。

ログが見にくいので、log4j2を導入します。
log4j2
pom.xmlにlog4j2の記述を追加するか、jarファイルをダウンロードして置いておく。
log4j2.xml
設定ファイルを作成します。
WEB-INF配下に置きます。
<?xml version="1.0" encoding="UTF-8"?>
<!DOCTYPE project>
	<Properties>
		<Property name="ptn">%d{yyyy-MM-dd HH:mm:ss.SSS} p=%-5p c=%c t=%t C=%C F=%F M=%M L=%L m=%m %n</Property>
	</Properties>
	<Appenders>
		<Console name="console" target="SYSTEM_OUT">
			<PatternLayout pattern="${ptn}" />
		</Console>
		<RollingFile name="file" fileName="log/log4j2.log"
			filePattern="log/%d{yyyyMM}/log4j2_%d{yyyyMMdd}_%i.log">
			<PatternLayout pattern="${ptn}" />
			<Policies>
				<OnStartupTriggeringPolicy />
				<SizeBasedTriggeringPolicy size="2 MB" />
				<TimeBasedTriggeringPolicy />
			</Policies>
			<DefaultRolloverStrategy max="10" />
		</RollingFile>
	</Appenders>
	<Loggers>
		<Root level="info">
			<AppenderRef ref="console" />
			<AppenderRef ref="file" />
		</Root>
	</Loggers>
</Configuration>
これでログが確認できると思っていたんですが、スタックトレースをログに出力する処理を特に書いてないので出るわけもなく、ここで力尽きました。
どこで設定をミスってるのかよくわからず終わりました。
次回もう一度プロジェクトを作成してリベンジします。