みなさん、スクレイピングしてますか?
この記事では現場でよく使う実践向けの内容をまとめました
- idやclass属性が無くても抽出する方法
- ログインが必要なサイトの攻略法
- 無限スクロールがあるサイトの攻略法
<iframe>をスクレイピングする方法- 他、いろいろなユースケース
使用するツール
| ツール | バージョン |
|---|---|
| Python | 3.10.6 |
| ChromeDriver | 107.0.5304.62 |
| selenium | 4.6.0 |
| beautifulsoup4 | 4.11.1 |
selenium 3系とselenium 4系でコードの書き方が異なるので注意
ツールを準備する
Python 3.10.6
ダウンロード先:https://www.python.org/downloads/
インストールするときの注意点としては Add Python 3.x to PATH のチェックを入れ忘れないこと
ChromeDriver
ダウンロード先:https://sites.google.com/chromium.org/driver/downloads
Google Chrome と ChromeDriver のバージョンを合わせる必要があるので
まずは Google Chrome のバージョンを確認してください。
確認する方法がいくつかありますが、得られる結果は同じです。
- Google Chromeの右上の
3点リーダーから、ヘルプ>Google Chrome について - Google Chromeのアドレスバーに以下を入力して確認する
投稿時に確認したバージョンはバージョン: 107.0.5304.106でした。
次に、ChromeDriverのダウンロード先にアクセスしてください。
Current Releases の下に箇条書きがあるので条件に当てはまるバージョンをダウンロードします。
Current Releases
- If you are using Chrome version 108, please download ChromeDriver 108.0.5359.22
- If you are using Chrome version 107, please download ChromeDriver 107.0.5304.62
- If you are using Chrome version 106, please download ChromeDriver 106.0.5249.61
ダウンロードしたファイルを解凍したら、任意の場所に移動させます。
自分はCドライブの直下に移動させました。
C:\chromedriver_win32\chromedriver.exe
環境変数のススメ
C:\chromedriver_win32
上記のパスを環境変数に追加しておくと、短くなってスッキリします。
追加前:service = ChromeService(executable_path="C:\chromedriver_win32\chromedriver.exe")
追加後:service = ChromeService()
selenium, beautifulsoup4
コンソール内に以下の2行を入力してください。
pip install selenium
pip install beautifulsoup4
スペース区切りで同時にインストールすることもできます
pip install selenium beautifulsoup4
ここまで済ませたら準備完了です。
スクレイピングの基本
下記コードを実行してスクレイピングしてみよう
import time

from bs4 import BeautifulSoup
from selenium import webdriver
from selenium.webdriver.chrome.options import Options
from selenium.webdriver.chrome.service import Service as ChromeService
from selenium.webdriver.common.by import By

# ブラウザのオプション
options = Options()
options.add_argument("--blink-settings=imagesEnabled=false")
options.add_argument("--disable-blink-features=AutomationControlled")
options.add_argument("--disable-browser-side-navigation")
options.add_argument("--disable-dev-shm-usage")
options.add_argument("--disable-extensions")
options.add_argument("--disable-gpu")
# options.add_argument("--headless")  # ブラウザを非表示で起動する
options.add_argument("--ignore-certificate-errors")
options.add_argument("--incognito")
options.add_argument("--no-sandbox")
options.add_experimental_option("excludeSwitches", ["enable-automation"])
options.add_experimental_option("excludeSwitches", ["enable-logging"])
options.add_experimental_option("useAutomationExtension", False)

# ブラウザ起動
service = ChromeService(executable_path="C:\chromedriver_win32\chromedriver.exe")
driver = webdriver.Chrome(service=service, options=options)

# 要素が見つかるまで10秒待つ
driver.implicitly_wait(10)

# URLにアクセス
url = "https://www.google.com/"
driver.get(url)
time.sleep(1)

# 検索フォームを探す
input_tag = driver.find_element(By.NAME, "q")

# 検索フォームに文字を入力
input_tag.send_keys("Qiita 面白い記事")

# 検索ボタンをクリック
driver.find_element(By.NAME, "btnK").click()

# ブラウザのHTMLを取得
soup = BeautifulSoup(driver.page_source, features="html.parser")

# 検索結果1つ目のタイトルをターミナルに表示
print(soup.select_one("h3").text)
Google Chromeが起動してターミナルにネタ - Qiitaが表示されましたか?

このコードを基本に実践的なスクレイピングを作っていきます。
# options.add_argument("--headless") # ブラウザを非表示で起動するについて
実行テスト中やデバッグするときはコメントアウトして、問題や動作の確認ができるようにします。
スクレイピング中のブラウザを閉じてしまった、などの誤操作をしないようにするため
コードが完成したらコメントアウトを外して、ヘッドレスブラウザ(非表示)で起動しよう。
要素の探し方
# 検索フォームを探す
input_tag = driver.find_element(By.NAME, "q")
この要素をどこから持ってきたのか、Google Chromeを使って軽く説明します
-
Ctrl + Shift + Vで開発者ツールを出す - 欲しい要素の場所をクリックする
- タグ内から指定する要素を決める(今回は赤枠内)
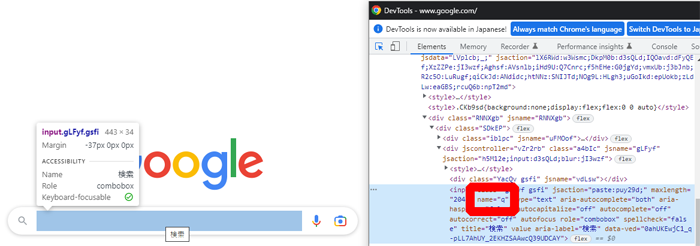
- WebDriverやBeautifulSoupの引数に当てはめる
無理に覚えなくても多用するので自然と覚えます。
なので、最初は何となく覚えておけば大丈夫です。
CSSセレクターで指定する方法もあるけど、ここでは省略
ここまで、簡単な基礎となります。
実践的なスクレイピング
ログインが不要なサイト
import time

from bs4 import BeautifulSoup
from selenium import webdriver
from selenium.webdriver.chrome.options import Options
from selenium.webdriver.chrome.service import Service as ChromeService

# ブラウザのオプション
options = Options()
options.add_argument("--blink-settings=imagesEnabled=false")
options.add_argument("--disable-blink-features=AutomationControlled")
options.add_argument("--disable-browser-side-navigation")
options.add_argument("--disable-dev-shm-usage")
options.add_argument("--disable-extensions")
options.add_argument("--disable-gpu")
# options.add_argument("--headless")  # ブラウザを非表示で起動する
options.add_argument("--ignore-certificate-errors")
options.add_argument("--incognito")
options.add_argument("--no-sandbox")
options.add_experimental_option("excludeSwitches", ["enable-automation"])
options.add_experimental_option("excludeSwitches", ["enable-logging"])
options.add_experimental_option("useAutomationExtension", False)

# ブラウザ起動
service = ChromeService(executable_path="C:\chromedriver_win32\chromedriver.exe")
driver = webdriver.Chrome(service=service, options=options)

# 要素が見つかるまで10秒待つ
driver.implicitly_wait(10)

# URLにアクセス
url = "https://books.toscrape.com/index.html"
driver.get(url)
time.sleep(1)

# ブラウザのHTMLを取得
soup = BeautifulSoup(driver.page_source, features="html.parser")

# 1つ目の本のタイトルをターミナルに表示
print(soup.select_one("h3").text)
1つ目の本のタイトル(リンクテキスト)が表示されたらスクレイピングができています

上のscrape2.pyを元にケース別のコードを書いていきます
特定のテキストを含む要素を全部取得 (完全一致)
button_tags = soup.find_all(text="Add to basket")
この方法だと<td>Add to basket</td>や<p>Add to basket</p>など
どんなタグであれ、該当するテキストは全部取得します。実務であまり使わないかな・・・
特定のテキストを含む要素を全部取得+タグ指定 (完全一致)
button_tags = soup.find_all("button", text="Add to basket")
特定のテキストを含む要素を全部取得+タグ指定 (正規表現)
import re
button_tags = soup.find_all("button", text=re.compile("Add"))
soup.find, soup.find_all で正規表現を使うにはimport reが必要です
スクレイピングでよく使う正規表現たち( find系 )
前方一致:soup.find_all("button", text=re.compile("^Add"))
後方一致:soup.find_all("button", text=re.compile("basket$"))
ワイルドカード:soup.find_all("button", text=re.compile("Add(.*)basket"))
大文字・小文字を区別しない:soup.find_all("button", text=re.compile("ADD", re.I))
スクレイピングでよく使う正規表現たち( select系 )
前方一致:soup.select('img[alt^="The"]')
後方一致:soup.select('img[alt$="The"]')
ワイルドカード:soup.select('img[alt*="The"]')
大文字・小文字を区別しない:soup.select('img[alt*="The" i]')
alt属性にTheが含まれるimgタグを全部取得
# soup.select
img_tags = soup.select('img[alt*="The"]')

# soup.find_all
import re
img_tags = soup.find_all("img", alt=re.compile("The"))
alt属性にTheが含まれるimgタグを全部取得 (大文字・小文字を区別しない)
# soup.select
img_tags = soup.select('img[alt*="The" i]')

# soup.find_all
import re
img_tags = soup.find_all("img", alt=re.compile("The", re.I))
ex4 と ex5 で2パターン書きましたが、自分のおすすめはCSSセレクターが書けるsoup.selectです。
soup.selectやsoup.find_allもそれぞれで使う場面があるので、好みがわかれるところ。
20冊の本からリンク先のhrefを全部取得したい
# soup.select
a_tags = soup.select("h3 > a")
href_list = [a.get("href") for a in a_tags]

# soup.find_all
h3_tags = soup.find_all("h3")
a_tags = [h3.find("a") for h3 in h3_tags]
href_list = [a.get("href") for a in a_tags]
相対URLから絶対URLにする
href_listはcatalogueから始まる相対URLのリストです
このまま使うことはほぼ無いので、絶対URLにしておくと◎
from urllib.parse import urljoin
link_list = [urljoin(url, href) for href in href_list]
全てのh1タグを取得したい
# soup.select
h1_tags = soup.select("h1")

# soup.find_all
h1_tags = soup.find_all("h1")
全てのh1, h3タグを取得したい
# soup.select
h13_tags = soup.select("h1, h3")

# soup.find_all
h13_tags = soup.find_all(["h1", "h3"])
全てのhタグを取得したい
# soup.select
# 公式ドキュメントざっと見した限りでは該当なし

# soup.find_all
h_tags = soup.find_all(re.compile("h[0-9]"))
とある要素の親要素を取得したい
# soup.select_one
h1_parent = soup.select_one("h1").parent

# soup.find
h1_parent = soup.find("h1").parent
parentについて
リストに対してはAttributeErrorとなるので、1つの要素に対して使うようにしてください。
select, find_allなら、複数の要素をリストで返す
select_one, findなら、1つの要素を変数で返す
なので、select, find_all の場合はfor ~ inやインデックス番号で1つの要素にしてあげる必要があります。
何がしたいのか、用途に応じて使い分けることが必要です。
とある要素のn番目の子要素を取得したい
# soup.select
p_child = soup.select_one("section > div:nth-of-type(2)")

# soup.find_all
# 公式ドキュメントざっと見した限りでは該当なし
実務で使ったことない・・・
複数の属性ごとに条件、imgタグを全部取得
# soup.select
img_tags = soup.select('button[type="submit"][data-loading-text="Adding..."]')

# soup.find_all
img_tags = soup.find_all('button', attrs={"type":"submit", "data-loading-text":"Adding..."})
同じ属性に複数の条件、divタグを全部取得
# soup.select
soup.select('div[class="image_container"], div[class="product_price"]')

# soup.find_all
soup.find_all('div', attrs={"class": ['image_container', 'product_price']})
ex12 と ex13 のコードは、正規表現を使った書き方もできます。
ログインが必要なサイト
import time
from bs4 import BeautifulSoup
from selenium import webdriver
from selenium.common.exceptions import NoSuchElementException
from selenium.webdriver.chrome.options import Options
from selenium.webdriver.chrome.service import Service as ChromeService
from selenium.webdriver.common.by import By
# ブラウザのオプション
options = Options()
options.add_argument("--blink-settings=imagesEnabled=false")
options.add_argument("--disable-blink-features=AutomationControlled")
options.add_argument("--disable-browser-side-navigation")
options.add_argument("--disable-dev-shm-usage")
options.add_argument("--disable-extensions")
options.add_argument("--disable-gpu")
# options.add_argument("--headless") # ブラウザを非表示で起動する
options.add_argument("--ignore-certificate-errors")
options.add_argument("--incognito")
options.add_argument("--no-sandbox")
options.add_experimental_option("excludeSwitches", ["enable-automation"])
options.add_experimental_option("excludeSwitches", ["enable-logging"])
options.add_experimental_option("useAutomationExtension", False)
# ブラウザ起動
service = ChromeService(executable_path="C:\chromedriver_win32\chromedriver.exe")
driver = webdriver.Chrome(service=service, options=options)
# 要素が見つかるまで10秒待つ
driver.implicitly_wait(10)
# URLにアクセス
url = "https://hotel.testplanisphere.dev/ja/"
driver.get(url)
time.sleep(1)
# ログインページにアクセス
try:
driver.find_element(By.LINK_TEXT, "ログイン").click()
except NoSuchElementException:
driver.find_element(By.CLASS_NAME, "navbar-toggler-icon").click()
driver.find_element(By.LINK_TEXT, "ログイン").click()
finally:
time.sleep(1)
# ユーザー名を入力
driver.find_element(By.ID, "email").send_keys("jun@example.com")
# パスワードを入力
driver.find_element(By.ID, "password").send_keys("pa55w0rd!")
# ログインをクリック
driver.find_element(By.ID, "login-button").click()
# トップページから宿泊予約へ
driver.get(url)
time.sleep(1)
try:
driver.find_element(By.LINK_TEXT, "宿泊予約").click()
except NoSuchElementException:
driver.find_element(By.CLASS_NAME, "navbar-toggler-icon").click()
driver.find_element(By.LINK_TEXT, "宿泊予約").click()
finally:
time.sleep(1)
# ブラウザのHTMLを取得
soup = BeautifulSoup(driver.page_source, features="html.parser")
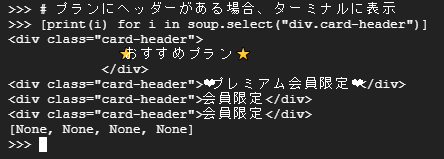
# プランにヘッダーがある場合、ターミナルに表示
[print(i) for i in soup.select("div.card-header")]
おすすめプランと3つの会員限定プランが表示されましたか?
# ログインページにアクセスについて
画面サイズによってレイアウトが変わるページなのでログインボタンがクリックできない場合があります。
try-exceptでクリックできなかったときの例外処理を書きましたが、
driver.set_window_size(x,y)などでウィンドウサイズを変えてしまうのもアリ。
無限スクロールがあるサイト
スクロールするたびに、画面外の非表示だった部分を表示させる。
Lazy Loadや遅延ロードなんて言ったりします。
YoutubeやTwitterなんかでも使われてますね。
import time

from bs4 import BeautifulSoup
from selenium import webdriver
from selenium.webdriver.chrome.options import Options
from selenium.webdriver.chrome.service import Service as ChromeService

# ブラウザのオプション
options = Options()
options.add_argument("--blink-settings=imagesEnabled=false")
options.add_argument("--disable-blink-features=AutomationControlled")
options.add_argument("--disable-browser-side-navigation")
options.add_argument("--disable-dev-shm-usage")
options.add_argument("--disable-extensions")
options.add_argument("--disable-gpu")
# options.add_argument("--headless")  # ブラウザを非表示で起動する
options.add_argument("--ignore-certificate-errors")
options.add_argument("--incognito")
options.add_argument("--no-sandbox")
options.add_experimental_option("excludeSwitches", ["enable-automation"])
options.add_experimental_option("excludeSwitches", ["enable-logging"])
options.add_experimental_option("useAutomationExtension", False)

# ブラウザ起動
service = ChromeService(executable_path="C:\chromedriver_win32\chromedriver.exe")
driver = webdriver.Chrome(service=service, options=options)

# 要素が見つかるまで10秒待つ
driver.implicitly_wait(10)

# URLにアクセス
url = "https://infinite-scroll.com/demo/full-page/"
driver.get(url)
time.sleep(1)

# ブラウザのHTMLを取得
soup = BeautifulSoup(driver.page_source, features="html.parser")

# 要素の数をターミナルに表示
length = len(soup.select('article[class="article"]'))
print(f"articleの数は{length}")
ページ全体のarticleの数は15ですが、いくつでしたか? 2?
画面外が読み込まれていないので、ある意味正解なのですが欲しいのは15です。
ちょっと手直ししたコードが下のようになります。
import time

from bs4 import BeautifulSoup
from selenium import webdriver
from selenium.webdriver.chrome.options import Options
from selenium.webdriver.chrome.service import Service as ChromeService
from selenium.webdriver.common.by import By

# ブラウザのオプション
options = Options()
options.add_argument("--blink-settings=imagesEnabled=false")
options.add_argument("--disable-blink-features=AutomationControlled")
options.add_argument("--disable-browser-side-navigation")
options.add_argument("--disable-dev-shm-usage")
options.add_argument("--disable-extensions")
options.add_argument("--disable-gpu")
# options.add_argument("--headless")  # ブラウザを非表示で起動する
options.add_argument("--ignore-certificate-errors")
options.add_argument("--incognito")
options.add_argument("--no-sandbox")
options.add_experimental_option("excludeSwitches", ["enable-automation"])
options.add_experimental_option("excludeSwitches", ["enable-logging"])
options.add_experimental_option("useAutomationExtension", False)

# ブラウザ起動
service = ChromeService(executable_path="C:\chromedriver_win32\chromedriver.exe")
driver = webdriver.Chrome(service=service, options=options)

# 要素が見つかるまで10秒待つ
driver.implicitly_wait(10)

# URLにアクセス
url = "https://infinite-scroll.com/demo/full-page/"
driver.get(url)
time.sleep(1)

# ブラウザのHTMLを取得
soup = BeautifulSoup(driver.page_source, features="html.parser")

# 要素の数をターミナルに表示
length = len(soup.select('article[class="article"]'))
print(f"スクロールする前のarticleの数は{length}")

# ページの最下部へ移動する
old_size = 0
html_body = driver.find_element(By.XPATH, "/html/body")
for _ in range(1, 50):
    driver.execute_script("window.scrollTo(0, document.body.scrollHeight);")
    time.sleep(1)
    new_size = html_body.size
    if new_size == old_size:
        print(f"{_}回スクロールしました。")
        break
    old_size = new_size

# ブラウザのHTMLを取得
soup = BeautifulSoup(driver.page_source, features="html.parser")

# 要素の数をターミナルに表示
length = len(soup.select('article[class="article"]'))
print(f"スクロールした後のarticleの数は{length}")
articleの数がスクロールする前は2、スクロールした後は15になりましたか?
# ページの最下部へ移動するについて
seleniumでは、javascriptを実行するexecute_script()関数があります。
ここではbodyのheightを取得して、一番下までスクロールするという動きを実現しています。
old_size (スクロール前)とnew_size (スクロール後)のサイズが一致=これ以上はスクロールできないのでbreakで抜ける処理を書きました。
BASIC認証を突破する方法
BASIC認証とは、対象URLにアクセスした後に出てくるコレのこと
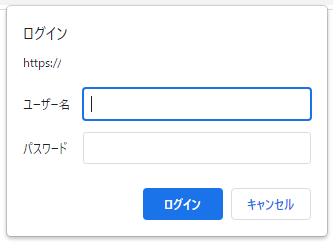
下記の形式でBASIC認証を通過する事が可能です。
# 通常のアクセス
driver.get("http://hogehoge.jp")

# BASIC認証+アクセス
driver.get("http://username:password@hogehoge.jp")
iframeがあるサイト
見ているページ(<iframe>があるページ)は1つだけの部屋に見えるが
実際は、基本のHTMLといくつかの<iframe>で別々の部屋として構成されている、と抽象的に捉えておけばok。
例)
| ブラウザ | HTML内 | |
|---|---|---|
| 見ているページ | 基本 | |
| iframe | ||
| iframe | ||
いろいろな記事の中に埋め込まれているTwitterやYoutubeなども<iframe>ですね。
なので、取りたいデータの部屋に移動する必要があります。
tak-dcxiさんが作ったCODEPENをお借りしてスクレイピングします
See the Pen a, button, divで作ったボタンの比較 by tak-dcxi (@tak-dcxi) on CodePen.
import time

from bs4 import BeautifulSoup
from selenium import webdriver
from selenium.webdriver.chrome.options import Options
from selenium.webdriver.chrome.service import Service as ChromeService
from selenium.webdriver.common.by import By

# ブラウザのオプション
options = Options()
options.add_argument("--blink-settings=imagesEnabled=false")
options.add_argument("--disable-blink-features=AutomationControlled")
options.add_argument("--disable-browser-side-navigation")
options.add_argument("--disable-dev-shm-usage")
options.add_argument("--disable-extensions")
options.add_argument("--disable-gpu")
# options.add_argument("--headless")  # ブラウザを非表示で起動する
options.add_argument("--ignore-certificate-errors")
options.add_argument("--incognito")
options.add_argument("--no-sandbox")
options.add_experimental_option("excludeSwitches", ["enable-automation"])
options.add_experimental_option("excludeSwitches", ["enable-logging"])
options.add_experimental_option("useAutomationExtension", False)

# ブラウザ起動
service = ChromeService(executable_path="C:\chromedriver_win32\chromedriver.exe")
driver = webdriver.Chrome(service=service, options=options)

# 要素が見つかるまで10秒待つ
driver.implicitly_wait(10)

# URLにアクセス
url = "https://qiita.com/kawagoe6884/items/889f8f2cf816439c026b"
driver.get(url)
time.sleep(1)

# 対象までスクロールして読み込み
scroll = driver.find_element(By.ID, "iframeがあるサイト")
driver.execute_script("arguments[0].scrollIntoView();", scroll)

# データを取りたいiframeを指定
iframe = driver.find_element(By.CLASS_NAME, "cp_embed_iframe ")

# CODEPENの外枠に移動
driver.switch_to.frame(iframe)

# ブラウザのHTMLを取得
soup = BeautifulSoup(driver.page_source, features="html.parser")

# 3つのボタンを取得したい
li_tags = soup.select("li.code-type")
print(li_tags)

# 元々いた部屋に戻りたい場合は以下のコード
driver.switch_to.default_content()

# ブラウザのHTMLを取得
soup = BeautifulSoup(driver.page_source, features="html.parser")

# 3つのボタンを取得したかった
li_tags = soup.select("li.code-type")
print(li_tags)
3つの<li class="code-type">が表示されたあと、空のリストが表示されましたか?
※元々いた部屋には<iframe>が無いので空のリストになります。
移動するときは、driver.switch_to.frame(移動先の要素)
戻るときは、driver.switch_to.default_content()
iframeが入れ子になっているとき
入れ子になっている数だけdriver.switch_to.frame(移動先の要素)するだけでok
import time

from selenium import webdriver
from selenium.webdriver.chrome.options import Options
from selenium.webdriver.chrome.service import Service as ChromeService
from selenium.webdriver.common.by import By

# ブラウザのオプション
options = Options()
options.add_argument("--blink-settings=imagesEnabled=false")
options.add_argument("--disable-blink-features=AutomationControlled")
options.add_argument("--disable-browser-side-navigation")
options.add_argument("--disable-dev-shm-usage")
options.add_argument("--disable-extensions")
options.add_argument("--disable-gpu")
# options.add_argument("--headless")  # ブラウザを非表示で起動する
options.add_argument("--ignore-certificate-errors")
options.add_argument("--incognito")
options.add_argument("--no-sandbox")
options.add_experimental_option("excludeSwitches", ["enable-automation"])
options.add_experimental_option("excludeSwitches", ["enable-logging"])
options.add_experimental_option("useAutomationExtension", False)

# ブラウザ起動
service = ChromeService(executable_path="C:\chromedriver_win32\chromedriver.exe")
driver = webdriver.Chrome(service=service, options=options)

# 要素が見つかるまで10秒待つ
driver.implicitly_wait(10)

# URLにアクセス
url = "https://qiita.com/kawagoe6884/items/889f8f2cf816439c026b"
driver.get(url)
time.sleep(1)

# 対象までスクロールして読み込み
scroll = driver.find_element(By.ID, "iframeがあるサイト")
driver.execute_script("arguments[0].scrollIntoView();", scroll)

# データを取りたいiframeを指定
iframe = driver.find_element(By.CLASS_NAME, "cp_embed_iframe ")
# CODEPENの枠に移動
driver.switch_to.frame(iframe)

# データを取りたいiframeを指定
iframe = driver.find_element(By.CLASS_NAME, "result-iframe  ")
# Resultの枠に移動
driver.switch_to.frame(iframe)

# 1つ目のボタンをクリックする
driver.find_element(By.XPATH, '//a[text()="a要素で作ったボタン"]').click()


# ```driver.implicitly_wait(10)```を設定しているので10秒後、エラーになるよ
driver.switch_to.default_content()
driver.find_element(By.XPATH, '//a[text()="a要素で作ったボタン"]').click()
# driver.switch_to.frame()で移動しないとクリックできない!
# selenium.common.exceptions.NoSuchElementException:
# Message: no such element: Unable to locate element:
# {"method":"xpath","selector":"//a[text()="a要素で作ったボタン"]"}
プッシュされました!が表示された後、エラーが発生しましたか?
おまけ:スクレイピングしてCSVで保存するまで
ここまでつらつら書きましたが、それぞれのポイントをまとめただけなので
全体像があるとより分かりやすいのかなと思ったので作ってみました
このコードを動かすにはpip install pandasのインストールが必要です
import getpass
import time
from urllib.parse import urljoin

import pandas as pd
from bs4 import BeautifulSoup
from selenium import webdriver
from selenium.common.exceptions import NoSuchElementException
from selenium.webdriver.chrome.options import Options
from selenium.webdriver.chrome.service import Service as ChromeService
from selenium.webdriver.common.by import By

# ブラウザのオプション
options = Options()
options.add_argument("--blink-settings=imagesEnabled=false")
options.add_argument("--disable-blink-features=AutomationControlled")
options.add_argument("--disable-browser-side-navigation")
options.add_argument("--disable-dev-shm-usage")
options.add_argument("--disable-extensions")
options.add_argument("--disable-gpu")
# options.add_argument("--headless")  # ブラウザを非表示で起動する
options.add_argument("--ignore-certificate-errors")
options.add_argument("--incognito")
options.add_argument("--no-sandbox")
options.add_experimental_option("excludeSwitches", ["enable-automation"])
options.add_experimental_option("excludeSwitches", ["enable-logging"])
options.add_experimental_option("useAutomationExtension", False)

# ブラウザ起動
service = ChromeService(executable_path="C:\chromedriver_win32\chromedriver.exe")
driver = webdriver.Chrome(service=service, options=options)

# 要素が見つかるまで10秒待つ
driver.implicitly_wait(10)

# スクレイピングするURLにアクセス
url = "https://books.toscrape.com/"
driver.get(url)
time.sleep(1)


# 商品タイトルのリスト
title_list = []
# 商品評価のリスト
rating_list = []
# 商品価格のリスト
price_list = []
# 在庫状態のリスト
stock_list = []
# 商品URLのリスト
link_list = []
# nextのボタンがある限りスクレイピングをする
while True:
    # ブラウザのHTMLを取得
    soup = BeautifulSoup(driver.page_source, features="html.parser")

    # 商品タイトルをリストに追加
    a_tags = soup.select("h3 > a")
    title_list += [a.get("title") for a in a_tags]

    # 商品URLをリストに追加
    href_list = [a.get("href") for a in a_tags]
    href_list = [href.replace("catalogue/", "") for href in href_list]
    link_list += [urljoin(url, "/catalogue/" + href) for href in href_list]

    # 商品の評価をリストに追加
    p_tags = driver.find_elements(By.CSS_SELECTOR, 'p[class^="star-rating"]')
    for p in p_tags:
        rating = ""
        i_tags = p.find_elements(By.CLASS_NAME, "icon-star")
        for i in i_tags:
            if i.value_of_css_property("color") == "rgba(230, 206, 49, 1)":
                rating += "★"
            else:
                rating += "☆"
        rating_list.append(rating)

    # 商品価格をリストに追加
    p_tags = soup.select("p.price_color")
    price_list += [p.get_text(strip=True) for p in p_tags]

    # 在庫の状態をリストに追加
    p_tags = soup.select("p.instock.availability")
    stock_list += [p.get_text(strip=True) for p in p_tags]

    # ※※※※※※※※※※※※※※※
    break
    # ※※※※※※※※※※※※※※※
    try:
        driver.find_element(By.CSS_SELECTOR, 'li[class="next"] > a').click()
        time.sleep(1)
    except NoSuchElementException:
        break


# 商品カテゴリのリスト
cate_list = []
# 商品画像URLのリスト
img_list = []
# 商品説明のリスト
desc_list = []
# 商品詳細のデータフレーム
df_info = pd.DataFrame()
# 商品URLのリストから一つ一つアクセスしてスクレイピングをする
for link_url in link_list:
    # 商品URLにアクセス
    driver.get(link_url)
    time.sleep(1)

    # ブラウザのHTMLを取得
    soup = BeautifulSoup(driver.page_source, features="html.parser")

    # 商品カテゴリをリストに追加
    li_tag = soup.select_one('a[href^="../category/books/"]')
    cate_list.append(li_tag.get_text(strip=True))

    # 商品画像URLをリストに追加
    img_tag = soup.select_one("div.item.active > img")
    img_list.append(urljoin(url, img_tag.get("src")))

    # 商品説明をリストに追加
    p_tag = soup.find(lambda tag: tag.name == "p" and not tag.attrs)
    # ```soup.find("p", class_=False)``` でも同じことができるが汎用的なのは上記のコードか。
    #
    # Product Descriptionが無い場合は空文字を追加
    if p_tag is None:
        desc_list.append("")
    else:
        desc_list.append(p_tag.get_text(strip=True))

    # 商品詳細をデータフレームに追加
    table_tag = soup.select("table.table.table-striped")
    df = pd.read_html(str(table_tag))[0]
    # 取得したいテーブルが決まってるなら、soupで探してstr型で渡すのも◎
    # ```df = pd.read_html(driver.page_source)``` でも問題ない
    #
    # 行/列の入れ替え
    df = df.transpose()
    # 1行目を列名にする
    df.columns = df.iloc[0]
    # 列名にした1行目を削除
    df.drop(0, inplace=True)
    # dfを行方向に追加していく
    df_info = pd.concat([df_info, df], axis="rows")


# 取得したデータをまとめる
df_info = df_info.assign(商品URL=link_list)
df_info = df_info.assign(画像URL=img_list)
df_info.insert(0, "在庫", stock_list)
df_info.insert(0, "価格", price_list)
df_info.insert(0, "評価", rating_list)
df_info.insert(0, "説明", desc_list)
df_info.insert(0, "タイトル", title_list)
df_info.insert(0, "カテゴリ", cate_list)


# CSV形式でデスクトップに保存する
file_path = f"C:\\Users\\{getpass.getuser()}\\Desktop\\"
df_info.to_csv(f"{file_path}info.csv", index=False, encoding="utf_8_sig")
~~~.get_text(strip=True)は先頭と末尾から空白を除いてくれます
①と②は同じ処理です。①を内包表記といって処理が早い上に見栄えも◎
title_list += [a.get("title") for a in a_tags]
for a in a_tags:
    title_list.append(a.get("title"))
※※※※※※※※※※※※※※※ の間にあるbreakについて
コメントアウトすることで全てのページをスクレイピングできます。
その代わりに、処理が終わるまで27分くらい掛かります。
テストで動かしてみたい、という場合はコメントアウト非推奨です
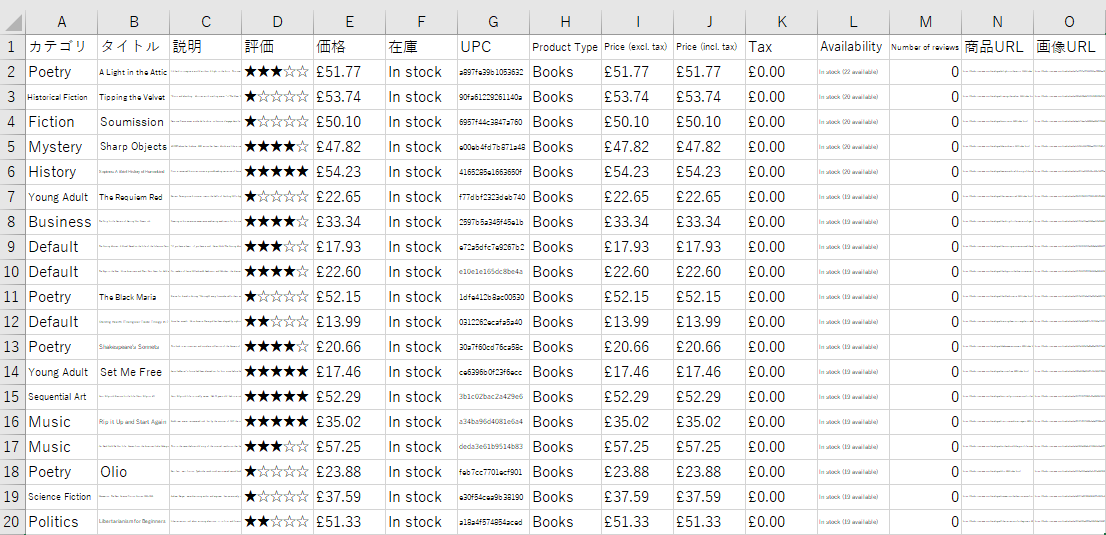
出来上がったCSVはこんな感じになります
動作テストができるサイト
あとがき
昔々あるところに1000Contributionsを超える有用な記事がありました。
その記事は、皆からの情報や質問を元により良い記事になっていきました。
とある日、その記事は突然'404'を表示するようになりました。記事を移転や移行するわけでもなく。※1
仕方ないので古より伝わる秘儀、wayback machine で記事を見ることにしました。※2
しかし、 wayback machine を知らない人はもとより、URLが分からない人たちは見ることができません。
後世のためにも有用な記事を徒労に帰す訳にはいかない。と思い立った投稿主は、新たに記事を書き起こすことにしましたとさ。
●何か理由があって、削除したと思われるので元となった記事には触れません●
※1「移転や移行」:良さげな記事を見つけて「おっ」となり、アクセスしたら "移転・移行" の文字。「はあ~~~~(ため息)」(ブラウザバック)
※2「wayback machine」:7,540億以上のアーカイブされたWebページを見ることができるサイト。20年前のYahooやGoogleが見れたりする。