1. SPSS CADSによるジョブのスケジュール実行
SPSS Collaboration And Deployment Services(以下CADS)はSPSS Modelerで作った処理をジョブ化してスケジュール実行することができます。

CADSにはスケジューラーがついていますので、月次、週次、日次、分次などでジョブ実行が可能です。

CADSのみでスケジューリングができることで、分析者自身が分析処理を自動化することができますし、週末に大量データの前処理を行うアドホックなスケジュール実行を行うことができます。
しかしながら、以下のような場合、JP1などの外部のスケジューラーからCADSのジョブを起動したいことがあります。
- 休日カレンダーなどで細かく起動を制御したい
- IT部門管理のスケジューラーで、他のシステムの処理とCADSジョブを組み合わせたジョブネットを組みたい。例外処理なども一元管理したい
CADS8.3ではこのCADSジョブ実行をおこなうREST APIが用意されました。

CADS8.2.2以前ではCADSTool.pyというユーティリティーがあり、これでコマンドでCADSジョブを起動することはできました。しかしながら、これではジョブ変数によるパラメーター実行ができませんでした。
後はSOAPのWebサービスをつかった方法が用意されていましたが、SOAPなので難しいプログラムが必要でした。
この記事ではパラメーター付きのCADSジョブをREST APIで実行するサンプルプログラムを紹介します。
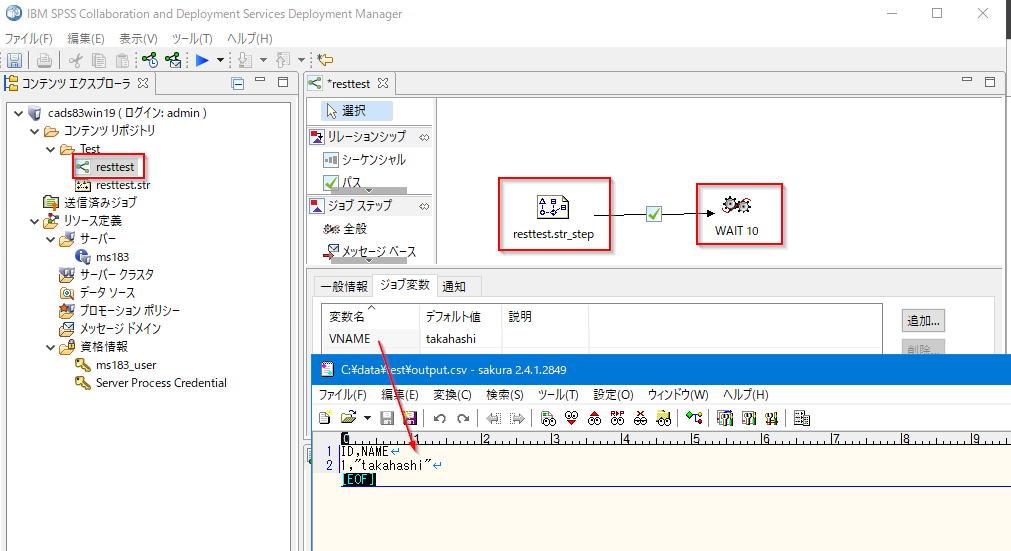
2. パラメーター付きのCADSジョブ
CADSジョブではジョブ変数を指定することでストリームのパラメーターを書き換えて実行することができます。ここではoutput.csvのNAMEの値を書き換えるCADSジョブを作っています。
またここでは、処理としては無意味ですがあまりすぐに終わらないように、WAIT10というジョブステップでは10秒間pingを実行して待ち時間を意図的に入れています。
3. CADSジョブをREST APIで実行するPythonスクリプト
サンプルのスクリプトは以下にあります。
このスクリプトを実行するには以下のように起動します。
python cadsjobexec.py ms183-win19:9080 Test/resttest admin password VNAME hogehoge
テスト環境
CADS 8.3
Windows 10
Python 3.7
4. CADSジョブをREST APIで実行するPythonスクリプトの解説
まず、 [parameter1_name] [parameter1_value] [parameter2_name] [parameter2_value]の引数を取得しています。
#引数の確認
if len(args)<4 or len(args)%2!=0:
    print('usage: <url> <job_path> <user> <password> [parameter1_name] [parameter1_value] [parameter2_name] [parameter2_value]...')
    exit(1)
url_pre=args[0]
job_path=args[1]
user=args[2]
password=args[3]

parameters=[]
for i in range(4,len(args),2):
    parameters.append({'Name':args[i],'Value':args[i+1]})
RESTAPIのheaderを作成します。
マニュアルに必要な項目は載っています。
ユーザー、パスワードはbasic認証なのでbase64でエンコードしてください。
#basic認証のためにbase64でencode
userpass=str(base64.b64encode((user+':'+password).encode()).decode("ascii"))

headers = {'Content-Type':'application/json',
           'Authorization': 'Basic {}'.format(userpass),
#          'Client-Accept-Language': 'en',
          'Accept-Language':'en'}
ジョブを実行するためにはsubmitjobwithoptionsを使います。
まずbodyを作ります。jobLocationURIを指定します。以下であればspsscr:///Test/resttestです。

また、jobParameterValueを指定します。以下の例だと

以下のように設定します。
"Name": "VNAME"
"Value": "takahashi"
body={
  "jobLocationURI": "spsscr:///"+job_path,
  "jobOptions": {
    "setNotificationEnabled": "true",
    "jobParameterValue": parameters
  }
}
URLは以下のマニュアルの通りに設定し、POSTします。HTTPのステータスコードが200なら成功です。
url="http://"+url_pre+"/process/rest/job/submitJobWithOptions"
import json
r_submitJobWithOptions = requests.post(url, data=json.dumps(body),headers=headers)
if r_submitJobWithOptions.status_code!=200:
    print('Request failed. http status:{}'.format(r_submitJobWithOptions.status_code))
    exit(2)
レスポンスにはexecution IDがありますので、それを抜き出します。
print(r_submitJobWithOptions.text)

import re
execution_ID= re.match('Job is submitted with options and execution ID is (.+)',r_submitJobWithOptions.text).group(1)
非同期で実行されるので、getexecutiondetailsをつかって終了を確認します。
executionStateがENDEDになると終了したことがわかります。RUNNINGの場合は1秒待って、再度確認しています。
import time
url="http://"+url_pre+"/process/rest/job/getExecutionDetails?executionID="+execution_ID
r_getExecutionDetails = requests.get(url, headers=headers)
#1秒おきに終了確認
while r_getExecutionDetails.json()['executionState']!='ENDED' and r_getExecutionDetails.status_code==200:
    print ('.',end='',flush=True)
    time.sleep(1)
    r_getExecutionDetails = requests.get(url, headers=headers)
print('')
詳細な結果としては以下が返ります。
---getExecutionDetails---
{'artifactLocation': [],
 'completionCode': 0,
 'endDateTime': '2021-08-06 02:14:37',
 'eventName': 'resttest',
 'eventUuid': '0ee2794545c72d510000017aa35bdeda1d09',
 'executionState': 'ENDED',
 'executionSuccess': True,
 'executionWarning': False,
 'hasIterations': False,
 'log': {'logAsAttachment': None,
         'logAsString': 'Job variables:\nVNAME\t = \thogehoge\n\n'},
 'notificationEnabled': True,
 'queuedDateTime': '2021-08-06 02:14:26',
 'startDateTime': '2021-08-06 02:14:26',
 'userName': 'admin',
 'uuid': '0ee2794545c72d510000017aa35bdeda1db6'}
成功して終了していれば以下が返ります。
'executionState': 'ENDED',
'executionSuccess': True,
さらにgetjobstepexecutionsでジョブステップの結果も取得します。
url="http://"+url_pre+"/process/rest/job/getJobStepExecutions?executionID="+execution_ID
r_getJobStepExecutions = requests.get(url, headers=headers)
詳細な結果としては以下が返ります。
---getJobStepExecutions---
[{'artifactLocation': ['file://localhost/C:/data/test/output.csv'],
  'completionCode': 0,
  'endDateTime': 1628234067000,
  'eventName': 'resttest.str_step',
  'eventUuid': '0ee2794545c72d510000017aa35bdeda1d0a',
  'executionState': 'ENDED',
  'executionSuccess': True,
  'executionWarning': False,
  'hasIterations': False,
  'log': {'logAsAttachment': None,
          'logAsString': 'Connected to server: localhost:28059, session: '
                         '3136-11708\r\n'
                         'Starting run...\r\n'
                         'StreamExecutionSuccess\r\n'
                         'Stream execution complete, Elapsed=0.05 sec, CPU=0.0 '
                         'sec\r\n'
                         'Adding artifact '
                         'file://localhost/C:/data/test/output.csv.\r\n'},
  'notificationEnabled': True,
  'queuedDateTime': 1628234066000,
  'startDateTime': 1628234066000,
  'userName': None,
  'uuid': '0ee2794545c72d510000017aa35bdeda1db8'},
 {'artifactLocation': [],
  'completionCode': 0,
  'endDateTime': 1628234077000,
  'eventName': 'WAIT 10',
  'eventUuid': '0ee2794545c72d510000017aa35bdeda1d0d',
  'executionState': 'ENDED',
  'executionSuccess': True,
  'executionWarning': False,
  'hasIterations': False,
  'log': {'logAsAttachment': None,
          'logAsString': '--- PRMS ---\r\n'
                         'C:\\Windows\\System32\\ping -w 1000 -n  10 '
                         'www.ibm.com\r\n'
                         'The process terminated with the exit code 0.\r\n'
                         '--- STDOUT ---\r\n'
                         '\r\n'
                         'Pinging e7817.dscx.akamaiedge.net [104.78.95.69] '
                         'with 32 bytes of data:\r\n'
                         'Reply from 104.78.95.69: bytes=32 time=1ms TTL=58\r\n'
                         'Reply from 104.78.95.69: bytes=32 time=1ms TTL=58\r\n'
                         'Reply from 104.78.95.69: bytes=32 time=1ms TTL=58\r\n'
                         'Reply from 104.78.95.69: bytes=32 time=1ms TTL=58\r\n'
                         'Reply from 104.78.95.69: bytes=32 time=1ms TTL=58\r\n'
                         'Reply from 104.78.95.69: bytes=32 time=1ms TTL=58\r\n'
                         'Reply from 104.78.95.69: bytes=32 time=1ms TTL=58\r\n'
                         'Reply from 104.78.95.69: bytes=32 time=1ms TTL=58\r\n'
                         'Reply from 104.78.95.69: bytes=32 time=1ms TTL=58\r\n'
                         'Reply from 104.78.95.69: bytes=32 time=1ms TTL=58\r\n'
                         '\r\n'
                         'Ping statistics for 104.78.95.69:\r\n'
                         '    Packets: Sent = 10, Received = 10, Lost = 0 (0% '
                         'loss),\r\n'
                         'Approximate round trip times in milli-seconds:\r\n'
                         '    Minimum = 1ms, Maximum = 1ms, Average = 1ms\r\n'
                         '--- STDERR ---\r\n'},
  'notificationEnabled': True,
  'queuedDateTime': 1628234067000,
  'startDateTime': 1628234067000,
  'userName': None,
  'uuid': '0ee2794545c72d510000017aa35bdeda1dc0'}]
各ステップはeventNameで確認できます。それぞれのステップにもexecutionStateとexecutionSuccessが記録されます。
'eventName': 'resttest.str_step'
'executionState': 'ENDED',
'executionSuccess': True,
logをみるとoutput.csvを出力していることがわかります。
'Adding artifact '
'file://localhost/C:/data/test/output.csv.\r\n'},
WAIT10ではpingを実行したログが書かれています。
'eventName': 'WAIT 10',
'executionState': 'ENDED',
'executionSuccess': True,
'Pinging e7817.dscx.akamaiedge.net [104.78.95.69] '
'with 32 bytes of data:\r\n'
'Reply from 104.78.95.69: bytes=32 time=1ms TTL=58\r\n'