どうも。一昨日に引き続きまたやってきました、katsuyukiです。
最近寒くなってきましたね、ようやく12月だな〜と実感しています。そういえば大学生くらいの頃から毎度、冬季休みなど休日が連続する時は
- 休み中にやりたいことを洗い出し、それを時間割にしてなるべくその通りに過ごす
という謎なことをやっていますね。もちろん今年も年末に向けてやりたいことを洗い出して作成中ですw
そこにはキャッチアップした技術がちゃんと身についているのか、あの設計を今制約なしで考えるとどうなるのだろうかみたいな振り返りを含めた1人re:Inventの開催の日は必ず取るようにしています。
そしてまだ何が正解だったのか考えていないのでわかりませんが今回題材にしても良いものがあったのでそれについて書こうと思います。(1人re:Invent後に追記で更新かけるかもしれません)
背景
ひょんなことから知り合った方にリリース開発を手伝ってくれと言われたのであるサービスを手伝っていました。
フロント側を書ける人がいるということで環境としてはフロント側をNuxt、サーバー側をRailsでGitHubのリポジトリも分けて実装することになっていました。
インフラ
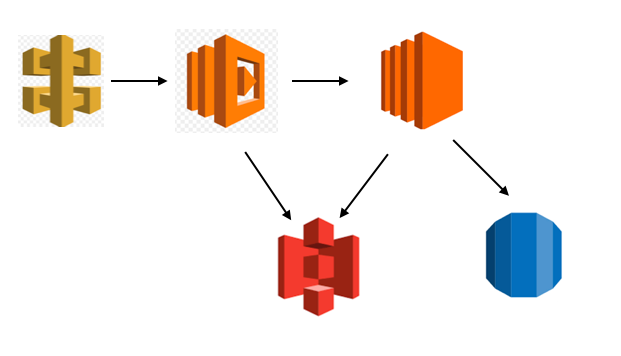
お金もそんなにかけたくないということで構成はこんな感じになりました。
- フロント側をApiGateway + Lambda
- サーバー側はEC2 + RDS
認証部分
認証部分はInstagramを使用したいということだったのでInstagram認証をかますことにしました。
Instagramの用意
ここから準備してくださいな。
https://www.instagram.com/developer/
諸々準備したあとManage Clientsで以下を確認します。ここはあとでサーバー側の設定に使います。
Client ID xxxxxxx
Client Secret xxxxxx
securityタブをクリックして「Valid redirect URIs」に以下で設定します。
http://localhost:8080/omniauth/instagram/callback
Rails側をポート8080で起動し、Nuxt側を3000ポートで起動することを想定しています。
サーバー側の実装
rails newした後のGemfileはこんな感じ。
gem 'devise'
gem 'devise_token_auth'
gem 'omniauth'
gem 'omniauth-oauth2'
gem 'instagram'
gem 'omniauth-instagram'
gem 'rack-cors'
以下コマンドでdevise_token_authのインストールとモデルを作成します。
https://github.com/lynndylanhurley/devise_token_auth/blob/master/docs/config/README.md
$ rails g devise_token_auth:install User auth
db/migrate/2018xxxxxxxx_devise_token_auth_create_users.rb
というファイルができるので以下みたいに編集しました。この辺は仕様と相談しながら決めちゃってください。
class DeviseTokenAuthCreateUsers < ActiveRecord::Migration[5.2]
  def change

    create_table(:users) do |t|
      ## Required
      t.string :provider, :null => false, :default => "email"
      t.string :uid, :null => false, :default => ""

      ## Database authenticatable
      t.string :encrypted_password, :null => false, :default => ""

      ## Recoverable
      t.string   :reset_password_token
      t.datetime :reset_password_sent_at
      t.boolean  :allow_password_change, :default => false

      ## Rememberable
      t.datetime :remember_created_at

      ## Trackable
      t.integer  :sign_in_count, :default => 0, :null => false
      t.datetime :current_sign_in_at
      t.datetime :last_sign_in_at
      t.string   :current_sign_in_ip
      t.string   :last_sign_in_ip

      ## Confirmable
      t.string   :confirmation_token
      t.datetime :confirmed_at
      t.datetime :confirmation_sent_at
      t.string   :unconfirmed_email # Only if using reconfirmable

      ## Lockable
      # t.integer  :failed_attempts, :default => 0, :null => false # Only if lock strategy is :failed_attempts
      # t.string   :unlock_token # Only if unlock strategy is :email or :both
      # t.datetime :locked_at

      ## User Info
      t.string :name
      t.string :nickname
      t.string :image
      t.string :email

      ## Tokens
      t.json :tokens

      t.timestamps
    end

    add_index :users, :email,                unique: true
    add_index :users, [:uid, :provider],     unique: true
    add_index :users, :reset_password_token, unique: true
    add_index :users, :confirmation_token,   unique: true
    # add_index :users, :unlock_token,       unique: true
  end
モデルはこんな感じにしました。
class User < ActiveRecord::Base
  # Include default devise modules. Others available are:
  # :confirmable, :lockable, :timeoutable and :omniauthable
  devise :database_authenticatable, :registerable,
         :recoverable, :rememberable, :trackable, :validatable, :rememberable, :omniauthable
  include DeviseTokenAuth::Concerns::User
end
あとはmigrateして設定は終わりです。
$ rails db:migrate
このあとはログインする時に使うcontrollerをオーバーライドします。
module Users
  class OmniauthCallbacksController < DeviseTokenAuth::OmniauthCallbacksController
    include Devise::Controllers::Rememberable
    def omniauth_success
      get_resource_from_auth_hash
      set_token_on_resource
      create_auth_params

      if confirmable_enabled?
        # don't send confirmation email!!!
        @resource.skip_confirmation!
      end

      sign_in(:user, @resource, store: false, bypass: false)

      @resource.save!

      yield @resource if block_given?

      update_auth_header

             # ここを修正しています
      if Rails.env.production?
        return redirect_to ""
      else
        return redirect_to "http://localhost:3000/"
      end
    end


    def omniauth_failure
      super
    end
  end
end
routeを通します。
Rails.application.routes.draw do
  mount_devise_token_auth_for 'User', at: 'auth', controllers: { omniauth_callbacks: "users/omniauth_callbacks" }
  # For details on the DSL available within this file, see http://guides.rubyonrails.org/routing.html
end
headerに仕込まないとエラーになるので以下を設定する。
# frozen_string_literal: true

DeviseTokenAuth.setup do |config|
  # By default the authorization headers will change after each request. The
  # client is responsible for keeping track of the changing tokens. Change
  # this to false to prevent the Authorization header from changing after
  # each request.
  config.change_headers_on_each_request = false

  # By default, users will need to re-authenticate after 2 weeks. This setting
  # determines how long tokens will remain valid after they are issued.
  config.token_lifespan = 2.weeks

  # Sets the max number of concurrent devices per user, which is 10 by default.
  # After this limit is reached, the oldest tokens will be removed.
  # config.max_number_of_devices = 10

  # Sometimes it's necessary to make several requests to the API at the same
  # time. In this case, each request in the batch will need to share the same
  # auth token. This setting determines how far apart the requests can be while
  # still using the same auth token.
  # config.batch_request_buffer_throttle = 5.seconds

  # This route will be the prefix for all oauth2 redirect callbacks. For
  # example, using the default '/omniauth', the github oauth2 provider will
  # redirect successful authentications to '/omniauth/github/callback'
  # config.omniauth_prefix = "/omniauth"

  # By default sending current password is not needed for the password update.
  # Uncomment to enforce current_password param to be checked before all
  # attribute updates. Set it to :password if you want it to be checked only if
  # password is updated.
  # config.check_current_password_before_update = :attributes

  # By default we will use callbacks for single omniauth.
  # It depends on fields like email, provider and uid.
  # config.default_callbacks = true

  # Makes it possible to change the headers names
  config.headers_names = {:'access-token' => 'access-token',
                         :'client' => 'client',
                         :'expiry' => 'expiry',
                         :'uid' => 'uid',
                         :'token-type' => 'token-type' }

  # By default, only Bearer Token authentication is implemented out of the box.
  # If, however, you wish to integrate with legacy Devise authentication, you can
  # do so by enabling this flag. NOTE: This feature is highly experimental!
  # config.enable_standard_devise_support = false
end
APIモードだとエラーになるのでmiddlewareの設定を入れます。
require_relative 'boot'

require "rails"
# Pick the frameworks you want:
require "active_model/railtie"
require "active_job/railtie"
require "active_record/railtie"
require "active_storage/engine"
require "action_controller/railtie"
require "action_mailer/railtie"
require "action_view/railtie"
require "action_cable/engine"
# require "sprockets/railtie"
require "rails/test_unit/railtie"

# Require the gems listed in Gemfile, including any gems
# you've limited to :test, :development, or :production.
Bundler.require(*Rails.groups)

module Sample
  class Application < Rails::Application
    config.load_defaults 5.2
    config.api_only = true

    # APIモードで作ってしまったため追加
    config.middleware.use Rack::MethodOverride
    config.middleware.use ActionDispatch::Cookies
    config.middleware.use ActionDispatch::Session::CookieStore
    config.middleware.use ActionDispatch::Flash

    # クロスドメイン対策
    config.middleware.insert_before 0, Rack::Cors do
      allow do
        origins '*'
        resource '*',
                  :headers => :any,
                  :expose => ['access-token', 'expiry', 'token-type', 'uid', 'client'],
                  :methods => [:get, :post, :options, :delete, :put]
      end
    end
  end
end
instagramの設定を書きます。最初で確認したIDを以下でセットします。
Rails.application.config.middleware.use OmniAuth::Builder do
  provider :instagram, ENV['INSTAGRAM_CLIENT_ID'], ENV['INSTAGRAM_CLIENT_SECRET'], scope: 'basic public_content follower_list comments relationships likes'
end
ポートを8080でサーバーを立てます。
$ rails s -p=8080
簡単で結構端折っていますが、こんな感じです
フロント側の実装
$ npm install -g vue-cli
$ vue init nuxt/starter sample
$ cd sample
$ yarn install
$ yarn run dev
簡単に作ります。ポートは3000で動いています。
|-- pages
    |-- index.vue
|-- package.json
ページはこんな感じにします。
<template>
  <div>
      <a href="http://localhost:8080/auth/instagram">ログイン</a>
  </div>
</template>
ここまでやるとマイクロサービスっぽくフロントとサーバーで環境を分けても問題なく動きます。
詰まりポイント
こんなエラーになる時があります。
{"error_type": "OAuthException", "code": 400, "error_message": "Redirect URI does not match registered redirect URI"}
- InstagramのValid redirect URIsの設定ミス
- InstagramのClient IDなどが合っていない
のどちらかです。なので確認しましょう。「Valid redirect URIs」の設定が合っている場合はClient IDをチェックします。この時、エラー画面のURLにキーが返ってくるのでそれが自分の意図しているものか確認します。
ログイン機能
ユーザー登録があるのでその人がログインしているかどうかを確認しないといけません。なので今回jwtを使いました。
Rails側にgemを追加しました。
gem 'jwt'
controllerにパラメタ持たせます。
jwt = JsonWebToken.encode({user_id: @resource.id, exp: (Time.now + 10.year).to_i})
return redirect_to "http://localhost:3000?jwt=#{jwt}"
initializersで読み込むようにして
require 'json_web_token'
ライブラリでオーバーライドします。
class JsonWebToken
  class << self
    def encode(payload)
      JWT.encode(payload, Rails.application.credentials.config[:secret_key_base])
    end

    def decode(token)
      HashWithIndifferentAccess.new(
        JWT.decode(
          token,
          Rails.application.credentials.config[:secret_key_base]
        )[0]
      )
    rescue
      nil
    end
  end
end
フロント側はaxiosでinterceptorsを使ってjwtを仕込みます。
  asyncData (context) {
    axios.interceptors.request.use(config => {
      config.headers.Authorization = `${context.query["jwt"]}`
      return config
    })
    return axios.get(`APIサーバーのURL`)
    .then((res) => {
      return { userData: res.data}
    })
  }
これで通信することができます。基本jwtのみなのでセキュリティ的には弱いかなーと思っています。なのでフロント側でもログインボタン押した時にsessionを作成し、それと取得したjwtを組み合わせても良いかと思います。まあ本来ならサーバーレスでやることではない気がしますがw
まとめ
Instagram認証ってあまりやったことなかったですが、twitterなどと同様にできるので試してみても良いかもですね。

