暫くぶりにmruby/cを試そうとしたらバージョンが3.1になってました。
PlatformIOでM5Stack用のビルドがうまくいったので記録しておきます。
手順
プロジェクト作成
-
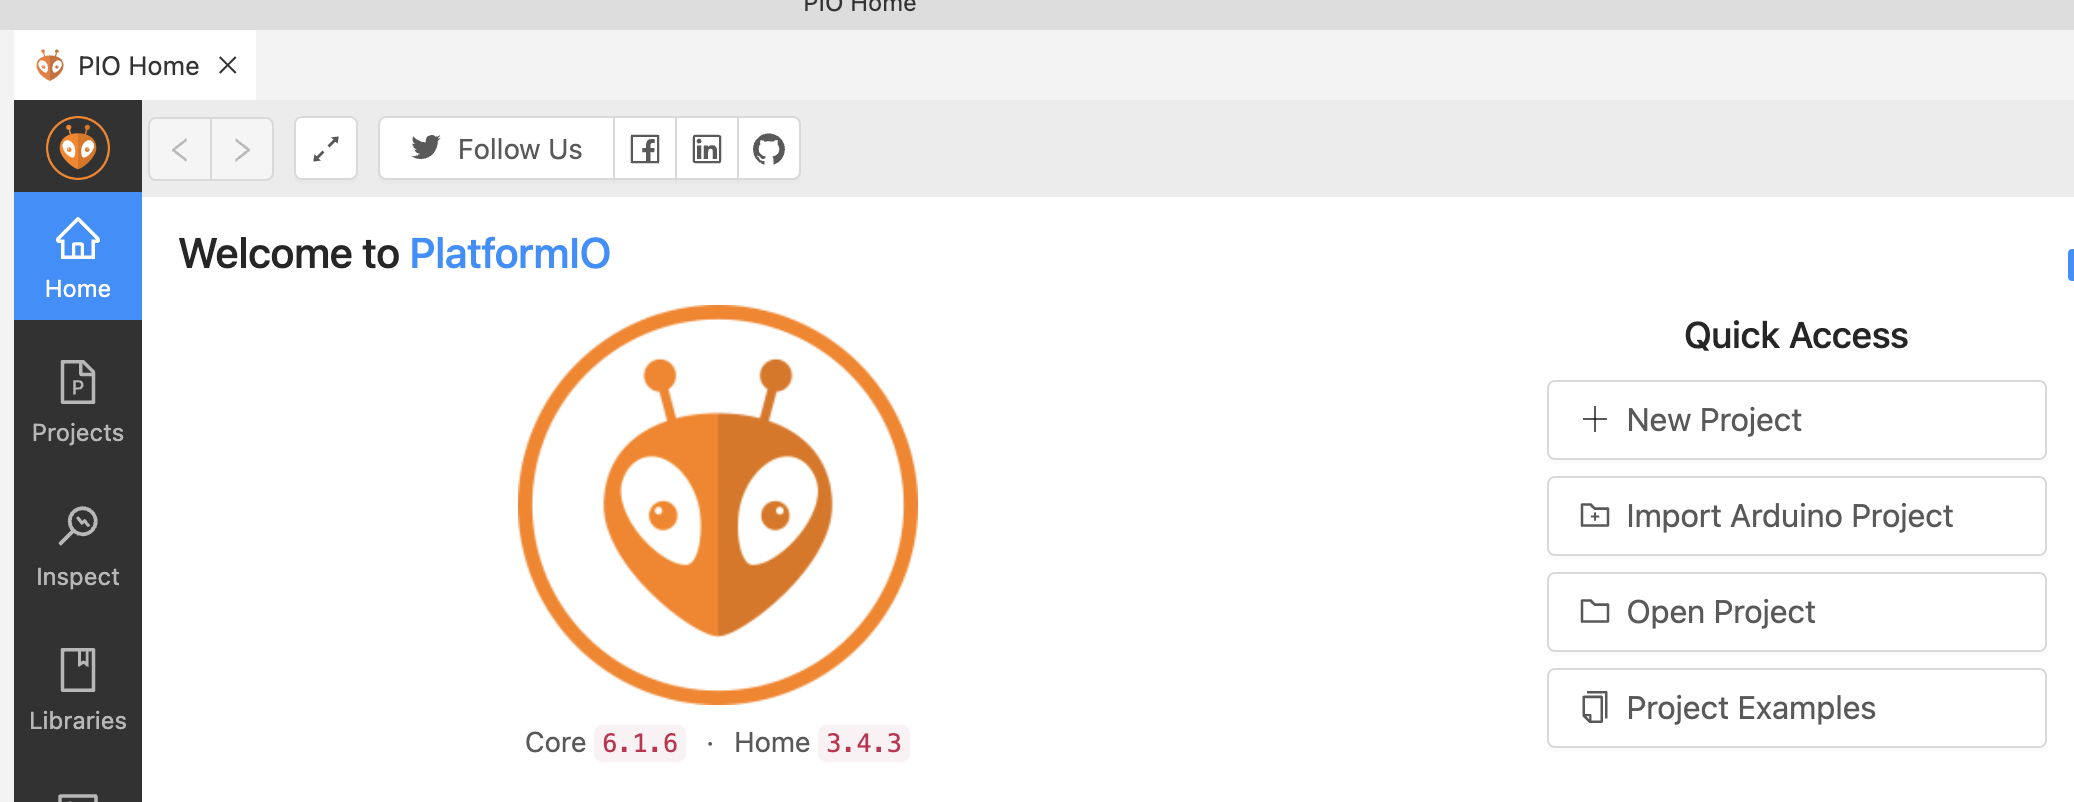
PlatformIOのHomeタブで +New Project ボタンを押します。
-
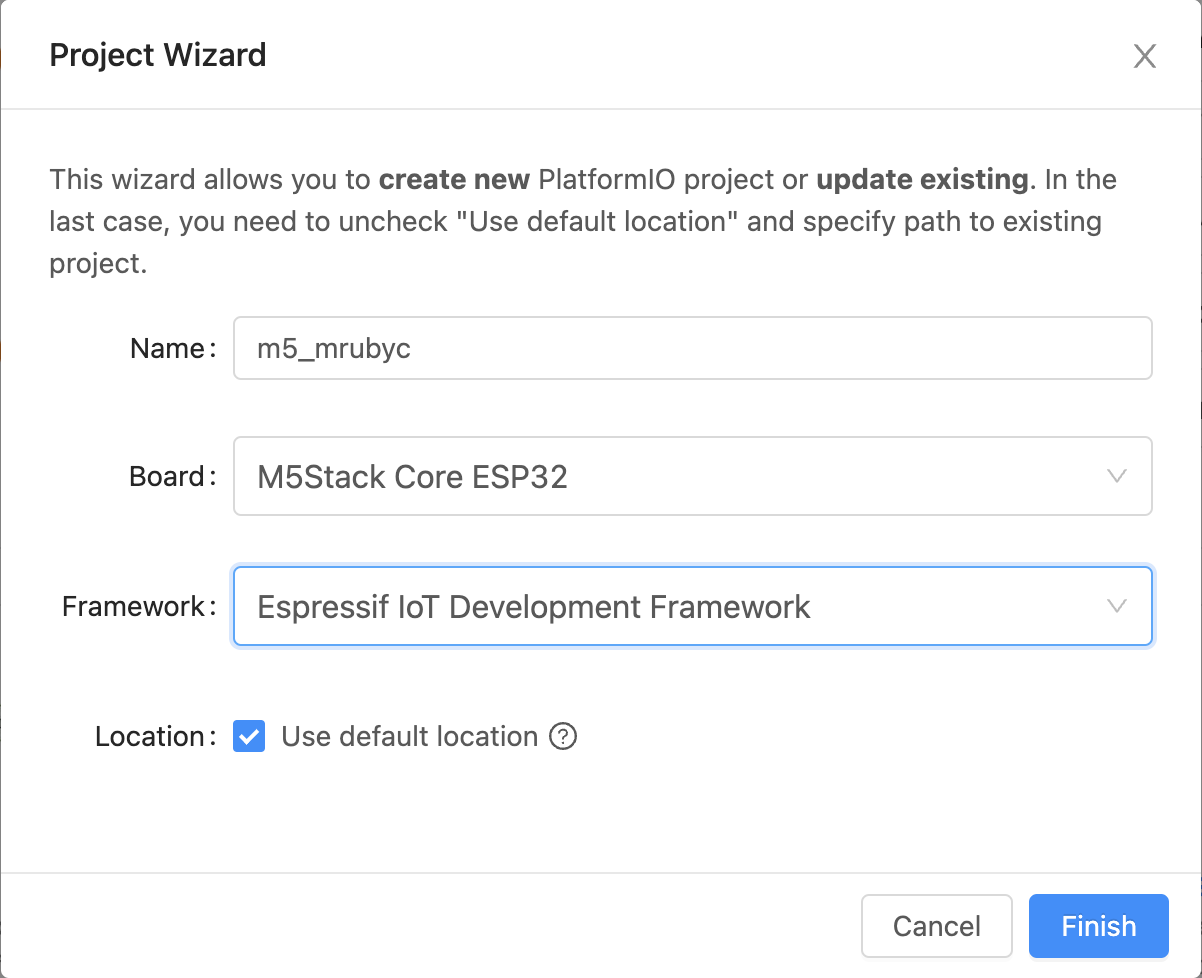
ターゲットとしてM5Stack Basicを想定しているのでProject Wizard の Board で M5Stack Core ESP32、Frameworkで Espressif IoT Development Framework (espidf)を選択します。

-
初めての場合Frameworkなど開発環境のダウンロードで時間がかかりますので気長に待ちます。
platform.iniの編集
mruby/cの組み込み
- platform.iniの lib_dept にmruby/cの github url を入力してライブラリーとして取り込みます。
[env:m5stack-core-esp32]
platform = espressif32
board = m5stack-core-esp32
framework = espidf
lib_deps = https://github.com/mrubyc/mrubyc
include pathとhalの指定
そのままだとmruby/cのincludeファイルを見つけられないので build_flags でパスを指定します。
そしてhalとしてESP32を選択するためMRBC_USE_HAL_ESP32の定義も追加します。
[env:m5stack-core-esp32]
platform = espressif32
board = m5stack-core-esp32
framework = espidf
lib_deps = https://github.com/mrubyc/mrubyc
build_flags=
  -I .pio/libdeps/m5stack-core-esp32/mrubyc/src
  -DMRBC_USE_HAL_ESP32
不要なhalのファイルを除外
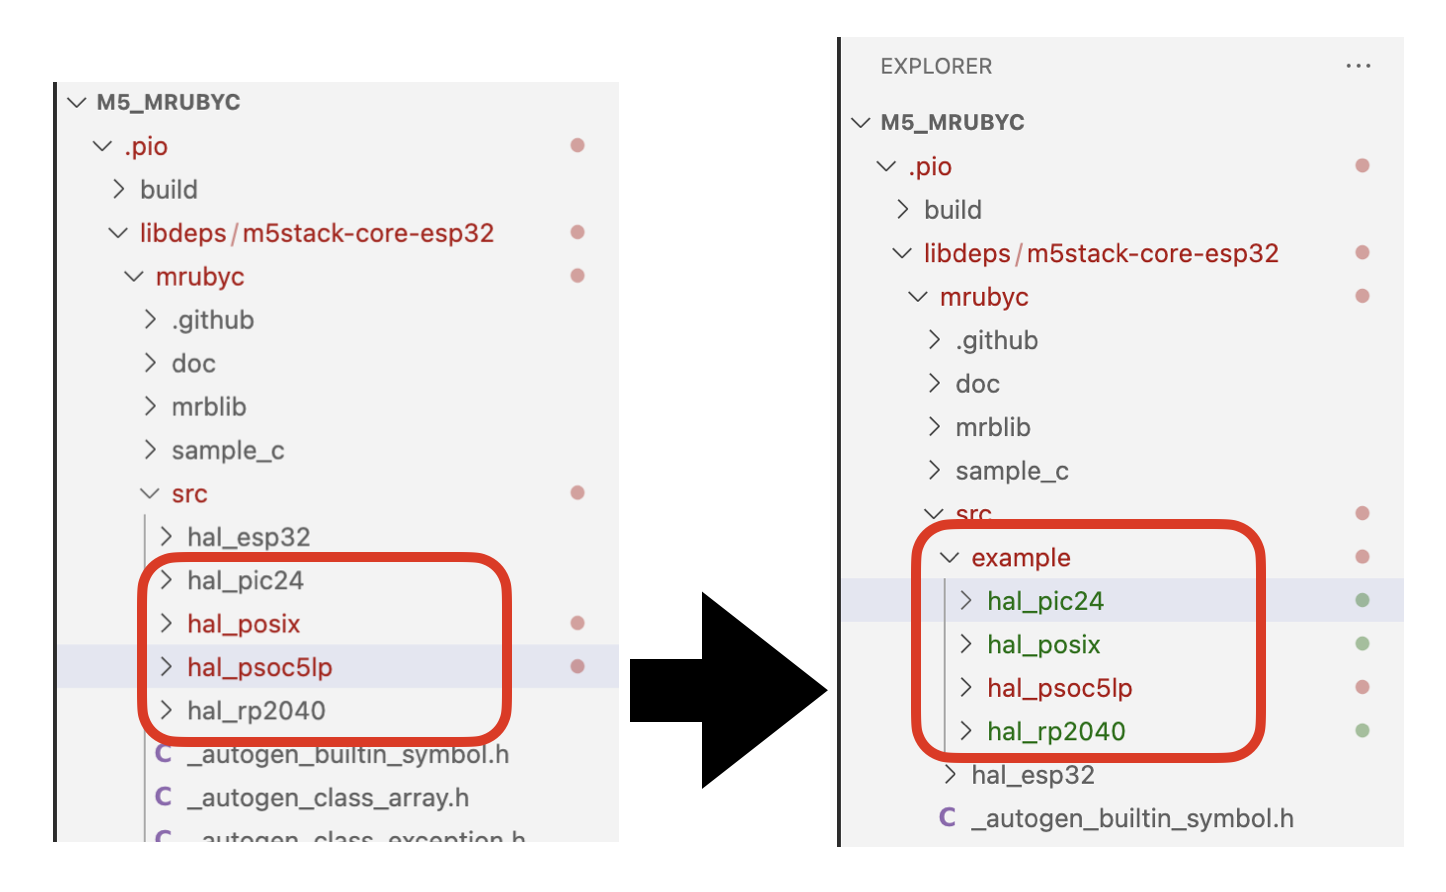
halは様々なターゲット用のファイルが含まれています。そのままビルドすると使用しないhalもビルドしてしまいエラーになります。
ESP32以外のhalファイルは除外します。
ファイルの除外は build_src_filter でできる様ですが、うまく指定できませんでした。src_dir で指定した直下のファイルしか指定できない様で、更にその下のファイルなのでうまく除外できないのではないでしょうか。
代わりにexampleフォルダを作成し、不要なファイルをその中に入れます。exampleの中は除外されます。
mrubycのファイルには手をつけたくないので、ファイルを除外する上手い方法があったら教えてください。
ビルド
この状態でビルドするとエラーなくビルドできるはずです。
書き込み
まだmruby/cのプログラムは動いてませんが、ここで一旦書き込みます。
するとRTCWDT_RTC_RESETがかかって正常に起動しません。
rst:0x10 (RTCWDT_RTC_RESET),boot:0x17 (SPI_FAST_FLASH_BOOT)
configsip: 0, SPIWP:0xee
clk_drv:0x00,q_drv:0x00,d_drv:0x00,cs0_drv:0x00,hd_drv:0x00,wp_drv:0x00
mode:QIO, clock div:1
load:0x3fff0030,len:6656
load:0xffffffff,len:-1
ets Jun  8 2016 00:22:57
これは正常に書き込みできていないためで、platformio.iniに書き込みに関する設定を追加します。
[env:m5stack-core-esp32]
platform = espressif32
board = m5stack-core-esp32
framework = espidf
lib_deps = https://github.com/mrubyc/mrubyc
build_flags=
  -I .pio/libdeps/m5stack-core-esp32/mruby/src
  -DMRBC_USE_HAL_ESP32
board_build.f_cpu = 240000000L
board_build.f_flash = 80000000L
board_build.flash_mode = dio
monitor_speed = 115200
これで書き込みができる様になりました。
mruby/cを動かす
mruby/cのサンプルがmrubycのsample_cディレクトリ内にあります。
この中のsample_include.cの内容をmain.cにコピーします。
espidf frameworkではmain関数がapp_main()になるので、そのまま残してそこからサンプルのmainを呼び出します。
#include <stdio.h>
#include <stdlib.h>
#include "mrubyc.h"

#include "sample_include_bytecode.c"

#define MRBC_MEMORY_SIZE (1024*30)
static uint8_t memory_pool[MRBC_MEMORY_SIZE];

int main(void)
{
  mrbc_init(memory_pool, MRBC_MEMORY_SIZE);

  if( mrbc_create_task(mrbbuf, 0) != NULL ){
    mrbc_run();
  }

  return 0;
}

void app_main() {
  main();
}
このプログラムは sample_include_bytecode.c をインクルードしていて、インクルードできる様にplatformio.iniの build_flags にファイルパスを追加します。
build_flags=
  -I .pio/libdeps/m5stack-core-esp32/mrubyc/src
  -I .pio/libdeps/m5stack-core-esp32/mrubyc/sample_c
  -DMRBC_USE_HAL_ESP32
sample_include_bytecode.c は sample_include_bytecode.rb をコンパイルしたバイトコードがcの配列として定義されたものです。
sample_include_bytecode.rb:
while true
  puts "sample"
  sleep 1
end
sample_include_bytecode.c:
#include <stdint.h>
#ifdef __cplusplus
extern
#endif
const uint8_t mrbbuf[] = {
0x52,0x49,0x54,0x45,0x30,0x33,0x30,0x30,0x00,0x00,0x00,0x6a,0x4d,0x41,0x54,0x5a,
0x30,0x30,0x30,0x30,0x49,0x52,0x45,0x50,0x00,0x00,0x00,0x4e,0x30,0x33,0x30,0x30,
0x00,0x00,0x00,0x42,0x00,0x01,0x00,0x04,0x00,0x00,0x00,0x00,0x00,0x00,0x00,0x15,
0x51,0x02,0x00,0x2d,0x01,0x00,0x01,0x07,0x02,0x2d,0x01,0x01,0x01,0x25,0xff,0xf0,
0x11,0x01,0x38,0x01,0x69,0x00,0x01,0x00,0x00,0x06,0x73,0x61,0x6d,0x70,0x6c,0x65,
0x00,0x00,0x02,0x00,0x04,0x70,0x75,0x74,0x73,0x00,0x00,0x05,0x73,0x6c,0x65,0x65,
0x70,0x00,0x45,0x4e,0x44,0x00,0x00,0x00,0x00,0x08,
};
これを書き込んで実行すると sample_include_bytecode.rb にあるように"sample"が1秒毎に表示されます。
sample
sample
sample
sample
M5Stack社の他のデバイス
M5Stack社の他のデバイスでも試してみます。
platformio.iniに各デバイス向けの環境を追加すると環境を切替えてビルドすることができます。
platformio セクションの default_env で使用する環境を指定します。
使いたいものだけコメントを外します。
[platformio]
;default_envs = m5stack-core-esp32
;default_envs = m5stack-core2
default_envs = m5stack-atom
[env]で共通する設定を指定し、[env:...]で各ボードに対する設定を記述します。
[env]
platform = espressif32
framework = espidf
lib_deps = https://github.com/mrubyc/mrubyc
board_build.f_cpu = 240000000L
board_build.f_flash = 80000000L
board_build.flash_mode = dio
monitor_speed = 115200

[env:m5stack-core-esp32]
board = m5stack-core-esp32
build_flags=
  -I .pio/libdeps/m5stack-core-esp32/mrubyc/src
  -I .pio/libdeps/m5stack-core-esp32/mrubyc/sample_c
  -DMRBC_USE_HAL_ESP32

[env:m5stack-core2]
board = m5stack-core2
build_flags=
  -I .pio/libdeps/m5stack-core2/mrubyc/src
  -I .pio/libdeps/m5stack-core2/mrubyc/sample_c
  -DMRBC_USE_HAL_ESP32

[env:m5stack-atom]
board = m5stack-atom
build_flags=
  -I .pio/libdeps/m5stack-atom/mrubyc/src
  -I .pio/libdeps/m5stack-atom/mrubyc/sample_c
  -DMRBC_USE_HAL_ESP32
不要なhalの除外は環境を作る毎にexampleフォルダを作って移動する必要があります。
以下のデバイスで同じ様に動作するのを確認できました。
| デバイス | default_envs |
|---|---|
| M5Stack Basic | m5stack-core-esp32 |
| M5Stack Core2 | m5stack-core2 |
| M5Atom Lite | m5stack-atom |
| M5Stamp pico | m5stack-atom |
M5Atom Liteでビルドした時の情報がこちらです。
M5Atom Liteはリソースが少ないと思いますが、RAM、Flashともに空きがあるのが確認できます。
Checking size .pio/build/m5stack-atom/firmware.elf
Advanced Memory Usage is available via "PlatformIO Home > Project Inspect"
RAM:   [=         ]  13.6% (used 44644 bytes from 327680 bytes)
Flash: [==        ]  24.3% (used 254529 bytes from 1048576 bytes)
Building .pio/build/m5stack-atom/firmware.bin
esptool.py v4.2.1
Creating esp32 image...
Merged 2 ELF sections
Successfully created esp32 image.
==================================================== [SUCCESS] Took 7.61 seconds ====================================================
使用したコードはこちらに置いています。
まとめ
- PlatfromIOで比較的簡単にmruby/cを動かせる環境を作ることができました。
- M5Stack以外でもPlatfromIOが対応しているボードなら同じ様なやりかたでできるのではないでしょうか。

