今回、firebase × react.jsなアプリに、Algoliaを利用した全文検索機能を実装します。
- Viewからデータをfirestoreに保存させる
- functionsによって、データ保存(更新)時にAlgolia側にも保存させる
- ViewでAlgoliaに保存されているデータ(firestoreのデータ)を全文検索する
これらをチュートリアル形式で、大雑把に説明します。
また、公式ドキュメントでも、全文検索にはAlgoliaの利用を推奨しています。
今回作成したアプリのソースコードは、githubにて公開しています。こちらから確認できます。
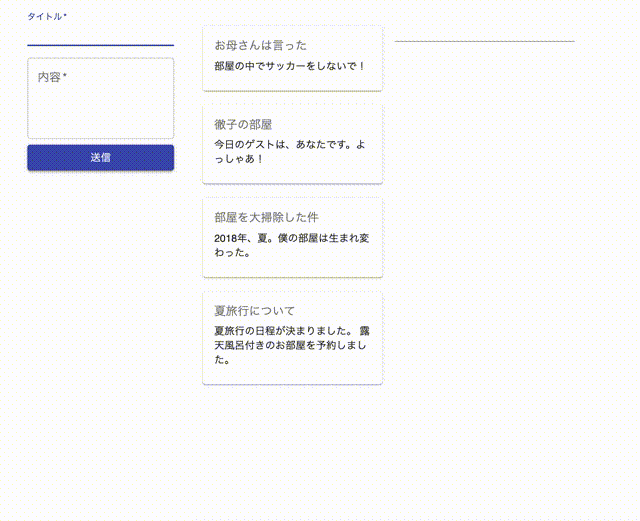
実際の動作は以下のようになります。
1.プロジェクトのセットアップ
1.1 react環境の構築
react環境に関しては、create-react-appコマンドに任せます。
$ create-react-app firebase-algolia-sample-app
$ cd firebase-algolia-sample-app
1.2 firebase側の設定
firebase consoleから、firebaseプロジェクトを作ります。
プロジェクト名、プロジェクトIDは、なんでも良いです。
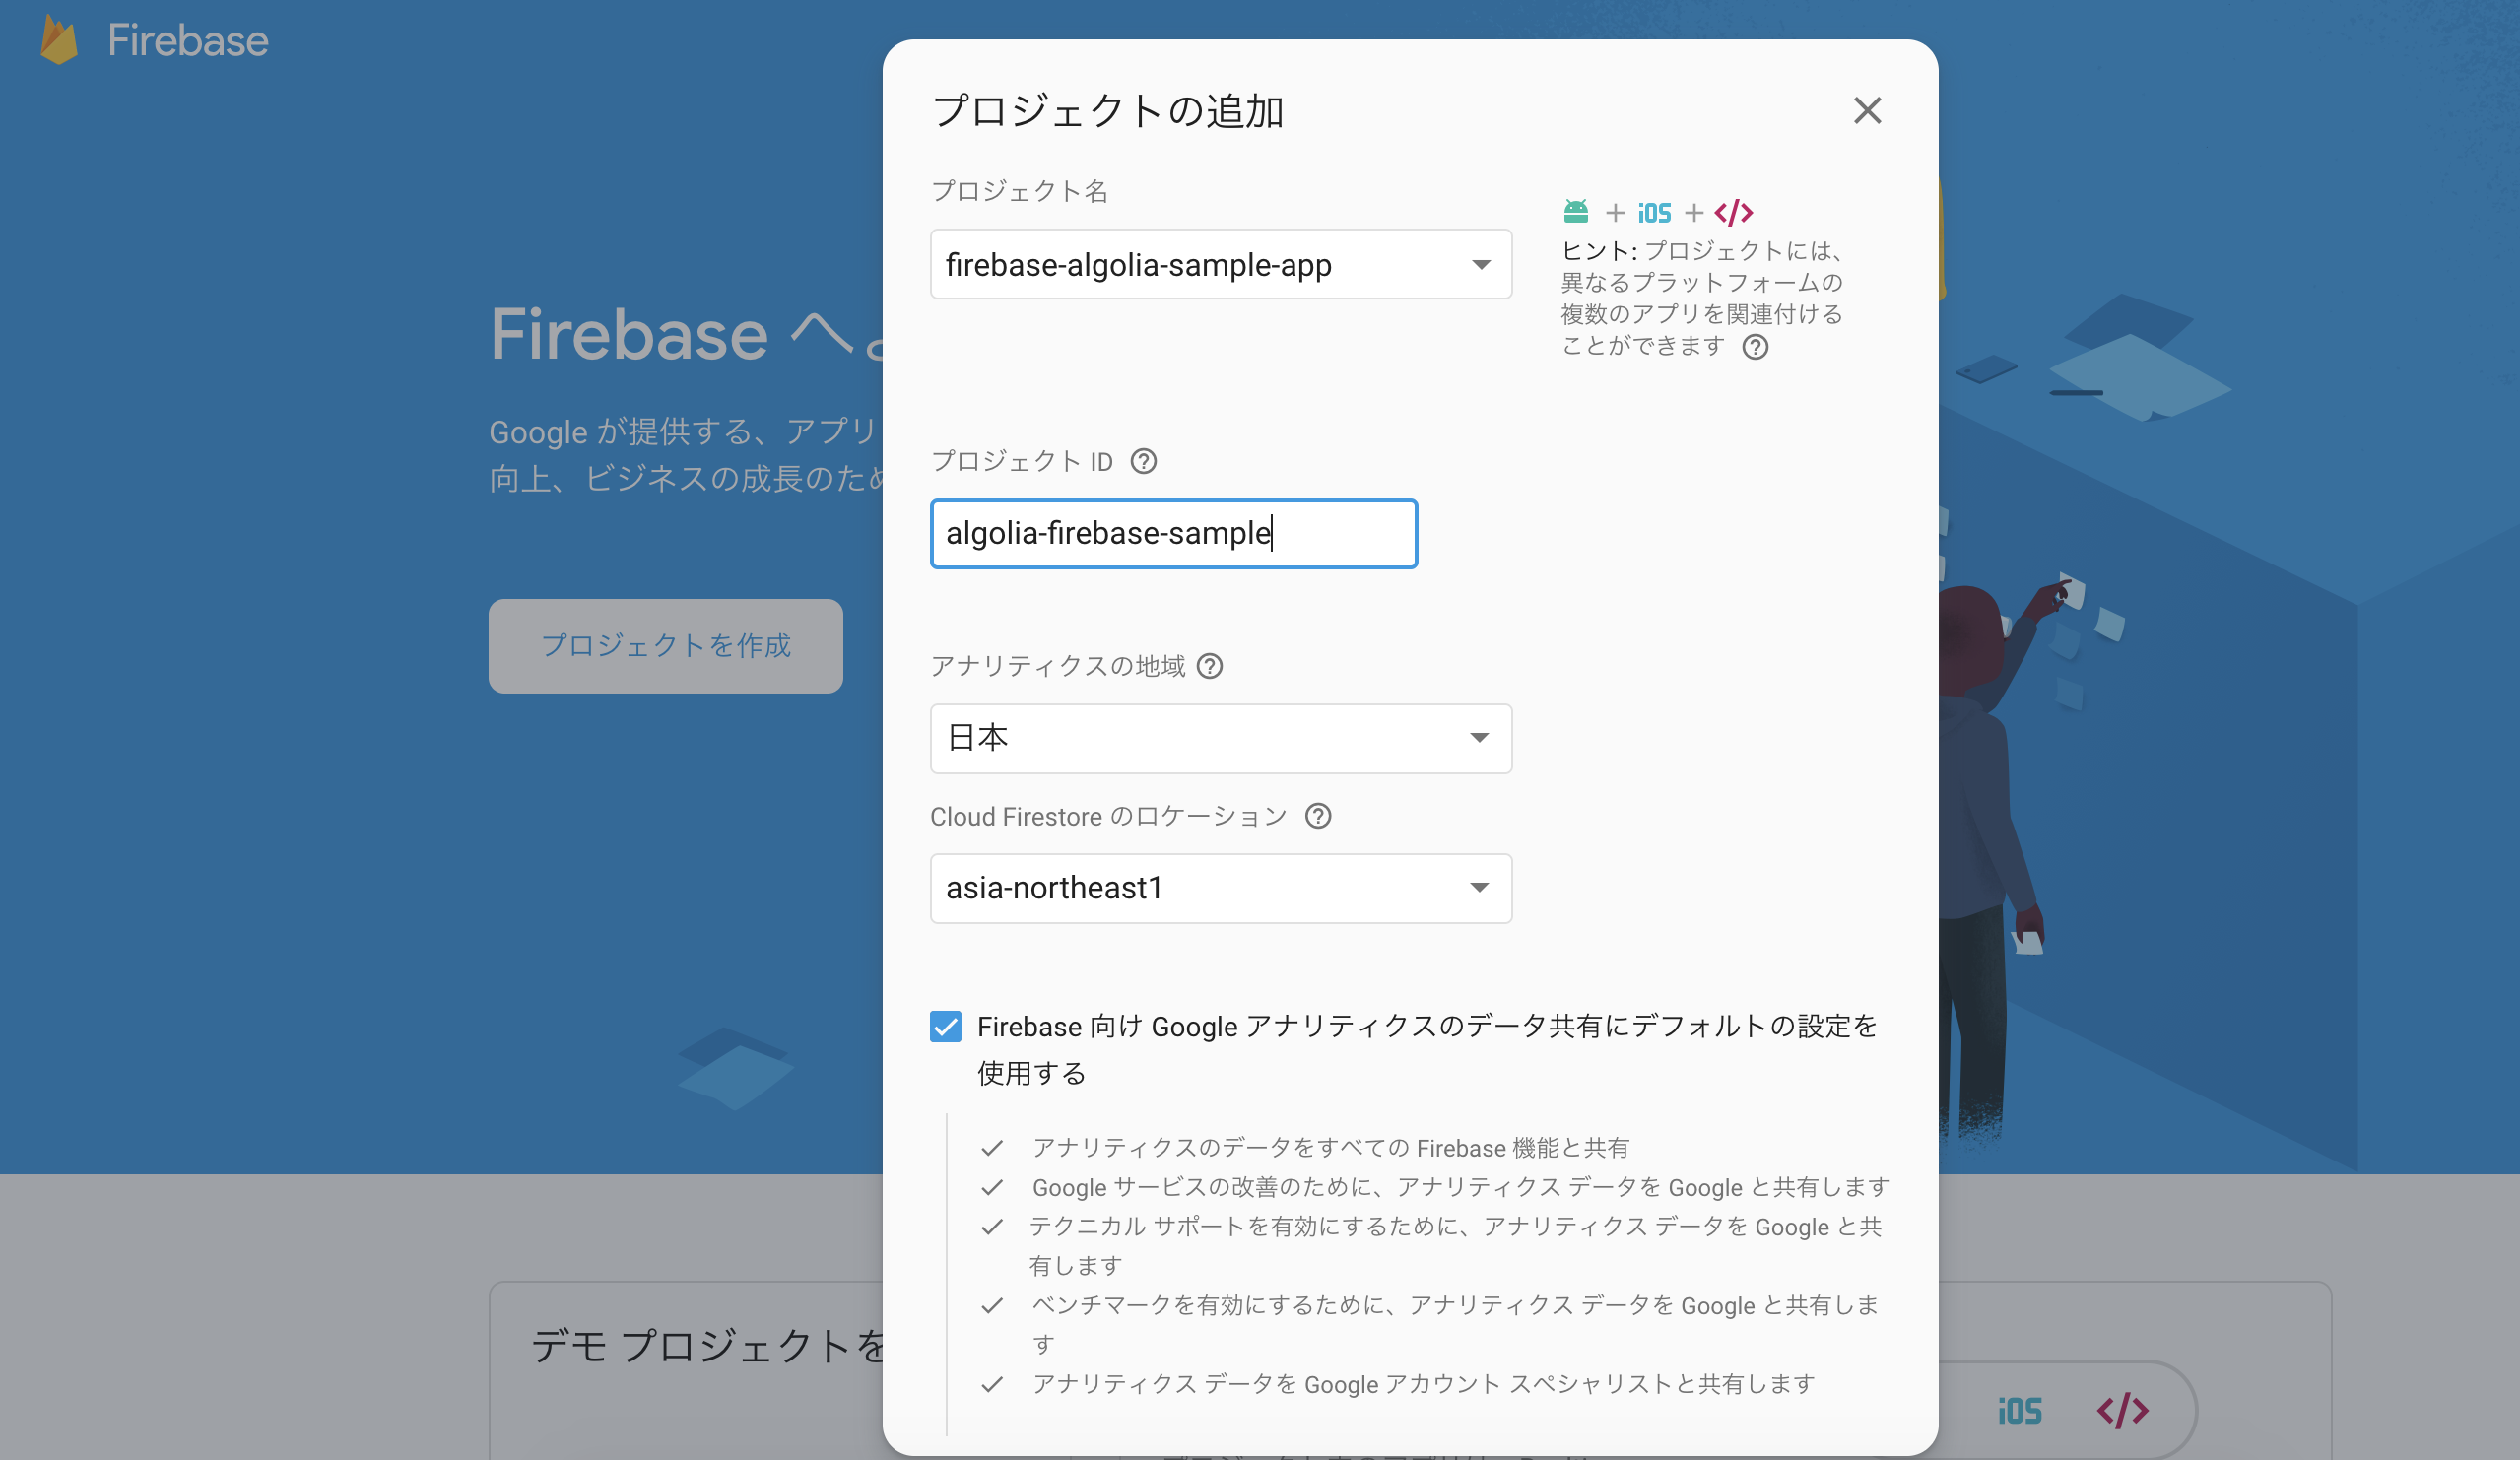
※firebaseプロジェクトの料金体系が、デフォルトでは無料プランになっていますが、無料プランでは外部APIとの連携ができないので、従量課金制などの有料プランに更新する必要がありますので注意してください。
1.3 reactアプリとfirebaseプロジェクトを紐付ける
firebaseプロジェクトが作成できたら、今回のreactアプリと紐付けます。
まず、firebase CLIをインストールします。
それから、先ほど作成したfirebaseプロジェクトのgmailアカウントを選択し、firebaseにログインします。
$ npm install firebase-tools
$ npm install firebase
$ firebase login
? Allow Firebase to collect anonymous CLI usage and error reporting information? Yes

Visit this URL on any device to log in:
https://accounts.google.com/o/oauth2/auth?client_id=563584335869-fgrhgmd47bqnekij5i8b5pr03ho849e6.apps.googleusercontent.com&scope=email%20openid%20https%3A%2F%2Fwww.googleapis.com%2Fauth%2Fcloudplatformprojects.readonly%20https%3A%2F%2Fwww.googleapis.com%2Fauth%2Ffirebase%20https%3A%2F%2Fwww.googleapis.com%2Fauth%2Fcloud-platform&response_type=code&state=367212830&redirect_uri=http%3A%2F%2Flocalhost%3A9005

Waiting for authentication...

✔  Success! Logged in as ************
次に、下記コマンドで、firebaseプロジェクトを紐付けます。
今回、firestore,functions,hostingを利用するので、それらをマークします。
$ firebase init

     ######## #### ########  ######## ########     ###     ######  ########
     ##        ##  ##     ## ##       ##     ##  ##   ##  ##       ##
     ######    ##  ########  ######   ########  #########  ######  ######
     ##        ##  ##    ##  ##       ##     ## ##     ##       ## ##
     ##       #### ##     ## ######## ########  ##     ##  ######  ########

You're about to initialize a Firebase project in this directory:

? Which Firebase CLI features do you want to setup for this folder? Press Space to select features, then Enter to confirm your choices.
 ◯ Database: Deploy Firebase Realtime Database Rules
 ◉ Firestore: Deploy rules and create indexes for Firestore
 ◉ Functions: Configure and deploy Cloud Functions
❯◉ Hosting: Configure and deploy Firebase Hosting sites
 ◯ Storage: Deploy Cloud Storage security rules
firestoreの設定ですが、デフォルトのままで問題ありません。(Enterを押していけば良い)
=== Firestore Setup

Firestore Security Rules allow you to define how and when to allow
requests. You can keep these rules in your project directory
and publish them with firebase deploy.

? What file should be used for Firestore Rules? firestore.rules

Firestore indexes allow you to perform complex queries while
maintaining performance that scales with the size of the result
set. You can keep index definitions in your project directory
and publish them with firebase deploy.

? What file should be used for Firestore indexes? firestore.indexes.json
functionsの設定も、デフォルトのままで問題ありません。
=== Functions Setup

A functions directory will be created in your project with a Node.js
package pre-configured. Functions can be deployed with firebase deploy.

? What language would you like to use to write Cloud Functions? JavaScript
? Do you want to use ESLint to catch probable bugs and enforce style? No
✔  Wrote functions/package.json
✔  Wrote functions/index.js
✔  Wrote functions/.gitignore
? Do you want to install dependencies with npm now? Yes

> grpc@1.21.1 install /Users/aokikatsuomi/Desktop/firebase-algolia-sample-app/functions/node_modules/grpc
> node-pre-gyp install --fallback-to-build --library=static_library

node-pre-gyp WARN Using request for node-pre-gyp https download
[grpc] Success: "/Users/aokikatsuomi/Desktop/firebase-algolia-sample-app/functions/node_modules/grpc/src/node/extension_binary/node-v57-darwin-x64-unknown/grpc_node.node" is installed via remote

> protobufjs@6.8.8 postinstall /Users/aokikatsuomi/Desktop/firebase-algolia-sample-app/functions/node_modules/protobufjs
> node scripts/postinstall


> firebase-functions@2.3.1 postinstall /Users/aokikatsuomi/Desktop/firebase-algolia-sample-app/functions/node_modules/firebase-functions
> node ./upgrade-warning


======== WARNING! ========

This upgrade of firebase-functions contains breaking changes if you are upgrading from a version below v1.0.0.

To see a complete list of these breaking changes, please go to:

https://firebase.google.com/docs/functions/beta-v1-diff

npm notice created a lockfile as package-lock.json. You should commit this file.
added 325 packages from 222 contributors and audited 1040 packages in 35.728s
found 0 vulnerabilities
hostingの設定もデフォルトのままで問題ありません。
=== Hosting Setup

Your public directory is the folder (relative to your project directory) that
will contain Hosting assets to be uploaded with firebase deploy. If you
have a build process for your assets, use your build's output directory.

? What do you want to use as your public directory? public
? Configure as a single-page app (rewrite all urls to /index.html)? No
✔  Wrote public/404.html
? File public/index.html already exists. Overwrite? No
i  Skipping write of public/index.html

i  Writing configuration info to firebase.json...
i  Writing project information to .firebaserc...

✔  Firebase initialization complete!
紐付けるfirebaseプロジェクトの設定を記入するためのファイルを作成します。
$ mkdir srcfirebase
$ touch firebase/firebase.js
そのファイルに設定情報を書き込みます。
import firebase from 'firebase';


const config = {
  apiKey: "*************************",
  authDomain: "*************************",
  databaseURL: "*************************",
  projectId: "*************************",
  storageBucket: "*************************",
  messagingSenderId: "*************************",
  appId: "*************************"
}

firebase.initializeApp(config);

export const db = firebase.firestore();
export const functions = firebase.functions();

export default firebase;
1.4 Algolia側の設定
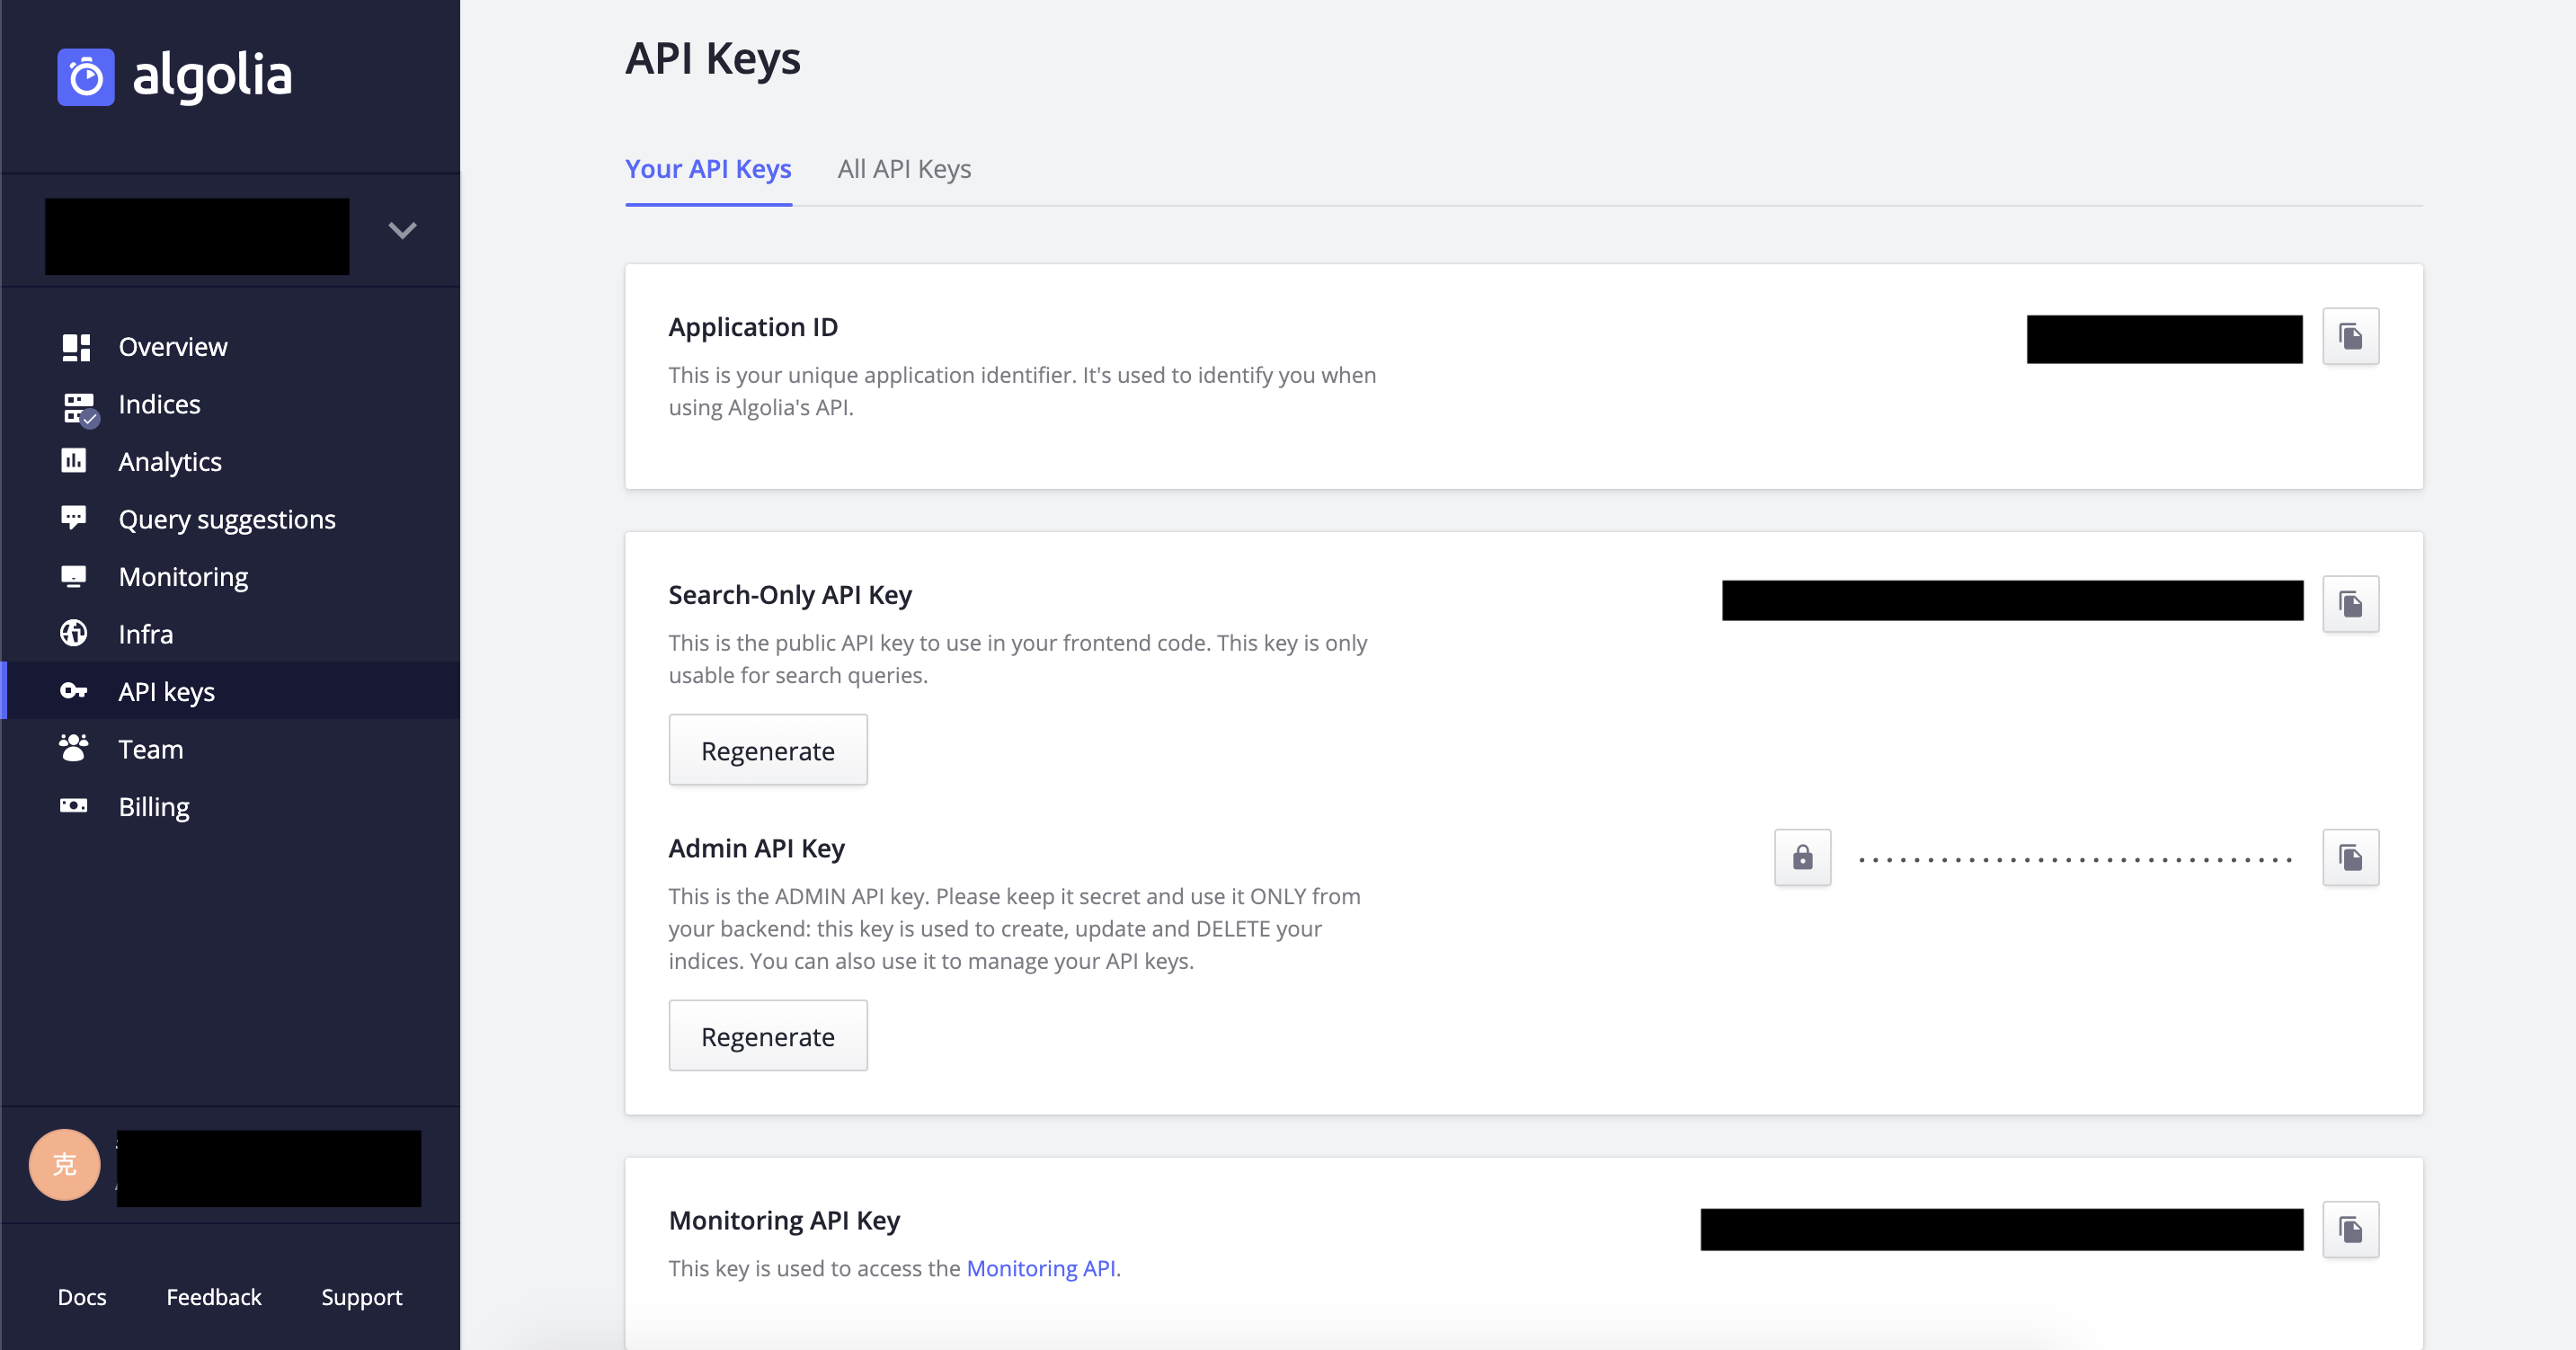
Alogolia公式ページから、Algoliaアカウントを作成しましょう。
アカウントを作成したら、ダッシュボードからindexを作成します。index名はなんでも良いですが、今回は、Practiceとしました。
次に、API Keysという項目から、Application ID,Search-only API key, Admin API Kes をメモします。
2.functionsの設定
AlgoliaのAPIキーなどをfunctionsのプロジェクト内で参照する環境変数として設定します。以下のコマンドで設定できます。
functionsの環境変数に関しては、こちら
$ firebase functions:config:set algolia.app_id="your_app_id"
$ firebase functions:config:set algolia.api_key="your_api_key"
$ firebase functions:config:set algolia.search_key="your_search_key"
次に、利用するパケージをインストールします。
$ cd functions
$ npm install save algoliasearch
$ cd ..
今回、firestoreの特定のcollectionにデータが追加された時に実行されるfunctionを実装します。こちらに関しては、公式ドキュメントをご確認ください。
function内で、先ほどインストールしたパッケージ(algoliasearch)を利用して、Algolia側にもデータを保存するようにします。
const functions = require("firebase-functions");
const admin = require('firebase-admin')
admin.initializeApp(functions.config().firebase)
const algoliasearch = require("algoliasearch")
const ALGOLIA_ID = functions.config().algolia.app_id
const ALGOLIA_ADMIN_KEY = functions.config().algolia.api_key
const ALGOLIA_SEARCH_KEY = functions.config().algolia.search_key
const ALGOLIA_INDEX_NAME = "Practice"
const client = algoliasearch(ALGOLIA_ID, ALGOLIA_ADMIN_KEY)


exports.onProductCreated = functions.firestore.document("posts/{id}").onCreate((snap, context) => {
  const data = snap.data()
  data.objectID = context.params.id
  const index = client.initIndex(ALGOLIA_INDEX_NAME)
  return index.saveObject(data)
})
今回の場合、postsコレクションにデータが追加・更新された時に、それをAlgolia側にも保存しています。
参照:公式ドキュメント
続いて、これらのfunctionをデプロイします。
$ firebase deploy --only functions
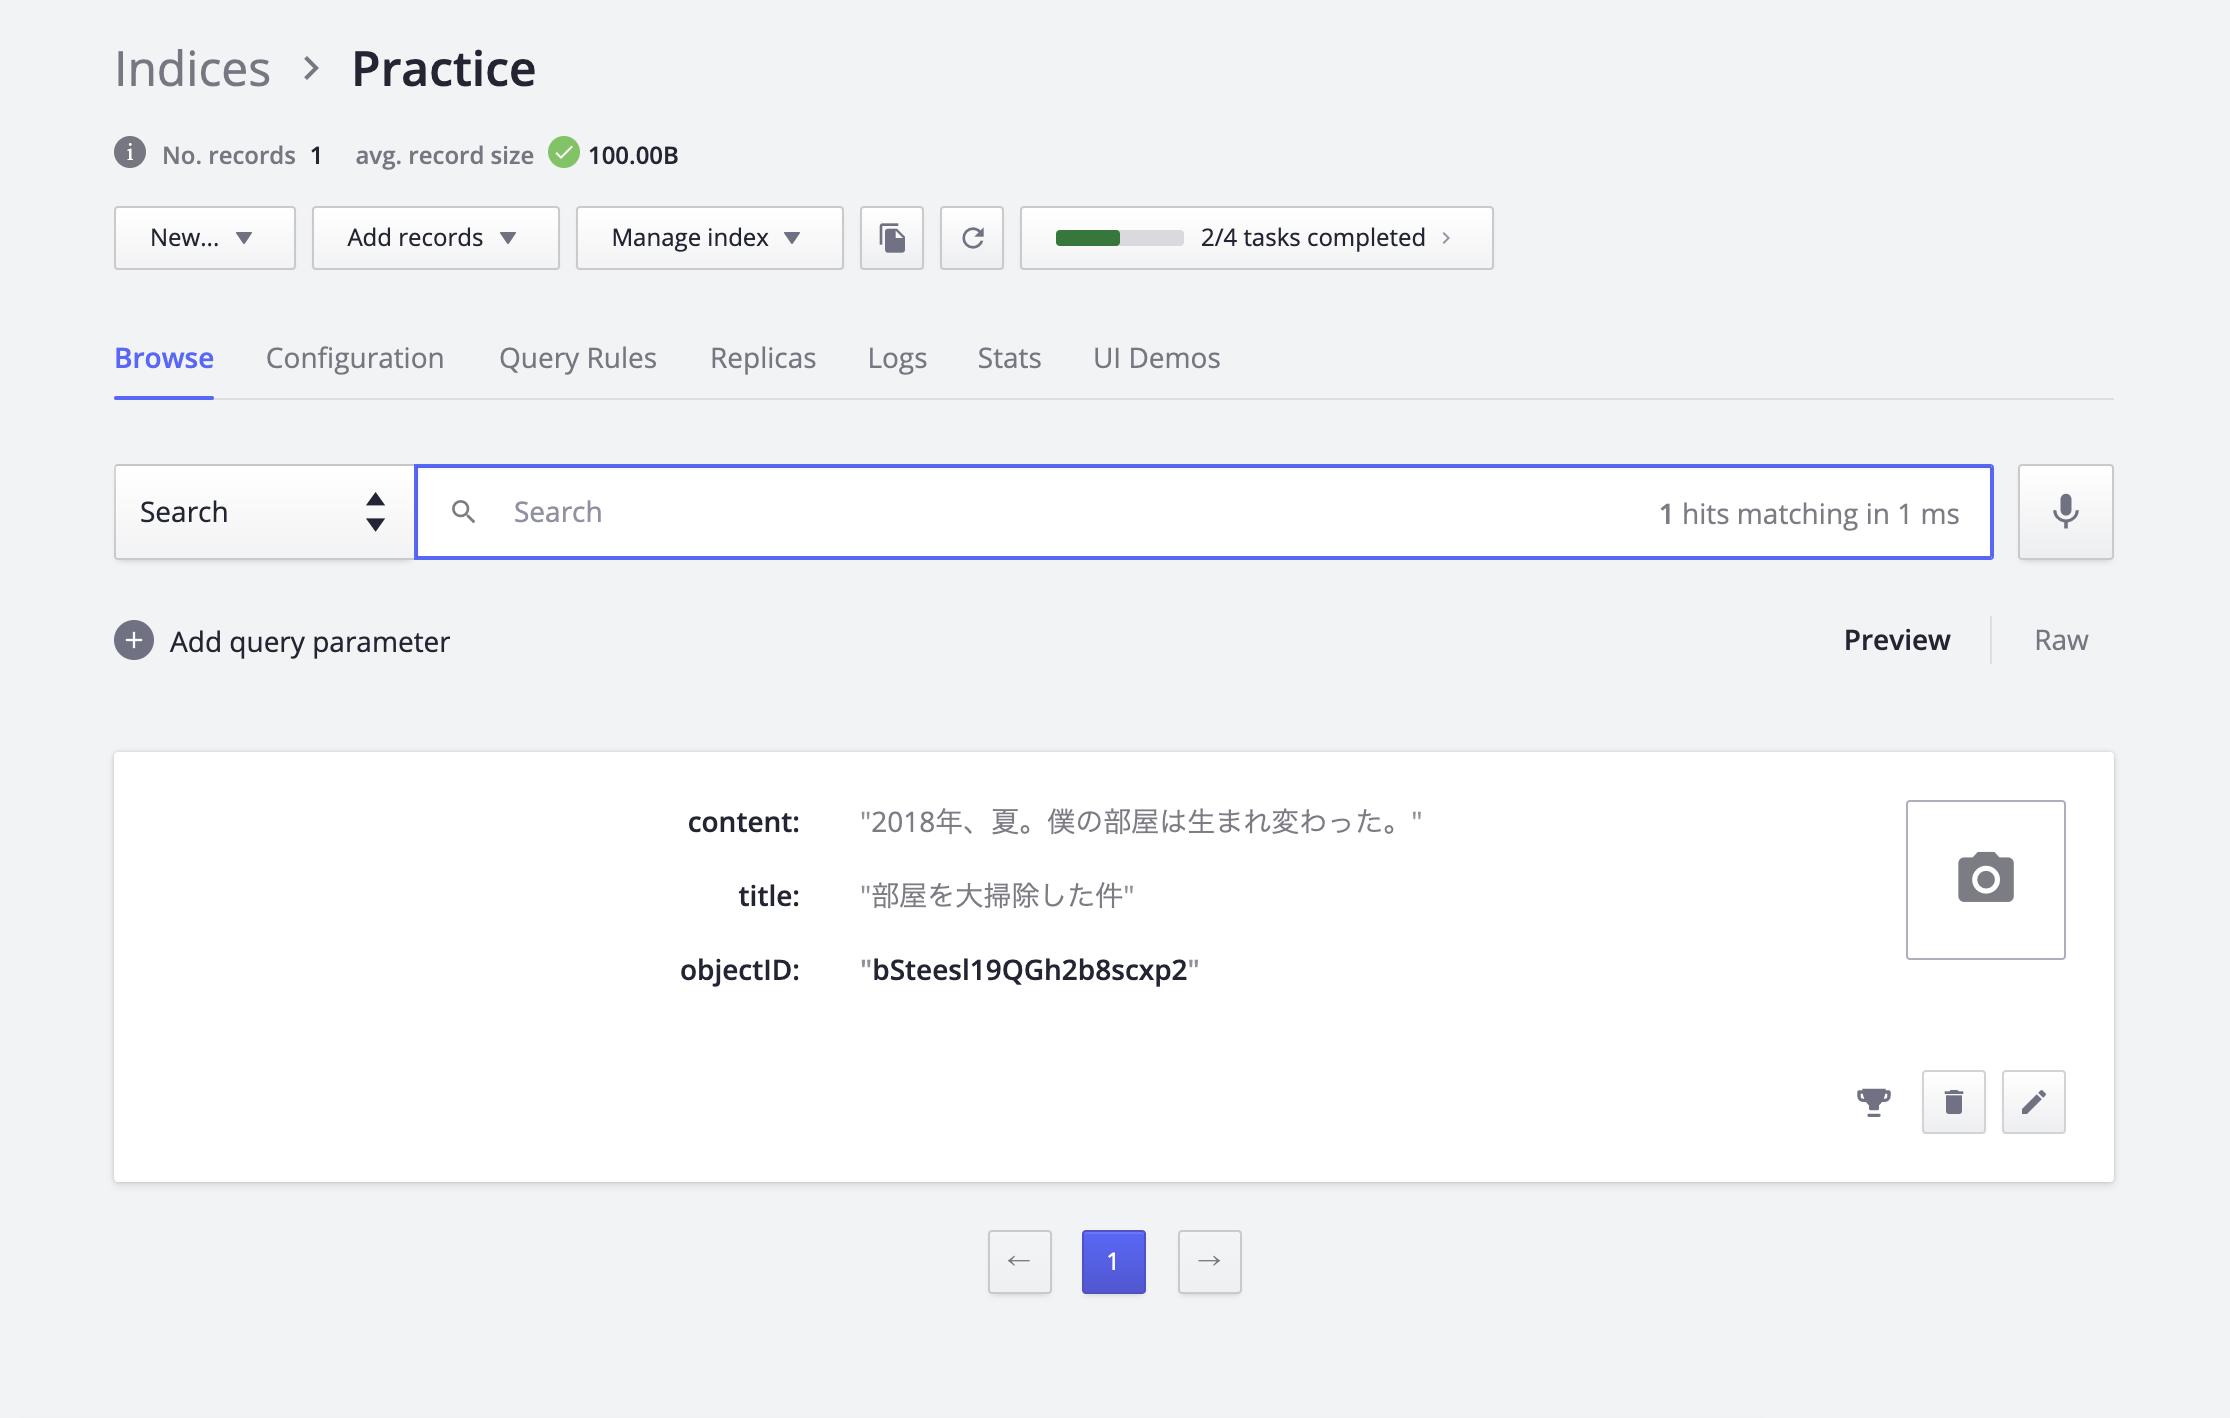
ここまで終わったら、firebase consoleからpostsコレクションにデータを追加してみましょう。
画像のように、Aloglia側にもデータが保存されていればOKです!

3.React.jsでViewの作成
 このような構成でViewを作っていきます。
必要なディレクトリ類を作ってください。
このような構成でViewを作っていきます。
必要なディレクトリ類を作ってください。
$ mkdir src/components
$ touch src/components/SubmitPostComponent.js
$ touch src/components/AllPostsComponent.js
$ touch src/components/SearchPostsComponent.js
レイアウトの整形にmaterialUiを使用するので、インストールします。
$ npm install @material-ui/core
3.1 postsコレクションにデータを保存するComponent
import React from 'react';
import TextField from '@material-ui/core/TextField';
import Button from '@material-ui/core/Button'

const textFieldStyle = {
  display: "flex",
  width: "100%",
}

const contactForm = {
  display: "flex",
  flexDirection: "column",
  alignItems: "center",
}


const SubmitPostComponent = (props) => (
  <React.Fragment>
    <div style={contactForm}>
      <form onSubmit={props.onSubmit}>
        <TextField name="title" label="タイトル" type="text" required style={textFieldStyle} />
        <TextField
          style={textFieldStyle}
          required
          name="content"
          label="内容"
          multiline
          rows="4"
          margin="normal"
          variant="outlined"
        />
        <Button variant="contained" color="primary" type="submit" name="submit" style={textFieldStyle}>
          送信
        </Button>
      </form>
    </div>
  </React.Fragment>
);


export default SubmitPostComponent
AppComponentから渡ってきた関数をpropsとして受け取って、値を渡しています。
3.2 postsコレクションのデータを全て表示するComponent
import React from 'react';
import Card from '@material-ui/core/Card';
import CardContent from '@material-ui/core/CardContent';
import Typography from '@material-ui/core/Typography';

const allPostsStyle = {
  display: "flex",
  flexDirection: "column",
  alignItems: "center",
}


const AllPostsComponent = (props) => (
  <React.Fragment>
    <div style={allPostsStyle}>
    {props.posts.map((post,i) => (
      <Card key={i} style={{marginTop: "20px",width: "250px"}}>
        <CardContent>
          <Typography color="textSecondary" gutterBottom>
            {post.title}
          </Typography>
          <Typography variant="body2" component="p">
            {post.content}
          </Typography>
        </CardContent>
      </Card>
    ))}
    </div>
  </React.Fragment>
);


export default AllPostsComponent
3.3 全文検索のComponent
import React from "react";
import Input from "@material-ui/core/Input";
import Card from "@material-ui/core/Card";
import CardContent from "@material-ui/core/CardContent";
import Typography from "@material-ui/core/Typography";

const allPostsStyle = {
  display: "flex",
  flexDirection: "column",
  alignItems: "center"
};

const SearchPostsComponent = props => (
  <React.Fragment>
    <div style={allPostsStyle}>
      <Input
        name="keyword"
        label="全文検索"
        type="text"
        onChange={props.onSearch}
        style={{ width: "250px", marginTop: "10px" }}
      />
      {props.searchResultPosts.map((post, i) => (
        <Card key={i} style={{ marginTop: "20px", width: "250px" }}>
          <CardContent>
            <Typography color="textSecondary" gutterBottom>
              {post.title}
            </Typography>
            <Typography variant="body2" component="p">
              {post.content}
            </Typography>
          </CardContent>
        </Card>
      ))}
    </div>
  </React.Fragment>
);

export default SearchPostsComponent;
3.4 App.js
import React, { Component } from "react";
import "./App.css";
import SubmitPostComponent from "./components/SubmitPostComponent";
import AllPostsComponent from "./components/AllPostsComponent";
import SearchPostsComponent from "./components/SearchPostsComponent";
import Grid from "@material-ui/core/Grid";
import { db } from "./firebase/firebase";
const algoliasearch = require("algoliasearch");
const client = algoliasearch(
  process.env.REACT_APP_ALGOLIA_ID,
  process.env.REACT_APP_ADMIN_API_KEY
);
const index = client.initIndex("Practice");

class App extends Component {
  constructor(props) {
    super(props);
    this.onSubmit = this.onSubmit.bind(this);
    this.ReadPosts = this.ReadPosts.bind(this);
    this.onSearch = this.onSearch.bind(this);
    this.state = {
      posts: [],
      searchResultPosts: []
    };
  }

  componentDidMount() {
    this.ReadPosts();
  }

  onSubmit(e) {
    e.preventDefault();
    let data = { title: e.target.title.value, content: e.target.content.value };
    db.collection("posts")
      .doc()
      .set(data);
    e.target.title.value = "";
    e.target.content.value = "";
    this.ReadPosts();
  }

  async ReadPosts() {
    let tempResults = [];
    await db
      .collection("posts")
      .get()
      .then(function(querySnapshot) {
        querySnapshot.forEach(function(doc) {
          tempResults.push({
            title: doc.data().title,
            content: doc.data().content
          });
        });
      });
    this.setState({ posts: tempResults });
  }

  async onSearch(e) {
    let tempResults = [];
    await index
      .search({
        query: e.target.value
      })
      .then(function(responses) {
        tempResults = responses.hits;
      });

    this.setState({ searchResultPosts: tempResults });
  }

  render() {
    return (
      <Grid container>
        <Grid item xs={12} sm={12} md={4}>
          <SubmitPostComponent onSubmit={this.onSubmit} />
        </Grid>
        <Grid item xs={12} sm={6} md={4}>
          <AllPostsComponent posts={this.state.posts} />
        </Grid>
        <Grid item xs={12} sm={6} md={4}>
          <SearchPostsComponent
            onSearch={this.onSearch}
            searchResultPosts={this.state.searchResultPosts}
          />
        </Grid>
      </Grid>
    );
  }
}

export default App;
ViewのComponentたちは、上記のようになります。
App.js内で、環境変数を利用している点に注意してください。
$ touch .env
からの
REACT_APP_ALGOLIA_ID="*****"
REACT_APP_ADMIN_API_KEY="*****"
で簡単に環境変数が使えます。
create-react-appでは、デフォルトで環境変数が使えるようです。
ただし、REACT_APP_(名前)という形にしないとダメらしいので注意してください。
長くなりましたが、以上になります。