はじめに
こんにちは!
株式会社エイアイ・フィールドの佐藤と申します。
この記事は株式会社エイアイ・フィールドアドベントカレンダー2021の16日目の記事です。
私自身がWindowsでのDockerを使用したPython開発環境の構築に苦労したので、先人の知恵をお借りして構築した方法を今回の記事にします。
なお、参考にさせていただいた記事等につきましては本記事の最下部に記載いたしますので、適宜ご参照ください。
今回の記事の対象
・Windowsでの初級開発者
・環境構築について分からない方、Dockerで手軽に構築&管理したい方
使用環境・ツール
・Windows10
・WSL2
・Ubuntu
・VSCode(ver1.63)
・Docker Desktop for Windows(ver4.3.0)
・GitHub
手順
WSL2のインストール
1、コントロールパネルを開きます。
2、「プログラム」→「プログラムと機能」の「Windowsの機能の有効化または無効化」を開きます。

3、「Linux 用 Windows サブシステム」と「仮想マシンプラットフォーム」にチェックを入れ、OK ボタンを押します。


4、インストールが完了したら再起動。
5、コマンドプロンプトで 既定のバージョンを '2' にします。
wsl --set-default-version 2
Ubuntuのインストール
1、Windows StoreでUbuntuと検索し、インストール。
Windows Storeが使えない場合は下記サイトからダウンロードする。
https://www.ubuntulinux.jp/download
2、ダウンロード完了後、Ubuntuのターミナルが起動される。
3、Linuxでのユーザー名とパスワードを任意のものに設定し、Installation successful!の表示が出たらインストール成功。

Visual Studio Codeのインストール
Visual Studio Code(通称VS Code)を下記公式サイトからダウンロードしてインストールを行う。
https://azure.microsoft.com/ja-jp/products/visual-studio-code/
Docker Desktop for Windowsのインストール
Docker Desktop for Windowsを下記公式サイト(Docker Hub)からダウンロードしてインストールを行う。
https://hub.docker.com/editions/community/docker-ce-desktop-windows
~そもそもDockerとは~
Dockerとは、コンテナ (Container) とよばれる仮想環境下で,ホストOSとは独立した別の計算環境を走らせるためのソフトウェアです。
Dockerを使うことで、OS を含めたすべてのプログラムをコンパクトにパッケージングすることが可能になります。
また、クラウドのサーバー上に瞬時に計算環境を複製することが可能になります。
Dockerについての詳しい説明は下記Qiita記事をご参照ください。
https://qiita.com/etaroid/items/b1024c7d200a75b992fc
(@etaroid(株式会社KOSKA)様作成 「【図解】Dockerの全体像を理解する -前編-」)
GitHubにリポジトリを作成する
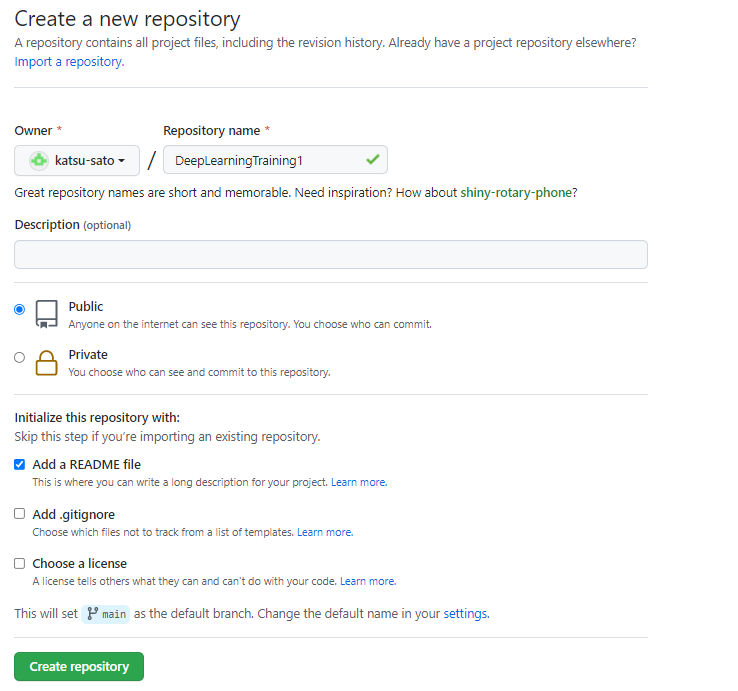
GitHub上でリポジトリ作成画面へ進み、適当なRepository nameを付け、ADD a README fileにチェックを入れて
「Create repository」をクリックしてリポジトリを作成する。
(「Add .gitignore」は後で作成するのでチェック不要)
VSCode上でコンテナを作成する
1、VSCode上で左メニューバーの「Extension」(Ctrl + Shift + X)を選択し、「Remote Development」を選択してインストールする。

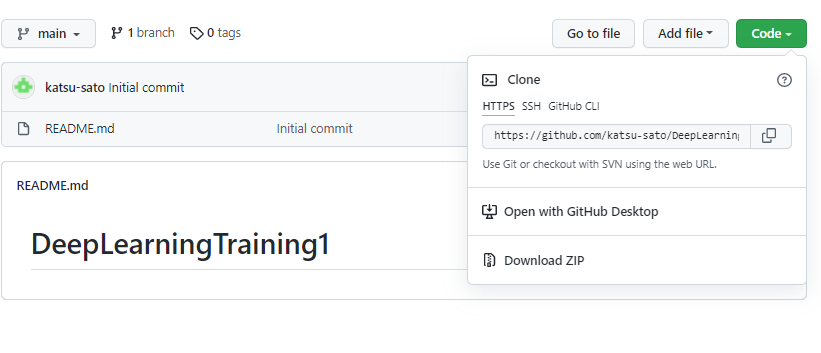
2、先ほど作成したGitHubリポジトリのURLをコピーする
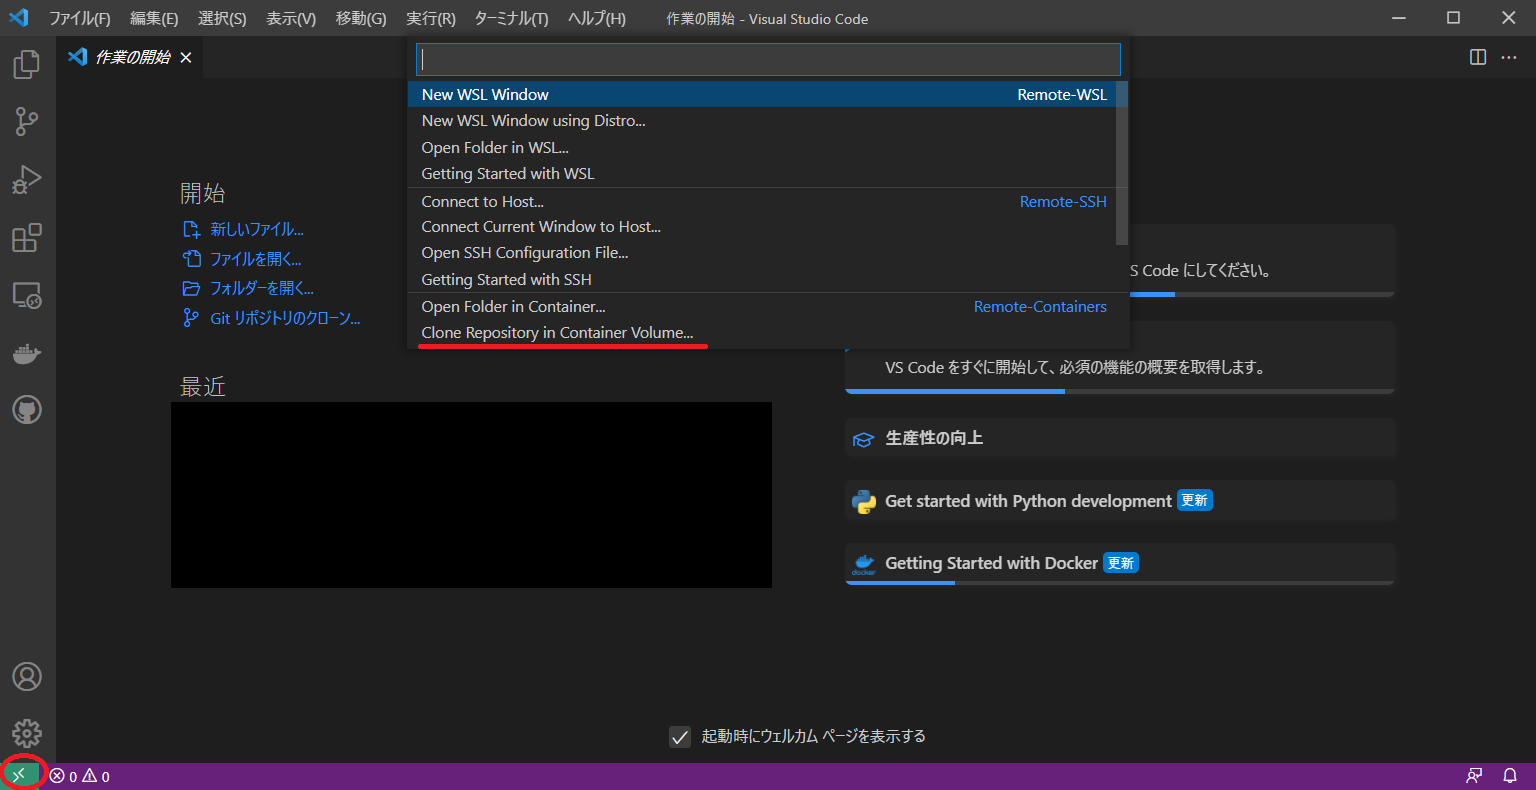
3、VSCodeの左下「><」マークをクリック後、「Clone Repository in Container Volume(Remote-Containers)」を選択
4、GitHubリポジトリのURLを入力してGitHubとVSCodeを紐づける

5、「Select a container configuration definition」の表示が出てコンテナの種類を求められるので、「Ubuntu」を選択
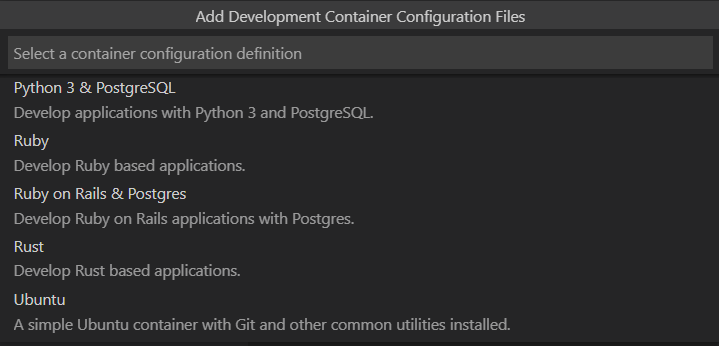
コンテナの設定
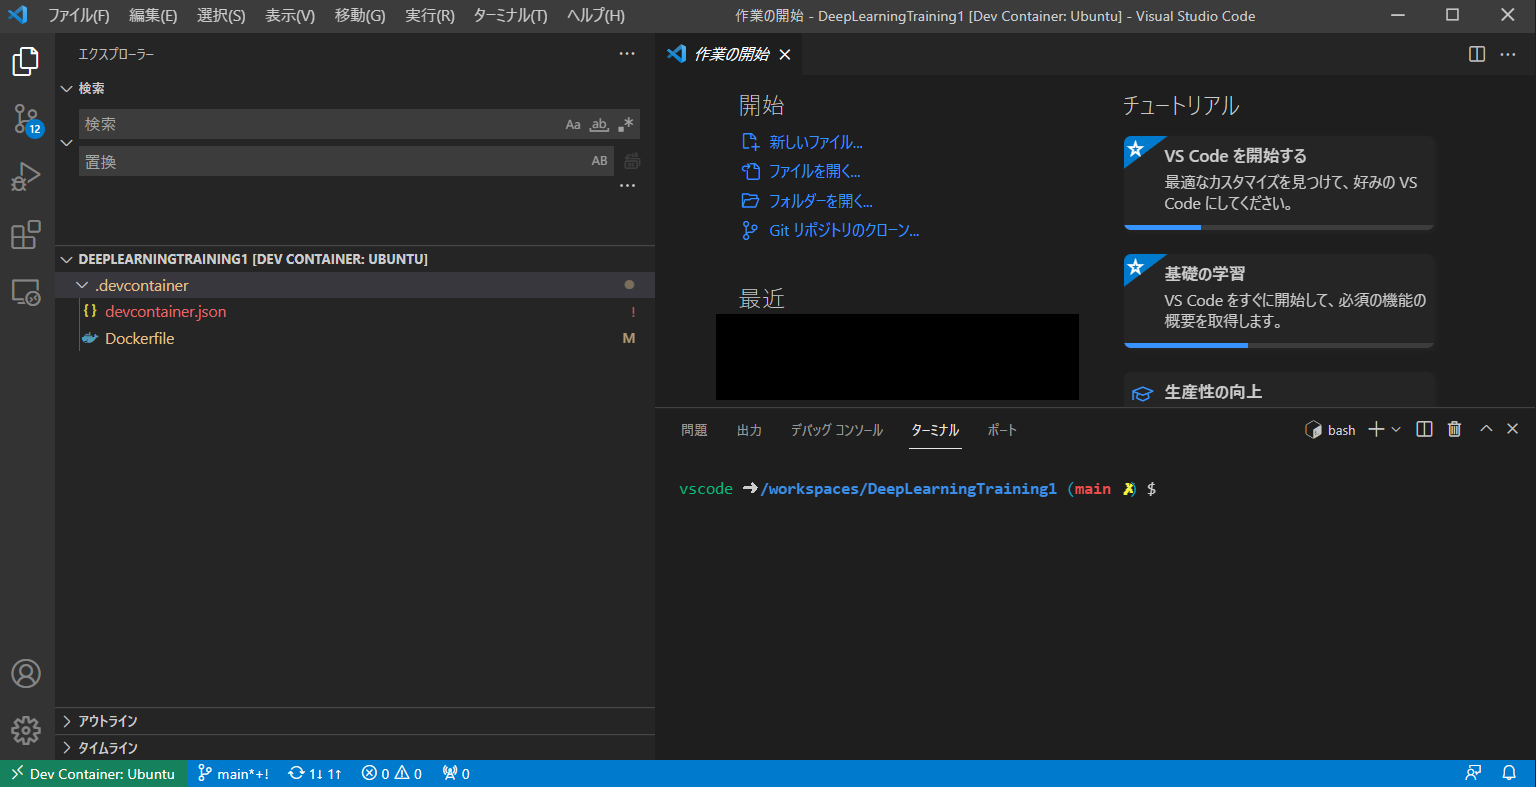
上記の方法でコンテナイメージを作成したときは、以下のようなディレクトリ構成が出来ています。
この他に必要なファイルを新たに追加・編集していきます。
/workspaces/<repo-name>
├── .devcontainer
│   ├── devcontainer.json
│   └── Dockerfile
├── .git
└── README.md
1、Dockerfileの編集
Dockerfileとは…
自分の好きなようにカスタマイズしたコンテナイメージを作成するためのファイルです。
通常、コンテナイメージを作成する際はdocker container runコマンドなど各種コマンドを実行する必要があります。
ですが、あらかじめDockerfileにその内容を記述することで、必要なコマンドを起動時に自動で実行することができます。
今回は下記の通り、Dockerfileの#[optional] Uncomment this section ~のRUNコマンドを変更します。
apt-getでインストールするものに、python3-pipを追加します。
これでPythonのパッケージインストーラpipを起動時に自動でインストールすることができます。

# See here for image contents: https://github.com/microsoft/vscode-dev-containers/tree/v0.205.2/containers/ubuntu/.devcontainer/base.Dockerfile

# [Choice] Ubuntu version (use hirsuite or bionic on local arm64/Apple Silicon): hirsute, focal, bionic
ARG VARIANT="focal"
FROM mcr.microsoft.com/vscode/devcontainers/base:0-${VARIANT}

# [Optional] Uncomment this section to install additional OS packages.
RUN apt-get update && export DEBIAN_FRONTEND=noninteractive \
    && apt-get -y install --no-install-recommends \
    python3-pip
2、requirements.txt の作成
requirements.txtとは...
Pythonのパッケージ管理に使うファイルです。
このファイルにパッケージ情報を記載し、後述のdevcontainer.json内にて「pip3 install -r requirements.txt」を実行するコードを記載しておくことで、必要なパッケージをコンテナ起動時に自動でインストールすることができます。
また、パッケージのバージョンを指定することで、他のユーザーとの開発環境の共有を行うことができます。
今回は下記の通り記載しておりますので、必要に応じて適宜ご変更ください。
| パッケージ | 説明 |
|---|---|
| autopep8 | コードの自動整形 |
| flake8 | コードチェック |
| mccabe | コードチェック |
| pylint | コードチェック |
| mypy | コードチェック |
| numpy | 行列演算・数値計算 |
| matplotlib | グラフ描画 |
| jupyterlab | JupyterNotebook |
autopep8==1.6.0
flake8==4.0.1
mccabe==0.6.1
pylint==2.12.2
mypy==0.910
numpy==1.19.4
matplotlib==3.5.0
jupyterlab==3.2.4
3、devcontainer.jsonの編集
devcontainer.jsonとは…
自分の好きなようにカスタマイズしたコンテナ独自のVSCodeの設定や拡張機能、コンテナ作成後に実行したいコマンドなどを記載するファイルです。
この中に記載することで、コンテナを作成したときに記載された設定が自動的に反映されます。
記載する部分の説明は以下の通りです。
"settings"
VSCodeの設定を記載します。
    "terminal.integrated.shell.linux": ターミナルで起動するシェルを記載
    "editor.formatOnSave":true でファイル保存時に自動でフォーマットする
    "python.languageServer":VSCodeのIntelliSense機能(コード補完)のためのサーバ
    "python.pythonPath": Pythonインタプリタのパス
    "python.linting.flake8Args": flake8の引数
    "python.formatting.provider":Pythonのフォーマッタを指定
    "python.formatting.autopep8Args":autopep8の設定
"extensions"
VSCodeの拡張機能を記載します。
    "visualstudioexptteam.vscodeintellicode":コード補完の自動提示
    "donjayamanne.git-extension-pack":Gitバージョン管理用
    "ms-python.python":Python拡張用
    "ms-python.vscode-pylance":Pythonコードチェック用
    "coenraads.bracket-pair-colorizer-2":括弧のカラーリング機能
    "shardulm94.trailing-spaces":余分なスペースをハイライトする機能
    "ms-ceintl.vscode-language-pack-ja":VSCodeの日本語化機能
なお、VSCodeには他にも便利な拡張機能があり、弊社社員が紹介しておりますのでこちらもぜひご覧ください!!
@YomamaBanana(株式会社エイアイ・フィールド)「【VSCode】知っておきたいExtenstions(拡張機能)7選」
https://qiita.com/YomamaBanana/items/8a613eca2b3d93957c50
"postCreateCommand"
コンテナ作成後に実行されるコマンドを記載します。
先ほどrequirements.txtにて記載したパッケージを自動でインストールするために、
「pip3 install -r requirements.txt」をこちらに記載します。
以上の内容を踏まえ、今回は下記の通り記載しておりますので必要に応じて適宜ご変更ください。
// For format details, see https://aka.ms/devcontainer.json. For config options, see the README at:
// https://github.com/microsoft/vscode-dev-containers/tree/v0.205.2/containers/python-3
{
	"name": "Ubuntu",
	"build": {
		"dockerfile": "Dockerfile",
		// Update 'VARIANT' to pick an Ubuntu version: focal, bionic
		"args": {
			"VARIANT": "focal"
		}
	},
	// Set *default* container specific settings.json values on container create.
	"settings": {
		"terminal.integrated.shell.linux": "/bin/bash",
		"editor.formatOnSave": true,
		"python.languageServer": "Pylance",
		"python.pythonPath": "/usr/bin/python3",
		"python.linting.flake8Args": [
			"--max-line-length", // 1 行あたりの文字数を 110 に設定
			"110"
		],
		"python.formatting.provider": "autopep8",
		"python.formatting.autopep8Args": [
			"--max-line-length", // 1 行あたりの文字数を 110 に設定
			"110"
		],
	},
	// Add the IDs of extensions you want installed when the container is created.
	"extensions": [
		"visualstudioexptteam.vscodeintellicode",
		"donjayamanne.git-extension-pack",
		"ms-python.python",
		"ms-python.vscode-pylance",
		"coenraads.bracket-pair-colorizer-2",
		"shardulm94.trailing-spaces",
		"ms-ceintl.vscode-language-pack-ja"
	],
	// Use 'forwardPorts' to make a list of ports inside the container available locally.
	// "forwardPorts": [],
	// Use 'postCreateCommand' to run commands after the container is created.
	"postCreateCommand": "pip3 install -r requirements.txt",
	// Comment out connect as root instead. More info: https://aka.ms/vscode-remote/containers/non-root.
	// "remoteUser": "vscode"
}
4、.gitignoreファイルの作成
.gitignoreファイルとは...
gitignoreはGitで使われる特殊なファイル名で、このファイルに書かれたファイルは上から順に処理されて、Gitのトラッキングの対象外になります。 Gitのトラッキングの対象外になるということは、Gitで管理していたディレクトリの中にあっても無視されるということです。
まず、リポジトリのディレクトリ内でターミナルを開き、touch.gitignoreを実行して空のファイルを作成します。
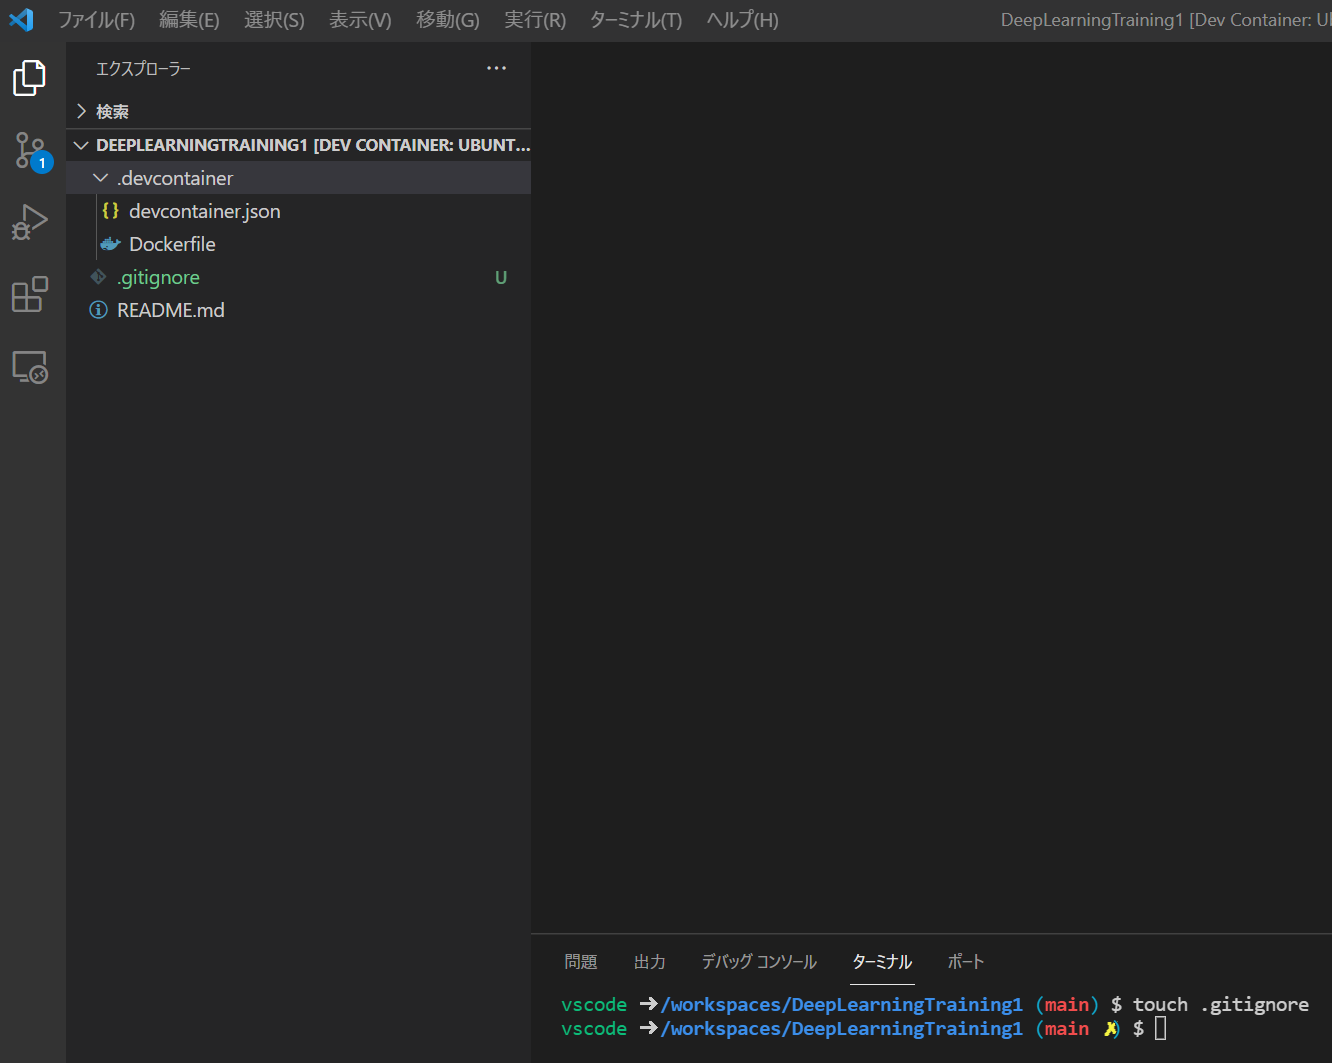
次に、下記サイトを開き、サイト上でVisualStudioCode、Pythonを入力してCreateをクリックします。
gitignore.io (https://www.toptal.com/developers/gitignore)
表示された内容を全て、先ほど作成した.gitignoreファイルにコピーして作成完了です。
コンテナのリビルド
上記のコンテナ設定が完了したら、設定を反映するためコンテナをリビルド(再作成)します。
左下緑色のUbuntuをクリックし、Rebuild Container(Remote-Containers)をクリックします。
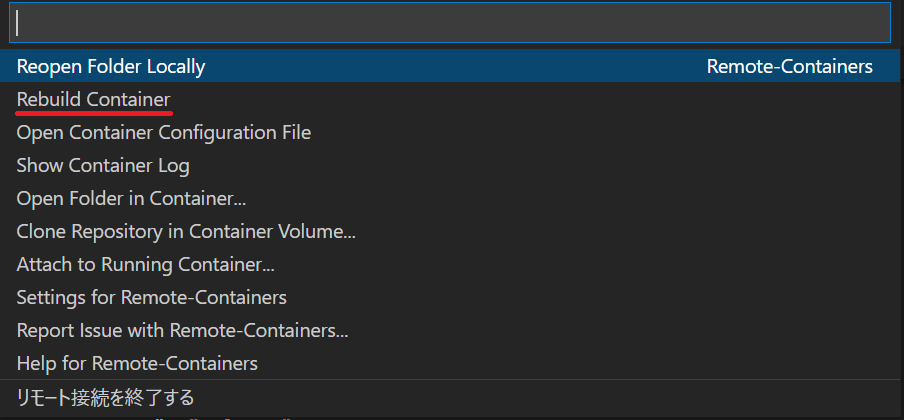
その後ターミナル上でコンテナのリビルド状況が表示され、しばらくするとリビルドが完了します。
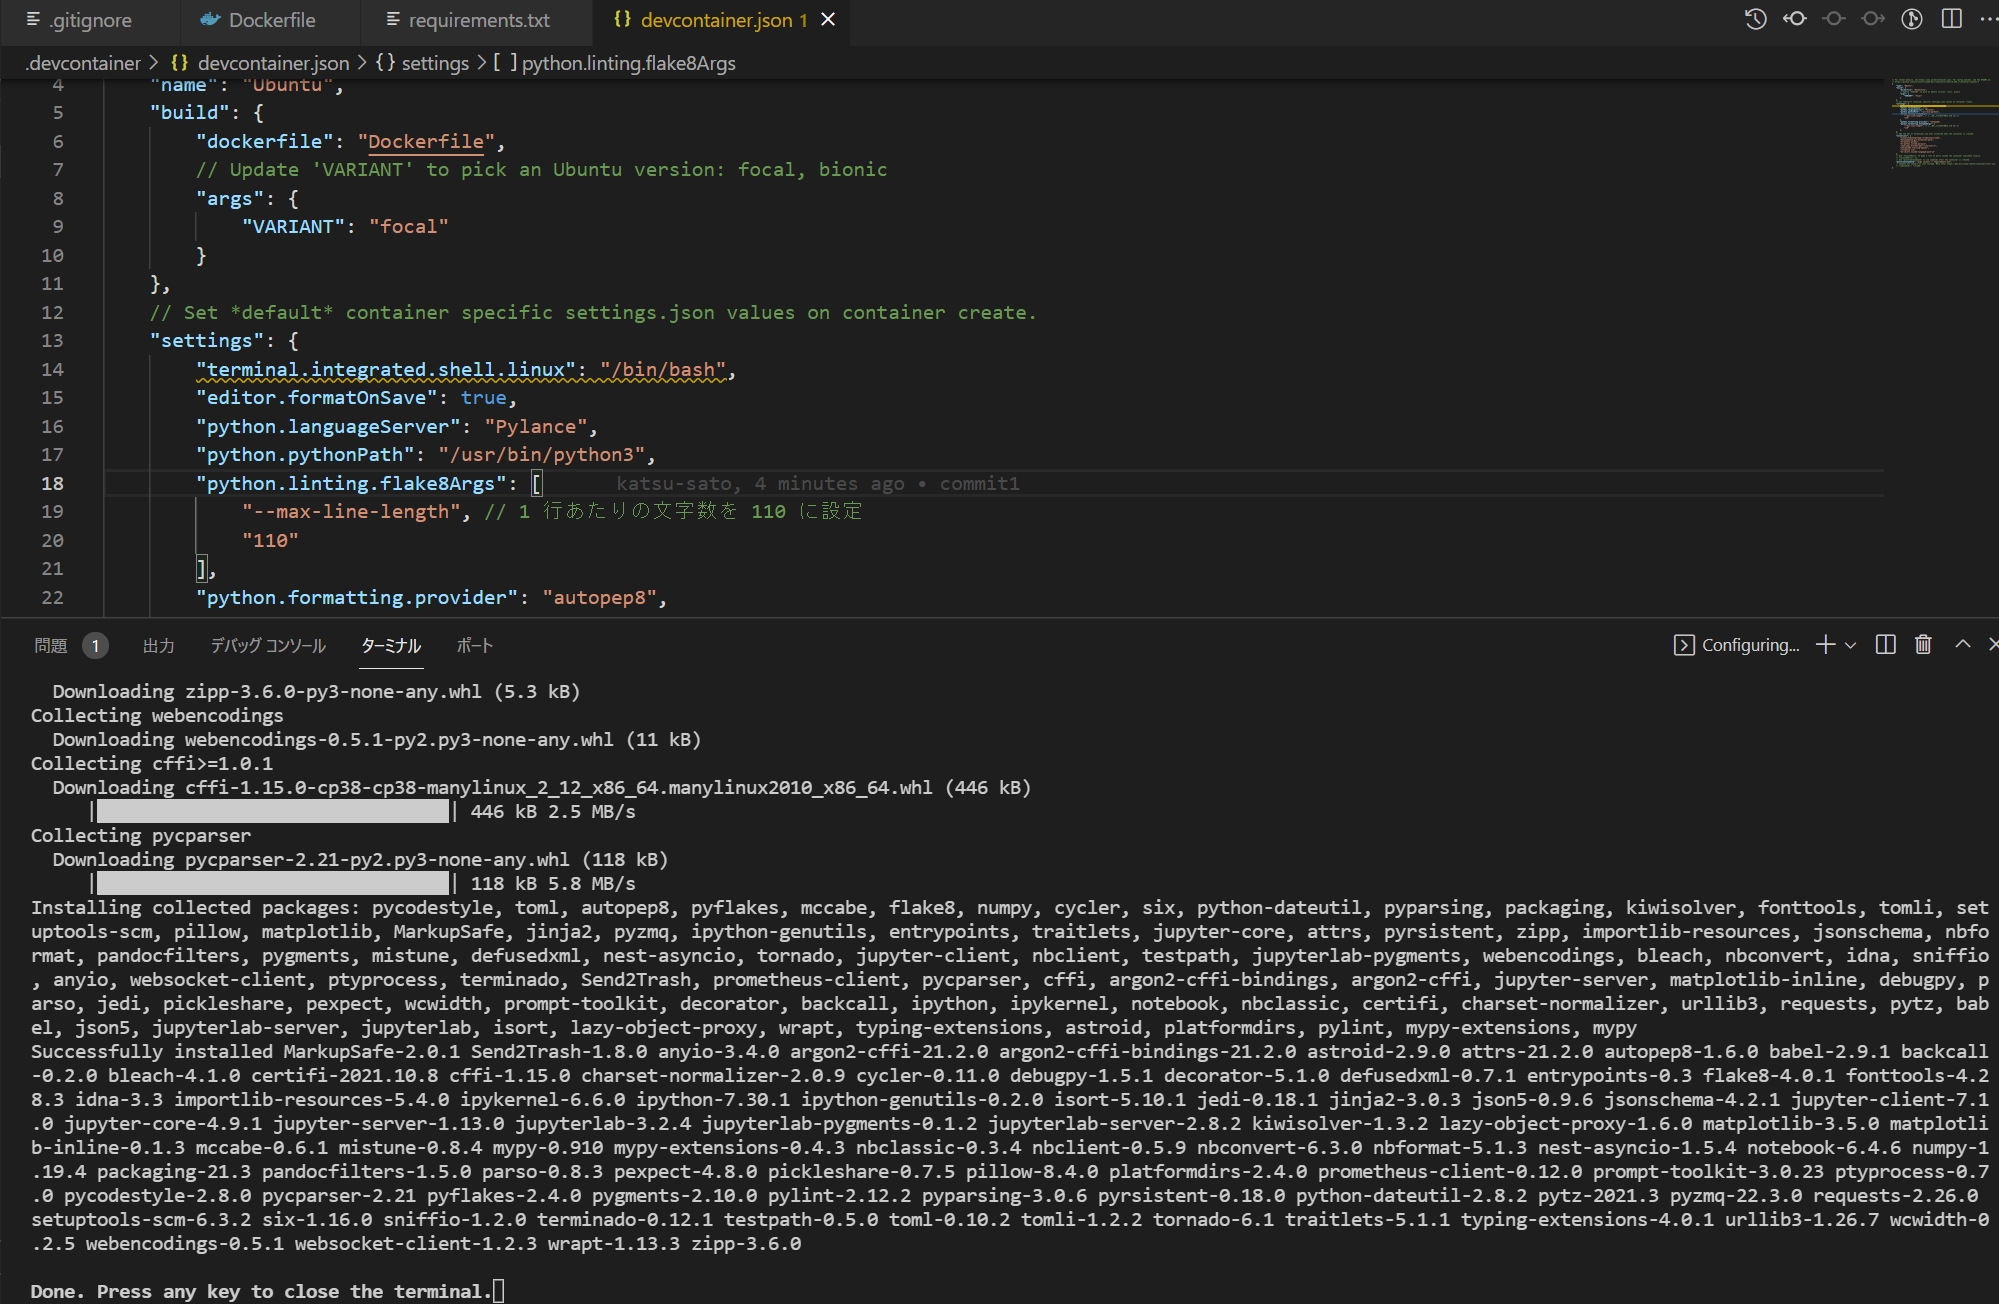
これで、Docker + VSCodeでPythonの環境構築ができました。
JupyterNotebookの使用
最後にVSCode上でJupyterNotebookを使用します。
VSCode上で使用すれば、各種VSCodeの拡張機能が使えるようになりコードの入力などが楽になります。
使用方法は簡単で、リポジトリ内で「ノート名.ipynb」と指定することでJupyterNotebookを作成することができます。
JupyterNotebookのコマンドも問題なく使用できます。

GitHubへの反映(Push/Pull)
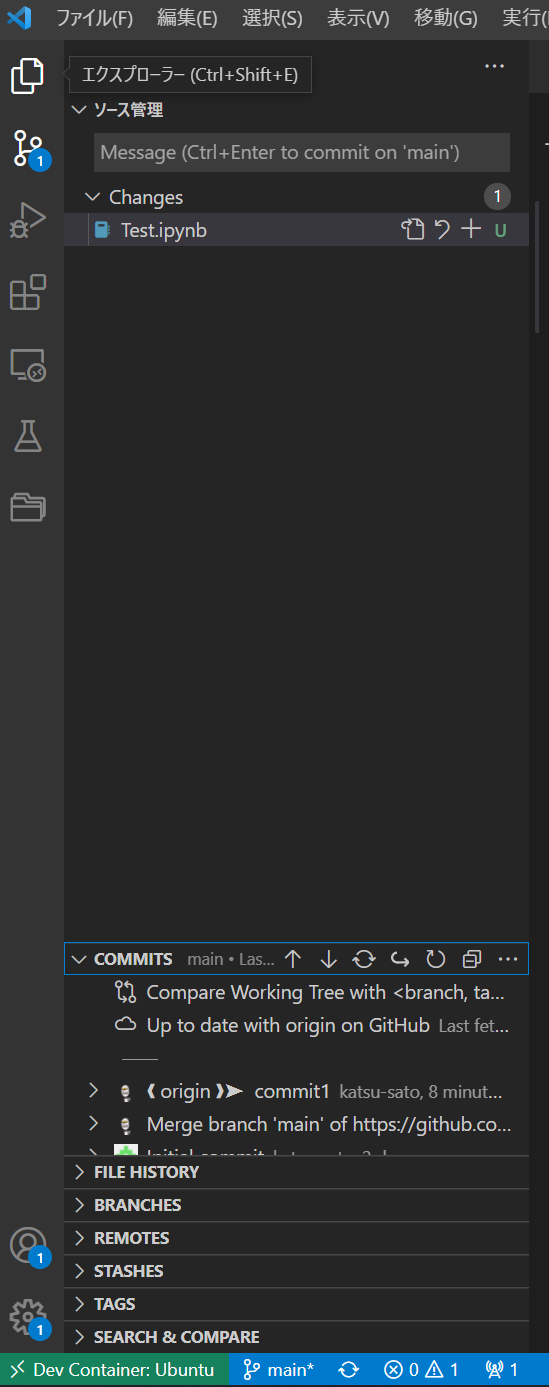
変更内容のGitHubへの反映は、左メニュー内の「Source Control」(Ctrl + Shift + G)で行えます。
「↑」はPush、「↓」はPullを実行します。
参考記事
・はやぶさの技術ノート様:「WSL2とDockerとVSCodeのRemote Containersで最高の開発環境をつくる」
https://cpp-learning.com/wsl2-docker-vscode/#Visual_Studio_Code
・banaTECH様:「WSL2とDockerの導入」
https://banatech.net/blog/view/42
・penpenメモ様:「【図解】VScodeのRemote Container拡張機能とは?わかりやすく」
https://penpen-dev.com/blog/vscode-remote-container-toha/
・@etaroid(株式会社KOSKA)様:「【図解】Dockerの全体像を理解する -前編-」
https://qiita.com/etaroid/items/b1024c7d200a75b992fc
・@EBIHARA_kenji様:「WSL2 + VSCode + Docker 開発環境」
https://qiita.com/EBIHARA_kenji/items/12c7a452429d79006450
・@espe0n様:「WSL2 + Docker + VSCode で C++ と Python の実行環境を作る」
https://qiita.com/espe0n/items/dc3905437748b7008a60?utm_campaign=popular_items&utm_medium=feed&utm_source=popular_items
・@sugurutakahashi12345様:「Dockerfile と docker-compose を利用すると何がうれしいのか?」
https://qiita.com/sugurutakahashi12345/items/0b1ceb92c9240aacca02
