Cisco Intersightとは?
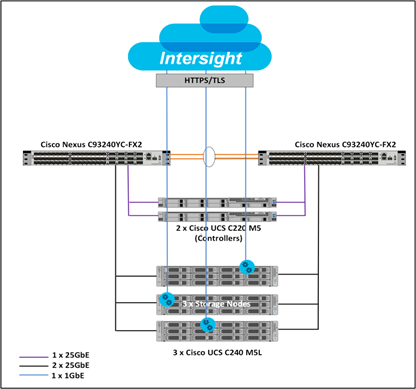
Cisco Intersight(SaaSによる提供)サーバ・ストレージなどのハードウェアの一元管理を行うことができる。拠点に散らばったサーバをどこからでも管理できるので、容易にサーバ管理可能。イメージとしては下記のような感じ。
一般的なIntersightをサーバ自動化を行うメリットは以下の通り。その他、仮想インフラの最適化、Kubernetesの管理、仮想マシンの展開の自動化やパブリッククラウド連携など様々な機能拡張を行っている。
たとえば、下記の動画の例ではオンプレミスにあるPureStorageのストレージ作成の自動化をIntersight経由で行い、自動的にESXに作成したデバイスをマッピングしております。このように、SaaS経由でオンプレミスの自動化の促進をする機能を提供している。

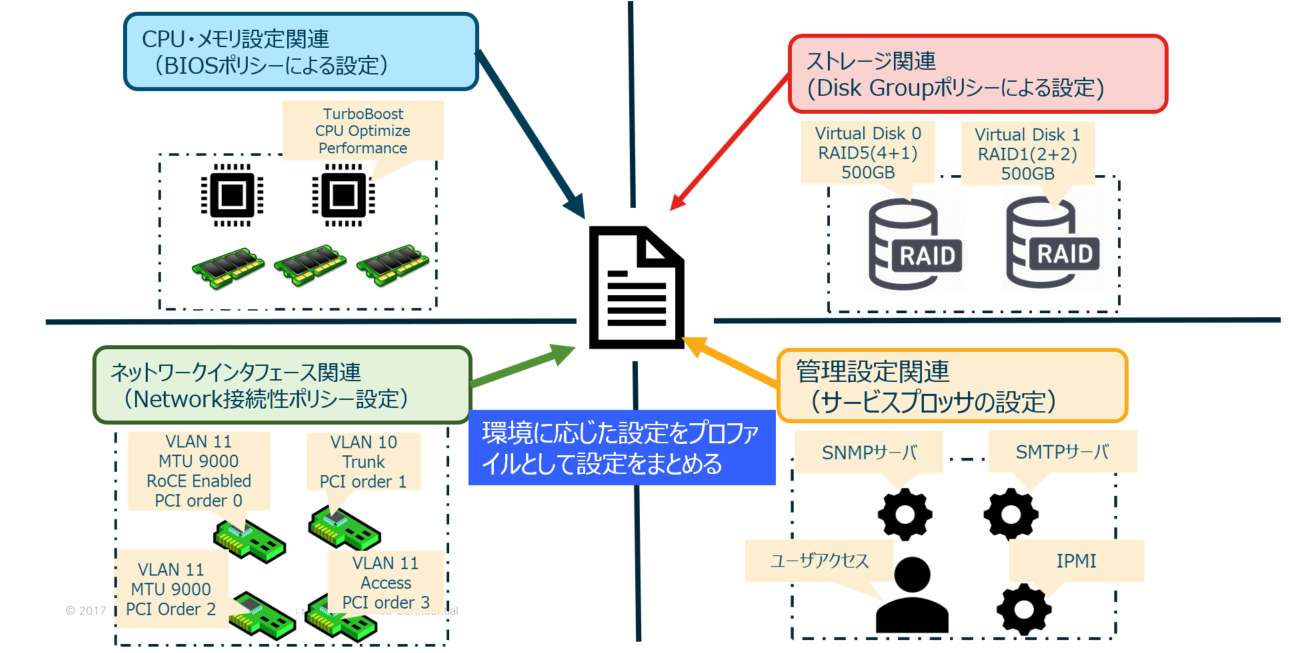
Cisco UCS(シスコ社サーバ製品)に特有に機能ではあるが、ポリシーを用いてサーバ構築を自動化することができる。一般的には、CPUやメモリに特化したBIOS設定、ネットワークインタフェースに関する環境設定、ストレージボリュームに特化した設定など、サーバ管理者が独自で設定を進める必要があり、自動化するのが難しい。あらかじめ指定されたポリシーに従ってサーバハードウェア設定を自動化することがこのServer Profileを利用するメリット。
IntersightとAnsible連携
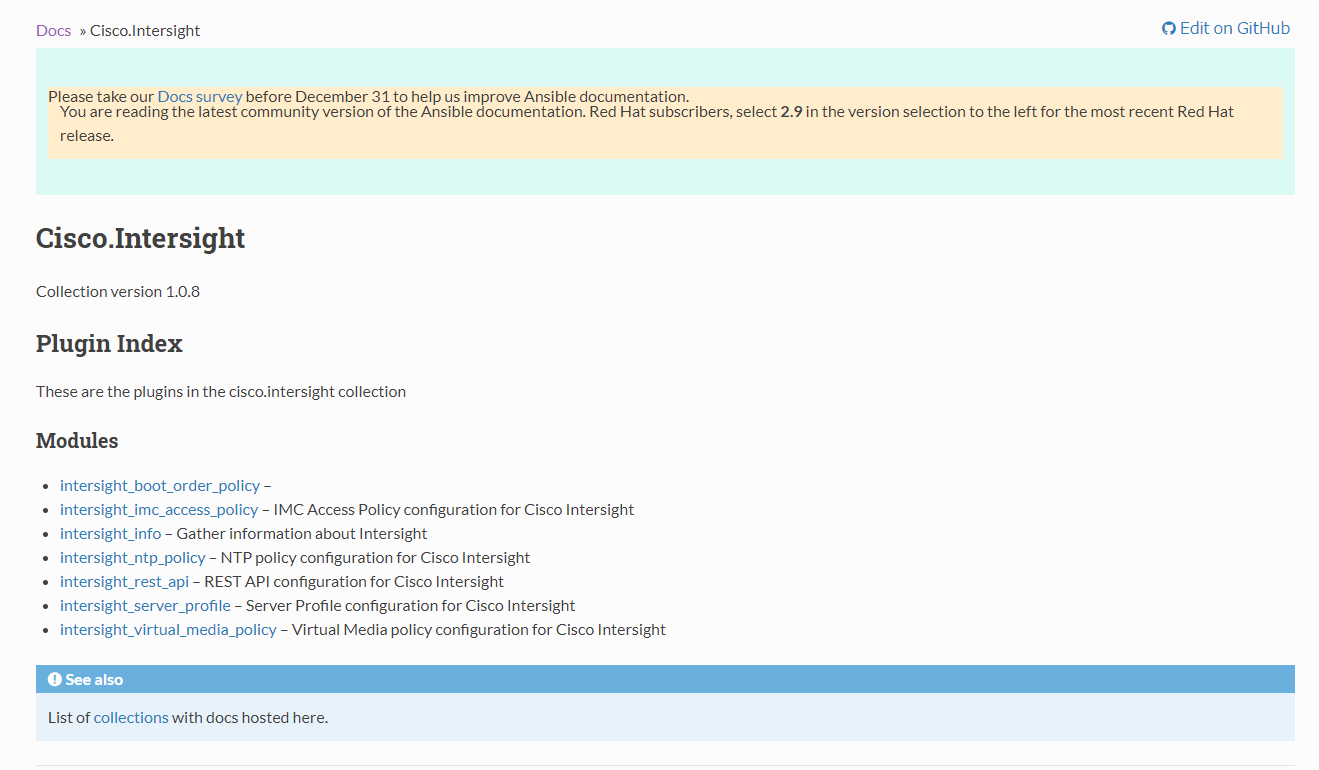
Ansibleの公式ページにIntersight Ansibleモジュールに掲載があり、Ansible 2.10以降を利用することで特にモジュール等のインストールをせずに利用することができます。
Cisco IntersightとAnsibleを連携するメリット
Cisco Intersightのオペレーションを他のAnsibleモジュールと併用して、自動化のプロセスを進めることができる。サーバ台数が多くなるにつれて自動化をすることで人件費やオペレーションミスを防ぐことが可能。IntersightはSaaSにて提供されるため、どこの端末からでもAnsibleを利用することで自動化可能。
Cisco Intersight Ansibleモジュール確認
Ansibleの公式ドキュメントに記載がある通り、現在のansibleの最新リリースをインストールするとIntersightのモジュールが利用できるようになっている。
# ansible --version
ansible 2.10.3
  config file = /root/ansible_practice/ansible.cfg
  configured module search path = ['/root/.ansible/plugins/modules', '/usr/share/ansible/plugins/modules']
  ansible python module location = /root/my_env/lib/python3.6/site-packages/ansible
  executable location = /root/my_env/bin/ansible
  python version = 3.6.8 (default, Apr  2 2020, 13:34:55) [GCC 4.8.5 20150623 (Red Hat 4.8.5-39)]
# ansible-doc -l | grep intersight
(省略)
cisco.intersight.intersight_boot_order_policy                                  Boot Order policy configuration for Cisco Inters...
cisco.intersight.intersight_imc_access_policy                                  IMC Access Policy configuration for Cisco Inters...
cisco.intersight.intersight_info                                               Gather information about Inters...
cisco.intersight.intersight_local_user_policy                                  Local User Policy configuration for Cisco Inters...
cisco.intersight.intersight_ntp_policy                                         NTP policy configuration for Cisco Inters...
cisco.intersight.intersight_rest_api                                           REST API configuration for Cisco Inters...
cisco.intersight.intersight_server_profile                                     Server Profile configuration for Cisco Inters...
cisco.intersight.intersight_virtual_media_policy
Interisght Ansible playbookのサンプルの取得
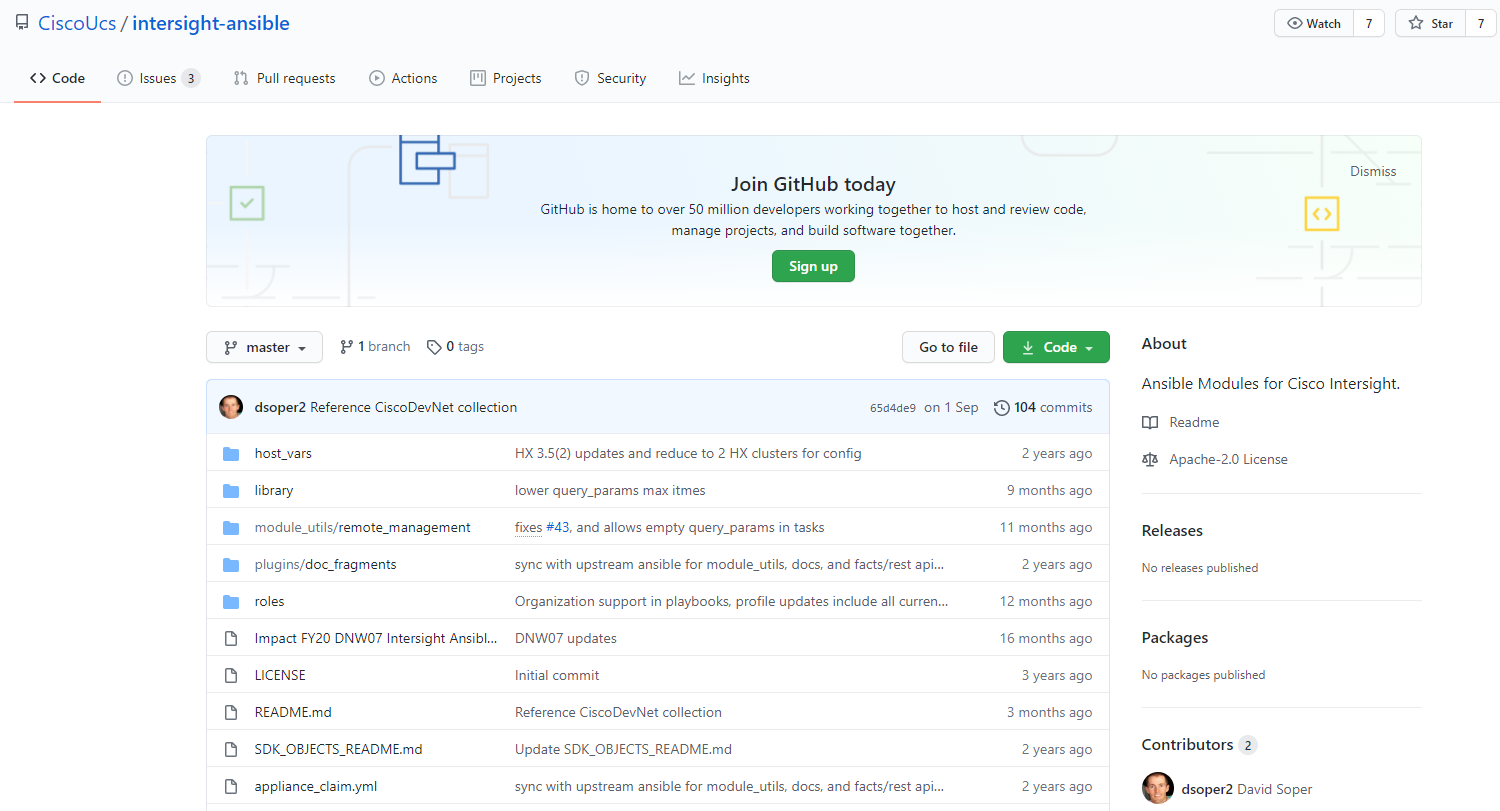
Intersight Ansibleモジュールを使用して、Ansibleによって、サーバ情報を取得したいと思う。下記の通りgithubにあるサンプルの利用方法を解説する。
STEP1. API Keyの発行
こちらのAPI key発行は実際にIntersightにアクセスしてキーの発行する必要がある。
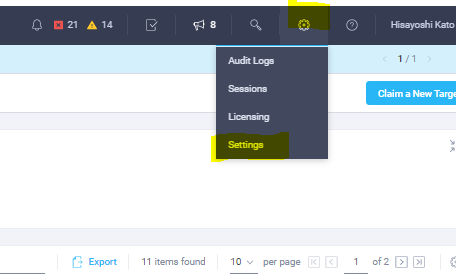
1. 設定
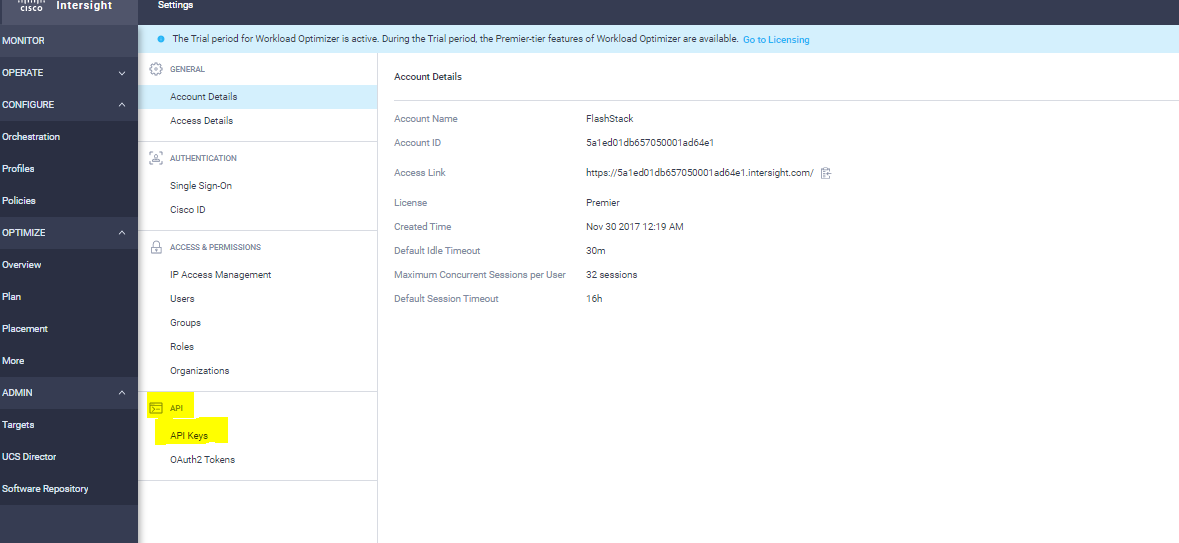
2. APIキー選択
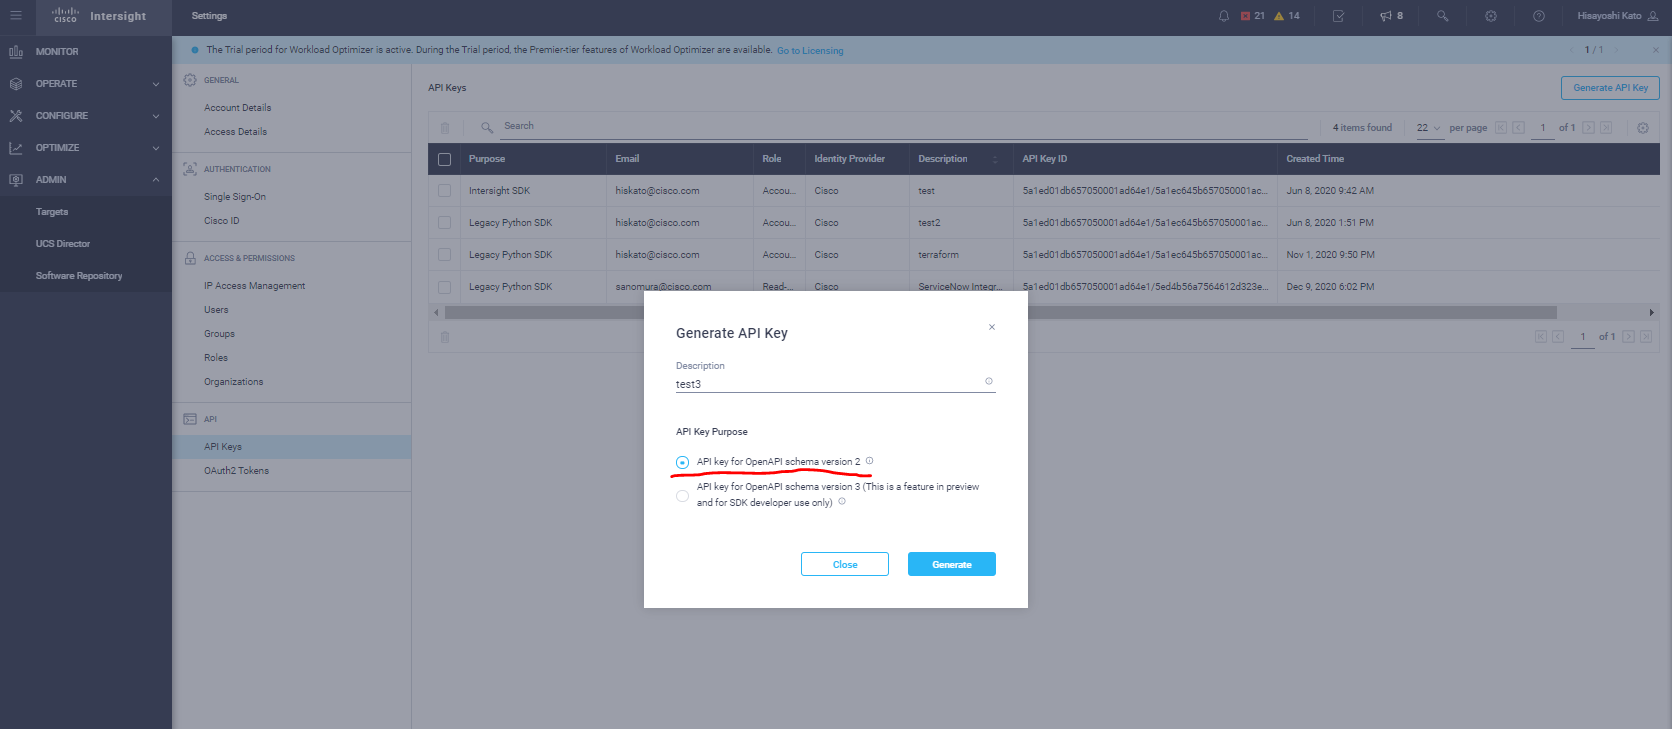
3. Generate Key
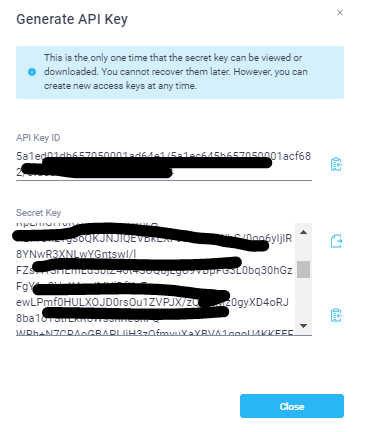
4. キーファイルの取得
STEP2. Inventoryファイルの更新
Inventoryファイルはupdate_all_inventory.ymlファイルにて、Intersightを通じて自動的にアップデートを行ってくれる。ただし、API用のキーなどはSTEP1で実行したキーを指定。
- hosts: "{{ group | default('Intersight') }}"
  connection: local
  gather_facts: false
  vars:
    # api_info用のAnchor
    api_info: &api_info
      api_private_key: "{{ api_private_key }}"
      api_key_id: "{{ api_key_id }}"
      api_uri: "{{ api_uri | default(omit) }}"
      validate_certs: "{{ validate_certs | default(omit) }}"
      state: "{{ state | default(omit) }}"
    # Change filepath if you want to update a different inventory file
    filepath: "{{ inventory_file }}"
    # Change host_group if you want to use another group name for your servers in the created inventory
    host_group: Intersight_Servers
  tasks:
    # Enclose tasks in a block that is only run once
    - block:
        # Find all servers
        - intersight_info
            <<: *api_info
            server_names:
          register: all_results
        # Place the servers in a group in the file
        - debug:
            msg: Inventory filepath "{{ filepath }}"
        - lineinfile:
            path: "{{ filepath }}"
            line: "[{{ host_group }}]"
            create: true
        # Update servers in the file
        - lineinfile:
            path: "{{ filepath }}"
            insertafter: "^\\[{{ host_group }}\\]"
            regexp: "^{{ item.Name }} serial={{ item.Serial }} "
            # Each line of the inventory has the following:
            # Name server_moid=<Moid value> model=<Model value> boot_policy=<policy from tag> | 'na'
            line: "{{ item.Name }} serial={{ item.Serial }} server_moid={{ item.Moid }} model={{ item.Model }}"
            create: true
          # Ansible and jmespath contains have type differences, so to/from_json used
          loop: "{{ all_results.intersight_servers }}"
          loop_control:
            label: "{{ item.Name }}"
          when: all_results.intersight_servers is defined
      delegate_to: localhost
      run_once: true
[Intersight_HX]
# Note: at least one host (e.g., sjc07-r13-501) must be present for update_*_inventory.yml to work

[Intersight_Servers]
C240-FCH1939V0U8 serial=FCH1939V0U8 server_moid=xxxxxxxxxx model=UCSC-C240-M4SX # update_all_inventory.ymlで自動的に値を取得してくれる。
C240-FCH1939V0R4 serial=FCH1939V0R4 server_moid=xxxxxxxxxxxxxx model=UCSC-C240-M4SX

[Intersight:children]
Intersight_Servers

[Intersight:vars]
api_private_key=/intersight-ansible/key.pem # Intersightからファイルを取得
api_key_id=xxxxxxx # Intersightから値をとってくる。
STEP3. update_all_inventory.yml実行
update_all_inventory.ymlを実行すると、自動的にinventoryファイルをアップデートしてくれる。なぜ、この作業が必要かというと、server_moidというサーバの識別子にて、サーバ情報を取得するのに、rest_apiを発行などを行うのに必要となる。
# ansible-playbook -i inventory update_all_inventory.yml

PLAY [Intersight] **************************************************************************************

TASK [intersight_info] *********************************************************************************
ok: [C240-FCH1939V0U8]

TASK [debug] *******************************************************************************************
ok: [C240-FCH1939V0U8] => {
    "msg": "Inventory filepath \"/intersight-ansible/inventory\""
}

TASK [lineinfile] **************************************************************************************
ok: [C240-FCH1939V0U8]

TASK [lineinfile] **************************************************************************************
changed: [C240-FCH1939V0U8] => (item=fi6332-1-1)
changed: [C240-FCH1939V0U8] => (item=fi6332-1-5)
changed: [C240-FCH1939V0U8] => (item=fi6332-1-4)
changed: [C240-FCH1939V0U8] => (item=fi6332-1-2)
changed: [C240-FCH1939V0U8] => (item=fi6332-1-3)
changed: [C240-FCH1939V0U8] => (item=fi6332-1-6)
ok: [C240-FCH1939V0U8] => (item=C240-FCH1939V0R4)
ok: [C240-FCH1939V0U8] => (item=C240-FCH1939V0U8)

PLAY RECAP *********************************************************************************************
C240-FCH1939V0U8           : ok=4    changed=1    unreachable=0    failed=0    skipped=0    rescued=0    ignored=0
サンプルplaybook実行 - サーバ情報取得
サンプルplaybookの中にget_server_details.ymlというplaybookが含まれている。このplaybookはサーバから必要な情報をjson形式で値を引っ張ってくることができます。
---
#   e.g., ansible-playbook server_profiles.yml -e group=TME_Demo
#
- hosts: "{{ group | default('Intersight_Servers') }}"
  connection: local
  gather_facts: false
  vars:
    # Create an anchor for api_info that can be used throughout the file
    api_info: &api_info
      api_private_key: "{{ api_private_key }}"
      api_key_id: "{{ api_key_id }}"
      api_uri: "{{ api_uri | default(omit) }}"
      validate_certs: "{{ validate_certs | default(omit) }}"
      state: "{{ state | default(omit) }}"
  tasks:
    - intersight_rest_api:
        <<: *api_info
        resource_path: "{{ item }}"
        query_params:
          $filter: "Ancestors.Moid eq '{{ server_moid }}'"
        # Return the full API Results list
        return_list: true
      register: inventory
      loop:
        - /memory/Units
        - /network/Elements
        - /storage/Controllers
        - /storage/PhysicalDisks
        - /processor/Units
      delegate_to: localhost

    # Create a <server_name>_inventory.json file in the local directoy
    - local_action: copy content={{ inventory.results }} dest=json/{{ inventory_hostname }}_inventory.json
# ansible-playbook -i inventory get_server_details.yml

PLAY [Intersight_Servers] ******************************************************************************

TASK [intersight_rest_api] *****************************************************************************
ok: [C240-FCH1939V0U8] => (item=/memory/Units)
ok: [C240-FCH1939V0R4] => (item=/memory/Units)
ok: [C240-FCH1939V0R4] => (item=/network/Elements)
ok: [C240-FCH1939V0U8] => (item=/network/Elements)
ok: [C240-FCH1939V0R4] => (item=/storage/Controllers)
ok: [C240-FCH1939V0U8] => (item=/storage/Controllers)
ok: [C240-FCH1939V0R4] => (item=/storage/PhysicalDisks)
ok: [C240-FCH1939V0U8] => (item=/storage/PhysicalDisks)
ok: [C240-FCH1939V0R4] => (item=/processor/Units)
ok: [C240-FCH1939V0U8] => (item=/processor/Units)

TASK [copy] ********************************************************************************************
changed: [C240-FCH1939V0U8]
changed: [C240-FCH1939V0R4]

PLAY RECAP *********************************************************************************************
C240-FCH1939V0R4           : ok=2    changed=1    unreachable=0    failed=0    skipped=0    rescued=0    ignored=0
C240-FCH1939V0U8           : ok=2    changed=1    unreachable=0    failed=0    skipped=0    rescued=0    ignored=0

# ls
claim_device.yml  dl.pem                  inventory  key.pem
devnet            get_server_details.yml  json       update_all_inventory.yml
# cd json
# ls
C240-FCH1939V0R4_inventory.json  C240-FCH1939V0U8_inventory.json
# #json形式でファイルが出力。
# cat C240-FCH1939V0R4_inventory.json | jq
[
  {
    "changed": false,
    "api_response": [
      {
        "AccountMoid": "5a1ed01db657050001ad64e1",
        "Ancestors": [
          {
            "ClassId": "mo.MoRef",
            "Moid": "5f4060986176752d31f10091",
            "ObjectType": "compute.Board",
            "link": "https://www.intersight.com/api/v1/compute/Boards/5f4060986176752d31f10091"
          },
          {
            "ClassId": "mo.MoRef",
            "Moid": "5f4060986176752d31f0ffea",
            "ObjectType": "compute.RackUnit",
            "link": "https://www.intersight.com/api/v1/compute/RackUnits/5f4060986176752d31f0ffea"
          }
        ],
        "Architecture": "Xeon",
        "ClassId": "processor.Unit",
        "ComputeBlade": null,
        "ComputeBoard": {
          "ClassId": "mo.MoRef",
          "Moid": "5f4060986176752d31f10091",
          "ObjectType": "compute.Board",
...(省略)
さいごに
Intersightを触ったことない方、もしくは、開発者向けにsanboxが提供されている。
下記のURLからアクセスできるので、UCSサーバやIntersightをこれから利用しようとされる方は是非Ansible連携を試していただきたいと思う。
参考情報
- Ansible公式ドキュメント
- Cisco UCS intersight-ansible GitHub
- DevNet SandBox
