いろんな画面遷移
MAUIプロジェクト作成時の初期アプリをいじって、単純な画面遷移を試します。
開発環境
- Win11
- VS2022 Preview Version 17.3.0 Preview 2.0
環境構築&プロジェクト作成の流れはこちらの記事でどうぞ。
画面遷移のやり方
- Shell.Current.GoToAsync (Shell利用時の単純なページ移動)
- TabBar / Tab デザイン
- Flyout デザイン
- NavigationPage
1. Shell.Current.GoToAsync()
SHellで画面を移動するには、Shell.Current.GoToAsync()を呼び出します。
移動するためのContentPageを作る
初期画面(MainPage)と、移動する画面(SubPage)を作ります。
MainPage
MainPage.xaml
<?xml version="1.0" encoding="utf-8" ?>
<ContentPage xmlns="http://schemas.microsoft.com/dotnet/2021/maui"
             xmlns:x="http://schemas.microsoft.com/winfx/2009/xaml"
             x:Class="MauiAppDemo.MainPage">
    <ScrollView>
        <VerticalStackLayout
            VerticalOptions="Center">

            <Button
                Text="Go to Sub"
                HorizontalOptions="Center" Clicked="OnClicked" />

        </VerticalStackLayout>
    </ScrollView>
</ContentPage>
MainPage.xaml.cs
namespace MauiAppDemo;

public partial class MainPage : ContentPage
{

  public MainPage()
  {
    InitializeComponent();
  }

  private async void OnClicked(object sender, EventArgs e)
  {
    // サブページへ移動
    await Shell.Current.GoToAsync("//SubPage");
    }
}
SubPage
SubPage.xaml
<?xml version="1.0" encoding="utf-8" ?>
<ContentPage xmlns="http://schemas.microsoft.com/dotnet/2021/maui"
             xmlns:x="http://schemas.microsoft.com/winfx/2009/xaml"
             x:Class="MauiAppDemo.SubPage">
    <ScrollView>
        <VerticalStackLayout
            VerticalOptions="Center">

            <Button
                Text="Back To Main"
                HorizontalOptions="Center" Clicked="OnClicked" />

        </VerticalStackLayout>
    </ScrollView>
</ContentPage>
SubPage.xaml.cs
namespace MauiAppDemo;

public partial class SubPage : ContentPage
{

  public SubPage()
  {
    InitializeComponent();
  }

    private async void OnClicked(object sender, EventArgs e)
    {
        // メインページへ移動
        await Shell.Current.GoToAsync("//MainPage");
    }
}
ShellにShellContentを定義する
MainPageとSubPageを、Shellに定義する。
一番上に定義したページが最初に表示されます。
ロジック側から、特定のページに遷移するために、Route属性を定義します。
AppShell.xaml
<?xml version="1.0" encoding="UTF-8" ?>
<Shell
    x:Class="MauiAppDemo.AppShell"
    xmlns="http://schemas.microsoft.com/dotnet/2021/maui"
    xmlns:x="http://schemas.microsoft.com/winfx/2009/xaml"
    xmlns:local="clr-namespace:MauiAppDemo"
    Shell.FlyoutBehavior="Disabled">

    <ShellContent
        Title="Main"
        ContentTemplate="{DataTemplate local:MainPage}"
        Route="MainPage" />

    <ShellContent
        Title="Sub"
        ContentTemplate="{DataTemplate local:SubPage}"
        Route="SubPage" />
</Shell>
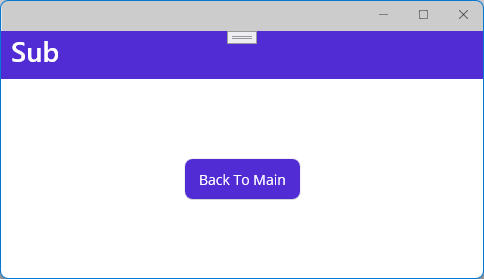
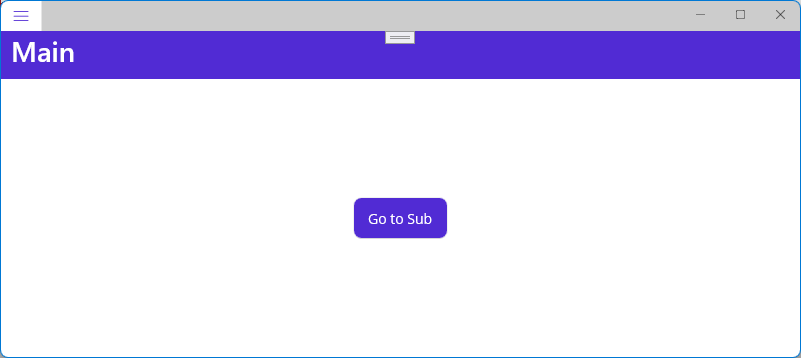
動作確認
初期状態で、MainPageが表示されます。
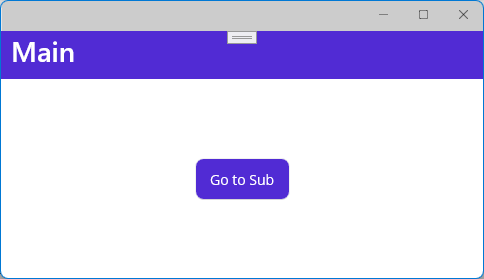
[Go to Sub]ボタンをクリックすると、SubPageに移動します。
2. TabBar / Tab
タブを利用した画面遷移
AppShell.xamlを編集する
AppShell.xaml
<?xml version="1.0" encoding="UTF-8" ?>
<Shell
    x:Class="MauiAppDemo.AppShell"
    xmlns="http://schemas.microsoft.com/dotnet/2021/maui"
    xmlns:x="http://schemas.microsoft.com/winfx/2009/xaml"
    xmlns:local="clr-namespace:MauiAppDemo"
    Shell.FlyoutBehavior="Disabled">

    <TabBar Title="">
        <Tab Title="MainTab" Route="MainTab">
            <ShellContent
                Title="Main"
                ContentTemplate="{DataTemplate local:MainPage}"
                Route="MainPage" />
        </Tab>

        <Tab Title="SubTab" Route="SubTab">
            <ShellContent
                Title="Sub"
                ContentTemplate="{DataTemplate local:SubPage}"
                Shell.BackgroundColor="LightBlue"
                Route="SubPage" />

            <ShellContent
                Title="Sub2"
                ContentTemplate="{DataTemplate local:SubPage2}"
                Shell.BackgroundColor="LightBlue"
                Route="SubPage2" />
        </Tab>
    </TabBar>

</Shell>
ロジックから各ページへの画面遷移は、こんな感じ。
await Shell.Current.GoToAsync("//MainTab/MainPage");
await Shell.Current.GoToAsync("//SubTab/SubPage");
await Shell.Current.GoToAsync("//SubTab/SubPage2");
※ルート名が特定できるなら相対でも書けます。
await Shell.Current.GoToAsync("///MainPage");
await Shell.Current.GoToAsync("///SubPage");
await Shell.Current.GoToAsync("///SubPage2");
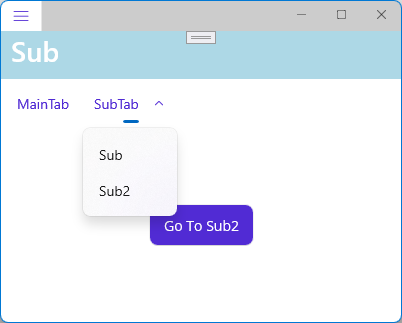
動作確認
タブメニュー(Windowsだと、メニューバーぽい)からロジックなしで移動可能です。
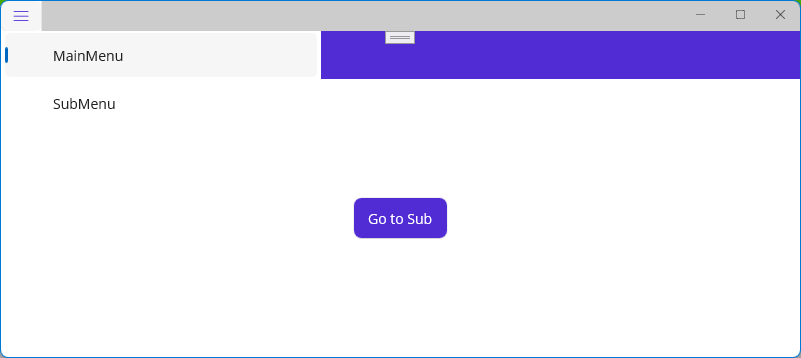
3. Flyout
Androidの画面デザインによくある、右側からスライドしてくるやつですね。
AppShell.xamlを編集する
AppShell.xaml
<?xml version="1.0" encoding="UTF-8" ?>
<Shell
    x:Class="MauiAppDemo.AppShell"
    xmlns="http://schemas.microsoft.com/dotnet/2021/maui"
    xmlns:x="http://schemas.microsoft.com/winfx/2009/xaml"
    xmlns:local="clr-namespace:MauiAppDemo"
    Shell.FlyoutBehavior="Locked">


    <FlyoutItem Title="MainMenu" Route="MainMenu">
            <ShellContent
                Title="Main"
                ContentTemplate="{DataTemplate local:MainPage}"
                Route="MainPage" />
    </FlyoutItem>

    <FlyoutItem Title="SubMenu" Route="SubMenu">
            <ShellContent
                Title="Sub"
                ContentTemplate="{DataTemplate local:SubPage}"
                Shell.BackgroundColor="LightBlue"
                Route="SubPage" />

            <ShellContent
                Title="Sub2"
                ContentTemplate="{DataTemplate local:SubPage2}"
                Shell.BackgroundColor="LightBlue"
                Route="SubPage2" />
    </FlyoutItem>

</Shell>
各ページへの画面遷移こうなります。
await Shell.Current.GoToAsync("//MainMenu/MainPage");
await Shell.Current.GoToAsync("//SubMenu/SubPage");
await Shell.Current.GoToAsync("//SubMenu/SubPage2");
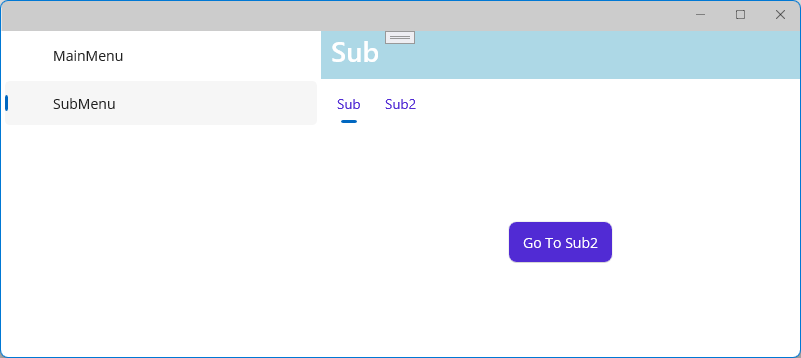
動作確認
右メニューから移動できます。
Shell.FlyoutBehaviorをFlyoutにすると開閉式になります。開閉は左上のボタンで行います。
閉じた状態
開いた状態
4. NavigationPage
ウィザード形式の画面遷移。
App.xaml.csを編集
ShellじゃなくてNavigationPageにする。
namespace MauiAppDemo;
public partial class App : Application
{
	public App()
	{
		InitializeComponent();

		//MainPage = new AppShell();
		MainPage = new NavigationPage(new MainPage(string.Empty));
	}
}
MainPage
MainPage.xaml
<?xml version="1.0" encoding="utf-8" ?>
<ContentPage xmlns="http://schemas.microsoft.com/dotnet/2021/maui"
             xmlns:x="http://schemas.microsoft.com/winfx/2009/xaml"
             x:Class="MauiAppDemo.MainPage"
             Title="{Binding Navi}">

    <ScrollView>
        <VerticalStackLayout
            Spacing="25"
            Padding="30,0"
            VerticalOptions="Center">

            <Button
                Text="push"
                Clicked="OnPush"
                HorizontalOptions="Center" />

            <Button
                Text="pop"
                Clicked="OnPop"
                HorizontalOptions="Center" />

            <Button
                Text="pop root"
                Clicked="OnPopRoot"
                HorizontalOptions="Center" />

        </VerticalStackLayout>
    </ScrollView>

</ContentPage>
MainPage.xaml.cs
namespace MauiAppDemo;

public partial class MainPage : ContentPage
{
    public string Navi { get; set; }

    public MainPage(string title)
    {
        InitializeComponent();
        this.Navi = title + "Main > ";

        this.BindingContext = this;
    }

    private void OnPush(object sender, EventArgs e)
	{
		Navigation.PushAsync(new SubPage(Navi));
    }

	private void OnPop(object sender, EventArgs e)
	{
		Navigation.PopAsync();
    }

    private void OnPopRoot(object sender, EventArgs e)
    {
        Navigation.PopToRootAsync();
    }
}
SubPage
SubPage.xaml
<?xml version="1.0" encoding="utf-8" ?>
<ContentPage xmlns="http://schemas.microsoft.com/dotnet/2021/maui"
             xmlns:x="http://schemas.microsoft.com/winfx/2009/xaml"
             x:Class="MauiAppDemo.SubPage"
             Title="{Binding Navi}">

    <ScrollView>
        <VerticalStackLayout
            Spacing="25"
            Padding="30,0"
            VerticalOptions="Center">

            <Button
                Text="push"
                Clicked="OnPush"
                HorizontalOptions="Center" />

            <Button
                Text="pop"
                Clicked="OnPop"
                HorizontalOptions="Center" />

            <Button
                Text="pop root"
                Clicked="OnPopRoot"
                HorizontalOptions="Center" />

        </VerticalStackLayout>
    </ScrollView>

</ContentPage>
SubPage.xaml.cs
namespace MauiAppDemo;

public partial class SubPage : ContentPage
{
    public string Navi { get; set; }

    public SubPage(string title)
    {
        InitializeComponent();
        this.Navi = title + "Sub > ";

        this.BindingContext = this;
    }

    private void OnPush(object sender, EventArgs e)
	{
		Navigation.PushAsync(new MainPage(Navi));
    }

	private void OnPop(object sender, EventArgs e)
	{
		Navigation.PopAsync();
    }

    private void OnPopRoot(object sender, EventArgs e)
    {
        Navigation.PopToRootAsync();
    }
}
何やっているかというと・・・
    // App.MainPageをNavigationPageにする。
    MainPage = new NavigationPage(newContentPage);

    // 次のページに移動
    Navigation.PushAsync(newContentPage);
    // 前のページに戻る
    Navigation.PopAsync();
    // 初期画面に戻る
  Navigation.PopToRootAsync();
動作確認
起動時にメイン画面が表示されます。
ルートの画面なので、popはできません。
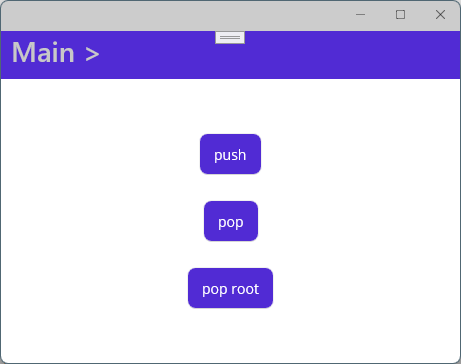
[push]ボタンをクリックします。
サブページに遷移しました。
元画面が存在するので、右上に[←]ボタンが出てきました。

さらに[push]ボタンをクリックします。
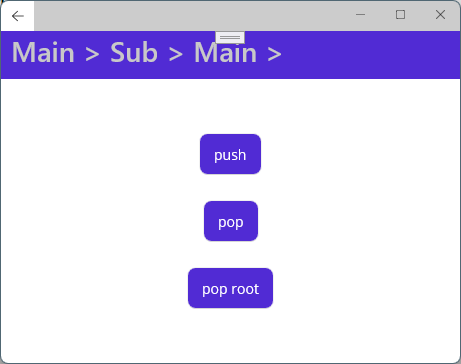
ここで、[←]ボタンか、[pop]ボタンをクリックすると、1つ前のページに戻れます。
ちなみに、[pop root]ボタンをクリックした場合は、ルートの画面に一気に戻れます。