はじめに
クラスを利用したQtWidgetの作成方法の覚書です。
クラスについて以前まとめた記事はこちら
https://qiita.com/kashiba/items/339b81f63612ffdba573
今回作るもの
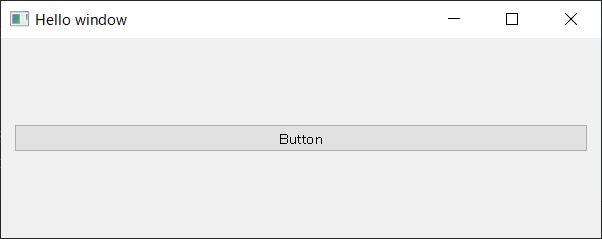
完成図
ボタンをクリックする度に「Hello world」とprintされます。
Hello world
Hello world
Hello world
Hello world
コード
# !/usr/bin/python3
# -*- coding: utf-8 -*-


import sys
from PySide2.QtWidgets import *


class window_A(QWidget):
    def __init__(self, parent=None):
        super(window, self).__init__(parent)
        self.w = QWidget()
        self.layout = QVBoxLayout()
        # ボタンを作成して配置
        self.button = QPushButton("Button")
        self.layout.addWidget(self.button)
        # ボタンのクリックを、関数helloとリンク
        self.button.clicked.connect(self.hello)
        self.w.setLayout(self.layout)
        self.w.show()

    # ボタンクリックによって呼び出される
    def hello(self):
        print("Hello world")


if __name__ == '__main__':
    app = QApplication(sys.argv)
    main_window = window()
    sys.exit(app.exec_())
解説
class window_A(QWidget):
    def __init__(self, parent=None):
        super(window, self).__init__(parent)
QWidgetを継承したクラスwindow_Aを作成しsuperクラス(QWidget)のinitを継承します。
この辺りは「クラス 継承」で調べると情報がたくさん出てきます。
        self.w = QWidget()
        QVBoxLayout
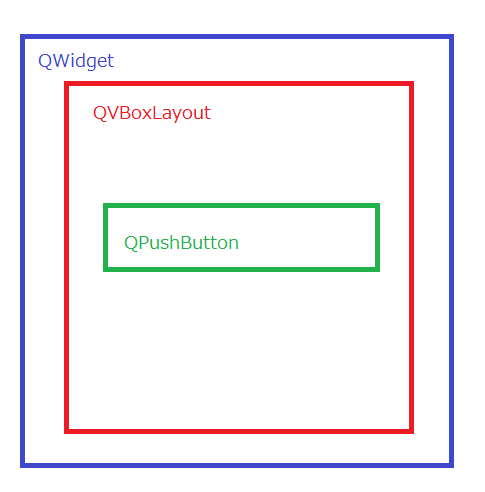
windowの土台になるQWidgetと、ボタンをレイアウトする為の枠組みとなるQVBoxLayoutをそれぞれ作成します。QVBoxLayoutのVはVertical、垂直レイアウト、QHBoxLayoutのHはHorizontal、水平レイアウトを示しています。
        self.button = QPushButton("Button")
        self.layout.addWidget(self.button)
QPushButtonオブジェクトを作成し、Buttonというラベルをボタンに貼り付けています。
addWidgetコマンドで、self.layout = QVBoxLayoutにボタンをレイアウトしています。
self.button.clicked.connect(self.hello)
self.buttonにself.hello関数を接続しています。
.clicked.connectを用いると、ボタンクリック時のイベントに指定の関数を接続する事が出来ます。self.hello()ではなく、self.helloと指定している事に注意してください。()が不要です。
        self.w.setLayout(self.layout)
        self.w.show()
.setLayoutでself.w = QWidgetの上に、self.layout = QVBoxLayoutを乗せます。
■イメージ図

    def hello(self):
        print("Hello world")
Hello world をプリントするだけの関数です。
if __name__ == '__main__':
    app = QApplication(sys.argv)
    main_window = window()
    sys.exit(app.exec_())
pythonファイル起動時の処理です。
QApplicationを作成したあと、windowクラスを生成します。
windowクラス生成と同時に、__init__でwindowが生成されます。
QApplicationやsys.exit(app.exec_())について以前まとめた記事はこちら
https://qiita.com/kashiba/items/95f04ea9700236853803
参考にしたページ


