下記環境でFlutterアプリを開発中です。
| ツールなど | バージョンなど |
|---|---|
| MacBook Air Early2015 | macOS Mojave 10.14.5 |
| Android Studio | 3.6.1 |
| Java | 1.8.0_131 |
| Flutter | 1.12.13+hotfix.5 |
| Dart | 2.7.0 |
少し凝ったレイアウトを作っていてリップルエフェクトに苦労したのでちょっとまとめます。
1.リップルエフェクトとは
マテリアルデザインでアクション可能なウィジェットをタップしたときに、波紋のように広がるアニメーションのことです。
2.基本的な設定の仕方
(1)デフォルトで使えるウィジェットを使う
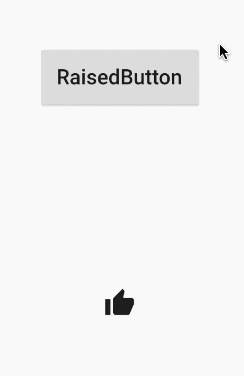
RaisedButtonなどのMaterialButtonの派生クラスや、IconButtonなどに
標準装備されています。
↑のサンプルは、RaisedButtonとIconButtonです。
サンプルのコードはこちら
class MyHomePage extends StatelessWidget {
  MyHomePage({Key key, this.title});

  final String title;

  @override
  Widget build(BuildContext context) {
    return Scaffold(
      appBar: AppBar(
        title: Text(title),
      ),
      body: Center(
        child: Column(
          mainAxisAlignment: MainAxisAlignment.spaceAround,
          children: <Widget>[
            RaisedButton(
              padding: EdgeInsets.all(20),
              child: Text(
                'RaisedButton',
                style: TextStyle(fontSize: 28),
              ),
              onPressed: () => debugPrint('RaisedButton pushed.'),
            ),
            IconButton(
              iconSize: 42,
              icon: Icon(
                Icons.thumb_up,
              ),
              onPressed: () => debugPrint("IconButton tapped"),
            ),
          ],
        ),
      ),
      // This trailing comma makes auto-formatting nicer for build methods.
    );
  }
}
onPressed()がnullだとdisabledになるので何か設定して下さいね。
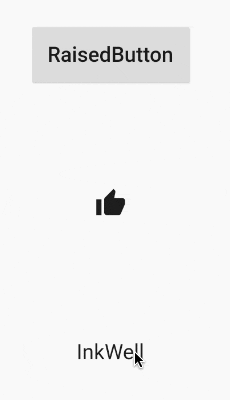
(2)InkWellを使う
InkWellというウィジェットの子にすると、リップルエフェクトを掛けることが出来ます。
            InkWell(
              onTap: () => debugPrint("InkWell tapped"),
              child: Padding(
                padding: EdgeInsets.all(20.0),
                child: Text(
                  'InkWell',
                  style: TextStyle(fontSize: 28),
                ),
              ),
            ),
onTap()がnullだと反応しないので何か設定して下さい。
3.ちょっとコツが必要なパターン
(1)Card
Flutterには便利なCardウィジェットというのがあります。マテリアルデザインらしく、浮いた状態に出来るやつですね。

Cardウィジェットは、「子」にInkWellを持たせないと、リップルエフェクトが表示されません。
NGなパターン
            InkWell(
              onTap: () => debugPrint("Card tapped"),
              child: Card(
                child: Padding(
                  padding: EdgeInsets.all(20.0),
                  child: Text(
                    'Card',
                    style: TextStyle(fontSize: 28),
                  ),
                ),
              ),
            ),
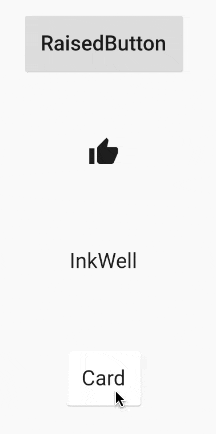
なにやらカードの後ろにいるのが分かりますね。
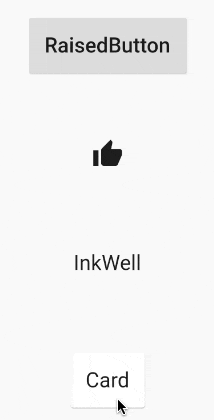
OKなパターン
            Card(
              child: InkWell(
                onTap: () => debugPrint("Card tapped"),
                child: Padding(
                  padding: EdgeInsets.all(20.0),
                  child: Text(
                    'Card',
                    style: TextStyle(fontSize: 28),
                  ),
                ),
              ),
            ),
(2)子に色が付いているとリップルエフェクトが表示されない
多分(1)はこれと関連しているのですが、最初に出したInkWellのみでCardを使っていないパターンで、Containerなんかで括ってcolor:などで色を付けると、リップルエフェクトが出なくなります。
以下のコードどちらも、ダメです。
NGパターン1
InkWell-Container-child widget の構成
            InkWell(
                onTap: () => debugPrint("InkWell tapped"),
                child: Container(
                  color: Colors.pink[100],
                  child: Padding(
                    padding: EdgeInsets.all(20.0),
                    child: Text(
                      'InkWell',
                      style: TextStyle(fontSize: 28),
                    ),
                  ),
                )),
NGパターン2
Container-InkWell-child の構成
            Container(
                color: Colors.pink[100],
                child: InkWell(
                  onTap: () => debugPrint("InkWell tapped"),
                  child: Padding(
                    padding: EdgeInsets.all(20.0),
                    child: Text(
                      'InkWell',
                      style: TextStyle(fontSize: 28),
                    ),
                  ),
                )),
これは、実はFlatButtonやRaisedButton, MaterialButton等の標準でリップルするウィジェットでも同様で、子に色を付けると出なくなります。
解決方法は、子ウィジェットが単独のウィジェットの場合は、Mateiralウィジェットの子にしてやり、そちらに色を付けてやれば良いです。
            new Material(
                type: MaterialType.button,
                color: Colors.pink[100],
                child: InkWell(
                  highlightColor: Colors.pink.shade300,
                  splashColor: Colors.pink.shade100,
                  onTap: () => debugPrint("InkWell tapped"),
                  child: Padding(
                    padding: EdgeInsets.all(20.0),
                    child: Text(
                      'InkWell',
                      style: TextStyle(fontSize: 28),
                    ),
                  ),
                )),
3.複雑なウィジェット構成の場合
こんなレイアウトを考えました。
(Prottで作成しました)
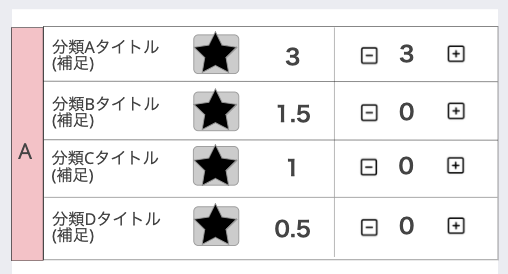
細かいとこは説明しませんが、分類ごとにカードにして、各行はリストにしたいです。分類によって行数が違います。
星マークの部分は、画像をいれるところ。
-/+アイコンを押すと、その間にある数字がカウントダウン/アップします。
こんなレイアウトを作りたいのだけど・・・
-/+アイコンと、かつカード全体にリップルエフェクトを出したくて、非常に苦労しました。
私が最初に考えたカード内のウィジェット構成は、こうなります。
Card - Row
        +-- TextWidget(Aのラベル部分)
        +-- Expanded(残りのスペースをすべて使うため)
              +- ListView
ListViewの行レイアウトは、このように考えました。
Row
 +-- Expanded
       +-- Text(分類タイトル/補足のテキスト)
 +-- Image
 +-- Text(固定数字)
 +-- Icons.remove_circle_outline
 +-- Text(カウントダウン/アップする数字)
 +-- Icons.add_circle_outline
Paddingなどは除外しています。
TextWidget(Aのラベル部分)が親の高さにまで引き延ばせれば、テキストの背景色でなんとかなりそうでもあるんですが(Textの背景色のみ、リップルエフェクトに影響しませんでした)、その方法が分からず、「行数に応じた高さでラベルの文字入り画像を作る」というなんともアナログな手法で対応しています。
カウントダウン/アップはまだ実装してないので動いていません(汗)
実際のコードはこちら
import 'package:flutter/material.dart';

import '../data/RecordClassification.dart';
import 'input_styles.dart';

/// 区分別カード用ウィジェット
class TypeCardWidget extends StatelessWidget {
  TypeCardWidget(this.majorType);

  final MajorClassification majorType;

  @override
  Widget build(BuildContext context) {
    return Card(
      semanticContainer: true,
      clipBehavior: Clip.antiAliasWithSaveLayer,
      shape: RoundedRectangleBorder(
        borderRadius: BorderRadius.circular(6.0),
      ),
      child: InkWell(
        onTap: () => debugPrint("Card tapped."),
        child: Row(
          children: <Widget>[
            // 種類ラベル
            Padding(
              padding: EdgeInsets.only(right: 6.0),
              child: Image.asset(majorType.imageAssetName, width: 20),
            ),
            // データ行ウィジェット
            Expanded(
              child: TypeBoard(majorType),
            ),
          ],
        ),
      ),
    );
  }
}

/// 大分類ラベルを除いた小分類行を載せるレイアウト部分のウィジェット
class TypeBoard extends StatelessWidget {
  TypeBoard(this.majorType);

  final MajorClassification majorType;

  @override
  Widget build(BuildContext context) {
    return ListView.builder(
      shrinkWrap: true,
      physics: new NeverScrollableScrollPhysics(),
      itemBuilder: (BuildContext context, int index) {
        return index != 0
            ? Container(
                decoration: BoxDecoration(
                  border: Border(
                    top: BorderSide(
                      width: index == 0 ? 0.0 : 0.5,
                      color: Theme.of(context).dividerColor,
                    ),
                  ),
                ),
                child: TypeRow(majorType.minors[index]))
            : TypeRow(majorType.minors[index]);
      },
      itemCount: majorType.minors.length,
    );
  }
}

/// データ行ウィジェット
class TypeRow extends StatelessWidget {
  TypeRow(this.minorType);

  final MinorClassification minorType;

  @override
  Widget build(BuildContext context) {
    return Row(
      mainAxisAlignment: MainAxisAlignment.start,
      children: <Widget>[
        // 項目ラベル
        Expanded(
          child: Padding(
            padding: EdgeInsets.all(6.0),
            child: Text(
                "${minorType.name} ${minorType.notes ?? ''}\n${minorType.description}",
                style: minorLabelStyle),
          ),
        ),
        // 画像
        Padding(
          padding: EdgeInsets.all(6.0),
          child: Icon(
            Icons.star,
            size: 36.0,
          ),
        ),
        // 基礎点
        Padding(
          padding: EdgeInsets.only(left: 12.0, right: 12.0),
          child: Text(minorType.basePoint.toStringAsFixed(1),
              style: basePointLabelStyle),
        ),
        // -ボタン
        Padding(
          padding: EdgeInsets.only(left: 8.0),
          child: IconButton(
            icon: Icon(Icons.remove_circle_outline),
            onPressed: () => debugPrint("icon tapped"),
          ),
        ),
        // 現在点数
        Text(
          "3",
          style: countLabelStyle,
        ),
        // +ボタン
        Padding(
          padding: EdgeInsets.only(),
          child: IconButton(
            icon: Icon(Icons.add_circle_outline),
            onPressed: () => debugPrint("icon tapped"),
          ),
        ),
      ],
    );
  }
}
当然、画像の高さの調整は何度も修正が必要です。HotReloadが無ければこんなコトしようとは思わなかったでしょう・・・
気持ちが悪いので、なんとか背景画像を使わずに済ませられる方法を探しています。是非コメントお寄せ下さい(懇願)
なお、画像は角丸では作っていません。四角形で、文字入りです。
角丸画像で無くても、Cardに以下の設定をしておくと、自動で角丸からはみ出た部分はクリップしてくれます。
      semanticContainer: true,
      clipBehavior: Clip.antiAliasWithSaveLayer,
参考
Flutter 背景色ありで Ripple Effect を効かせる
https://qiita.com/najeira/items/db6edb1c8d8f75042b98
InkWell and FlatButton do not ripple when inside a container with opaque background
https://github.com/flutter/flutter/issues/3782