目的
- とにかくやりきることが一番の目的
- 毎日発信することで、発信する習慣作り
- 個人開発をやりきることで、実績作り
開発するもの
X(旧Twitter)のパクリ
構成
- バックエンド
- python
- django REST framework
- DB
- postgreSQL
- フロントエンド
- React
本編
react-router-domをインストール
npm i -S react-router-dom
Material UIをインストール
npm install @mui/material @emotion/react @emotion/styled
npm install @mui/icons-material
ディレクトリを作成
bulletproof-reactではfeatures配下に機能単位でディレクトリを作成し、
機能ディレクトリ配下にコンポーネントや、ルーティングのディレクトリを作成しているらしい。
mkdir ./src/features/auth
mkdir ./src/features/auth/components
mkdir ./src/features/auth/routes
会員登録画面で表示する資材を作成
以下サンプルを丸パクリ。
細かいところはおいおい。
import * as React from 'react';
import Avatar from '@mui/material/Avatar';
import Button from '@mui/material/Button';
import CssBaseline from '@mui/material/CssBaseline';
import TextField from '@mui/material/TextField';
import FormControlLabel from '@mui/material/FormControlLabel';
import Checkbox from '@mui/material/Checkbox';
import Link from '@mui/material/Link';
import Grid from '@mui/material/Grid';
import Box from '@mui/material/Box';
import LockOutlinedIcon from '@mui/icons-material/LockOutlined';
import Typography from '@mui/material/Typography';
import Container from '@mui/material/Container';
import { createTheme, ThemeProvider } from '@mui/material/styles';

function Copyright(props) {
  return (
    <Typography variant="body2" color="text.secondary" align="center" {...props}>
      {'Copyright © '}
      <Link color="inherit" href="https://mui.com/">
        Your Website
      </Link>{' '}
      {new Date().getFullYear()}
      {'.'}
    </Typography>
  );
}

// TODO remove, this demo shouldn't need to reset the theme.

const defaultTheme = createTheme();

export const RegisterForm = () => {
  const handleSubmit = (event) => {
    event.preventDefault();
    const data = new FormData(event.currentTarget);
    console.log({
      email: data.get('email'),
      password: data.get('password'),
    });
  };

  return (
    <ThemeProvider theme={defaultTheme}>
      <Container component="main" maxWidth="xs">
        <CssBaseline />
        <Box
          sx={{
            marginTop: 8,
            display: 'flex',
            flexDirection: 'column',
            alignItems: 'center',
          }}
        >
          <Avatar sx={{ m: 1, bgcolor: 'secondary.main' }}>
            <LockOutlinedIcon />
          </Avatar>
          <Typography component="h1" variant="h5">
            会員登録
          </Typography>
          <Box component="form" noValidate onSubmit={handleSubmit} sx={{ mt: 3 }}>
            <Grid container spacing={2}>
              <Grid item xs={12} sm={6}>
                <TextField
                  autoComplete="given-name"
                  name="firstName"
                  required
                  fullWidth
                  id="firstName"
                  label="First Name"
                  autoFocus
                />
              </Grid>
              <Grid item xs={12} sm={6}>
                <TextField
                  required
                  fullWidth
                  id="lastName"
                  label="Last Name"
                  name="lastName"
                  autoComplete="family-name"
                />
              </Grid>
              <Grid item xs={12}>
                <TextField
                  required
                  fullWidth
                  id="email"
                  label="Email Address"
                  name="email"
                  autoComplete="email"
                />
              </Grid>
              <Grid item xs={12}>
                <TextField
                  required
                  fullWidth
                  name="password"
                  label="Password"
                  type="password"
                  id="password"
                  autoComplete="new-password"
                />
              </Grid>
              <Grid item xs={12}>
                <FormControlLabel
                  control={<Checkbox value="allowExtraEmails" color="primary" />}
                  label="I want to receive inspiration, marketing promotions and updates via email."
                />
              </Grid>
            </Grid>
            <Button
              type="submit"
              fullWidth
              variant="contained"
              sx={{ mt: 3, mb: 2 }}
            >
              会員登録
            </Button>
            <Grid container justifyContent="flex-end">
              <Grid item>
                <Link href="#" variant="body2">
                  Already have an account? Sign in
                </Link>
              </Grid>
            </Grid>
          </Box>
        </Box>
        <Copyright sx={{ mt: 5 }} />
      </Container>
    </ThemeProvider>
  );
}
会員登録画面をルーティング
auth内のルーティングを定義
bulletproof-reactでは細かい機能単位で、ファイルを作成し、index.jsで細かい機能単位でパスを付与してルーティングしているみたい。
import { RegisterForm } from '../components/RegisterForm';

export const Register = () => {
    return (
        <>
            <RegisterForm />
        </>
    );
};
import { Route, Routes } from 'react-router-dom';
import { Register } from './Register';

export const AuthRoutes = () => {
  return (
    <Routes>
      <Route path="register" element={<Register />} />
    </Routes>
  );
};
アプリケーション全体に対して、authのルーティングを定義
先ほど定義してた、AuthRoutesを全体のルーティング部分で読み込む。
import { useRoutes } from 'react-router-dom';
import { AuthRoutes } from '../features/auth/routes/index';

export const AppRoutes = () => {
    const publicRoutes = useRoutes([
        {
            path: '/auth/*',
            element: <AuthRoutes />,
        },
    ]);

    return <>{publicRoutes}</>;
};
AppRoutesをApp.jsで読み込む。
import './App.css';
import './routes/index'
import './'
import { AppRoutes } from './routes/index'

function App() {
  return (
    <AppRoutes />
  );
}

export default App;
Appをindex.jsで読み込む。
BrowserRouter配下に、Appを配置しないと、いくらルーティングを書いても何も起こらないので注意!
(ここら辺はフロントエンジニアからは当たり前だろといわれそう。。)
bulletproof-reactではproviderでBrowserRouterやログイン・未ログインの判定をしていたが、それはおいおい。
import React from 'react';
import ReactDOM from 'react-dom/client';
import './index.css';
import { BrowserRouter } from 'react-router-dom';
import App from './App';
import reportWebVitals from './reportWebVitals';

const root = ReactDOM.createRoot(document.getElementById('root'));
root.render(
  <React.StrictMode>
    <BrowserRouter>
      <App />
    </BrowserRouter>
  </React.StrictMode>
);

reportWebVitals();
画面を表示
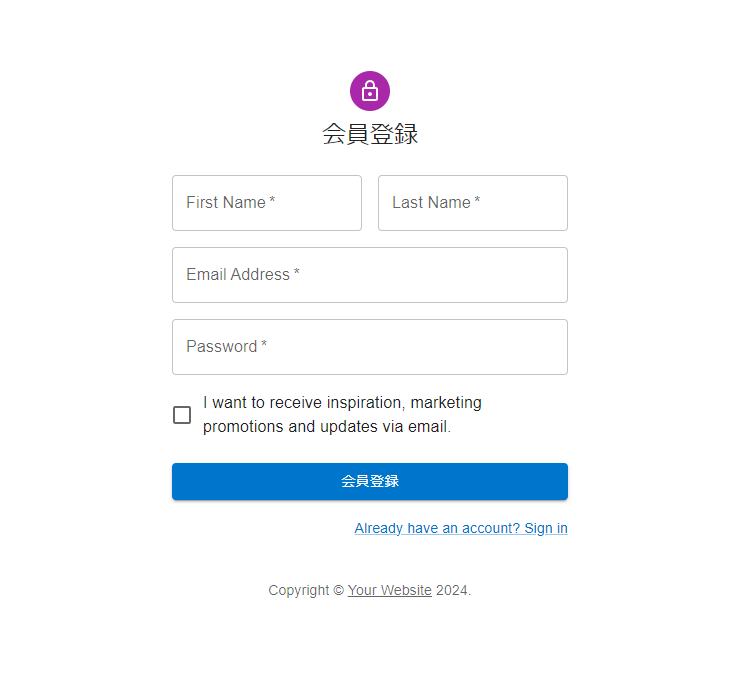
http://localhost:3000/auth/registerにアクセス!
サンプル通りの画面が作成されました!
感想
bulletproof-reactのやり方を踏襲しつつも、ほとんどやったことないフロントを作成しているため、進捗が全然ありませんでした。。
小さく泥臭く作ることを忘れてはいけないですね。
あとMaterial UIをうまく活用していけば、いい感じのものがさくっと作れそうなので開発がはかどりそう。
明日はdjangoとreactをつなげる部分をやる!
