環境
OS:Windows10 HOME 64bit
SHELL:PowerShell Version 5.1.19041.610
基本的にPowerShellは管理者権限で起動してください。
powershell と入力してから管理者として実行を押すと下のような確認画面が開きます。
管理者権限のダイアログが開くので はい を選択してください。
使用するもの
Chocolatey 0.10.15 ー パッケージマネージャー
VirtualBox 6.1.18 ー 仮想環境を構築するためのソフト
Vagrant 2.2.14 ー VirtualBox の操作を簡単にしてくれるツール
Rlogin 2.25.0 ー 仮想環境に入るためのSSH クライアント
Ubuntu 20.04 ー Linuxのディストリビューション
1. Chocolateyの導入
Chocolatey の公式サイトにアクセスします。
以下のコードをコピペして管理者権限で開いたPowerShellで実行してください。
めんどくさがりなあなたのためにコードを貼っておきました。↑と同じものです。
Set-ExecutionPolicy Bypass -Scope Process -Force; [System.Net.ServicePointManager]::SecurityProtocol = [System.Net.ServicePointManager]::SecurityProtocol -bor 3072; iex ((New-Object System.Net.WebClient).DownloadString('https://chocolatey.org/install.ps1'))
ダウンロードが完了したら choco と打って実行してみてください。
以下の画像のようになっていたら成功です。
ちなみにChocolateyの使い方を詳しく知りたい方は以下の記事をご覧ください。
chocolatey 基本情報まとめ
2. VirtualBox・Vagrant の導入
まず VirtualBox を入れます。
choco install virtualbox
↑のコマンドを実行してください。
※実行中に赤色で大量のメッセージが表示されますが、それが正常なのでご安心を。
続いて Vagrant を入れます。
choco install vagrant
↑のコマンドを実行してください。
実行が完了したらWindowsの再起動が必要なので再起動を行ってください。
ちなみに、以下のコマンドでも再起動できます。
※ただし、実行した瞬間に再起動が始まるので、他のソフトを起動しているときなどはご注意ください。
Restart-Computer
再起動が完了したら以下のコマンドを実行して、VirtualBoxとVagrantが正しくインストールされているか確認してください。
choco list -localonly
こんな感じで表示されていたら成功です。
Chocolatey v0.10.15
chocolatey-core.extension 1.3.5.1
vagrant 2.2.14
virtualbox 6.1.18
3. Ubuntu20.04の導入
Ubuntuを入れます。
Ubuntuを入れるディレクトリを作成してください。
おすすめは
PS C:\Users\あなたのユーザ名\
↑のディレクトリの中にubuntu20.04などのディレクトリを作ってそこで作業すると良いと思います。
ちなみにめんどくさい人は以下を実行したら筆者が紹介したディレクトリ構成になります。
mkdir ~\ubuntu20.04
cd ~\ubuntu20.04
※ここから先の内容は基本的にPC C:\Users\あなたのユーザ名\ubuntu20.04に移動している状態で行ってください。ubuntu20.04のところは別に他の名前でも良いです。
Vagrant CloudというサイトでUbuntu 20.04と検索してみましょう。
こんな感じで出てくるので、とりあえず一番上のgeneric/ubuntu2004を選択しましょう。
(多分下のやつでもいいと思いますが、ダウンロード数が多いやつの方が信頼度が高いと判断しました。)
Newをクリックして出てきたコードを実行しましょう。
これまた、めんどくさがりなあなたのためにコードを貼っておきますね。
vagrant init generic/ubuntu2004
vagrant up
これで仮想環境のマシンに電源が入りました。
vagrant status
一応 Vagrant の起動確認のため↑のコマンドを実行してください。
以下のように表示されていたら、成功です。。
default                   running (virtualbox)

The VM is running. To stop this VM, you can run `vagrant halt` to
shut it down forcefully, or you can run `vagrant suspend` to simply
suspend the virtual machine. In either case, to restart it again,
simply run `vagrant up`.
4. Rlogin の導入
Rloginをいれます。
choco install rlogin
インストールが完了したら、以下のコマンドを実行してRloginを開きましょう。
rlogin
起動したら新規をクリックしてください。
以下のような画面が開きます。
ここで一旦 PowerShellに戻って、以下のコマンドを実行してください。
vagrant ssh-config
すると以下のような感じで表示されます。
※表示されない人はVagrantが立ち上がっていないのでvagrant upを実行してください。
Host default
  HostName 127.0.0.1
  User vagrant
  Port 2222
  UserKnownHostsFile /dev/null
  StrictHostKeyChecking no
  PasswordAuthentication no
  IdentityFile C:/Users/ユーザー名/ubuntu20.04/.vagrant/machines/default/virtualbox/private_key
  IdentitiesOnly yes
  LogLevel FATAL
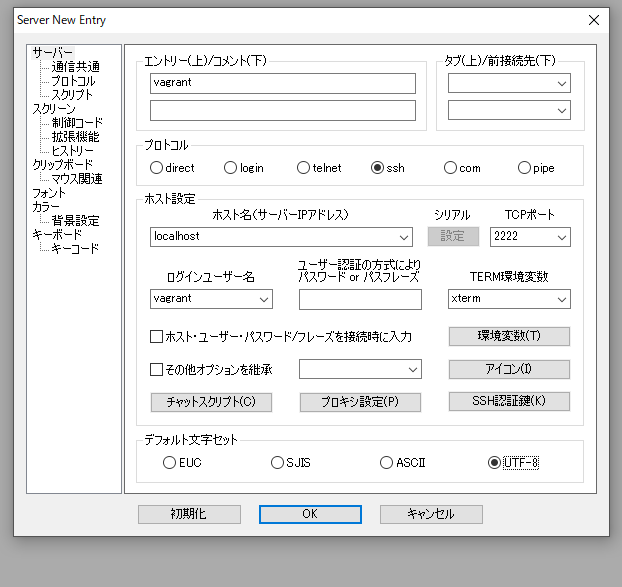
表示された内容をもとにRloginの設定を埋めます。
- エントリー(上)←
vagrantと入力 - プロトコル ←
sshを選択 - ホスト名(サーバー IP アドレス):
localhostを選択 - TCP ポート : ↑で表示されたPortの番号(多分2222か2000です。)を入力
ログインユーザー名 : ↑で表示されたUser名(今回は vagrant )を入力 - SSH 認証鍵 :↑で表示されたIdentityFileがカギの場所なので、そこを選択してください。
- デフォルト文字セット :
UTF-8を選択
以下のようになります。
全て埋めれたらOKを選択し、追加されたところをダブルクリックしてください。
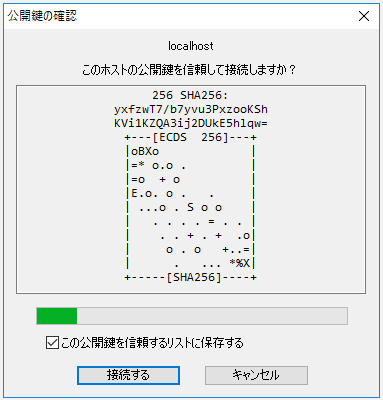
ダブルクリックすると以下のように表示されますが接続するを押してください。
(緑の進捗バーは気にせずに押してもらって大丈夫です。)

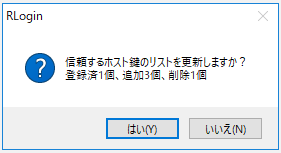
すると、こんな感じのが表示されるのではいを選択してください。
ubuntuが起動したら日本語化のため以下のコマンドを実行してください。
sudo locale-gen ja_JP.UTF-8
echo export LANG=ja_JP.UTF-8 >> ~/.profile
source ~/.profile
sudo timedatectl set-timezone Asia/Tokyo
実行が完了したらdateと打ってください。
以下のように表示されれば成功です。
date


2021年  4月  1日 木曜日 11:44:22 JST
5. Vagrantfileの編集
/ubuntu20.04(vagrant initを実行したディレクトリです)のディレクトリの中にVagrantfileなるものが存在しています。
vscodeなどのエディターを開いて以下の内容に変更してください。
仮想化された Ubuntu のポートへの通信を、実際に使っている Windows のポートに転送するために27行目くらいに以下を追加してください。
config.vm.network "forwarded_port", guest: 8000, host: 8000
また、35行目くらいの以下の内容をコメントの#を外してください。
これは、固定ipを指定するもので既存の設定だとubuntuのlocalhostでサーバーが立ち上がってしまい、ホスト(windows)からlocalhostに接続しても接続できません。なので、以下のように固定ipをしていています。別に変更してもらっても大丈夫です。
※railsやlaravelなどで開発用のサーバーを立てて開発を進める場合には必ずオプション指定でここで指定した192.168.33.10で立てるようにしてください。(自分はこれに気が付くのに3~4時間くらいかかりました笑)お気をつけて・・・。
config.vm.network "private_network", ip: "192.168.33.10"
ubuntu内のフォルダーを同期するために47行目くらいに以下の行を追加してください。
ちなみに、ここではworkspaceとしていますが好きな名前に変えてもらって大丈夫です。
ここで使用するフォルダーはあらかじめ/ubuntu20.04/workspaceのようにフォルダーを作っておいてください。
config.vm.synced_folder "./workspace", "/home/vagrant/workspace"
仮想マシンで利用できるメモリの量を増やすために52~58行目くらいを以下のように変更してください。
 config.vm.provider "virtualbox" do |vb|
  #   # Display the VirtualBox GUI when booting the machine
  #   vb.gui = true
  #
  #   # Customize the amount of memory on the VM:
    vb.memory = "1024"
  end
一応自分のVagrantfileを貼っておきます。
# -*- mode: ruby -*-
# vi: set ft=ruby :

# All Vagrant configuration is done below. The "2" in Vagrant.configure
# configures the configuration version (we support older styles for
# backwards compatibility). Please don't change it unless you know what
# you're doing.
Vagrant.configure("2") do |config|
  # The most common configuration options are documented and commented below.
  # For a complete reference, please see the online documentation at
  # https://docs.vagrantup.com.

  # Every Vagrant development environment requires a box. You can search for
  # boxes at https://vagrantcloud.com/search.
  config.vm.box = "generic/ubuntu2004"

  # Disable automatic box update checking. If you disable this, then
  # boxes will only be checked for updates when the user runs
  # `vagrant box outdated`. This is not recommended.
  # config.vm.box_check_update = false

  # Create a forwarded port mapping which allows access to a specific port
  # within the machine from a port on the host machine. In the example below,
  # accessing "localhost:8080" will access port 80 on the guest machine.
  # NOTE: This will enable public access to the opened port
  # config.vm.network "forwarded_port", guest: 80, host: 8080
  config.vm.network "forwarded_port", guest: 8000, host: 8000
  # Create a forwarded port mapping which allows access to a specific port
  # within the machine from a port on the host machine and only allow access
  # via 127.0.0.1 to disable public access
  # config.vm.network "forwarded_port", guest: 80, host: 8080, host_ip: "127.0.0.1"

  # Create a private network, which allows host-only access to the machine
  # using a specific IP.
  config.vm.network "private_network", ip: "192.168.33.10"

  # Create a public network, which generally matched to bridged network.
  # Bridged networks make the machine appear as another physical device on
  # your network.
  # config.vm.network "public_network"

  # Share an additional folder to the guest VM. The first argument is
  # the path on the host to the actual folder. The second argument is
  # the path on the guest to mount the folder. And the optional third
  # argument is a set of non-required options.
  # config.vm.synced_folder "../data", "/vagrant_data"
  config.vm.synced_folder "./workspace", "/home/vagrant/workspace"
  # Provider-specific configuration so you can fine-tune various
  # backing providers for Vagrant. These expose provider-specific options.
  # Example for VirtualBox:
  #
  config.vm.provider "virtualbox" do |vb|
  #   # Display the VirtualBox GUI when booting the machine
  #   vb.gui = true
  #
  #   # Customize the amount of memory on the VM:
    vb.memory = "1024"
  end
  #
  # View the documentation for the provider you are using for more
  # information on available options.

  # Enable provisioning with a shell script. Additional provisioners such as
  # Ansible, Chef, Docker, Puppet and Salt are also available. Please see the
  # documentation for more information about their specific syntax and use.
  # config.vm.provision "shell", inline: <<-SHELL
  #   apt-get update
  #   apt-get install -y apache2
  # SHELL
end
変更を保存したら、Rloginからの接続を切るためにubuntuで以下のコマンドを実行してください。
※PowerShellじゃなくてubuntuの方です。
exit
完了したらPowerShellの方で以下のコマンドを実行しVagrantを再起動してください。
vagrant reload --provision
最後にもう一度Rloginを立ち上げてlsコマンドで先ほど同期したファイルがubuntuの中に入っているか確認してください。
※PowerShellじゃなくてubuntuで実行してください。
ls

workspace ← さっき同期させたファイル名
表示されたら同期されているかの確認のためにファイルを作って確認して見ましょう。
cd workspace
touch a
Windowsで PC C:/Users/ユーザー名/ubuntu20.04/workspace/の中を確認してaというファイルが作成されていれば成功です!
さいごに
久しぶりにQiitaを書きました。
というか環境構築系の記事は初めて書いたのですがめっちゃ時間かかる(笑)
なんと2時間13分かかりました(笑)
Qiitaにたくさん投稿している人は本当にすごいですね(痛感)
先人の皆様に感謝する限りでございますorz
昨日の技育CAMPでアウトプットが大切と聞いたので早速やってみました。
頑張って、つよつよ で てぇてぇ エンジニアになりたいものです。
あと何か質問・疑問、訂正ありましたらコメントお願いします!
そして、LGTMしてくださるとやる気が・・・・・でます!
ありがとうございました!!


