こんにちは。金融グループ所属の山﨑です。
本記事はフューチャーアドベントカレンダー2023の19日目です。
今回はRust向けのクラウドプラットフォーム、Shuttleを使ってWebアプリケーションのバックエンドサーバーを立ててみたのでご紹介します!
Shuttleを使うとRust向けのバックエンドサーバを設定なしで立ち上げることができます。
Shuttleはいくつかのフレームワークをサポートしていますが、今回はAxumとsqlx(& PostgreSQL)を使用しました。
Shuttleとは?
簡単なCLI操作でRustのアプリケーションをデプロイできる無料のプラットフォームサービスです。
ほとんど設定なしでサービスデプロイ時にDBサーバも自動でデプロイ+アプリに接続してくれるのですごい楽でした。
みんなもインフラのことは忘れてコードに集中しよう💪
以下はShuttleのExampleの抜粋です。
↓みたいなコードをデプロイするだけで、自動でアプリ・DBサーバが立ってくれます。
#[shuttle_runtime::main]
async fn tide(#[shuttle_aws_rds::Postgres] pool: PgPool) -> ShuttleTide<MyState> {
    pool.execute(include_str!("../schema.sql"))
        .await
        .map_err(CustomError::new)?;

    let state = MyState { pool };
    let mut app = tide::with_state(state);

    app.with(tide::log::LogMiddleware::new());
    app.at("/todo").post(add);
    app.at("/todo/:id").get(retrieve);

    Ok(app.into())
}
ハンズオン
Shuttle CLIのインストール
まずはhttps://www.shuttle.rs/でアカウントを作成しましょう。
次にShuttle CLIをインストールします。
Windowsの方やCargoを使ってインストールしたい場合はShuttleのドキュメントを参照ください。
curl -sSfL https://www.shuttle.rs/install | bash
CLIのインストールが完了したら初めに作成したアカウントでログインします。
cargo shuttle login
アプリの作成
initコマンドを叩いてプロジェクト名などを設定すればテンプレートが生成されます。ここではフレームワークとしてAxumを選択します。
※プロジェクト名はurl等にも使用されるため、Shuttle上で一意である必要があります。
cargo shuttle init --template axum
「Do you want to create the project environment on Shuttle?」と聞かれますが、ここでyesと答えるとShuttle上に早速プロジェクトがローンチされます。
ローカルで試してみたいだけの場合はnoを選んでおきましょう。
プロジェクトフォルダが作られ、src/main.rsにはこんな感じのコードが書かれているはずです。
use axum::{routing::get, Router};

async fn hello_world() -> &'static str {
    "Hello, world!"
}

#[shuttle_runtime::main]
async fn main() -> shuttle_axum::ShuttleAxum {

    let router = Router::new().route("/", get(hello_world));

    Ok(router.into())
}
runコマンドを実行することで、ローカルサーバが起動します。
cargo shuttle run
中身は通常のAxumと同じように実装すればいいので、Axumの例を参考に機能を実装しましょう🥳
DBとの接続
shuttle-aws-rds、sqlxをプロジェクトに追加します。
cargo add shuttle-aws-rds --features postgres
cargo add sqlx --features postgres
main関数の引数にPostgreSQLとの接続poolを追加します。
また、poolは何らかの形で持ちまわる必要がありますが、Stateを使うのが一般的かと思います。
use axum::{routing::get, Router};
use sqlx::Pgpool;

async fn hello_world() -> &'static str {
    "Hello, world!"
}

pub struct AppState {
    pub pool: Pgpool,
}

#[shuttle_runtime::main]
async fn main(#[shuttle_aws_rds::Postgres] pool: Pgpool) -> shuttle_axum::ShuttleAxum {
    sqlx::migrate()!
        .run(&pool)
        .await
        .map_err(shuttle_runtime::CustomError::new)?;

    let state = AppState { pool };

    let router = Router::new().route("/", get(hello_world))
        .with_state(state);

    Ok(router.into())
}
あとはsqlxのドキュメントを参考にテーブル定義やクエリを実装しましょう
local_uriとSecretsを使ったローカル実行
アプリを実装したら当然テストが必要になりますね。
Shuttleはデプロイ時には自動的にDBを立ち上げてアプリケーションと接続してくれますが、さすがにローカルではそうはいきません。
DI(依存性注入)すれば純粋なロジックのテストではDBを無視できますが、結局最終的にはDBと接続してのテストが必要になるでしょう。
フロントエンドの実装時にもサーバを欲しいときがあるかもしれません。
というわけで、ローカル環境のDBと接続してサーバを立ち上げる方法をご紹介します。
やり方は単純で、poolの定義マクロに対してlocal_uriパラメータを渡してあげるだけです。
use axum::{routing::get, Router};
use sqlx::Pgpool;

async fn hello_world() -> &'static str {
    "Hello, world!"
}

pub struct AppState {
    pub pool: Pgpool,
}

#[shuttle_runtime::main]
async fn main(#[shuttle_aws_rds::Postgres(
        local_uri = "{secrets.LOCAL_DB_URI}" // 追加
    )] pool: Pgpool) -> shuttle_axum::ShuttleAxum {
    sqlx::migrate()!
        .run(&pool)
        .await
        .map_err(shuttle_runtime::CustomError::new)?;

    let state = AppState { pool };

    let router = Router::new().route("/", get(hello_world))
        .with_state(state);

    Ok(router.into())
}
DBのURIにはパスワードなどが載ってしまうので隠しておく必要があります。
Shuttleでは起動時に読み込まれる環境変数をSecrets.tomlに記述しておくことができ、ローカル起動時にはSecrets.dev.tomlが読み込まれます。
(デフォルトでSecrets*.tomlは.gitignoreに組み込まれています。)
そこで以下の2ファイルを用意しましょう。
# デプロイ時は使用しないが、未定義だとエラーになるので一応定義する
LOCAL_DB_URI=''
LOCAL_DB_URI='postgres://postgres:PASSWORD@localhost:16695/postgres'
これでcargo shuttle runを叩いてサーバを起動したときにはローカルのDBと接続できるようになりました🎉
Secretsは他にもCORSの設定切替などで使用するので覚えておきましょう!
開発者コミュニティが熱い🔥
Shuttleはまだベータ版なので時々エラーに遭遇します。
不具合で詰まってしまったらDiscordに開発者コミュニティがあるので質問してみましょう。
(英語だけなので若干ハードル高いですが…。)
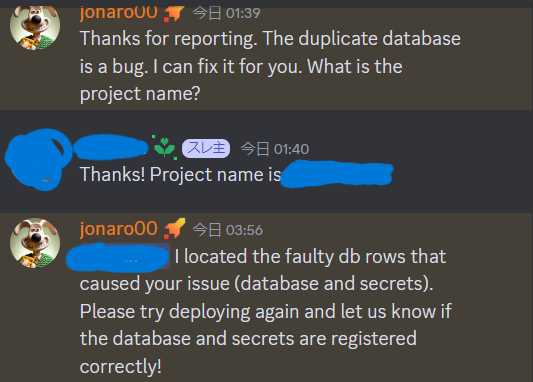
僕もDBコンテナが二つ立ち上がってしまうバグに遭遇したんですが、開発者コミュニティで質問したところ、3分で返事がきて2時間後には修正されていました。
開発コミュニティがすごく活発で、開発体験としてもかなり良いプラットフォームでした。
みんなでShuttleを応援しよう!
