はじめに
私は最近はBlazor WebAssemblyでアプリを開発をしているのでAzure Static Web Appsを使うことが増えてきましたが、まだBlazor WebAssemblyとAzure Functionsと連携するような機会はありませんでした。来年はそういったシステム構成の開発もしたいと思っているので、その準備としてAzure Static Web AppsとAzure Functionsを連携するHello Worldをやってみます。
以下を参考にしました。
static-web-apps-cli を使ってローカルで動作
Blazor WebAssembly
Visual Studio 2022でBlazor WebAssemblyのアプリを作成します。この記事の例ではSwaSampleで作成しています。アプリを作成したら起動します。私の環境では7012番で起動したので、起動したポート番号を指定してstatic-web-apps-cliを起動します。
> npx @azure/static-web-apps-cli start https://localhost:7012
http://localhost:4280にアクセスすると、Blazor WebAssemblyのアプリの画面が表示されました。
Azure Functions
Azure Functions Core Toolsをインストールします。
Visual Studio 2022でAzure FunctionsのプロジェクトをApiという名前で作成して、HTTP triggerの関数を作成します。デフォルトでは以下のような関数が作成されました。
using System;
using System.IO;
using System.Threading.Tasks;
using Microsoft.AspNetCore.Mvc;
using Microsoft.Azure.WebJobs;
using Microsoft.Azure.WebJobs.Extensions.Http;
using Microsoft.AspNetCore.Http;
using Microsoft.Extensions.Logging;
using Newtonsoft.Json;

namespace Api
{
    public static class Function1
    {
        [FunctionName("Function1")]
        public static async Task<IActionResult> Run(
            [HttpTrigger(AuthorizationLevel.Function, "get", "post", Route = null)] HttpRequest req,
            ILogger log)
        {
            log.LogInformation("C# HTTP trigger function processed a request.");

            string name = req.Query["name"];

            string requestBody = await new StreamReader(req.Body).ReadToEndAsync();
            dynamic data = JsonConvert.DeserializeObject(requestBody);
            name = name ?? data?.name;

            string responseMessage = string.IsNullOrEmpty(name)
                ? "This HTTP triggered function executed successfully. Pass a name in the query string or in the request body for a personalized response."
                : $"Hello, {name}. This HTTP triggered function executed successfully.";

            return new OkObjectResult(responseMessage);
        }
    }
}
Visual Studio 2022から起動すると私の環境では7071番のポートを使用して起動したので、コンソールにhttp://localhost:7071/api/Function1でアクセスできるというメッセージが表示され、Webブラウザでアクセスするとレスポンスが返ってきました。
Blazor WebAssemblyとAzure Functionsをstatic-web-apps-cliで連携
以下のコマンドでBlazor WebAssemblyとAPIをstatic-web-apps-cliで連携して、どちらも同じホスト名とポート番号でアクセスできるようになります。
> npx @azure/static-web-apps-cli start https://localhost:7012 --api-location ./Api
Webブラウザでhttp://localhost:4280にアクセスするとBlazor WebAssemblyの画面が表示され、http://localhost:4280/api/Function1にアクセスするとAPIのレスポンスが返ってきました。
Blazor WebAssemblyからAPIを呼び出してみます。Pages/Index.razorを以下のように編集します。
@page "/"
@inject HttpClient Http

<PageTitle>Index</PageTitle>

<p>
    <input @bind="name" type="text" class="form-control" placeholder="Name" />
</p>

<p>
    <button class="btn btn-primary" @onclick="InvokeAPI">Start</button>
</p>

<p>
    @message
</p>


@code {
    private string? name { get; set; }
    private string? message { get; set; }

    private async Task InvokeAPI()
    {
        try
        {
            message = await Http.GetStringAsync($"/api/Function1?name={name}");
        }
        catch (Exception ex)
        {
            message = ex.ToString();
        }
    }
}
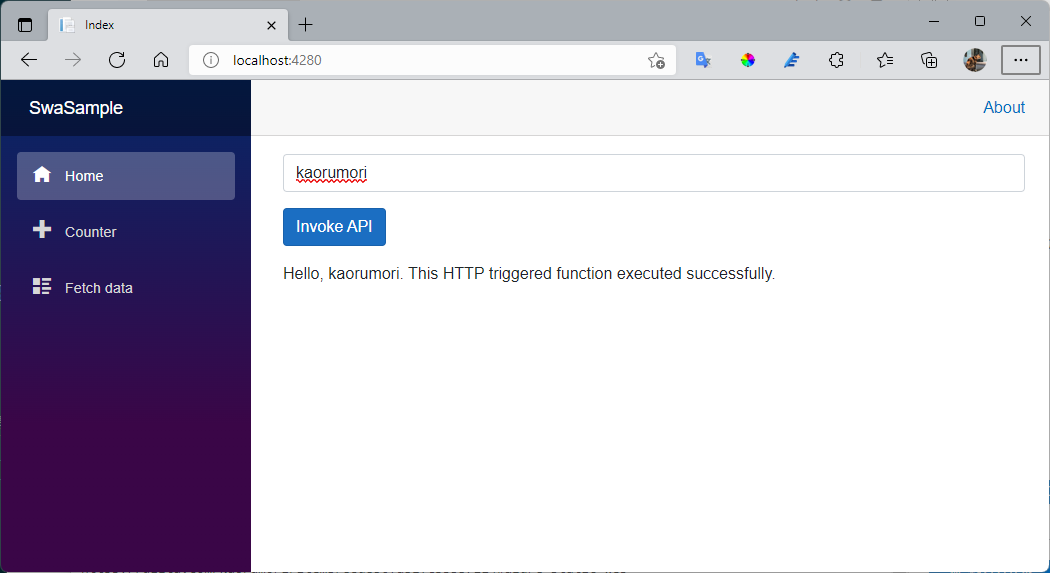
テキスト入力欄とボタンのシンプルなフォームが表示されます。テキスト入力欄に名前を入力してボタンをクリックすると、フォームで入力したテキストがAPIに渡されて、レスポンスが表示されました。
Azure Static Web Appsにデプロイ
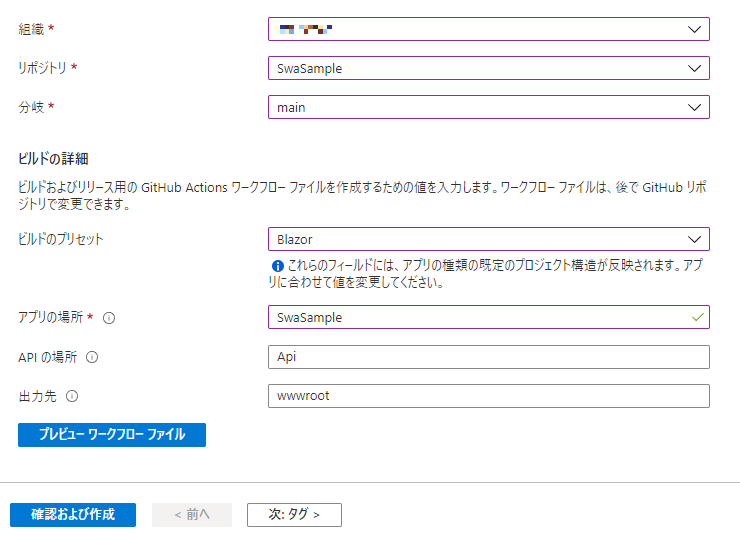
Azure Static Web Appsへのデプロイについては以下の手順を参考に進めていきます。
ビルドの詳細を指定する画面ではAPIの場所にAzure Functionsのプロジェクトが格納されているフォルダーを指定します。
GitHub Actionsでビルドが完了したら、WebブラウザでAzure Static Web AppsのURLにアクセスして動作を確認できました。
私の場合、最初はGitHub Actionsのビルドで以下のIssueと同じDeployment Failure Reason: Failed to deploy the Azure Functions.というエラーが表示されてビルドに失敗しました。GitHub Actionsでビルドを再度実行したら今度は成功してデプロイできました。
おわりに
static-web-apps-cliを利用してBlazor WebAssemblyのアプリとAzure Functionsの関数にローカルでアクセスしました。また、Azure Static Web Appsにそれらをデプロイすることができました。もっと大変かと思っていたのですが、思っていたよりも簡単でよかったです。