下記のライブラリでQRコードを作ってDLできるシステムをphpで作ってみました。
https://packagist.org/packages/endroid/qr-code
準備
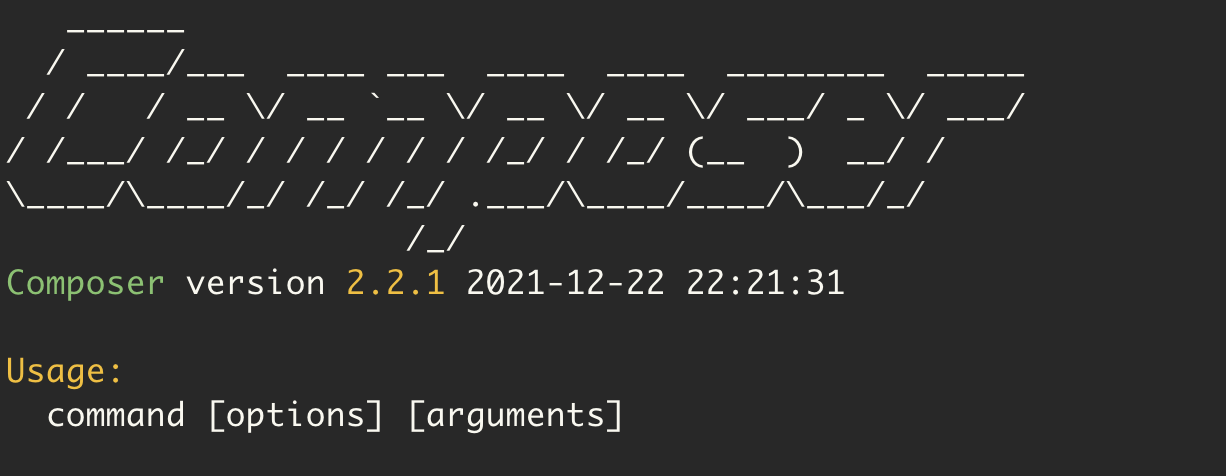
最初にcomposerをインストールします。
成功すると、こんな画面が出ました。
次はcomposerでendroid/qr-code をインストールします。
こちらもインストール出来たら下記の文面が出ました。

任意の場所にvendorというフォルダが出来ているので、それをそのまま使います。
コマンドラインでのインストールとライブラリの使い方は、下記のブログを参考にさせてもらいました。
オプションもわかり易く紹介されています。
https://blog.apar.jp/program/13204/
やりたいこと
- サイズと色を自由に選んで作れる
- pngとsvg形式が作れる
- 現物が見れて、ダウンロードできる
特にsvgで書き出す方法が中々見つからず、試した結果動いたもので書き出しています。
わかっていないので、不完全かもしれないです…。
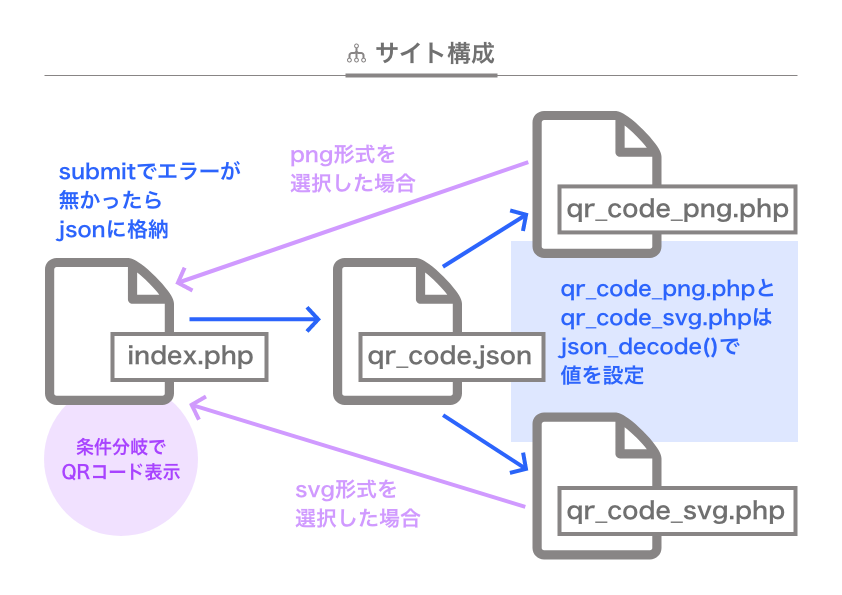
index.php 入力・DL
入力・表示・DLはindexページだけで完結します。
submit後、同ページ上でエラーチェックとjson用の値変換。
バリデーションが通ったらパラメータに変換してjsonに格納し、png生成とsvg生成のファイルにデータが入ります。
そして結果が下部のパネルに表示されて、DLボタンがアクティブになります。
  //クロスサイトスクリプト
  function html_esc($word){
    return htmlspecialchars($word,ENT_QUOTES,'UTF-8');
  }
//初期値
  $err = [];
  $err['text'] = '';
  $err['size'] = '';
  $err['color'] = '';
  $err['type'] = '';
//radioボタンチェック
  $cheked1 = '';
  $cheked6 = '';
  $cheked8 = '';
  $cheked10 = '';
  $cheked12 = '';
  $cheked15 = '';
  $cheked20 = '';
  $cheked_bla = '';
  $cheked_red = '';
  $cheked_blu = '';
  $cheked_gre = '';
  $cheked_ore = '';
  $cheked_cus = '';
  $cheked_png = '';
  $cheked_svg = '';
//テキストとnumber
  $qr_text = '';
  $all_size = '';
  $in_size = '';
  $r_color = '';
  $g_color = '';
  $b_color = '';
  $qr_show = 'ここにQRコードが表示されます';
//DLボタンを非アクティブに
  $qr_id = 'dlBtnNon';
  $qr_img = 'javascript:void(0);';

  if($_SERVER['REQUEST_METHOD'] === 'POST'){
    $qr_text = html_esc($_POST['qr_text']);
    //radioのチェックはissetで有無を調べないとnoticeが出た
    if(isset($_POST['qr_size'])){
      $qr_size = html_esc($_POST['qr_size']);
    }
    if(isset($_POST['qr_color'])){
      $qr_color = html_esc($_POST['qr_color']);
    }
    if(isset($_POST['qr_type'])){
      $qr_type = html_esc($_POST['qr_type']);
    }

    //カスタムサイズとカラー
    if(isset($_POST['all_size'])){
      $all_size = html_esc($_POST['all_size']);
    }
    if(isset($_POST['in_size'])){
      $in_size = html_esc($_POST['in_size']);
    }
    if(isset($_POST['r_color'])){
      $r_color = html_esc($_POST['r_color']);
    }
    if(isset($_POST['g_color'])){
      $g_color = html_esc($_POST['g_color']);
    }
    if(isset($_POST['b_color'])){
      $b_color = html_esc($_POST['b_color']);
    }

    //エラーチェックと値変換
    if($qr_text === '' || mb_strlen($qr_text) > 200){
      $err['text'] = '<p class="err"><span class="material-icons-outlined">error_outline</span>未入力か字数制限を超えています</p>';
    } else {
      $err['text'] = '';
    }
    //radioのエラーはemptyで確認しないと検出できなかった
    if(empty($qr_size)){
      $err['size'] = '<p class="err"><span class="material-icons-outlined">error_outline</span>未選択です</p>';
    } else {
        //サイズと余白設定
        switch($qr_size){
          case '60': $cheked6 = 'checked';
          $all_size_set = 58; $in_size_set = 6;
           break;
          case '80': $cheked8 = 'checked';
          $all_size_set = 84; $in_size_set = 6;
          break;
          case '100': $cheked10 = 'checked';
          $all_size_set = 110; $in_size_set = 6;
          break;
          case '120': $cheked12 = 'checked';
          $all_size_set = 128; $in_size_set = 10;
          break;
          case '150': $cheked15 = 'checked';
          $all_size_set = 150; $in_size_set = 10;
          break;
          case '200': $cheked20 = 'checked';
          $all_size_set = 180; $in_size_set = 10;
          break;
          case 'custam_size': $cheked1 = 'checked';
          break;
        }
        $err['size'] = '';
      }
    //カスタムサイズのチェック
    if(!empty($qr_size)){
      if($qr_size === 'custam_size'){
        if($all_size === '' || $in_size === ''){
          $err['size'] = '<p class="err"><span class="material-icons-outlined">error_outline</span>カスタムサイズの指定がありません</p>';
          } else {
          $all_size_set = (int)$all_size;
          $in_size_set = (int)$in_size;
          $err['size'] = '';
        }
      } else {
        //カスタムサイズのチェックが外れた時、数値を空に
        $all_size = '';
        $in_size = '';
      }
    }
//カスタムカラーのチェック
    if(empty($qr_color)){
      $err['color'] = '<p class="err"><span class="material-icons-outlined">error_outline</span>未選択です</p>';
    } else {
      //RGB値設定
      switch($qr_color){
        case 'black': $cheked_bla = 'checked';
        $rgb_r = 0; $rgb_g = 0; $rgb_b = 0;
        break;
        case 'blue': $cheked_blu = 'checked';
        $rgb_r = 0; $rgb_g = 0; $rgb_b = 255;
        break;
        case 'red': $cheked_red = 'checked';
        $rgb_r = 255; $rgb_g = 0; $rgb_b = 0;
        break;
        case 'green': $cheked_gre = 'checked';
        $rgb_r = 23; $rgb_g = 185; $rgb_b = 17;
        break;
        case 'orenge': $cheked_ore = 'checked';
        $rgb_r = 255; $rgb_g = 128; $rgb_b = 0;
        break;
        case 'custam_color': $cheked_cus = 'checked';
        break;
      }
      $err['color'] = '';
    }
    //RGB値のチェック
    if(!empty($qr_color)){
      if($qr_color === 'custam_color'){
        if($r_color === '' || $g_color === '' || $b_color === ''){
          $err['color'] = '<p class="err"><span class="material-icons-outlined">error_outline</span>RGB値の指定がありません</p>';
        } else {
          $rgb_r = (int)$r_color;
          $rgb_g = (int)$g_color;
          $rgb_b = (int)$b_color;
          $err['color'] = '';
        }
      } else {
      //チェックが外れたら数値を空に
        $r_color = '';
        $g_color = '';
        $b_color = '';
      }
    }

    if(empty($qr_type)){
      $err['type'] = '<p class="err"><span class="material-icons-outlined">error_outline</span>未選択です</p>';
    } else {
      switch($qr_type){
        case 'png': $cheked_png = 'checked'; break;
        case 'svg': $cheked_svg = 'checked'; break;
      }
      $err['type'] = '';
    }

    //エラーが無かった場合の処理
    if($qr_text !== '' && mb_strlen($qr_text) < 200 && $err['size'] === '' && $err['color'] === '' && !empty($qr_type)){
      //JSONに入れる為、配列へ
      $qr_data = [$qr_text,$all_size_set,$in_size_set,$rgb_r,$rgb_g,$rgb_b];
      //JSON形式に変換
      $json = json_encode($qr_data,JSON_UNESCAPED_UNICODE);
      //JSONへ格納
      file_put_contents('qr_data.json',$json);

      //見本表示とDLボタンアクティブ化
      if($qr_type === 'png'){
        $qr_show = '<img src="qr_code_png.php" alt="QRコード">';
        //リンクを有効
        $qr_img = 'qr_code_png.php';
        //idセレクタを変えてCSS変更
        $qr_id = 'dlBtn';
      } elseif ($qr_type === 'svg'){
        $qr_show = '<img src="qr_code_svg.php" alt="QRコード">';
        $qr_img = 'qr_code_svg.php';
        $qr_id = 'dlBtn';
      }
    }
  }
<form id="qrForm" method="post" action="">
        <div class="formGroup">
          <p class="groupNum"><span>1</span>テキストを入力して下さい(200文字以内)</p>
          <?php echo $err['text']; ?>
          <input type="text" class="inputText" name="qr_text" value="<?php echo $qr_text; ?>">
        </div>

        <div class="formGroup">
          <p class="groupNum"><span>2</span>サイズを選んでください(余白は10px程取っています)</p>
          <?php echo $err['size']; ?>
          <div class="qrImg">
            <label class="qrBox">
              <img class="sizeImg" src="image/qr_code70.svg" alt="70pxサイズ">
              <input type="radio" class="qrSize" name="qr_size" value="60" <?php echo $cheked6; ?>>70px
            </label>

            <label class="qrBox">
              <img class="sizeImg" src="image/qr_code96.svg" alt="96pxサイズ">
              <input type="radio" class="qrSize" name="qr_size" value="80" <?php echo $cheked8; ?>>96px
            </label>

            <label class="qrBox">
              <img class="sizeImg" src="image/qr_code122.svg" alt="122pxサイズ">
              <input type="radio" class="qrSize" name="qr_size" value="100" <?php echo $cheked10; ?>>122px
            </label>

            <label class="qrBox">
              <img class="sizeImg" src="image/qr_code148.svg" alt="148pxサイズ">
              <input type="radio" class="qrSize" name="qr_size" value="120" <?php echo $cheked12; ?>>148px
            </label>

            <label class="qrBox">
              <img class="sizeImg" src="image/qr_code170.svg" alt="170pxサイズ">
              <input type="radio" class="qrSize" name="qr_size" value="150" <?php echo $cheked15; ?>>170px
            </label>

            <label class="qrBox">
              <img class="sizeImg" src="image/qr_code200.svg" alt="200pxサイズ">
              <input type="radio" class="qrSize" name="qr_size" value="200" <?php echo $cheked20; ?>>200px
            </label>
          </div>
          <!-- //.qrImg -->

          <div class="custam">
            <p>※上記以外のサイズはカスタムサイズをチェックして数値を入力してください。(数値上限を設けています)<br>
            <span class="smallText">小さいサイズは多少誤差が出るようです。</span></p>
            <label class="qrRadioCustam">
              <input type="radio" class="qrSize" name="qr_size" value="custam_size" <?php echo $cheked1; ?>>カスタムサイズ
            </label>
            <label class="allSize">コード枠
              <input type="number" name="all_size" min="40" max="300" value="<?php echo $all_size; ?>">px
            </label>
            <label class="allSize">余白
              <input type="number" name="in_size" min="2" max="20" value="<?php echo $in_size; ?>">px
            </label>
          </div>
          <!-- //.custam -->
        </div>
        <!-- //.formGroup -->

        <div class="formGroup">
          <p class="groupNum"><span>3</span>カラーを選んでください</p>
          <?php echo $err['color']; ?>
          <div class="qrImg">
            <label class="qrBox">
              <img class="sizeImg" src="image/qr_code80.svg" alt="黒">
              <input type="radio" class="qrSize" name="qr_color" value="black" <?php echo $cheked_bla; ?>>黒
            </label>
            <label class="qrBox">
              <img class="sizeImg" src="image/qr_code80red.svg" alt="赤">
              <input type="radio" class="qrSize" name="qr_color" value="red" <?php echo $cheked_red; ?>>赤
            </label>
            <label class="qrBox">
              <img class="sizeImg" src="image/qr_code80bl.svg" alt="青">
              <input type="radio" class="qrSize" name="qr_color" value="blue" <?php echo $cheked_blu; ?>>青
            </label>
            <label class="qrBox">
              <img class="sizeImg" src="image/qr_code80gree.svg" alt="緑">
              <input type="radio" class="qrSize" name="qr_color" value="green" <?php echo $cheked_gre; ?>>緑
            </label>
            <label class="qrBox">
              <img class="sizeImg" src="image/qr_code80ore.svg" alt="オレンジ">
              <input type="radio" class="qrSize" name="qr_color" value="orenge" <?php echo $cheked_ore; ?>>オレンジ
            </label>
          </div>
          <!-- //.qrImg -->

          <div class="custam">
            <p>※上記以外のカラーはカスタムカラーをチェックしてRGB値を入力してください。</p>
            <label class="qrRadioCustam">
              <input type="radio" class="qrSize" name="qr_color" value="custam_color" <?php echo $cheked_cus; ?>>カスタムカラー
            </label>
            <label class="allSize">R
              <input type="number" name="r_color" min="0" max="255" value="<?php echo $r_color; ?>">
            </label>
            <label class="allSize">G
              <input type="number" name="g_color" min="0" max="255" value="<?php echo $g_color; ?>">
            </label>
            <label class="allSize">B
              <input type="number" name="b_color" min="0" max="255" value="<?php echo $b_color; ?>">
            </label>
          </div>
          <!-- //.custam -->
        </div>
        <!-- //.formGroup -->

        <div class="formGroup">
          <p class="groupNum"><span>4</span>画像形式を選んでください</p>
          <?php echo $err['type']; ?>
          <label class="qrMold">
            <input type="radio" class="qrSize" name="qr_type" value="png" <?php echo $cheked_png; ?>>PNG(推奨形式)
          </label>
          <label class="qrMold">
            <input type="radio" class="qrSize" name="qr_type" value="svg" <?php echo $cheked_svg; ?>>SVG(カスタマイズ向)
          </label>
        </div>
        <!-- //.formGroup -->

        <input type="submit" value="QRコードを作る" id="submibtn">
      </form>

      <!-- 生成コード表示 -->
      <div id="qr_panel">
        <p><?php echo $qr_show; ?></p>
      </div>

      <!-- DLボタン -->
      <a href="<?php echo $qr_img; ?>" id="<?php echo $qr_id; ?>">ダウンロードする</a>
      <p class="center">※ダウンロード後はQRコードの読み込みを確認してください</p>
サイズについて
最初の選択は60px、80px、100px、120px、150pxと端数は付けなかったのですが、実際生成してみると余白とコード本体のサイズがどうもおかしい。
80pxと100pxの内枠が同じになっている。外枠サイズは指定通り出るのに…
10pxくらいまでの数値がうまく設定できてないような。
以下、内枠60pxと80pxの画像を並べてみました。余白は同じ10px取りましたが何故か余白の方が大きくなってしまいます。

いろいろ試してみた結果、差が分かり易いサイズに設定し直しました。
コードの情報量によっても密度が変わるので、サイズが変わるかもしれません。
小さいサイズは不安定かもです。
qr_code_png.php 画像生成
png形式の画像生成ファイルでライブラリをインクルードしてます。
srcで画像出力、hrefでDLとして呼び出しにもなってます。
require_once(__DIR__ . '/vendor/autoload.php');

use Endroid\QrCode\QrCode;

//jsonファイルを取得
$json =file_get_contents('./qr_data.json');
$json = mb_convert_encoding($json, 'UTF8', 'ASCII,JIS,UTF-8,EUC-JP,SJIS-WIN');
$json = json_decode($json,true);

//jsonデータを変数に格納
$qr_text = $json[0];
$all_size_set = $json[1];
$in_size_set = $json[2];
$rgb_r = $json[3];
$rgb_g = $json[4];
$rgb_b = $json[5];

$qrCodeData = $qr_text;
// QRコードに埋め込む文字列の指定
$qrCode = new QrCode($qrCodeData);

$qrCode ->setEncoding('UTF-8');

// QRコードのサイス(単位:ピクセル)
$qrCode->setSize($all_size_set);

// QRコードの周囲の余白(単位:ピクセル)
$qrCode->setMargin($in_size_set);

// QRコードの色(RGBAで指定)
$qrCode->setForegroundColor(['r' => $rgb_r, 'g' => $rgb_g, 'b' => $rgb_b, 'a' => 1]);

// 背景の色(RGBAで指定)
$qrCode->setBackgroundColor(['r' => 255, 'g' => 255, 'b' => 255, 'a' => 1]);

echo $qrCode->writeString();
 $file = 'qr_code.png';

// 2.コンテンツタイプを「ダウンロード」にする
header('Content-Type: application/force-download');
// 3.ファイルサイズを取得して設定する
header('Content-Length: '.filesize($file));
// 4.ダウンロードする「ファイル名」を指定する。
header('Content-Disposition: attachment; filename="'.$file.'"');

// 5.ファイルを読み込む
readfile($file);
ここはほぼ参考ページのオプションのまま引用しました。
qr_code_svg.php 画像生成
これも同様のsvg形式書出しファイルです。
require_once(__DIR__ . '/vendor/autoload.php');

use Endroid\QrCode\QrCode;

//jsonファイルを取得
$json =file_get_contents('./qr_data.json');
$json = mb_convert_encoding($json, 'UTF8', 'ASCII,JIS,UTF-8,EUC-JP,SJIS-WIN');
$json = json_decode($json,true);

//jsonデータを変数に格納
$qr_text = $json[0];
$all_size_set = $json[1];
$in_size_set = $json[2];
$rgb_r = $json[3];
$rgb_g = $json[4];
$rgb_b = $json[5];

$qrCodeData = $qr_text;
// QRコードに埋め込む文字列の指定
$qrCode = new QrCode($qrCodeData);

$qrCode ->setEncoding('UTF-8');
// QRコードのサイス(単位:ピクセル)
$qrCode->setSize($all_size_set);

// QRコードの周囲の余白(単位:ピクセル)
$qrCode->setMargin($in_size_set);

// QRコードの色(RGBAで指定)
$qrCode->setForegroundColor(['r' => $rgb_r, 'g' => $rgb_g, 'b' => $rgb_b, 'a' => 1]);

// 背景の色(RGBAで指定)
$qrCode->setBackgroundColor(['r' => 255, 'g' => 255, 'b' => 255, 'a' => 1]);

//SVG化
$qrCode -> setWriterByExtension('svg');

//DLファイル名
$file = 'qr_code.svg';

// Content-Typeは下記にしないと画像としてリンクできない
header('Content-Type: '.$qrCode->getContentType());
//ダウンロードする「ファイル名」を指定する。
header('Content-Disposition: attachment; filename="'.$file.'"');
//画像表示、最後に置かないと表示されなかった
echo $qrCode->writeString();
ここは苦労しました。
検索しても情報少ないし、翻訳しても英語が難しい。
ただsvg形式はサイズ・色変更しやすい上、画像が綺麗なので外せないところ。
svg変換のそれらしいコードを探したところ、表示できたのはこれだけでした。
setWriterByExtension('svg')
あと最後に
echo $qrCode->writeString();
これで書き出すみたいです。
画像形式としてheader関数も必要で
header('Content-Type: '.$qrCode->getContentType());
を入れて表示・DLできるようになりました。
pngの時と同じにすると、表示されなかったので以下のコードは省きました。
header('Content-Type: application/force-download');

readfile($file);
このファイルに関しては動作確認を優先して、理解した上でコードを置いたわけでないので、これでいいのか自信はありません…。
ですが、様子見しながら気がついた点が出たら直していきます。
ファイル一式をGitHubにアップしました
https://github.com/mugikomugi/qr_code_generator