複数ファイルから歯抜けのリストを取得し、別ファイルに出力するツールです。
環境制約でPythonの開発環境が構築できず、久々にVBAで組みました。ちゃんとマッチしたものがネットに転がってなかったので記事にしました。
開発環境
- Windows10 PRo 1909
- Office Home&Business 2016
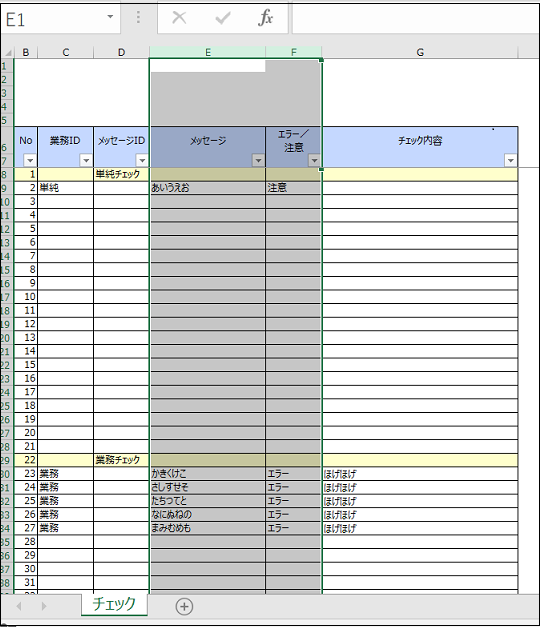
データ取得元のファイル群
このようなファイルを対象にデータの抽出を行います。この【メッセージ】と【エラー/注意区分】を取得します。
-
フォルダの中身
![vba1.png] (https://qiita-image-store.s3.ap-northeast-1.amazonaws.com/0/264141/12f18381-2229-d038-3baa-0fc5bce24da5.png) -
ファイルの中身
【実装】getMsgList.xlsm
出力用のテンプレートです(2シート構成)。VBAはこちらに実装します。


ツールの参照設定は以下の通りです.
- Microsoft Scripting Runtime
- Visual Basic For Applications
- OLE automation
- Microsoft Excel 16.0 Object Library
- Microsoft Office 16.0 Object Library
Sub GetMsgList()

Application.ScreenUpdating = False

'リストの頭の行、
Dim countWorkSheets As Long
countWorkSheets = 2

'初期化
Dim IniRows As Long
IniRows = Sheets(1).Cells(Rows.count, 2).End(xlUp).Row
Sheets(1).Range(Cells(2, 1), Cells(10000, 4)).ClearContents
Worksheets(2).Activate
ActiveSheet.Range(ActiveSheet.Cells(2, 1), ActiveSheet.Cells(10000, 5)).ClearContents

Sheets(1).Activate
'ファイル操作のオブジェクトを定義する
Dim objFso As FileSystemObject
Set objFso = New FileSystemObject

'相対パスから絶対パスを取得
Dim sPath As String
sPath = objFso.GetAbsolutePathName(ThisWorkbook.path & "\msg\")

'パスが取れてるかどうかをイミディエイトで確認
Debug.Print (sPath)

'ファイル数をカウントする。
Dim FileInt     As Long
FileInt = objFso.GetFolder(sPath).files.count
'ファイルがない場合はエラーにして終わる

If (FileInt < 0) Then
    MsgBox "フォルダがありません。"
    Set objFso = Nothing
    Exit Sub

'ファイルが存在する場合は処理を続行する
End If
    Dim targetFile As file
    '存在するファイル分ループする
    For Each targetFile In objFso.GetFolder(sPath).files
        'ファイルが取れてるかどうかをイミディエイトで確認
        Debug.Print (targetFile)
'        '改めてこのワークシートをアクティベートしておく
'        ThisWorkbook.Activate
        '取得したファイルを開く 以下ブックのwith句
        With Workbooks.Open(targetFile.path, UpdateLink:=False)
            '取得したファイルを開く 以下シートのwith句
            With .Sheets(1)
            '最終行の取得
            Dim LastRow As Long
            LastRow = .Cells(Rows.count, 5).End(xlUp).Row
            Debug.Print (LastRow)
            '縦で検索して、値の先頭から最後まで繰り返す
            Dim countRow As Long
            For countRow = 8 To LastRow
                '空でない場合
                If Not IsEmpty(.Cells(countRow, 5).Value) Then
                    Cells(countWorkSheets, 1) = countWorkSheets - 1
                    Cells(countWorkSheets, 2) = .Cells(countRow, 5)
                    Cells(countWorkSheets, 3) = .Cells(countRow, 6)
                    Cells(countWorkSheets, 4) = Dir(targetFile)
                    countWorkSheets = countWorkSheets + 1
                End If
            Next countRow

        End With
            Application.DisplayAlerts = False
            .Close
            Application.DisplayAlerts = True

    End With

Next targetFile

'一応このシートをアクティベートしておく
Sheets(1).Activate
Dim ThisLastRow As Long
'末行を取得し、rangeでコピーする。
ThisLastRow = Cells(Rows.count, 1).End(xlUp).Row
Debug.Print (ThisLastRow)
'rangeを流用し、コピー
ActiveSheet.Range(Cells(2, 2), Cells(ThisLastRow, 3)).Copy Destination:=Sheets(2).Range("B2")
'アクティベートを変更する。
Worksheets(2).Activate
'重複の削除
ActiveSheet.Range("B1").CurrentRegion.RemoveDuplicates Columns:=Array(2, 3), Header:=xlYes

'ソートを行う。
ActiveSheet.Sort.SortFields.Clear
ActiveSheet.Range("A1").CurrentRegion.Sort key1:=ActiveSheet.Range("B2"), key2:=ActiveSheet.Range("C2"), Order1:=xlAscending, Header:=xlYes

'末行を取得しNoを振る。
Dim ListMargeLastRow As Long
ListMargeLastRow = ActiveSheet.Cells(Rows.count, 2).End(xlUp).Row
Debug.Print (ListMargeLastRow)
Dim countMargeRow As Long
For countMargeRow = 2 To ListMargeLastRow
    ActiveSheet.Cells(countMargeRow, 1) = countMargeRow - 1
Next countMargeRow

'罫線を引く。
Dim bs As Borders
Set bs = ActiveSheet.Range("A1").CurrentRegion.Borders ' 上下左右の罫線
bs.LineStyle = xlContinuous

Set objFso = Nothing
End Sub
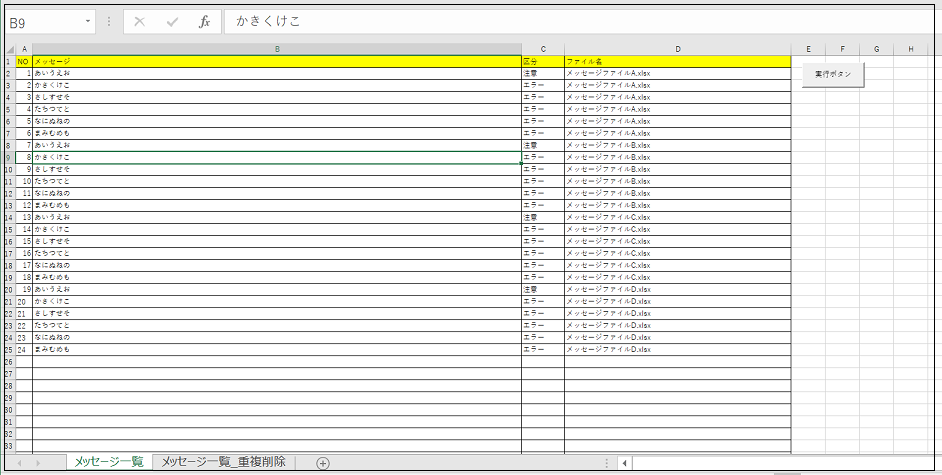
データ出力結果
ボタンにマクロの登録をして、実行します。すると御覧の通り出力できました。めでたしめでたし。
-
メッセージ一覧
-
メッセージ一覧_重複削除
