記事の内容
Postfixでメールサーバーを構築し、メールが受信される度にサーバー側で自作プログラムを動かします。
自作プログラムは受信メールをインプットデータにして何らかの処理を行います。これはどの言語で実装しても良いのですが、本記事ではPythonを使ってSlackへの投稿を実装します。
メールサーバーは今回はローカル環境で最低限動くように構築し、メールの送受信はローカル環境内でのみ行います。セキュリティ等、詳細な設定は行いません。
環境
CentOS 8とUbuntu 20.04の両方の手順を示します。
BIND9、Postfix、Dovecot は Linuxパッケージからインストールします。
メールサーバーを構築するサーバーの環境は以下の通りです。
- ドメイン名:localdomain
- ホスト名:localhost
- Linuxの一般ユーザー名とパスワード:usrname、secret
CentOS の Python バージョン
$ python3 -V
Python 3.6.8
Ubuntu の Python バージョン
$ python3 -V
Python 3.8.2
CentOS の ifconfig 結果
ens160: flags=4163<UP,BROADCAST,RUNNING,MULTICAST>  mtu 1500
        inet 192.168.79.128  netmask 255.255.255.0  broadcast 192.168.79.255
        inet6 fe80::59ac:7015:10c9:543c  prefixlen 64  scopeid 0x20<link>
        ether 00:0c:29:93:f6:a7  txqueuelen 1000  (Ethernet)
        RX packets 914  bytes 156651 (152.9 KiB)
        RX errors 0  dropped 0  overruns 0  frame 0
        TX packets 284  bytes 25365 (24.7 KiB)
        TX errors 0  dropped 0 overruns 0  carrier 0  collisions 0

lo: flags=73<UP,LOOPBACK,RUNNING>  mtu 65536
        inet 127.0.0.1  netmask 255.0.0.0
        inet6 ::1  prefixlen 128  scopeid 0x10<host>
        loop  txqueuelen 1000  (Local Loopback)
        RX packets 0  bytes 0 (0.0 B)
        RX errors 0  dropped 0  overruns 0  frame 0
        TX packets 0  bytes 0 (0.0 B)
        TX errors 0  dropped 0 overruns 0  carrier 0  collisions 0

virbr0: flags=4099<UP,BROADCAST,MULTICAST>  mtu 1500
        inet 192.168.122.1  netmask 255.255.255.0  broadcast 192.168.122.255
        ether 52:54:00:be:03:9b  txqueuelen 1000  (Ethernet)
        RX packets 0  bytes 0 (0.0 B)
        RX errors 0  dropped 0  overruns 0  frame 0
        TX packets 0  bytes 0 (0.0 B)
        TX errors 0  dropped 0 overruns 0  carrier 0  collisions 0
Ubuntu の ifconfig 結果
docker0: flags=4099<UP,BROADCAST,MULTICAST>  mtu 1500
        inet 172.17.0.1  netmask 255.255.0.0  broadcast 172.17.255.255
        ether 02:42:cd:65:85:ad  txqueuelen 0  (イーサネット)
        RX packets 0  bytes 0 (0.0 B)
        RX errors 0  dropped 0  overruns 0  frame 0
        TX packets 0  bytes 0 (0.0 B)
        TX errors 0  dropped 0 overruns 0  carrier 0  collisions 0

ens33: flags=4163<UP,BROADCAST,RUNNING,MULTICAST>  mtu 1500
        inet 192.168.79.130  netmask 255.255.255.0  broadcast 192.168.79.255
        inet6 fe80::f8e9:90fd:cfc4:280e  prefixlen 64  scopeid 0x20<link>
        ether 00:0c:29:cc:76:18  txqueuelen 1000  (イーサネット)
        RX packets 159457  bytes 233626546 (233.6 MB)
        RX errors 0  dropped 0  overruns 0  frame 0
        TX packets 10206  bytes 690515 (690.5 KB)
        TX errors 0  dropped 0 overruns 0  carrier 0  collisions 0

lo: flags=73<UP,LOOPBACK,RUNNING>  mtu 65536
        inet 127.0.0.1  netmask 255.0.0.0
        inet6 ::1  prefixlen 128  scopeid 0x10<host>
        loop  txqueuelen 1000  (ローカルループバック)
        RX packets 514  bytes 48478 (48.4 KB)
        RX errors 0  dropped 0  overruns 0  frame 0
        TX packets 514  bytes 48478 (48.4 KB)
        TX errors 0  dropped 0 overruns 0  carrier 0  collisions 0
Postfixメールサーバーを構築する
以下の2冊の書籍を見ながら、Postfix メールサーバーを構築します。
これらの書籍には、構築手順と解説が書かれていますので、本記事ではローカル環境構築に必要な手順のみ示します。
両書籍ともにCentOS 5.4を使用していますが、本記事では CentOS 8 と Ubuntu 20.04 用にコマンドを書き換えます。
- 書名:BIND9によるDNSサーバ構築(改定新版)
- 著者:伊藤宏通/著 川原龍人/著 野津新/著
- 出版者:技術評論社
- 出版年月:2010-07
- ISBN:9784774142753
- https://www.amazon.co.jp/dp/4774142751/
- 書名:Postfix実践入門
- 著者:清水正人/著
- 出版者:技術評論社
- 出版年月:2010-10
- ISBN:9784774143750
- https://www.amazon.co.jp/dp/4774143758/
DNSの設定
書籍「BIND9によるDNSサーバ構築」p.84~p.86
rootユーザーで、BIND9 をインストールします。
CentOSでは書籍に従って chroot を使用します。
Ubuntuでは今回は chroot を使用しません。
CentOS
yum install bind bind-chroot

cd /var/named/chroot/etc
mv /etc/named.conf .
ln -s /var/named/chroot/etc/named.conf /etc/
Ubuntu
apt install bind9 bind9utils
書籍「BIND9によるDNSサーバ構築」p.86、p.96
rootユーザーで、/etc/resolv.conf を編集します。
editor /etc/resolv.conf
CentOS
# Generated by NetworkManager
search localdomain
-nameserver 192.168.79.2
+nameserver 127.0.0.1
Ubuntu
-nameserver 127.0.0.53
+nameserver 127.0.0.1
options edns0
search localdomain
書籍「BIND9によるDNSサーバ構築」p.87
rootユーザーで、named.conf を編集します。
CentOS
editor /etc/named.conf
(前略)

options {
-        listen-on port 53 { 127.0.0.1; };
+        //listen-on port 53 { 127.0.0.1; };
-        listen-on-v6 port 53 { ::1; };
+        //listen-on-v6 port 53 { ::1; };
        directory       "/var/named";
        dump-file       "/var/named/data/cache_dump.db";
        statistics-file "/var/named/data/named_stats.txt";
        memstatistics-file "/var/named/data/named_mem_stats.txt";
        secroots-file   "/var/named/data/named.secroots";
        recursing-file  "/var/named/data/named.recursing";
-        allow-query     { localhost; };
+        //allow-query     { localhost; };

(中略)

include "/etc/named.rfc1912.zones";
include "/etc/named.root.key";
+
+zone "localdomain" IN {
+        type master;
+        file "localdomain.zone";
+        allow-update { none; };
+};
Ubuntu
editor /etc/bind/named.conf.local
//
// Do any local configuration here
//

// Consider adding the 1918 zones here, if they are not used in your
// organization
//include "/etc/bind/zones.rfc1918";
+zone "localdomain" IN {
+        type master;
+        file "localdomain.zone";
+        allow-update { none; };
+};
書籍「BIND9によるDNSサーバ構築」p.89
rootユーザーで、named.conf の構文チェックを行います。
CentOS
/usr/sbin/named-checkconf /etc/named.conf
Ubuntu
/usr/sbin/named-checkconf /etc/bind/named.conf
書籍「BIND9によるDNSサーバ構築」p.89
rootユーザーで、localdomain.zone を新規作成します。
CentOS
editor /var/named/chroot/var/named/localdomain.zone
$TTL 10800
localdomain. 1D IN SOA ns.localdomain. root.localdomain. (
        2020052601    ; serial
        43200         ; refresh
        5400          ; retry
        3600000       ; expiry
        3600 )        ; minimum

localdomain. 1D IN NS ns.localdomain.

localdomain. 1D IN MX 10 mail01.localdomain.

ns.localdomain. 1D IN A 192.168.79.128
mail01.localdomain. 1D IN A 192.168.79.128
Ubuntu
editor /var/cache/bind/localdomain.zone
$TTL 10800
localdomain. 1D IN SOA ns.localdomain. root.localdomain. (
        2020052601    ; serial
        43200         ; refresh
        5400          ; retry
        3600000       ; expiry
        3600 )        ; minimum

localdomain. 1D IN NS ns.localdomain.

localdomain. 1D IN MX 10 mail01.localdomain.

ns.localdomain. 1D IN A 192.168.79.130
mail01.localdomain. 1D IN A 192.168.79.130
書籍「BIND9によるDNSサーバ構築」p.91
rootユーザーで、ゾーンファイルのパーミッション設定を行います。
CentOS
chmod 640 /var/named/chroot/var/named/localdomain.zone
chown root:named /var/named/chroot/var/named/localdomain.zone
ln -s /var/named/chroot/var/named/localdomain.zone /var/named/
Ubuntu
chmod 640 /var/cache/bind/localdomain.zone
chown root:bind /var/cache/bind/localdomain.zone
書籍「BIND9によるDNSサーバ構築」p.93
rootユーザーで、ゾーンファイルの構文チェックを行います。
CentOS
/usr/sbin/named-checkzone localdomain /var/named/chroot/var/named/localdomain.zone
Ubuntu
/usr/sbin/named-checkzone localdomain /var/cache/bind/localdomain.zone
書籍「BIND9によるDNSサーバ構築」p.94
rootユーザーで、BIND を起動します。
CentOS、Ubuntu共通
# 現在の状態を調べたい時
systemctl status named.service

# 停止してから起動したい時
systemctl stop named.service
systemctl start named.service

# OSブート時に自動起動したい時
systemctl enable named.service
書籍「BIND9によるDNSサーバ構築」p.100
rootユーザーで、ゾーン転送をテストします。
CentOS
dig @192.168.79.128 localdomain AXFR
CentOS 結果
; <<>> DiG 9.11.4-P2-RedHat-9.11.4-26.P2.el8 <<>> @192.168.79.128 localdomain AXFR
; (1 server found)
;; global options: +cmd
localdomain.		86400	IN	SOA	ns.localdomain. root.localdomain. 2020052601 43200 5400 3600000 3600
localdomain.		86400	IN	NS	ns.localdomain.
localdomain.		86400	IN	MX	10 mail01.localdomain.
mail01.localdomain.	86400	IN	A	192.168.79.128
ns.localdomain.		86400	IN	A	192.168.79.128
localdomain.		86400	IN	SOA	ns.localdomain. root.localdomain. 2020052601 43200 5400 3600000 3600
;; Query time: 1 msec
;; SERVER: 192.168.79.128#53(192.168.79.128)
;; WHEN: 木  6月 04 15:35:22 JST 2020
;; XFR size: 6 records (messages 1, bytes 217)
Ubuntu
dig @192.168.79.130 localdomain AXFR
Ubuntu 結果
; <<>> DiG 9.16.1-Ubuntu <<>> @192.168.79.130 localdomain AXFR
; (1 server found)
;; global options: +cmd
localdomain.		86400	IN	SOA	ns.localdomain. root.localdomain. 2020052601 43200 5400 3600000 3600
localdomain.		86400	IN	NS	ns.localdomain.
localdomain.		86400	IN	MX	10 mail01.localdomain.
mail01.localdomain.	86400	IN	A	192.168.79.130
ns.localdomain.		86400	IN	A	192.168.79.130
localdomain.		86400	IN	SOA	ns.localdomain. root.localdomain. 2020052601 43200 5400 3600000 3600
;; Query time: 3 msec
;; SERVER: 192.168.79.130#53(192.168.79.130)
;; WHEN: 木  6月 04 15:36:11 JST 2020
;; XFR size: 6 records (messages 1, bytes 217)
Postfixの設定
書籍「Postfix実践入門」p.89
rootユーザーで、sendmail が動作していたら停止します。
CentOS、Ubuntu 共通
ps ax | grep sendmail
当記事の環境では sendmail は動作していなかったので、何もしませんでした。
書籍「Postfix実践入門」p.104
rootユーザーで、Postfixをインストールします。
CentOS
yum install postfix
Ubuntu
apt install postfix
書籍「Postfix実践入門」p.105(CentOS のみ)
rootユーザーで、alternatives コマンドで Postfix を選択します。
CentOS
alternatives --config mta
当記事の環境では、選択肢は Postfix のみでしたので、何もしませんでした。
書籍「Postfix実践入門」p.121
rootユーザーで、main.cf を編集します。
CentOS、Ubuntu 共通
cd /etc/postfix
cp main.cf main.cf.org
editor main.cf
CentOS
(前略)

# myhostname = host.domain.tld
# myhostname = virtual.domain.tld
+myhostname = mail01.localdomain

(中略)

# mydomain = domain.tld
+mydomain = localdomain

(中略)

-#myorigin = $mydomain
+myorigin = $mydomain

(中略)

-mydestination = $myhostname, localhost.$mydomain, localhost
-#mydestination = $myhostname, localhost.$mydomain, localhost, $mydomain
+#mydestination = $myhostname, localhost.$mydomain, localhost
+mydestination = $myhostname, localhost.$mydomain, localhost, $mydomain

(以下をファイル末尾に追加)

+# Allowed to run :include: method in /etc/aliases
+alias_maps = hash:/etc/aliases
+alias_database = hash:/etc/aliases
+allow_mail_to_commands = alias,forward,include
+allow_mail_to_files    = alias,forward,include
Ubuntu
# See /usr/share/postfix/main.cf.dist for a commented, more complete version


# Debian specific:  Specifying a file name will cause the first
# line of that file to be used as the name.  The Debian default
# is /etc/mailname.
# myorigin = /etc/mailname

smtpd_banner = $myhostname ESMTP $mail_name (Ubuntu)
biff = no

# appending .domain is the MUA's job.
append_dot_mydomain = no

# Uncomment the next line to generate "delayed mail" warnings
# delay_warning_time = 4h

readme_directory = no

# See http://www.postfix.org/COMPATIBILITY_README.html -- default to 2 on
# fresh installs.
compatibility_level = 2


# TLS parameters
smtpd_tls_cert_file=/etc/ssl/certs/ssl-cert-snakeoil.pem
smtpd_tls_key_file=/etc/ssl/private/ssl-cert-snakeoil.key
smtpd_tls_security_level=may

smtp_tls_CApath=/etc/ssl/certs
smtp_tls_security_level=may
smtp_tls_session_cache_database = btree:${data_directory}/smtp_scache


smtpd_relay_restrictions = permit_mynetworks permit_sasl_authenticated defer_unauth_destination
-#myhostname = sample.localdomain
+myhostname = mail01.localdomain
alias_maps = hash:/etc/aliases
alias_database = hash:/etc/aliases
myorigin = /etc/mailname
-mydestination = mail01.localhost.localdomain, $myhostname, sample, localhost.localdomain, localhost
+mydestination = mail01.localhost.localdomain, $myhostname, mail01, localhost.localdomain, localhost localdomain
relayhost =
mynetworks = 127.0.0.0/8 [::ffff:127.0.0.0]/104 [::1]/128
mailbox_size_limit = 0
recipient_delimiter = +
inet_interfaces = loopback-only
default_transport = error
relay_transport = error
inet_protocols = all
+allow_mail_to_commands = alias,forward,include
+allow_mail_to_files    = alias,forward,include
書籍「Postfix実践入門」p.130
rootユーザーで、Postfixを起動します。
CentOS、Ubuntu 共通
# 設定をチェックしたい時
postfix check

# 現在の状態を調べたい時
postfix status

# 停止してから起動したい時
postfix stop
postfix start

# リロードしたい時
postfix reload
書籍「Postfix実践入門」p.134
一般ユーザーで、telnet で SMTP 接続して Postfix の動作確認を行います。
CentOS、Ubuntu 共通
telnet localhost 25

EHLO localdomain

MAIL FROM:<usrname@localdomain>

RCPT TO:<usrname@localdomain>

DATA

This is test1
This is test2
This is test3
.

NOOP

QUIT
途中で以下のエラーが出た場合は、
RCPT TO:<usrname@localdomain>
451 4.3.0 <usrname@localdomain>: Temporary lookup failure
rootユーザーで以下を実行し(書籍「Postfix実践入門」p.142)、一般ユーザーに戻って telnet から再実行します。
postalias /etc/aliases
postfix reload
実行した時の画面イメージは以下の通り。
CentOS
[usrname@localhost ~]$ telnet localhost 25
Trying ::1...
Connected to localhost.
Escape character is '^]'.
220 mail01.localdomain ESMTP Postfix
EHLO localdomain
250-mail01.localdomain
250-PIPELINING
250-SIZE 10240000
250-VRFY
250-ETRN
250-STARTTLS
250-ENHANCEDSTATUSCODES
250-8BITMIME
250-DSN
250 SMTPUTF8
MAIL FROM:<usrname@localdomain>
250 2.1.0 Ok
RCPT TO:<usrname@localdomain>
250 2.1.5 Ok
DATA
354 End data with <CR><LF>.<CR><LF>
This is test1
This is test2
This is test3
.
250 2.0.0 Ok: queued as 39B219AF86
NOOP
250 2.0.0 Ok
QUIT
221 2.0.0 Bye
Connection closed by foreign host.
Ubuntu
usrname@localhost:~$ telnet localhost 25
Trying 127.0.0.1...
Connected to localhost.
Escape character is '^]'.
220 mail01.localdomain ESMTP Postfix (Ubuntu)
EHLO localdomain
250-mail01.localdomain
250-PIPELINING
250-SIZE 10240000
250-VRFY
250-ETRN
250-STARTTLS
250-ENHANCEDSTATUSCODES
250-8BITMIME
250-DSN
250-SMTPUTF8
250 CHUNKING
MAIL FROM:<usrname@localdomain>
250 2.1.0 Ok
RCPT TO:<usrname@localdomain>
250 2.1.5 Ok
DATA
354 End data with <CR><LF>.<CR><LF>
This is test1
This is test2
This is test3
.
250 2.0.0 Ok: queued as 49F8B2F816F8
NOOP
250 2.0.0 Ok
QUIT
221 2.0.0 Bye
Connection closed by foreign host.
書籍「Postfix実践入門」p.141
rootユーザーで、エイリアスファイルを設定します。
書籍の手順に加えて、メール受信時に起動させるコマンドもここで指定しておきます。当記事では、メール受信の度に「/home/usrname/email_hook/hook」を起動することにします。このhookという名前のファイルは後に作成します。
CentOS、Ubuntu 共通
editor /etc/aliases
CentOS
(ファイル末尾)

# Person who should get root's mail
# root:          marc
+root:           usrname
+
+# hook
+usrname: usrname, :include:/home/usrname/email_hook/hook
Ubuntu
# See man 5 aliases for format
postmaster:    root

# Person who should get root's mail
root:           usrname
+
+# hook
+usrname: usrname, :include:/home/usrname/email_hook/hook
書籍「Postfix実践入門」p.142
rootユーザーで、aliases.db を更新して Postfix をリロードします。
CentOS、Ubuntu 共通
postalias /etc/aliases
postfix reload
Dovecotの設定
書籍「Postfix実践入門」p.215
rootユーザーで、Dovecot をインストールします。
CentOS
yum install dovecot
Ubuntu
apt install dovecot-core dovecot-imapd dovecot-pop3d
書籍「Postfix実践入門」p.222
rootユーザーで、dovecot-openssl.cnf を各々の状況に合わせて編集します。
CentOS
editor /etc/pki/dovecot/dovecot-openssl.cnf
CentOS は私の場合は以下の通り。
[ req ]
default_bits = 3072
encrypt_key = yes
distinguished_name = req_dn
x509_extensions = cert_type
prompt = no

[ req_dn ]
# country (2 letter code)
# C=FI
+C=JP

# State or Province Name (full name)
# ST=
+ST=TOKYO

# Locality Name (eg. city)
# L=Helsinki
+L=Chofu

# Organization (eg. company)
# O=Dovecot
+O=Kanedaq Office

# Organizational Unit Name (eg. section)
OU=IMAP server

# Common Name (*.example.com is also possible)
-CN=imap.example.com
+CN=mail01.localdomain

# E-mail contact
-emailAddress=postmaster@example.com
+emailAddress=postmaster@localdomain

[ cert_type ]
nsCertType = server
Ubuntu
editor /usr/share/dovecot/dovecot-openssl.cnf
Ubuntu は今回は内容を変更しませんでした。
#
# SSLeay configuration file for Dovecot.
#

RANDFILE                = /dev/urandom

[ req ]
default_bits            = 2048
default_keyfile         = privkey.pem
distinguished_name      = req_distinguished_name
prompt                  = no
policy                  = policy_anything
req_extensions          = v3_req
x509_extensions         = v3_req

[ req_distinguished_name ]
organizationName = Dovecot mail server
organizationalUnitName = @commonName@
commonName = @commonName@
emailAddress = @emailAddress@

[ v3_req ]
basicConstraints        = CA:FALSE
書籍「Postfix実践入門」p.223
rootユーザーで、証明書を再作成します。
CentOS
sh /usr/share/doc/dovecot/mkcert.sh
Ubuntu は、実行するなら以下のコマンドですが、今回は実行しませんでした。
sh /usr/share/dovecot/mkcert.sh
書籍「Postfix実践入門」p.227
rootユーザーで、dovecot.conf を編集します。
CentOS、Ubuntu 共通
editor /etc/dovecot/dovecot.conf
CentOS
(前略)

# Protocols we want to be serving.
# protocols = imap pop3 lmtp
+protocols = pop3

(以下をファイル末尾に追加)

+log_path = /var/log/dovecot.log
+disable_plaintext_auth = no    # とりあえず平文パスワードを許可(安全でない)
Ubuntu
(前略)

# Enable installed protocols
-!include_try /usr/share/dovecot/protocols.d/*.protocol
+!include_try /usr/share/dovecot/protocols.d/pop3d.protocol

(以下をファイル末尾に追加)

+log_path = /var/log/dovecot.log
+disable_plaintext_auth = no    # とりあえず平文パスワードを許可(安全でない)
書籍「Postfix実践入門」p.228
rootユーザーで、メールボックスの位置を編集します。
CentOS、Ubuntu 共通
editor /etc/dovecot/conf.d/10-mail.conf
CentOS
(前略)

# mail_location =
+mail_location = mbox:~/mail:INBOX=/var/mail/%u

(後略)
Ubuntu は、以下のように既に意図通りに設定されていたので、変更しませんでした。
(前略)

mail_location = mbox:~/mail:INBOX=/var/mail/%u

(後略)
書籍「Postfix実践入門」p.229
rootユーザーで、Dovecot を起動します。
CentOS、Ubuntu 共通
# 現在の状態を調べたい時
systemctl status dovecot.service

# 停止してから起動したい時
systemctl stop dovecot.service
systemctl start dovecot.service

# OSブート時に自動起動したい時
systemctl enable dovecot.service
書籍「Postfix実践入門」p.230
rootユーザーで、Dovecotの起動設定を確認します。
CentOS、Ubuntu 共通
systemctl list-unit-files -t service | grep dovecot
書籍「Postfix実践入門」p.231
rootユーザーで、開いているポートを確認します。
CentOS、Ubuntu 共通
netstat -ln | grep tcp
CentOS 結果
tcp        0      0 0.0.0.0:5355            0.0.0.0:*               LISTEN
tcp        0      0 0.0.0.0:110             0.0.0.0:*               LISTEN
tcp        0      0 0.0.0.0:111             0.0.0.0:*               LISTEN
tcp        0      0 192.168.79.128:53       0.0.0.0:*               LISTEN
tcp        0      0 127.0.0.1:53            0.0.0.0:*               LISTEN
tcp        0      0 192.168.122.1:53        0.0.0.0:*               LISTEN
tcp        0      0 0.0.0.0:22              0.0.0.0:*               LISTEN
tcp        0      0 127.0.0.1:631           0.0.0.0:*               LISTEN
tcp        0      0 127.0.0.1:25            0.0.0.0:*               LISTEN
tcp        0      0 127.0.0.1:953           0.0.0.0:*               LISTEN
tcp        0      0 0.0.0.0:995             0.0.0.0:*               LISTEN
tcp6       0      0 :::5355                 :::*                    LISTEN
tcp6       0      0 :::110                  :::*                    LISTEN
tcp6       0      0 :::111                  :::*                    LISTEN
tcp6       0      0 :::53                   :::*                    LISTEN
tcp6       0      0 :::22                   :::*                    LISTEN
tcp6       0      0 ::1:631                 :::*                    LISTEN
tcp6       0      0 ::1:25                  :::*                    LISTEN
tcp6       0      0 ::1:953                 :::*                    LISTEN
tcp6       0      0 :::995                  :::*                    LISTEN
Ubuntu 結果
tcp        0      0 172.17.0.1:53           0.0.0.0:*               LISTEN
tcp        0      0 192.168.79.130:53       0.0.0.0:*               LISTEN
tcp        0      0 127.0.0.1:53            0.0.0.0:*               LISTEN
tcp        0      0 127.0.0.53:53           0.0.0.0:*               LISTEN
tcp        0      0 127.0.0.1:631           0.0.0.0:*               LISTEN
tcp        0      0 127.0.0.1:953           0.0.0.0:*               LISTEN
tcp        0      0 127.0.0.1:25            0.0.0.0:*               LISTEN
tcp        0      0 0.0.0.0:995             0.0.0.0:*               LISTEN
tcp        0      0 0.0.0.0:110             0.0.0.0:*               LISTEN
tcp6       0      0 fe80::f8e9:90fd:cfc4:53 :::*                    LISTEN
tcp6       0      0 ::1:53                  :::*                    LISTEN
tcp6       0      0 ::1:631                 :::*                    LISTEN
tcp6       0      0 ::1:25                  :::*                    LISTEN
tcp6       0      0 ::1:953                 :::*                    LISTEN
tcp6       0      0 :::995                  :::*                    LISTEN
tcp6       0      0 :::110                  :::*                    LISTEN
書籍「Postfix実践入門」p.232
一般ユーザーで、telnet で POP サーバーの動作確認を行います。
その前に、CentOS では root ユーザーで以下の処理が必要でした。
CentOS
chmod 0600 /var/mail/*
chmod 0600 /var/spool/mail/*
それでは telnet を起動します。
CentOS、Ubuntu 共通
telnet localhost 110

USER usrname

PASS secret

LIST

RETR 1

QUIT
実行した時の画面イメージは以下の通り。
CentOS
[usrname@localhost ~]$ telnet localhost 110
Trying ::1...
Connected to localhost.
Escape character is '^]'.
+OK Dovecot ready.
USER usrname
+OK
PASS secret
+OK Logged in.
LIST
+OK 1 messages:
1 463
.
RETR 1
+OK 463 octets
Return-Path: <usrname@localdomain>
X-Original-To: usrname@localdomain
Delivered-To: usrname@localdomain
Received: from localdomain (localhost [IPv6:::1])
	by mail01.localdomain (Postfix) with ESMTP id 39B219AF86
	for <usrname@localdomain>; Thu,  4 Jun 2020 17:52:38 +0900 (JST)
Message-Id: <20200604085241.39B219AF86@mail01.localdomain>
Date: Thu,  4 Jun 2020 17:52:38 +0900 (JST)
From: usrname@localdomain

This is test1
This is test2
This is test3
.
QUIT
+OK Logging out.
Connection closed by foreign host.
Ubuntu
usrname@localhost:~$ telnet localhost 110
Trying 127.0.0.1...
Connected to localhost.
Escape character is '^]'.
+OK Dovecot (Ubuntu) ready.
USER usrname
+OK
PASS secret
+OK Logged in.
LIST
+OK 1 messages:
1 468
.
RETR 1
+OK 468 octets
Return-Path: <usrname@localdomain>
X-Original-To: usrname@localdomain
Delivered-To: usrname@localdomain
Received: from localdomain (localhost [127.0.0.1])
	by mail01.localdomain (Postfix) with ESMTP id 49F8B2F816F8
	for <usrname@localdomain>; Thu,  4 Jun 2020 17:08:33 +0900 (JST)
Message-Id: <20200604080837.49F8B2F816F8@mail01.localdomain>
Date: Thu,  4 Jun 2020 17:08:33 +0900 (JST)
From: usrname@localdomain

This is test1
This is test2
This is test3
.
QUIT
+OK Logging out.
Connection closed by foreign host.
以上で Postfix メールサーバーの構築は完了です。
メール受信時に起動されるコードの実装
以降の作業は一般ユーザーで行います。
CentOS と Ubuntu で、作業に違いはありません。
ホームディレクトリ( /home/usrname )の下にサブディレクトリ( email_hook )を作成し、ここに全てのファイルを置くことにします。
cd
mkdir email_hook
cd email_hook
以降の作業は /home/usrname/email_hook の下で行います。
メール受信時に起動されるコマンドの新規作成
hookという名前で(名前は何でも良いですが)、ファイルを新規作成し、そこにコマンドを記述します。
editor hook
コマンドの内容は、Postfix が受信したメールを、パイプラインを通して hook_slack.pyという Python コード(後で実装します)に渡します。
"|LC_CTYPE='C.UTF-8' /usr/bin/python3 /home/usrname/email_hook/hook_slack.py || true"
メール受信時に起動されるPythonコードの新規作成
hook_slack.py というファイル名(名前は何でも良いです)で新規作成します。
editor hook_slack.py
内容は以下の通りです。
コードの行儀があまり良くないのはお許しを。
Slack Incoming Webhooks の URL は適切なものを設定してください。
import logging
import os
import sys
import time
import datetime
import json
import email.parser
import urllib.request
import urllib.parse
from pathlib import Path


def make_logfile_path(file):
    directory = Path("/home/usrname/email_hook/log")

    # ディレクトリがなければ作成
    directory.mkdir(parents=True, exist_ok=True)

    # フルパスのログファイル名を返す
    return directory / os.path.basename(os.path.splitext(file)[0] + datetime.datetime.today().strftime("_%Y%m%d_%H%M%S.log"))


def get_logger(name, filepath):
    LOG_LEVEL_FILE = logging.DEBUG
    LOG_LEVEL_CONSOLE = logging.INFO

    _detail_formatting = "\n%(asctime)s %(levelname)-8s [%(module)s#%(funcName)s %(lineno)d]\n%(message)s"

    logging.basicConfig(
        level=LOG_LEVEL_FILE,
        format=_detail_formatting,
        filename=filepath
    )

    # ログをコンソールに送るハンドラconsoleを作成
    console = logging.StreamHandler()
    console.setLevel(LOG_LEVEL_CONSOLE)
    console_formatter = logging.Formatter(_detail_formatting)
    console.setFormatter(console_formatter)

    # ロガーを取得し、consoleハンドラを追加する
    logger = logging.getLogger(name)
    logger.addHandler(console)
    return console, logger


# ロガー
console, logger = get_logger(__name__, make_logfile_path(__file__))


def main():
    start = time.time()
    logger.info(f"hook started : {time.strftime('%d %b %X', time.localtime(start))}")

    # Postfixが受信したメールを標準入力から受け取る
    mime_str = sys.stdin.read()
    logger.debug(f"mime_str={mime_str}")
    message = email.parser.Parser().parsestr(mime_str)
    logger.debug(f"message={message}")

    ## Slack Incoming Webhooks の URL
    url = "内緒"

    payload = {}
    logger.debug(f'message.get("Subject")={message.get("Subject")}')
    logger.debug(f"message.get_payload()={message.get_payload()}")

    try:
        body = message.get_payload(0).get_payload()
    except:
        body = message.get_payload()
    payload["text"] = "Subject: " + message.get("Subject") + "\n\n" + body
    logger.debug(f"payload={payload}")

    data = json.dumps(payload).encode("utf-8")
    logger.debug(f"data={data}")

    request = urllib.request.Request(url, data)
    urllib.request.urlopen(request)

    stop = time.time()
    delta = stop - start
    logger.info(f"hook started : {time.strftime('%d %b %X', time.localtime(start))}")
    logger.info(f"hook finished : {time.strftime('%d %b %X', time.localtime(stop))}")
    logger.info("hook duration : {:0.3} seconds".format(delta))

if __name__ == "__main__":
    try:
        main()
    except Exception as ee:
        logger.exception(ee)
hook_slack.py.pyのSlack投稿テスト用データを用意しました。
editor hook_test_stdin.txt
From usrname@localdomain  Wed Jun  3 21:41:32 2020
Return-Path: <usrname@localdomain>
X-Original-To: usrname@localdomain
Delivered-To: usrname@localdomain
Received: from localhost.localdomain (localhost [127.0.0.1])
	by mail01.localdomain (Postfix) with ESMTPS id 9630E40D18C9
	for <usrname@localdomain>; Wed,  3 Jun 2020 21:41:32 +0900 (JST)
Content-Type: multipart/mixed; boundary="===============8887878637416477407=="
MIME-Version: 1.0
Subject: Slack投稿テストsubject
From: usrname@localdomain
To: usrname@localdomain
Date: Wed, 03 Jun 2020 12:41:32 -0000
Message-Id: <20200603124132.9630E40D18C9@mail01.localdomain>

--===============8887878637416477407==
Content-Type: text/plain; charset="us-ascii"
MIME-Version: 1.0
Content-Transfer-Encoding: 7bit

Slack投稿テストbody
--===============8887878637416477407==--
hook_slack.py を動かして、Slackに投稿されるかテストしてみます。
cat hook_test_stdin.txt | LC_CTYPE='C.UTF-8' /usr/bin/python3 ./hook_slack.py || true
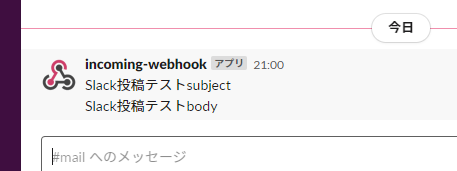
logサブディレクトリの下にログファイルが出力され、Slackには以下のように投稿されました。
テストメールを送信するPythonコードの新規作成
send_testmail.py というファイル名(名前は何でも良いです)で新規作成します。
editor send_testmail.py
内容は以下の通りです。
import smtplib
from email.mime.text import MIMEText
from email.utils import formatdate
from email.mime.multipart import MIMEMultipart


def create_message(from_addr, to_addr, subject, body):
    # ヘッダー
    msg = MIMEMultipart()
    msg['Subject'] = subject
    msg['From'] = from_addr
    msg['To'] = to_addr
    msg['Date'] = formatdate()

    # 本文
    msg.attach(MIMEText(body))

    return msg


def send_mail(from_addr, to_addr, body_msg):
    smtpobj = smtplib.SMTP("localhost", 25)
    smtpobj.ehlo()
    smtpobj.starttls()
    smtpobj.ehlo()
    smtpobj.sendmail(from_addr, to_addr, body_msg.as_string())
    smtpobj.close()


MAIL_ADDRESS = "usrname@localdomain"

from_addr = MAIL_ADDRESS
to_addr = MAIL_ADDRESS
subject = "test mail"
body = "We'll send you a test email."

msg = create_message(from_addr, to_addr, subject, body)
send_mail(from_addr, to_addr, msg)
このプログラムを動かしてメールを送信し、hookが起動するかテストします。
python3 ./send_testmail.py
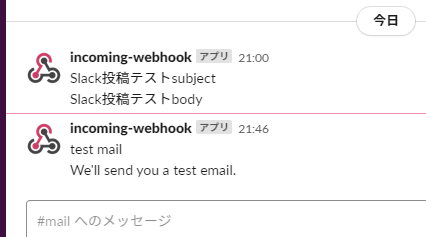
Slackには以下のように投稿されました。
今後やってみたいことリスト
- IMAP IDLEを使ってプッシュメール
- VPSにメールサーバーを立てて、セキュリティ等しっかり設定する
- MetaTraderのインジケーターやEAには、メール送信機能がついているものが多いらしいので、EAにローカルサーバー宛にメールを送信してもらって、hookプログラムで何らかの処理を行いたい。
以上です。