この記事は
クラウド画像変換サービスのCloudinaryのAPIを使って、画像をアップロードする方法をまとめたものです
書いてあること
- CloudinaryのAPIの説明
- REST-APIでゴリゴリにCloudnaryを操作する方法
- PHP-SDKを使ったアップロードのサンプル
Cloudinaryの公式ドキュメントに書いてあることをやっています。
この記事に書いてないこと
- Cloudinaryの基本的なことは書いてないです
- Admin APIとSearch APIの詳細は書いてないです
- 試す場合はCloudinaryのアカウントが必要なので、フリーのアカウントを作っておいてください。
![]() Admin APIとSearch APIは別の記事です
Admin APIとSearch APIは別の記事です
プログラム環境
プログラムはPHPで書いてます。今回はフレームワークは使わず生PHPで書きました。いつもどおり、Windows10の環境です。
λ php -v
PHP 7.2.11 (cli) (built: Oct 10 2018 02:39:52) ( ZTS MSVC15 (Visual C++ 2017) x86 )
Copyright (c) 1997-2018 The PHP Group
Zend Engine v3.2.0, Copyright (c) 1998-2018 Zend Technologies
    with Xdebug v2.7.2, Copyright (c) 2002-2019, by Derick Rethans

λ composer -V
Composer version 1.7.3 2018-11-01 10:05:06
以下、本題です。
Cloudinary APIとは
Cloudinaryは、ほぼすべての操作がAPI経由で実行できるようになっています。APIの大きな分類はこちらにあるとおり、Upload API、Admin API、Search APIの3種類です。簡単に紹介します。
https://cloudinary.com/documentation/cloudinary_references
Upload API
画像や動画をアップロードするAPIです。Upload APIにはMedia Library経由でのアップロードでは使えない機能があるので、APIの使い方と上手く使えそうな機能をいくつか紹介します。
Admin API
Admin APIは、大きくわけで3つの種類があります。
![]() Cloudinaryにアップロード済みアセットを扱います。画像の詳細の確認、削除の削除、タグの付け外しなど。
Cloudinaryにアップロード済みアセットを扱います。画像の詳細の確認、削除の削除、タグの付け外しなど。
![]() Cloudinary自体の設定をします。名前付きTransformationを作る、Presetを作る、利用容量の確認をするなど。
Cloudinary自体の設定をします。名前付きTransformationを作る、Presetを作る、利用容量の確認をするなど。
![]() Admin APIの一部として、Search APIがあります。Admin APIのresourceを探す機能でも検索に近いことはできますが、より細かい条件で探すときはSearch APIです。
Admin APIの一部として、Search APIがあります。Admin APIのresourceを探す機能でも検索に近いことはできますが、より細かい条件で探すときはSearch APIです。
Search API
Search APIはMediaLibraryに蓄えたアセットを複雑な条件で検索するためのAPIです。更新時間やタグ、ファイルタイプなどの他のAPIではできない条件で探せます。
APIの制限
CloudinaryのAPIには、実行回数の制限があります。プランによって違いますが、フリープランしか持っていないので、フリープランの制限値を貼っておきます。
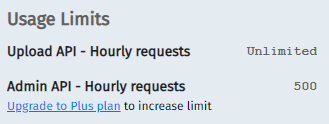
Upload APIは特に実行制限はありませんが、Admin APIは1時間あたり500回です。APIを実行したときのResponse headerに残りのコール可能数が入ってます。
X-FeatureRateLimit-Limit: 500
X-FeatureRateLimit-Remaining: 498
X-FeatureRateLimit-Reset: Sat, 18 Apr 2020 10:00:00 GMT
Upload APIとAdmin APIの両方でできることもあります。制限に引っかかるような使い方をする場合には、ちゃんとマニュアルを読んでUpload APIを使うようにしたほうがよいです。
Upload APIをRESTする
画像のアップロードのAPIを試します。
CloudinaryのAPIは、REST-FULなAPIであり自分でURLを組み立てて実行することもできますし、APIをラップしたSDK(プログラムしやすくした部品)でも実行できます。雰囲気を掴むために直接APIを叩くところからやってみます。
![]() ちなみに、かなりの苦行ですので、おススメはしません。ほとんどの言語用のSDKがあるのでそちらをお使いください。後半にSDKの話があるので、そちらまでジャンプして大丈夫です。
ちなみに、かなりの苦行ですので、おススメはしません。ほとんどの言語用のSDKがあるのでそちらをお使いください。後半にSDKの話があるので、そちらまでジャンプして大丈夫です。
直接HTTPSでアップロード
公式ドキュメントのUploading with a direct call to the APIに書いてあることをそのまま実装してみます。SDKのありがたさを感じるための一歩目です。
APIの接続先
APIの接続先のURLは、この形式です。
https://api.cloudinary.com/v1_1/<cloud name>/<resource_type>/upload
自分のcloud_nameとresource_typeを入れて組み立てます。私の場合はこうなります。
https://api.cloudinary.com/v1_1/kanaxx/image/upload
Uploadの種類
画像のアップロードには、認証が必要な方法と認証が**不要**な方法があります。認証が不要な方法は不特定多数から自分のCloudinaryアカウントに画像を放り込めることになります。
![]() Required parameters for authenticated requests:
Required parameters for authenticated requests:
今日はここがメインです。Signatureが必要なアップロードです。(Signatureが必要=API Secretを使います)
![]() Required parameters for unauthenticated requests:
Required parameters for unauthenticated requests:
API Secretを使わないでアップロードするバージョン。別の記事でやります。
Upload APIのパラメータ
Upload APIのパラメータを組み立てます。パラメータの一覧は一覧があります。API
https://cloudinary.com/documentation/image_upload_api_reference#optional_parameters
public_id, folder, use_filename, unique_filename, typeあたりが良く使うものです。transformationがUpload APIのパラメータにあるのは、アップロードと同時に元画像の変換を仕掛けるためです。
Signatureを作る
パラメータをSignしてSignatureを作ります。
https://cloudinary.com/documentation/upload_images#generating_authentication_signatures
Signatureの作成手順を日本語にすると、
- APIのパラメータから
file,cloud_name,resource_type,api_keyを除外する - timestampのパラメータにUnixTimeを追加
- パラメータ名を英語でソートして、param=value の形式にして、&でつなぐ
- 末尾に自分の
API Secretの値を付ける - 作った文字列全体をSHA-1でハッシュ値を作る
作ったシグネチャは、signatureとしてAPI実行時に渡します。
fileパラメータ
APIを直接叩くときには、画像ファイルの処理を自分でやらないといけません。
ローカルディスクにあるファイルをアップロードする場合、画像ファイルをBase64の文字列として渡します。インターネットに公開されている画像であればURLを渡すだけで取りめます。他にこの辺のオプションがあります。
こんな形式ですね。
https://cloudinary.com/documentation/upload_images#base_64_data_uri
ここまでをプログラミングすると、CloudinaryのUpload APIを呼び出して、画像を放り込むことができます。
レスポンスの検証
(ここは必須でもないですが、一応、理解しておきます。スキップしても大丈夫です。)
APIのJSONレスポンスには、リクエストで送ったSignatureとは別のSignatureが含まれています。リクエストを受けてCloudinary側で組み立てたSignatureの値です。
Signatureの組み立て方は公開されているので、その仕様に則り、APIのRespnseからsignatureを組み立てます。Cloudinaryから渡されたSignature値と、自分で組み立てたSigunarue値が一緒の時、Cloudinaryからのレスポンスであると証明できるというわけです。
(2者しか知らないAPI Secretで組み立てた文字列が同じってことは、API Secretを知るもの同士の通信ですね、という仕組みです)
もし一致しなかったら、、?
こちらからのCloudinaryへのAPIの呼び出しを中間地点で誰かが盗み、それっぽいレスポンスを返していると判断することができるので、システムを一時停止して、APIを送り続けないほうがよさそうですね。
ほぼ無いと思いますけど。
詳細はこちらに
https://cloudinary.com/documentation/upload_images#verifying_signatures_in_the_json_response
レスポンス検証のルール
レスポンス検証のルールは簡単です
- レスポンスから
public_idとversionを取得 - public_id=xxx&version=yyy を組み立てる
- API Secretを末尾に追加
- SHA-1でハッシュを取る
以上、ここまででREST-APIを実行する準備ができました。(長かった)
REST APIを実行するコード
ここまでをPHPのコードにしたものが、これです。
<?php
//各自設定
$cloudName='kanaxx';
$resourceType = 'image';
$apiKey = '3782621xxxx';
$apiSecret = 'eyhlvE3t16xxxx';
$api = "https://api.cloudinary.com/v1_1/{$cloudName}/{$resourceType}/upload";
//画像ファイル
$file = 'c:/tmp/images/test1.png';
$mime = mime_content_type($file);
$img = "data:{$mime};base64,".base64_encode(file_get_contents($file));
//API向けのパラメータ
//file, cloud_name, resource_type, your api_keyは含めない
$date = new DateTime();
$timestamp = $date->format('U');
$apiParameters = [
'timestamp' => $timestamp,
'public_id'=>'test1',
'folder'=>'upload-test',
'type'=>'upload',
// 'use_filename'=>true,
// 'unique_filename'=>true,
// 'type'=>'authenticated', //'type'=>'private',
];
//ソートしてparam=value¶m=valueを作る
$signatureString = '';
ksort($apiParameters);
foreach($apiParameters as $k=>$v){
if( strlen($signatureString) > 0){
$signatureString .= '&';
}
$signatureString .= "{$k}={$v}";
}
//APIシークレットを末尾にくっ付ける
$signatureString .= $apiSecret;
var_dump($signatureString);
//SHA-1
$signature = sha1($signatureString, false);
//REST-APIの全パラメータ
$post = [
'file' => $img,
'api_key' => $apiKey,
'signature' => $signature,
] + $apiParameters;
// var_dump($post);
// 以下、API実行部分
$ch = curl_init();
// オプションを設定
curl_setopt($ch, CURLOPT_URL, $api);
curl_setopt($ch, CURLOPT_RETURNTRANSFER, true);
curl_setopt($ch, CURLOPT_SSL_VERIFYPEER, false);
curl_setopt($ch, CURLOPT_VERBOSE, 1);
curl_setopt($ch, CURLOPT_POSTFIELDS, http_build_query($post));
// API実行
$json = curl_exec($ch);
curl_close($ch);
echo $json . PHP_EOL;
$result = json_decode($json, true);
var_dump($result);
// レスポンス検証 ======
//組みたて
$_publicId = $result['public_id']??'';
$_version = $result['version']??'';
$_string = "public_id={$_publicId}&version={$_version}";
$_string .= $apiSecret;
$_sign = sha1($_string, false);
//CloudinaryのSignature
$_signature = $result['signature'];
echo "signature from cloudinary > $_signature" . PHP_EOL;
echo "signature > $_sign" . PHP_EOL;
if($_signature === $_sign){
echo '一致!' . PHP_EOL;
}else{
echo '不一致' . PHP_EOL;
}
コメントが入っているので、特に説明は不要だと思いますので省きます。コピーすれば動くような気がします。
Upload APIをSDKで実行
今まで地味にプログラムしてきたことを、SDKを使って実施します。
CloudinaryのSDK
かなりの言語カバー率で、困る人がいないのではないか?と思うほどです。Vue.jsにも対応してますね。
https://cloudinary.com/documentation/cloudinary_sdks

SDKを使うとCloudinary側の面倒な仕様をプログラマーが意識しなくて済みます。(シグネチャを作成してパラメータに付与するとか、画像のbase64取るとか、レスポンスの検証とか)面倒な作業はSDKの内側で行ってくれるので、本来やるべきことに集中できます。PHPのSDKがあるのはうれしいです。
インストール&準備
PHPのSDKのインストール方法は、こちらのドキュメントを参照
https://cloudinary.com/documentation/php_integration#installation
PHPなのでcomposerを使って、カレントディレクトリ配下にインストールしておきます。
C:\vscode_workspace\php\cloudinary-sdk
λ composer require cloudinary/cloudinary_php
Using version ^1.16 for cloudinary/cloudinary_php
./composer.json has been created
Loading composer repositories with package information
Updating dependencies (including require-dev)
Package operations: 1 install, 0 updates, 0 removals
  - Installing cloudinary/cloudinary_php (1.16.0): Loading from cache
Writing lock file
Generating autoload files

λ  ls -al vendor
total 9
drwxr-xr-x 1 user 197613   0 Apr 18 19:46 ./
drwxr-xr-x 1 user 197613   0 Apr 18 20:10 ../
-rw-r--r-- 1 user 197613 178 Apr 18 19:46 autoload.php
drwxr-xr-x 1 user 197613   0 Apr 18 19:46 cloudinary/
drwxr-xr-x 1 user 197613   0 Apr 18 19:46 composer/
APIの認証情報の設定
https://cloudinary.com/documentation/php_integration#configuration
.envを使って環境変数に定義するのがよさそうですが、今回は素のPHPファイルで実行するので、コード上に認証情報を書いてます。
<?php
require_once "vendor/autoload.php";
\Cloudinary::config([
    "cloud_name" => "kanaxx",
    "api_key" => "37826219xxx",
    "api_secret" => "eyhlvE3t16l1xxx",
    "secure" => true
]);
事前の準備は以上です。
Upload SDKのサンプル
基本的には、サーバーサイドからCloudinaryにアップロードするときに使います。バッチ処理的に、自身が保有する画像をCloudinaryに順次アップロードするような用途です。
https://cloudinary.com/documentation/php_image_and_video_upload#server_side_upload
クライアント(ブラウザ)から直接Cloudinaryへアップロードする場合、どうしてもAPI Secretがブラウザに露出してしまうので使うことができません。1
やるとしたら、ブラウザからファイルをアップロードしたものを一度ファイルとして受け取り、サーバーサイドでCloudinaryにアップロードして、APIのレスポンスを見てHTMLを返却するというオーソドックスかつ面倒な実装をすることになります。
ファイルアップロード
RESTで実施していたのと同じく、ローカルディスクにあるファイルをCloudinaryに持っていくサンプルをいくつか書いてみます。
シンプルなアップロード
ローカルに置いてある画像のフルパスを指定してアップロードします。アップロードメソッドのoptionを極限まで削って一番シンプルに実施できる方法です。
<?php
require_once "vendor/autoload.php";
\Cloudinary::config([ "cloud_name" => "kanaxx", "secure" => true,
"api_key" => "37826219xxx", "api_secret" => "eyhlvE3t16l1WYxxx",
]);
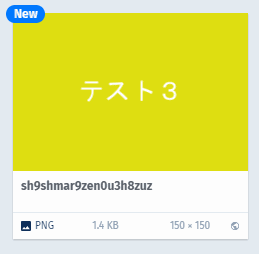
$response = \Cloudinary\Uploader::upload('c:/tmp/images/test4.png');
var_dump($response);
API Response
 'secure_url' =>
  string(83) "https://res.cloudinary.com/kanaxx/image/upload/v1587214727/sh9shmar9zen0u3h8zuz.png"
アップロードした画像

https://res.cloudinary.com/kanaxx/image/upload/v1587214727/sh9shmar9zen0u3h8zuz.png
メモ
test4.pngファイルをアップロードしたのに、public_id=sh9shmar9zen0u3h8zuzとして登録されています。アップロードするときのオプションが無いので、このようになります。
セキュリティを配慮してファイル名を推測できない形にしてあるそうです。
https://cloudinary.com/documentation/upload_images#uploading_images_to_the_cloud
ということは、レスポンスを正しくハンドリングしてpublic_idか画像URLのフルパスをデータベースなどに保存しておかないと、行方不明になります。
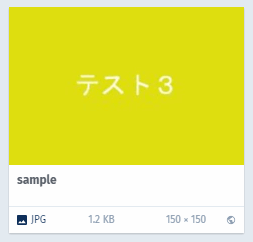
public_idを指定
アップロードしたい名前を自分で決めたいときには、public_idパラメータを指定すればよいです。
ユースケース的にpublic_idをプログラムで指定できるケースは、cloudinaryに同じpublic_idがないことを確認してあるか、上書きしても問題ないことが分かっているときです。
ファイル名をpublic_idにするために、自分でローカルファイル名を切り出してpublic_idに指定する、みたいなことはやらなくて大丈夫です。次の例3で紹介します。
<?php
require_once "vendor/autoload.php";
\Cloudinary::config([ "cloud_name" => "kanaxx", "secure" => true,
    "api_key" => "37826219xxx", "api_secret" => "eyhlvE3t16l1WYxxx",
]);
$response = \Cloudinary\Uploader::upload('c:/tmp/images/test4.png',
    ['public_id'=>'sample', 'format'=>'jpg']
);
var_dump($response);
実行結果
'secure_url' =>
  string(69) "https://res.cloudinary.com/kanaxx/image/upload/v1587215835/sample.jpg"

https://res.cloudinary.com/kanaxx/image/upload/v1587215835/sample.jpg
Media Library
メモ
test4.pngをsampleという名前で登録できました。すでに存在するpublic_idを指定すると、上書きされます。
ファイル名を使う
ローカルファイル名をベースにしたいときは、public_idのパラメータを指定せず、use_filenameとunique_filenameを指定します。
<?php
require_once "vendor/autoload.php";
\Cloudinary::config([ "cloud_name" => "kanaxx", "secure" => true,
    "api_key" => "37826219xxx", "api_secret" => "eyhlvE3t16l1WYxxx",
]);
$response = \Cloudinary\Uploader::upload('c:/tmp/images/test4.png',
    ['use_filename'=>true, 'unique_filename'=>true]
);
var_dump($response);
実行結果
//['use_filename'=>true, 'unique_filename'=>false]
'secure_url' =>
string(68) "https://res.cloudinary.com/kanaxx/image/upload/v1587227617/test4.png"
//['use_filename'=>true, 'unique_filename'=>true]
'secure_url' =>
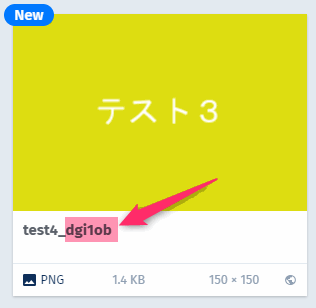
string(75) "https://res.cloudinary.com/kanaxx/image/upload/v1587227736/test4_dgi1ob.png"

https://res.cloudinary.com/kanaxx/image/upload/v1587227617/test4.png

https://res.cloudinary.com/kanaxx/image/upload/v1587227617/test4_dgi1ob.png
Media Library
['use_filename'=>true, 'unique_filename'=>false]
['use_filename'=>true, 'unique_filename'=>false]
メモ
unique_filenameをtrueにすると、ファイル名の末尾にランダムな文字列が6文字が付いて、重複しない名前で登録されます。
フォルダも作れる
folderパラメータを指定すると、アップロード先のフォルダを指定できます。フォルダが存在しない場合は階層を含めて自動で作られます。
<?php
require_once "vendor/autoload.php";
\Cloudinary::config([ "cloud_name" => "kanaxx", "secure" => true,
    "api_key" => "37826219xxx", "api_secret" => "eyhlvE3t16l1WYxxx",
]);
$response = \Cloudinary\Uploader::upload('c:/tmp/images/test4.png',
    ['folder'=>'sample/upload-sdk','use_filename'=>true, 'unique_filename'=>true]
);
var_dump($response);
実行結果
  'secure_url' =>
  string(93) "https://res.cloudinary.com/kanaxx/image/upload/v1587216904/sample/upload-sdk/test4_n6jbqx.png"

https://res.cloudinary.com/kanaxx/image/upload/v1587216904/sample/upload-sdk/test4_n6jbqx.png
Media Library
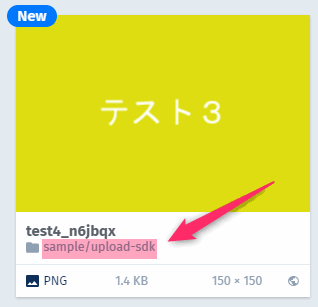
ちゃんと階層化されたフォルダの中に納まってますね。
メモ
アップロードと同時に変換
アップロードと一緒に画像の変換を行うことができます。ドキュメントではincoming transformationと呼ばれているもので、API、SDKを使ったときだけできます。
test4.png画像をborderという名前でアップロード。transformationで指定した変換を実行します。
<?php
require_once "vendor/autoload.php";
\Cloudinary::config([ "cloud_name" => "kanaxx", "secure" => true,
    "api_key" => "37826219xxx", "api_secret" => "eyhlvE3t16l1WYxxx",
]);
$response = \Cloudinary\Uploader::upload('c:/tmp/images/test4.png',
    ['folder'=>'upload-test',
        //'use_filename'=>true, 'unique_filename'=>true,
        'public_id'=>'border',
        'transformation'=>['width'=>100,'radius'=>'max', 'border'=>'5px_solid_red'],
    ]
);
var_dump($response);
実行結果
画像のURLには、変換パラメータは含まれない
  'secure_url' =>
  string(81) "https://res.cloudinary.com/kanaxx/image/upload/v1587229929/upload-test/border.png"
アップロードされた画像

https://res.cloudinary.com/kanaxx/image/upload/v1587229929/upload-test/border.png
Media Libraray
サイズも小さくなって、赤ボーダー、角丸マックスです。

メモ
incoming transformationの場合、元の画像がCloudinary内には残りません。アップロードの過程で変換をし、完成した画像が保存されます。元の画像を再利用したい場合には向きません。
eagar transformation
incoming transformationと違い、元の画像は無変換で保存しつつ、アップロード完了と同時に変換を仕掛ける仕組みです。変換された画像がMedia Library内には残るわけではなく、元画像に対するDelivered Imageとしてカウントされます。これも、API/SDKを使ったときだけできます。
eagerする理由は、
サイトで使う画像パターンが決まっている場合
普通は初回アクセスのときに画像の変換を掛けるので、ちょっとだけ遅くなります。すぐに参照されるのだから、事前に作ってしまおうという使い方です。
URLでのtransformationを禁止したい場合
on-the-flyでURLベースの変換を有効にしておくと、変換回数もリソースも食われるので、禁止したい場合。eagerにした場合はURLを組み立てて画像を変換できます。
これはアップロード時に変換なので、アップロード済みの画像に対しては効きません。
サムネイルのパターンが増えて、アップロード済みの画像にeagerをやり直す場合には、explicitメソッドで行います。
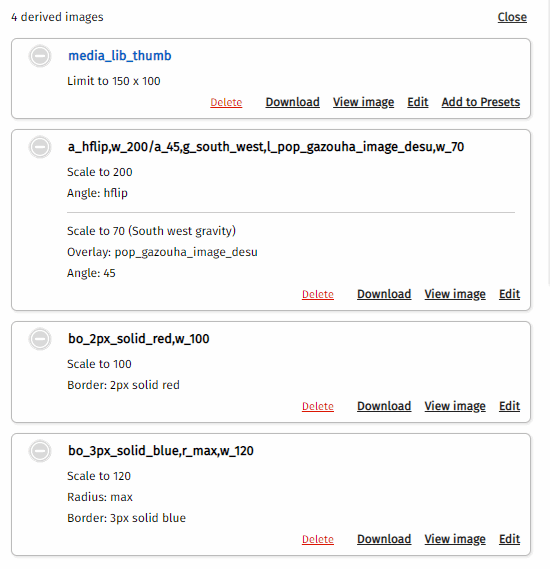
以下は、アップロードと同時に3つの変換を実行し、合計4ファイル生成するプログラムです。
<?php
require_once "vendor/autoload.php";
\Cloudinary::config([ "cloud_name" => "kanaxx", "secure" => true,
    "api_key" => "37826219xxx", "api_secret" => "eyhlvE3t16l1WYxxx",
]);
$response = \Cloudinary\Uploader::upload('c:/tmp/images/test4.png',
    [
        //元ファイルに対する指示
        'folder'=>'upload-test','type'=>'upload',
        'use_filename'=>true, 'unique_filename'=>true,

        //元ファイルからの変換(3ファイル分)
        'eager'=>[
            //1. 横幅100に縮小の赤枠
            ['width'=>100, 'border'=>'2px_solid_red'],

            //2. 横幅120にして丸枠の青枠の画像
            ['width'=>120,'radius'=>'max', 'border'=>'3px_solid_blue'],

            //3. 元画像を左右反転させ、「この画像はサンプルです」画像を左下に小さく45度傾けて乗せる
            [
                ['width'=>200, 'format'=>'jpg','angle'=>'hflip'],
                ["overlay"=>"pop_gazouha_image_desu", "width"=>70, "angle"=>45, 'gravity'=>'south_west']
            ],
        ]
    ]
);
var_dump($response);
実行結果
eagerが分かるように全文掲載
ログ
C:\vscode_workspace\php\cloudinary-sdk
λ php upload-local-eager.php
C:\vscode_workspace\php\cloudinary-sdk\upload-local-eager.php:28:
array(19) {
  'public_id' =>
  string(24) "upload-test/test4_l8ro1n"
  'version' =>
  int(1587268817)
  'signature' =>
  string(40) "39cb049b192f21007a975c59b8d53d8a801bc185"
  'width' =>
  int(150)
  'height' =>
  int(150)
  'format' =>
  string(3) "png"
  'resource_type' =>
  string(5) "image"
  'created_at' =>
  string(20) "2020-04-19T04:00:17Z"
  'tags' =>
  array(0) {
  }
  'bytes' =>
  int(1433)
  'type' =>
  string(6) "upload"
  'etag' =>
  string(32) "e3ae356ead1e954aa25ff8fe77e344b3"
  'placeholder' =>
  bool(false)
  'url' =>
  string(86) "http://res.cloudinary.com/kanaxx/image/upload/v1587268817/upload-test/test4_l8ro1n.png"
  'secure_url' =>
  string(87) "https://res.cloudinary.com/kanaxx/image/upload/v1587268817/upload-test/test4_l8ro1n.png"
  'backup_url' =>
  string(113) "api.cloudinary.com/v1_1/kanaxx/resources/d95a6e36330994e464f771af7b457179/backup/a3cf02e71109bac95ab0c5ac4c4e5df8"
  'access_mode' =>
  string(6) "public"
  'original_filename' =>
  string(5) "test4"
  'eager' =>
  array(3) {
    [0] =>
    array(7) {
      'transformation' =>
      string(22) "bo_2px_solid_red,w_100"
      'width' =>
      int(104)
      'height' =>
      int(104)
      'bytes' =>
      int(1172)
      'format' =>
      string(3) "png"
      'url' =>
      string(109) "http://res.cloudinary.com/kanaxx/image/upload/bo_2px_solid_red,w_100/v1587268817/upload-test/test4_l8ro1n.png"
      'secure_url' =>
      string(110) "https://res.cloudinary.com/kanaxx/image/upload/bo_2px_solid_red,w_100/v1587268817/upload-test/test4_l8ro1n.png"
    }
    [1] =>
    array(7) {
      'transformation' =>
      string(29) "bo_3px_solid_blue,r_max,w_120"
      'width' =>
      int(126)
      'height' =>
      int(126)
      'bytes' =>
      int(3548)
      'format' =>
      string(3) "png"
      'url' =>
      string(116) "http://res.cloudinary.com/kanaxx/image/upload/bo_3px_solid_blue,r_max,w_120/v1587268817/upload-test/test4_l8ro1n.png"
      'secure_url' =>
      string(117) "https://res.cloudinary.com/kanaxx/image/upload/bo_3px_solid_blue,r_max,w_120/v1587268817/upload-test/test4_l8ro1n.png"
    }
    [2] =>
    array(7) {
      'transformation' =>
      string(61) "a_hflip,w_200/a_45,g_south_west,l_pop_gazouha_image_desu,w_70"
      'width' =>
      int(200)
      'height' =>
      int(200)
      'bytes' =>
      int(6549)
      'format' =>
      string(3) "png"
      'url' =>
      string(148) "http://res.cloudinary.com/kanaxx/image/upload/a_hflip,w_200/a_45,g_south_west,l_pop_gazouha_image_desu,w_70/v1587268817/upload-test/test4_l8ro1n.png"
      'secure_url' =>
      string(149) "https://res.cloudinary.com/kanaxx/image/upload/a_hflip,w_200/a_45,g_south_west,l_pop_gazouha_image_desu,w_70/v1587268817/upload-test/test4_l8ro1n.png"
    }
  }
}
元画像

https://res.cloudinary.com/kanaxx/image/upload/v1587268817/upload-test/test4_l8ro1n.png


Media Library
元の画像が1枚
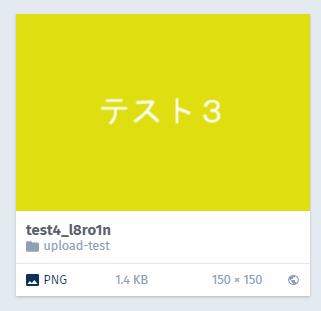
deliveredは3つ(+サムネイルで4つ)
メモ
変換回数は3回消費します。
無理にeagerをしなくても、URLパラメータで変換すれば同じ結果が手に入ります。事前に作るかどうかの差だけです。
タグの操作
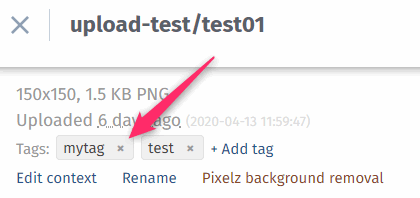
UploadAPIという名前なのに、アップロード済み画像への操作もあります。
指定したpublic_idのファイルに、add_tagメソッドでタグをつけるサンプルです。
<?php
require_once "vendor/autoload.php";
\Cloudinary::config([ "cloud_name" => "kanaxx", "secure" => true,
    "api_key" => "37826219xxx", "api_secret" => "eyhlvE3t16l1WYxxx",
]);
$files = ['upload-test/test01','upload-test/test02'];
$response = \Cloudinary\Uploader::add_tag('mytag', $files);
var_dump($response);
実行結果
array(1) {
  'public_ids' =>
  array(2) {
    [0] =>
    string(18) "upload-test/test01"
    [1] =>
    string(18) "upload-test/test02"
  }
}
Media Library
まとめ
画像のクラウドサービスCloudinaryにファイルをアップロードするプログラムのサンプルでした。SDKが準備されているので簡単に作れますね。
今後の予定
- Admin APIとSearch APIのサンプル
- 画像アクセス管理(typeパラメータ、access_modeパラメータ)
- Media Libraryのアップロード、preset、unsignedでのクライアントサイドからの直接の画像アップロード
-
クライアントサイドからCloudinaryに安全にアップロードする方法は、別の機会に。https://cloudinary.com/documentation/upload_widget ↩