はじめに
- 本記事はColey研究室から出ているOSSのpyscreenerの使い方を記載した記事です
- 創薬 (dry) Advent Calendar 2021の22日目の記事になります (#souyakuAC2021)
本記事の流れ
- Dockerによる環境構築
- pyscreenerのAPIの使い方
- pbtqtファイルの確認
Dockerによる環境構築
pyscreenerの奥底にはanacondaの設定ファイルがありますが、わかりにくい上にdocker環境はなかったので作りました
ここは特に説明もなく結論のみを下記に記します
FROM continuumio/anaconda3:2021.05

RUN pip install --upgrade pip

RUN mkdir /app
RUN mkdir /work
RUN mkdir /tool
ADD . /app
WORKDIR /app

RUN conda update -n base conda
RUN conda update --all
RUN conda install -c conda-forge openbabel -y
RUN pip install rdkit_pypi
RUN conda install -c conda-forge openmm -y
RUN pip install pyscreener
RUN pip install git+https://github.com/openmm/pdbfixer.git
RUN conda install -c conda-forge qvina
RUN wget --no-check-certificate https://ccsb.scripps.edu/adfr/download/1038/ -O ADFRsuite.tar.gz
RUN tar zxvf ADFRsuite.tar.gz
WORKDIR /app/ADFRsuite_x86_64Linux_1.0
RUN ./install.sh -d . -c 0
RUN echo "Y"
RUN echo export PATH=/app/ADFRsuite_x86_64Linux_1.0/bin:$PATH >> ~/.bashrc
WORKDIR /app
pyscreenerのAPIの使い方
一番初めにすること
rayを初期化する
コア数などを表示しておくと便利です
import ray
ray.init()
print('''This cluster consists of
        {} nodes in total
        {} CPU resources in total
      '''.format(len(ray.nodes()), ray.cluster_resources()['CPU']))
使用するドッキングソフトの定義
今回はvinaを利用します
import pyscreener as ps
metadata = ps.build_metadata("vina")
ドッキング環境の構築
今回はpyscreenerのREADMEにある設定をそのまま実行します
from pyscreener.utils import ScoreMode
pdb = "integration-tests/inputs/5WIU.pdb"
center = (-18.2, 14.4, -16.1)
size = (15.4, 13.9, 14.5)

virtual_screen = ps.virtual_screen("vina", [pdb],
                                       center,
                                       size,
                                       metadata_template=metadata,
                                       ncpu=int(
                                           ray.cluster_resources()['CPU']),
                                       score_mode=score_mode,
                                       repeat_score_mode=repeat_score_mode,
                                       ensemble_score_mode=ensemble_score_mode,
                                       repeats=repeats
                                       )
ただしREADMEにはScoreModeやrepeatsなどの設定の記載はないので少しだけ詳しく説明すると
https://github.com/coleygroup/pyscreener/blob/fc96cee2dd039b7b9228049ea02a749dbe1e6682/pyscreener/utils/utils.py には下記のようなクラスが定義されており、AVG・BEST・BOLTZMANN・TOP_Kの4つがあり、これらを使うことでスコアの取り方を設定することができます
class ScoreMode(AutoName):
    """The method by which to calculate a score from multiple possible scores.
    Used when calculating an overall docking score from multiple conformations,
    multiple repeated runs, or docking against an ensemble of receptors."""

    AVG = auto()
    BEST = auto()
    BOLTZMANN = auto()
    TOP_K = auto()
またドッキング環境のクラスには下記のような設計になっています (https://github.com/coleygroup/pyscreener/blob/fc96cee2dd039b7b9228049ea02a749dbe1e6682/pyscreener/docking/screen.py)
repeatsを使うことで試行回数が設定できます
kを設定することでtop_kの設定回数を設定できます
class DockingVirtualScreen:
    def __init__(
        self,
        runner: DockingRunner,
        receptors: Optional[Iterable[str]],
        center: Optional[Tuple],
        size: Optional[Tuple],
        metadata_template: CalculationMetadata,
        pdbids: Optional[Sequence[str]] = None,
        docked_ligand_file: Optional[str] = None,
        buffer: float = 10.0,
        ncpu: int = 1,
        base_name: str = "ligand",
        path: Union[str, Path] = ".",
        score_mode: Union[ScoreMode, str] = ScoreMode.BEST,
        repeat_score_mode: Union[ScoreMode, str] = ScoreMode.BEST,
        ensemble_score_mode: Union[ScoreMode, str] = ScoreMode.BEST,
        repeats: int = 1,
        k: int = 1,
        verbose: int = 0,
    ):
dockingの実行
最後にリガンドを設定して、ドッキングを実行できます
virtual_screenに直接SMILESを入れても実行できますが、LigandSupplyを使うと最適化後に実行なども可能です
 smiles = "c1ccccc1"
 supply = ps.LigandSupply(
                [],
                smis=[smiles],
                optimize=False)
 score = virtual_screen(supply.ligands)
pdbqtファイルの出力
実行したドッキングのpdbqtファイルは下記の方法で出力できます
filepath = "/hoge"
virtual_screen.collect_files(filepath)
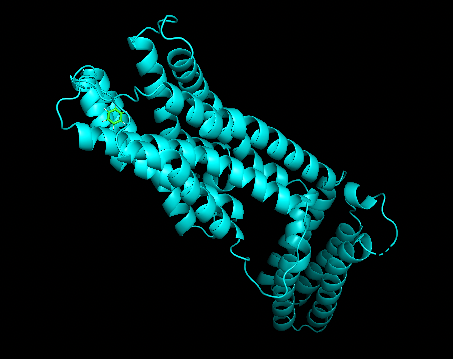
pdbqtファイルの確認
pymolなどで確認します
なんとなくうまく言っている気がします
ただ素人なので判断ができないです...
以上がpyscreenerの使い方になります
素人なので間違っていることがあるかもしれないのでもし間違っていたら指摘をいただけると幸いです
