今回は、debounceというオペレータについて、理解してみようと思います。
環境
【Xcode】13.1
【Swift】5.5
【macOS】Big Sur バージョン 11.4
公式ドキュメントから理解する
まずドキュメントにあったコードは以下の通り
// 以下のimportはドキュメントにはなかったので追加
import Combine
import Foundation

let bounces:[(Int,TimeInterval)] = [
    (0, 0),
    (1, 0.25),  // 0.25s interval since last index
    (2, 1),     // 0.75s interval since last index
    (3, 1.25),  // 0.25s interval since last index
    (4, 1.5),   // 0.25s interval since last index
    (5, 2)      // 0.5s interval since last index
]

let subject = PassthroughSubject<Int, Never>()
var cancellable: AnyCancellable?  // ドキュメントにはなかったが、これがないとコンパイルエラーが発生するので追加
cancellable = subject
    .debounce(for: .seconds(0.5), scheduler: RunLoop.main)
    .sink { index in
        print ("Received index \(index)")
    }

for bounce in bounces {
    DispatchQueue.main.asyncAfter(deadline: .now() + bounce.1) {
        subject.send(bounce.0)
    }
}
これを実行すると、以下が出力されます。
Received index 1
Received index 4
Received index 5
どういうわけか、bouncesのタプル配列のうち、1,4,5のみが出力されています。
では例に倣ってドキュメントを読んでいきます。
の前に、そもそも「bounce」という単語が気になったので調べてみました。
細かいことなので気になる人は、以下を開いてみてください。
「bounce」という単語について
参考書籍に書いてあったのですが、この単語自体は元々は 電気工学の世界で使われる単語のようです。(通りで聞き慣れないわけだ)辞書で調べるとこう書いてありました。
「電気回路で機械式スイッチが押され、短絡が連続したときにできる小さな電流のリップルを取り除くこと。」
To remove the small ripple of current that forms when a mechanical switch is pushed in an electrical circuit and makes a series of short contacts.([引用元](https://www.yourdictionary.com/debounce))
だめだ。英語で読んでも日本語で訳してもさっぱりわからん。。
ということで、Combine Mastery in SwiftUIの説明文を見てみますと、こんな感じでした。 いつもなら日本語は自分で頑張って訳してますが、今日はちょっと手抜きでDeepL使います。。
「デバウンスは休止のようなものだと考えてください。「バウンス」という作業は、電気工学で使われます。 押しボタン式のスイッチで、ボタンを押したときに何度も接触したり離れたりすることです。 ユーザーがタイピングしてバックスペースをとり、さらにタイピングしていると、文字がパイプラインの中を行ったり来たりしているように見えることがあります。 接頭辞の "de-"は、「取り除く、減らす」という意味です。 つまり、"debounce "は「跳ね返りを教訓化する」という意味です。パイプラインに送られる前に、入力を一時停止するために使われます。」
Think of "debounce" like a pause. The work "bounce" is used in electrical engineering. It is when push-button switches make and break contact several times when the button is pushed. When a user is typing and backspacing and typing more it could seem like the letters are bouncing back and forth into the pipeline. The prefix "de-" means "to remove or lessen." And so, "debounce" means to "lesson bouncing". It is used to pause input before being sent down the pipeline.
文章だけだとイメージしにくいですが、英単語から類推するよりは、少しわかりやすくなりました。
とりあえず公式ドキュメントを読んでみることにします。
ドキュメントにはこう書いてあります。
「イベントとイベントの間に指定された時間間隔が経過した後にのみ、要素をパブリッシュする。」
Publishes elements only after a specified time interval elapses between events.
bounce自体の英単語の意味はよくわかりませんでしたが、Combineにおける動作としてはなんか理解できそうな雰囲気です。
定義はこうなっています。
引数がたくさんあってみづらいので、ちょっと改行してます。
func debounce<S>(
  for dueTime: S.SchedulerTimeType.Stride,
  scheduler: S,
  options: S.SchedulerOptions? = nil
) -> Publishers.Debounce<Self, S> where S : Scheduler
dueTimeで、パブリッシュするまでの時間を指定して
schedulerは、このパブリッシャーが要素を配信するスケジューラ
optionsは、要素を配信方法のカスタマイズ
だそうです。
Discussionの部分を読んでいくと、サンプルコードについてもっと詳しく書いてあります。
「debounce(for:scheduler:options:) オペレータは、上流のパブリッシャーからの値の配信数と配信間隔を制御するために使用します。
この演算子は、バースト的なイベントストリームや大量のイベントストリームを処理する際に、下流のストリームに配信される値の数を指定した割合に減らす必要がある場合に便利です。」
Use the debounce(for:scheduler:options:) operator to control the number of values and time between delivery of values from the upstream publisher. This operator is useful to process bursty or high-volume event streams where you need to reduce the number of values delivered to the downstream to a rate you specify.
ふむ。
とりあえず次の文章も読んでみると、
「この例では、PassthroughSubject は bounces 配列で定義されたスケジュールで要素を公開します。
この配列は、PassthroughSubjectが送信した値を表すタプルと、配信タイマーを駆動する1/4秒(=0.25秒)から2秒までのTimeIntervalで構成されています。
キューが構築されると、2分の1秒(=0.5秒)のdebounceInterval(=debounceオペレータのdueTimeのこと)より速く到着した要素は破棄され、debounceIntervalより遅い速度で到着した要素はsink(receiveValue:)オペレータに渡されます。」
In this example, a PassthroughSubject publishes elements on a schedule defined by the bounces array. The array is composed of tuples representing a value sent by the PassthroughSubject, and a TimeInterval ranging from one-quarter second up to 2 seconds that drives a delivery timer. As the queue builds, elements arriving faster than one-half second debounceInterval are discarded, while elements arriving at a rate slower than debounceInterval are passed through to the sink(receiveValue:) operator.
サンプルコードの下に書いてあるコメントをみると、文章に書いてあるこの部分↓が理解できますね。
キューが構築されると、2分の1秒(=0.5秒)の
debounceInterval(=debounceオペレータのdueTimeのこと)より速く到着した要素は破棄され、debounceIntervalより遅い速度で到着した要素はsink(receiveValue:)オペレータに渡されます。
//  Time 0: Send index 0.
//  Time 0.25: Send index 1. Index 0 was waiting and is discarded.
//  Time 0.75: Debounce period ends, publish index 1.
//  Time 1: Send index 2.
//  Time 1.25: Send index 3. Index 2 was waiting and is discarded.
//  Time 1.5: Send index 4. Index 3 was waiting and is discarded.
//  Time 2: Debounce period ends, publish index 4. Also, send index 5.
//  Time 2.5: Debounce period ends, publish index 5.
最初の0.5秒が経過するまでに、index 0と index 1がsendされていますが、
より速く到着したindex 0 は破棄され、index 1が出力されています。
index 2とindex 3が出力されていない理由もそれと同様になります。
挙動に関しては、少しわかってきました。
実際の使用例
そしてAppleのドキュメントでは、やっぱり実際どのような場面で使用されるのかわかりませんでしたので、
もうちょっと調べてみました。
参考にしたこちらによると、こんなユースケースがあるようです。
- 入力をトリガーとする処理実行
- UNDO/REDO バッファの複雑化
ドキュメントに書いてあった「バースト的なイベントストリームや大量のイベントストリーム」というのは
こういったケースになるようですね!
詳細は、あちらの記事が大変わかりやすかったので、ここでは書かないのですが、
「イベントをまとめたい」というときに使うと良さそうです。
ではサンプルコードです。
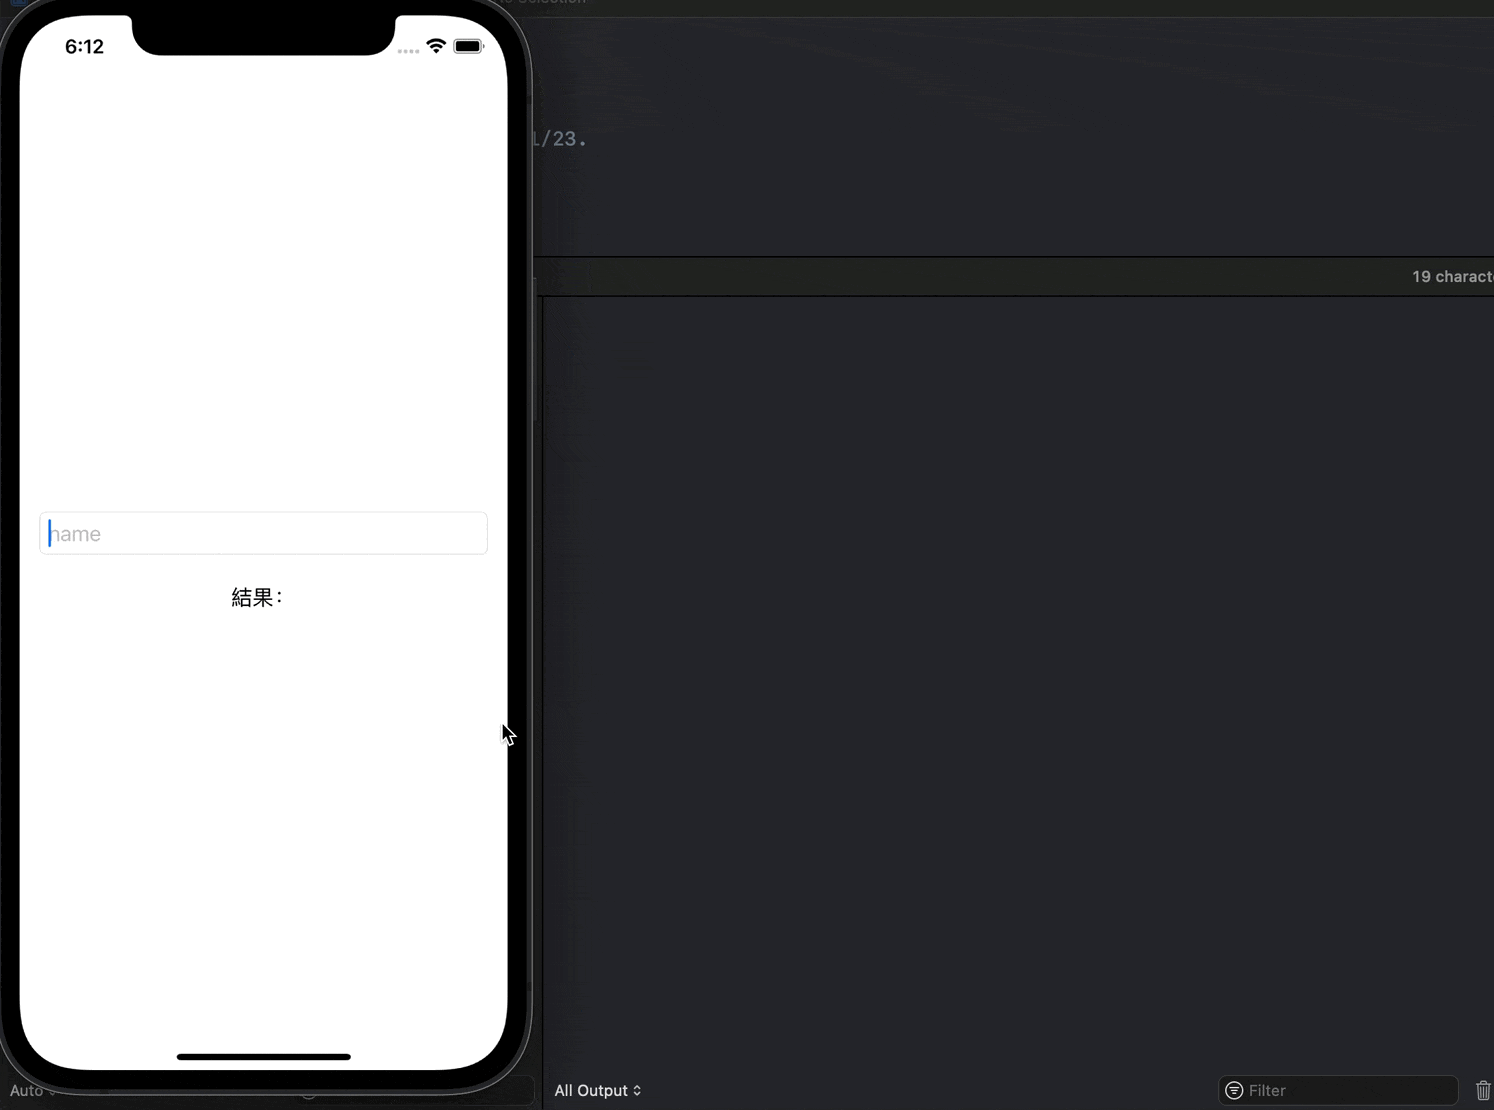
まずはViewから。
import SwiftUI

struct ContentView: View {
    @StateObject private var viewModel = ContentViewModel()

    var body: some View {
        VStack {
            Spacer()
            TextField("name", text: $viewModel.name)
                .textFieldStyle(RoundedBorderTextFieldStyle())
                .padding()
            Text("結果:\(viewModel.nameEntered)")
            Spacer()
        }
    }
}
1つのTextFieldと、入力したものを表示するTextが配置されています。
そして以下がViewModelのコードです。
import Foundation

class ContentViewModel: ObservableObject {
    @Published var name = ""
    @Published var nameEntered = ""

    init() {
        $name
            .debounce(for: 0.5, scheduler: RunLoop.main)
            .print(nameEntered)  // デバッグのために追加しているコード
            .assign(to: &$nameEntered)
    }
}
0.5秒ごとにパブリッシュしているため、nameの値がnameEnteredに即時反映されていません。
こうすることで、例えば、ユーザーがエンターを押下してからではなく、TextFieldに入力がある度に検索処理を行いたいような場合、
0.5秒待ってから検索処理を行うことができます。
こちらに書いてあった表現が個人的にはわかりやすかったですが、debounceオペレータを使用することで、
**「不要な連続リクエストを防ぐことが可能」**になります。
こういうのインクリメンタルサーチというんですね。
恥ずかしながら知らなかった・・・
動画で見た方が早いかと思うので、一応用意してみました。
0.5秒ごとにパブリッシュされていることを確認するために、print()オペレータを使っています。
コードはこちらに挙げています。
RxSwiftでは
Cheat Sheetによると、RxSwiftにも全く同じ名前でdebounceというオペレータが存在するようです。
ドキュメントの説明はこう。
「指定されたスケジューラを使用してスロットリングタイマーを実行し、指定された相対時間内に別の要素が続く観測可能なシーケンスから要素を無視します。」(DeepLで翻訳)
Ignores elements from an observable sequence which are followed by another element within a specified relative time duration, using the specified scheduler to run throttling timers.
なんとなくCombineのdebounceと同じことができそうな雰囲気です
(がちょっと説明がわかりづらいような・・・私の頭が悪いせいかも)
定義を見てみます。
public func debounce(
  _ dueTime: RxTimeInterval,
  scheduler: SchedulerType
)  -> Observable<Element>
Combineの定義と似ていますね。
違いはCombineにはoptionsの引数がありましたが、RxSwiftにはないくらいでしょうか。
今回は調べていないのですが、Combineではこのoptionsを使用して、要素をパブリッシュする方法をカスタマイズできるようです。
「RxSwift debounce」で調べると、インクリメンタルサーチの実装方法の記事がヒットしたので、
確かに用途としては、Combineのdebounceと同じようです。
おわりに
今回は、あまり馴染みがないユースケースだったので、どういう場でこのオペレータが使われるのかなかなかイメージがつかなかったのですが、
「インクリメンタルサーチ」というワードを見つけて結構理解が深まった気がします。
いろんな記事を行ったり来たりしたので、ちょっと記事自体が見づらくなったかもしれません・・・
こういうのもっと上手くかけるようになりたいです。
何か間違ったこと、他にもこんなユースケースあるよなど、コメントは大歓迎です。![]()
参考
debounceApple公式ドキュメント- MVVM with Combine Tutorial for iOS→Raywenderlichのチュートリアル
- Combine Mastery In SwiftUI→電子書籍。実際の使用例にあるコードはこちらのコードを少し修正したものです。
- RxSwift to Combine Cheatsheet
- [SwiftUI][Combine] debounce の使い方 (TextField を例として)
- SwiftUI(TextField)のみでインクリメンタルサーチを実現する
debounceRxSwift公式ドキュメント- RxSwiftで簡単インクリメンタルサーチ