はじめに
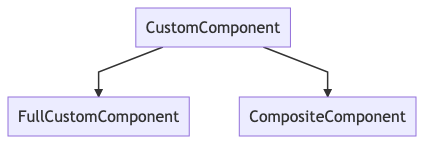
Android では公式にあるとおりカスタムビューを作成する方法が何パターンかあります。
今回は複合コンポーネントを作成してみたので作成方法をまとめたいと思います。
| 名称 | 説明 |
|---|---|
| フルカスタムコンポーネント |
Viewを継承していちから新たなコンポーネントを作成するパターン |
| 複合コンポーネント | 既存のコンポーネントを複数組み合わせて新たなコンポーネントを作成するパターン |
今回は次のような3つのボタンをまとめ、選択したボタンのテキストが
赤く表示される複合コンポーネントを作成したいと思います。
1. Containerクラスを継承する
複合コンポーネントを作成するためには、まずどのContainerクラスを継承するか決めます。
今回はLinearLayoutを利用するので次のように実装します。
class SelectorView(context : Context, attributeSet: AttributeSet) : LinearLayout(context, attributeSet)
このようにLinearLayoutを継承したクラスを定義するとレイアウトでSelectorViewを記述できるようになります。
<?xml version="1.0" encoding="utf-8"?>
<FrameLayout xmlns:android="http://schemas.android.com/apk/res/android"
xmlns:app="http://schemas.android.com/apk/res-auto"
xmlns:tools="http://schemas.android.com/tools"
android:layout_width="match_parent"
android:layout_height="match_parent"
tools:context=".MainActivity">

    <kaleidot725.customviewsample.SelectorView
        android:layout_width="match_parent"
        android:layout_height="match_parent"/>

</FrameLayout>
2. 複数のコンポーネントを組み合わせたレイアウトを作成して読み込む
次に複合コンポーネントで読み込むレイアウトを作成します。
3つのボタンを並べた複合コンポーネントを作成したいので、
次のようにmergerの中に3つButtonを入れたレイアウトを作成します。
<?xml version="1.0" encoding="utf-8"?>
<merge xmlns:android="http://schemas.android.com/apk/res/android">
    <Button
        android:id="@+id/one"
        android:layout_width="100dp"
        android:layout_height="wrap_content"
        android:text="1"/>

    <Button
        android:id="@+id/two"
        android:layout_width="100dp"
        android:layout_height="wrap_content"
        android:text="2"/>

    <Button
        android:id="@+id/three"
        android:layout_width="100dp"
        android:layout_height="wrap_content"
        android:text="3"/>
</merge>
そして複合コンポーネントでView.inflateを利用して読み込めば
複数のコンポーネントを組み合わせたカスタムビューを実装できます。
class SelectorView(context : Context, attributeSet: AttributeSet) : LinearLayout(context, attributeSet) {
    init {
        View.inflate(context, R.layout.selector_view, this)
    }
}

3. 複数のコンポーネントを組み合わせて処理を実装する。
レイアウトで定義した複数コンポーネントを制御する処理を実装し、
独自の複合コンポーネントならではの制御ができるようにします。
次のように選択したボタンのテキスト色を変え、他のボタンのテキスト色を戻す処理を実装してみます。
class SelectorView(context : Context, attributeSet: AttributeSet) : LinearLayout(context, attributeSet) {

    val oneButton : Button
    val twoButton : Button
    val threeButton : Button

    init {
        View.inflate(context, R.layout.selector_view, this)

        oneButton = findViewById(R.id.one)
        twoButton = findViewById(R.id.two)
        threeButton = findViewById(R.id.three)

        oneButton.setOnClickListener {
            oneButton.setTextColor(Color.RED)
            twoButton.setTextColor(Color.BLACK)
            threeButton.setTextColor(Color.BLACK)
        }

        twoButton.setOnClickListener {
            oneButton.setTextColor(Color.BLACK)
            twoButton.setTextColor(Color.RED)
            threeButton.setTextColor(Color.BLACK)
        }

        threeButton.setOnClickListener {
            oneButton.setTextColor(Color.BLACK)
            twoButton.setTextColor(Color.BLACK)
            threeButton.setTextColor(Color.RED)
        }
    }
}
*. なぜmergerを使うのか?
mergerですが無駄なViewを生成しないために利用しています。
例えばmergerをLinearLayoutに置き換えたレイアウトを
複合コンポーネントで読み込むと次の構造でViewが生成されてしまいます。
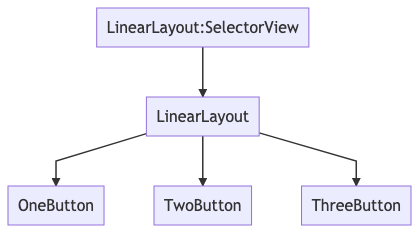
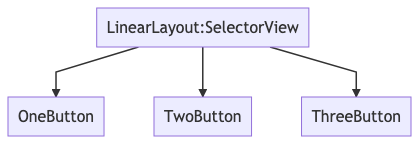
ですがmergerを利用すると次の構造でViewが生成されるので無駄にViewを生成を避けられます。 無駄にViewを生成するとUIパフォーマンスの低下に繋がるのでmerger`を利用したほうがよいです。
おわりに
今回作成したサンプルは次にまとめています。
なので必要に応じて閲覧していただければと思います。