はじめに
Android では View の位置を取得する関数が複数用意されています。それらの関数について調べ、どんな違いがあるのかまとめていきたいと思います。
TL;DR
- View.getLocationInWindow と View.getLocationOnScreen である View の座標を取得できる
- View.getLocationInWindow では Activity や Dialog の右端を原点とした座標を取得できる
- View.getLocationOnScreen では 端末のスクリーンの右端を原点とした座標を取得できる。
- どちらの関数も IntArray を渡すことで座標を取得できる、下記の関数を定義すると面倒なく座標を取得できる。
    fun View.getLocationPointInWindow(): Point {
        val array = IntArray(2)
        this.getLocationInWindow(array)
        return Point(array[0], array[1])
    }

    fun View.getLocationPointOnScreen(): Point {
        val array = IntArray(2)
        this.getLocationOnScreen(array)
        return Point(array[0], array[1])
    }
関数の種類
View の位置を取得する関数は 2種類あります。この2種類の関数の違いは画面のどこを原点とするかです。そのため画面のどこを基準にした位置情報が欲しいかで使い分けることになります。
| 名称 | 説明 |
|---|---|
| View.getLocationInWindow | その View が Window のどこにあるか取得する。Window の左上が原点になります。 Window とは Activity や Dialog のことを指します。 |
| View.getLocationOnScreen | その View が Screen のどこにあるか取得する。Screen の左上が原点になります。Screenとは物理的な端末の画面のことです。 |
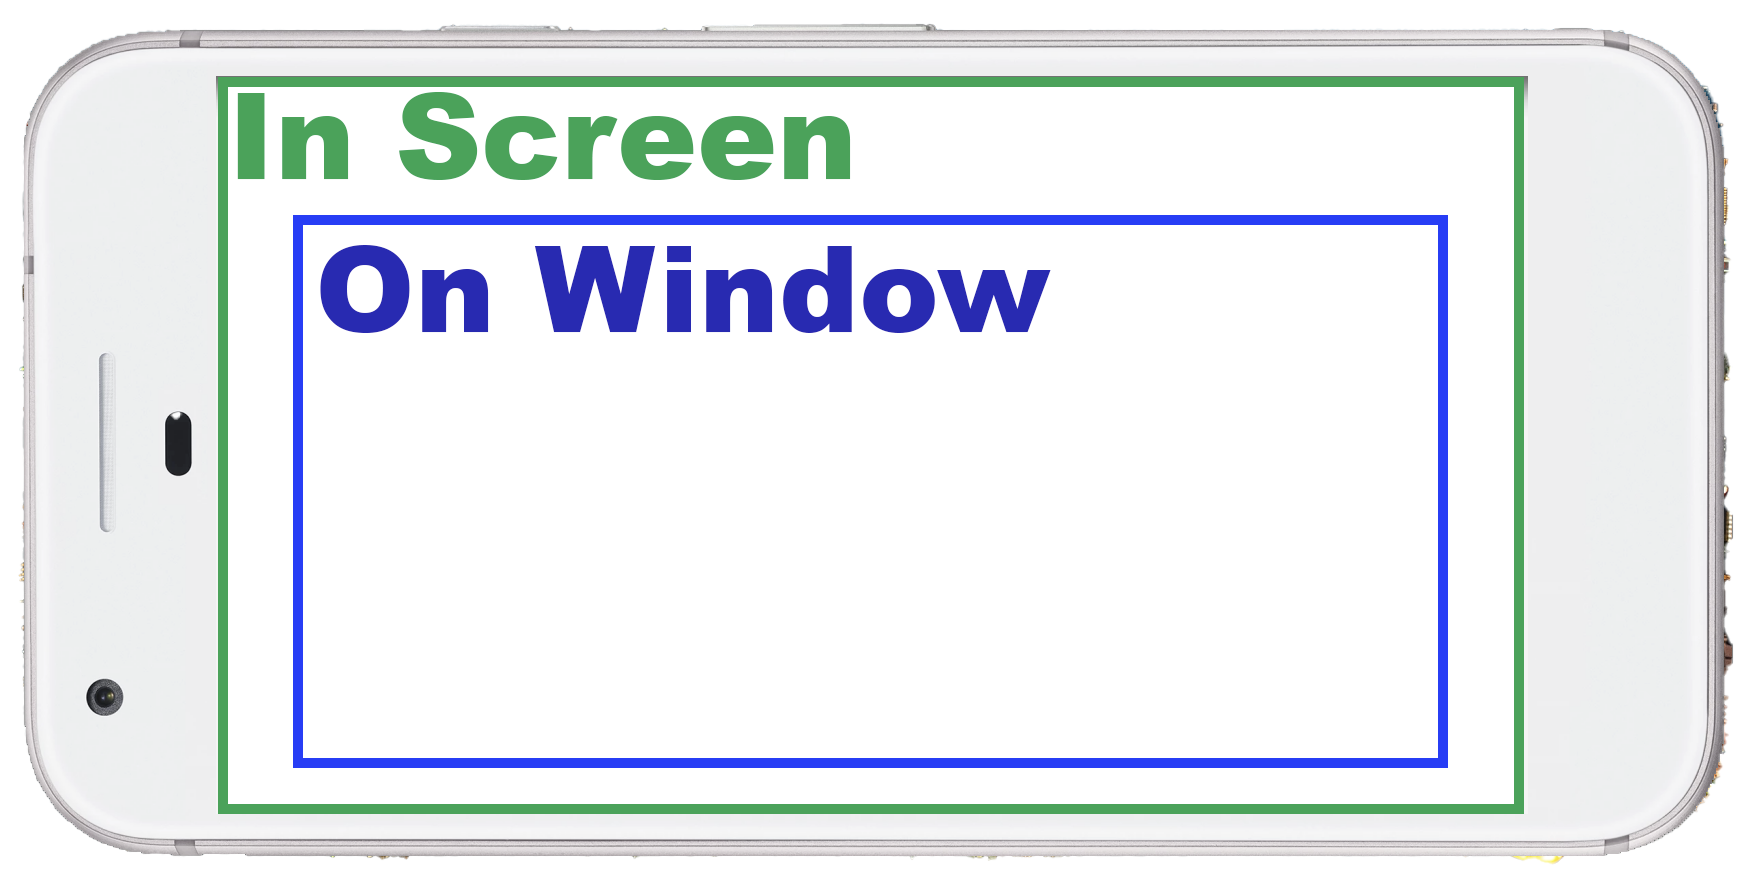
InScreenとOnWindowの関係は次のようになりますが、通常の Activity やFragmentの場合は InScreen == OnWindow となる場合が多いです。Dailogであると InScreen != OnWindow となるのでこの2つの関数は意識して使い分ける必要があります。
関数の利用
View.getLocationInWindow と View.getLocationOnScreen の使い方ですがちょっと面倒です。次のようにIntArrayを渡すと、1つめに X座標、 2つめに Y座標が格納されるようになっています。
    val textView = findViewById<TextView>(R.id.two)
    val array = IntArray(2)
    textView.getLocationOnScreen(array)
    Log.v("LOG", "X ${array[0]} Y ${array[1]}")
    textView.getLocationInWindow(array)
    Log.v("LOG", "X ${array[0]} Y ${array[1]}")
IntArray だと取り扱いがづらいので、次のような拡張関数を定義しましょう。拡張関数は Point を返すようにしているので IntArray を定義する必要が無くなるので取り扱いが楽になります。
    fun View.getLocationPointInWindow(): Point {
        val array = IntArray(2)
        this.getLocationInWindow(array)
        return Point(array[0], array[1])
    }

    fun View.getLocationPointOnScreen(): Point {
        val array = IntArray(2)
        this.getLocationOnScreen(array)
        return Point(array[0], array[1])
    }
2つの違いを検証してみる
InWindowとOnScreenの違い検証してみたいと思います。ダイアログに表示したTextViewのLocationを取得して比べてみます。すると InWindowが X:665,Y:422、 OnScreenが X:665,Y 515 となりました。このように Screen か Window の右上を原点した座標のどちらかを取得できるようになっています。


ちなみに動作検証に利用したコードになります。
MainActivity.kt
class MainActivity : AppCompatActivity() {

    override fun onCreate(savedInstanceState: Bundle?) {
        super.onCreate(savedInstanceState)
        setContentView(R.layout.activity_main)
        Dialog(this).apply {
            setContentView(R.layout.activity_main)
            window?.setLayout(
               WindowManager.LayoutParams.MATCH_PARENT,
               WindowManager.LayoutParams.MATCH_PARENT
            )
            show()

            val textView = findViewById<TextView>(R.id.text_view)
            val inWindowButton = findViewById<Button>(
                R.id.location_in_window_button
            )
            val onScreenButton = findViewById<Button>(
                R.id.location_on_screen_button
            )
            inWindowButton.setOnClickListener {
                toastLocationInWindow(textView)
            }
            onScreenButton.setOnClickListener {
                toastLocationOnScreen(textView)
            }
        }

    }

    private fun View.getLocationPointInWindow(): Point {
        val array = IntArray(2)
        this.getLocationInWindow(array)
        return Point(array[0], array[1])
    }

    private fun View.getLocationPointOnScreen(): Point {
        val array = IntArray(2)
        this.getLocationOnScreen(array)
        return Point(array[0], array[1])
    }

    private fun toastLocationInWindow(view: View) {
        val point = view.getLocationPointInWindow()
        Toast.makeText(applicationContext, "X ${point.x} Y ${point.y}", Toast.LENGTH_LONG).show()
    }

    private fun toastLocationOnScreen(view: View) {
        val point = view.getLocationPointOnScreen()
        Toast.makeText(applicationContext, "X ${point.x} Y ${point.y}", Toast.LENGTH_LONG).show()
    }
}
activity_main.xml
<?xml version="1.0" encoding="utf-8"?>
<FrameLayout xmlns:android="http://schemas.android.com/apk/res/android"
    xmlns:tools="http://schemas.android.com/tools"
    android:layout_width="match_parent"
    android:layout_height="match_parent"
    xmlns:app="http://schemas.android.com/apk/res-auto"
    tools:context=".MainActivity">

    <TextView
        android:id="@+id/text_view"
        android:layout_width="wrap_content"
        android:layout_height="wrap_content"
        android:layout_gravity="center"
        android:text="Sample Text"
        android:textSize="32sp"/>

    <androidx.constraintlayout.widget.ConstraintLayout
        android:layout_width="match_parent"
        android:layout_height="wrap_content"
        android:layout_gravity="right|bottom">
        <Button
            android:id="@+id/location_in_window_button"
            android:layout_width="0dp"
            android:layout_height="wrap_content"
            android:layout_gravity="right|bottom"
            android:text="IN WINDOW"
            app:layout_constraintStart_toStartOf="parent"
            app:layout_constraintEnd_toStartOf="@id/location_on_screen_button"
            app:layout_constraintTop_toTopOf="parent"
            app:layout_constraintBottom_toBottomOf="parent"/>

        <Button
            android:id="@+id/location_on_screen_button"
            android:layout_width="0dp"
            android:layout_height="wrap_content"
            android:text="ON SCREEN"
            app:layout_constraintStart_toEndOf="@id/location_in_window_button"
            app:layout_constraintEnd_toEndOf="parent"
            app:layout_constraintTop_toTopOf="parent"
            app:layout_constraintBottom_toBottomOf="parent"/>

    </androidx.constraintlayout.widget.ConstraintLayout>
</FrameLayout>