こんにちは、かくみょんです!
先日開催されたGoogle Cloud Nextで、注目の新ツール「Google ADK(Agent Development Kit)」が発表されました。
これは、AIエージェントを簡単に開発・デプロイできる開発キットで、今後のエージェント系アプリ開発を大きく変えるかもしれません。
▼ Google Cloud Nextの様子はこちら(ADKの発表は 49:16 あたり)
今回は、そんなGoogle ADKを実際に触ってみた感想や導入手順をまとめてみました!
- AIエージェントを使ったアプリを作ってみたい!
- エージェントって何?どうやって作るの?
そんな方に向けた記事になっていますので、ぜひ参考にしてみてください。
それでは、さっそく本編へどうぞ!🚀
はじめに
GoogleのADKとは?
一言で言うと、AIエージェントをかんたんに作って動かせる、Googleが提供する開発フレームワークです。
SDK(SoftwareDevelopmentKit)のSoftwareをAgentに文字ったものです。
その名の通り、ソフトウェアを作るような感覚で、シンプルなタスクから複雑なエージェントの動きまで設計・実行できるのが特徴です。
GeminiなどのGoogle製品と相性が良いですが、特定のモデルや環境に依存せず、他のツールやサービスとも組み合わせて使えます。
公式が発表しているADKの主なポイント
- エージェントの動きを自由に組み立てられる(順番に実行・並列処理・ループなど)
- 複数のエージェントを連携させて複雑な処理もOK
- LangChainやCrewAIなどの外部ツールとも連携可能
- 作ったエージェントはローカルやCloud Runなどにデプロイできる
- 自動でエージェントの動作を評価する機能もあり
- セキュリティにも配慮された設計ができる
※ 現在はPython版が正式リリース(v1.0.0)されていて、Java版はプレビュー版(v0.1.0)が利用可能です。
さっそく使ってみた
セットアップ
セットアップの方法は、英語ですが下記で詳しく記載されています。
以降はこの記事を翻訳しただけのものになるので、応用方法が知りたい方は次の章まで飛ばしてください。
-
プロジェクトフォルダを作成して、Pythonの仮想環境を作成してください
python -m venv .venv -
Pythonの仮想環境を起動させてください(コマンドはOSごとに異なります)
# macOS/Linux: source .venv/bin/activate # Windows CMD: .venv\Scripts\activate.bat # Windows PowerShell: .venv\Scripts\Activate.ps1 -
Google ADKをインストールしてください
pip install google-adk -
multi_tool_agentフォルダを作成してください
mkdir multi_tool_agent/ -
__init__.pyファイルをmulti_tool_agentフォルダ内に作成してください
echo "from . import agent" > multi_tool_agent/__init__.py -
agent.pyファイルをmulti_tool_agentフォルダ内に作成してください
touch multi_tool_agent/agent.py -
agent.pyファイルに以下を貼り付けてください
import datetime from zoneinfo import ZoneInfo from google.adk.agents import Agent def get_weather(city: str) -> dict: """Retrieves the current weather report for a specified city. Args: city (str): The name of the city for which to retrieve the weather report. Returns: dict: status and result or error msg. """ if city.lower() == "new york": return { "status": "success", "report": ( "The weather in New York is sunny with a temperature of 25 degrees" " Celsius (77 degrees Fahrenheit)." ), } else: return { "status": "error", "error_message": f"Weather information for '{city}' is not available.", } def get_current_time(city: str) -> dict: """Returns the current time in a specified city. Args: city (str): The name of the city for which to retrieve the current time. Returns: dict: status and result or error msg. """ if city.lower() == "new york": tz_identifier = "America/New_York" else: return { "status": "error", "error_message": ( f"Sorry, I don't have timezone information for {city}." ), } tz = ZoneInfo(tz_identifier) now = datetime.datetime.now(tz) report = ( f'The current time in {city} is {now.strftime("%Y-%m-%d %H:%M:%S %Z%z")}' ) return {"status": "success", "report": report} root_agent = Agent( name="weather_time_agent", model="gemini-2.0-flash", description=( "Agent to answer questions about the time and weather in a city." ), instruction=( "You are a helpful agent who can answer user questions about the time and weather in a city." ), tools=[get_weather, get_current_time], ) -
.envファイルをmulti_tool_agentフォルダ内に作成してください
touch multi_tool_agent/.env -
APIキーをGoogle AI Studioから作成してください
-
.envファイルに以下を貼り付け、2行目のPASTE_YOUR_ACTUAL_API_KEY_HEREにAPIキーを貼り付けてください
GOOGLE_GENAI_USE_VERTEXAI=FALSE GOOGLE_API_KEY=PASTE_YOUR_ACTUAL_API_KEY_HERE -
フォルダ構造が以下のようになっていることを確認してください
プロジェクトフォルダ/ multi_tool_agent/ __init__.py agent.py .env -
プロジェクトフォルダからdev UIを起動してください
adk web
できたもの
イメージ
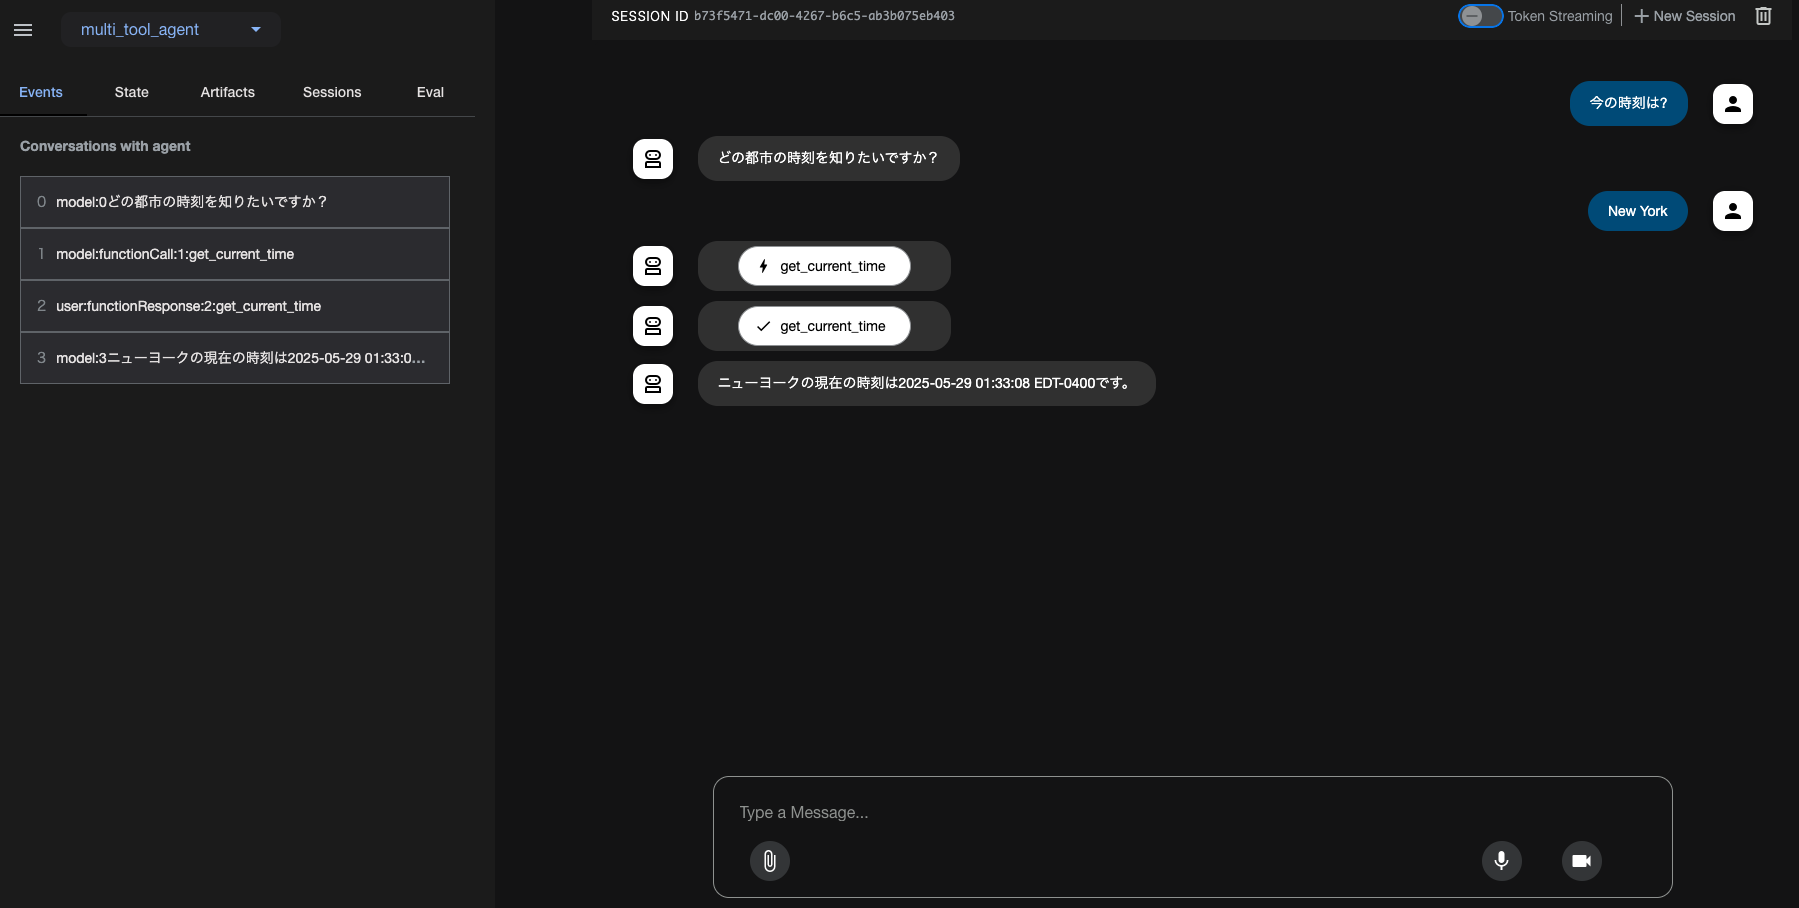
初期状態では、エージェントは 「New Yorkの現在時刻」と「天気」しか答えることができません。
これは、デフォルトで使える関数が get_current_time と get_weather の2つだけに限られているためです。
ただし、関数を追加していくことで、より多様な質問に対応させることが可能です。自分で新しい関数を定義して登録することで、エージェントの能力をどんどん拡張できます。
また、左側にある「Events」タブには、エージェントの実行履歴が表示されます。
このタブをクリックすると、
- どの関数を実行したのか(Event)
- Geminiに送ったプロンプト(Request)
- その返答(Response)
といった情報を確認できます。
API実行時に発生したエラーはResponseに記載されて返ってきます。
エージェントがどのように判断して動いたかの流れが可視化されているため、開発やデバッグに非常に役立ちます。
応用してみた
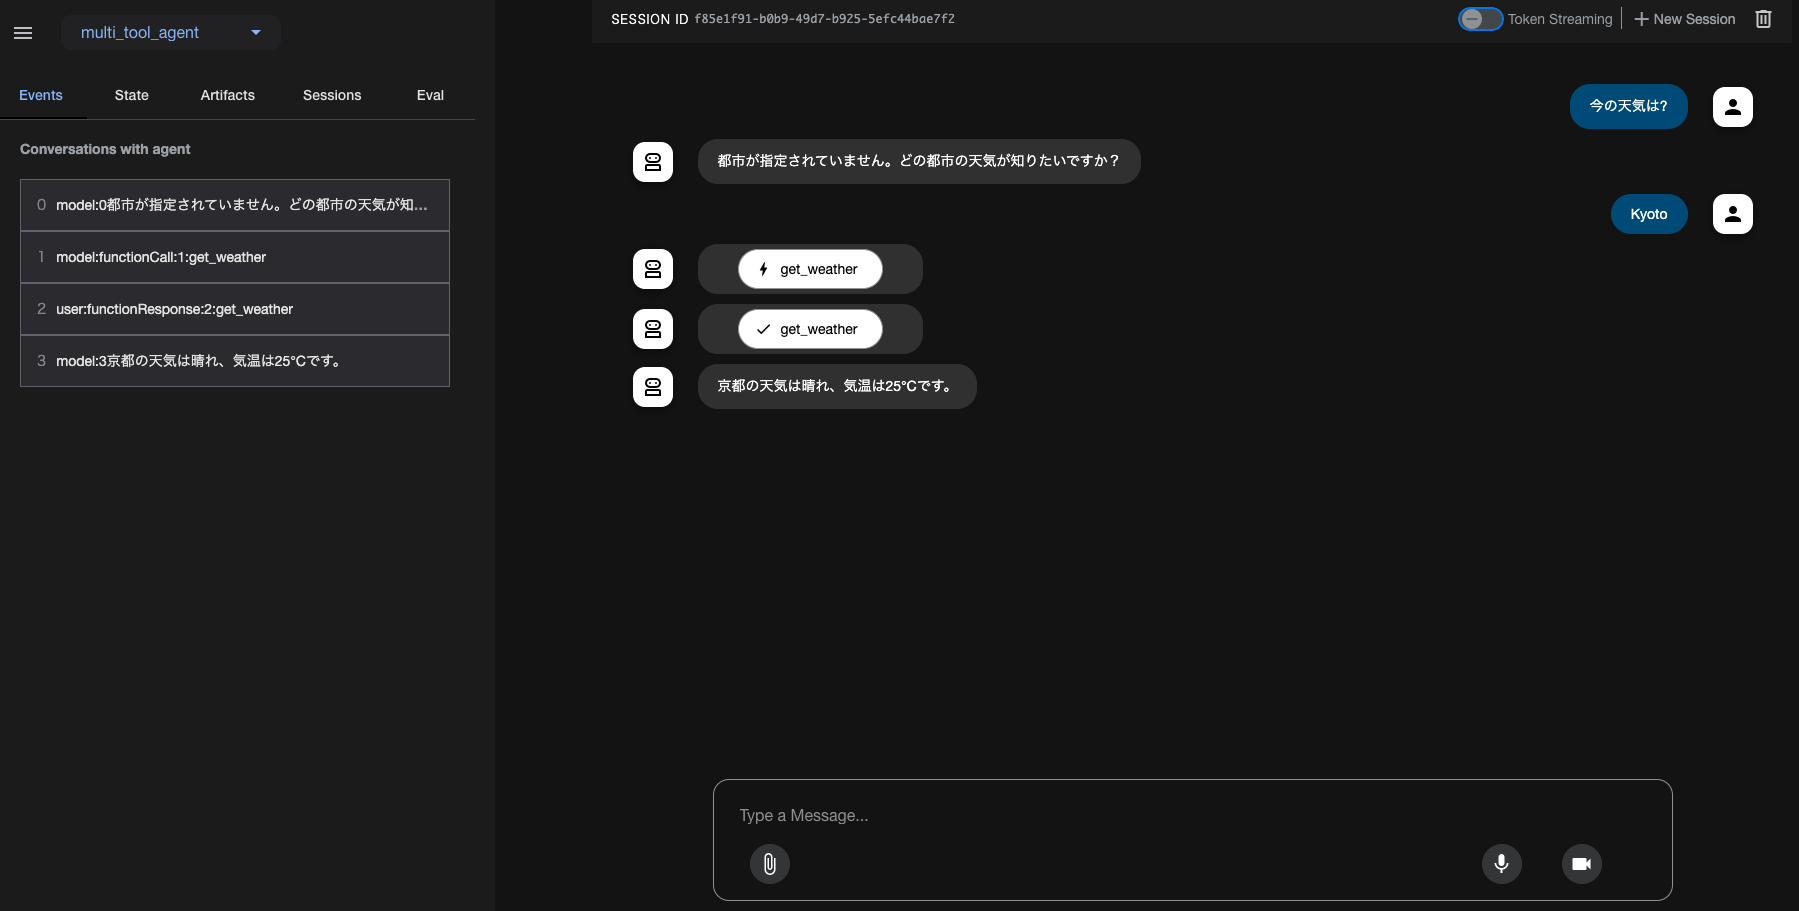
京都の現在時刻を答えてくれるようにしてみた
- イメージ
- 変更箇所(agent.py)
def get_weather(city: str) -> dict:
    """Retrieves the current weather report for a specified city.

    Args:
        city (str): The name of the city for which to retrieve the weather report.

    Returns:
        dict: status and result or error msg.
    """
    if city.lower() == "new york":
        return {
            "status": "success",
            "report": (
                "The weather in New York is sunny with a temperature of 25 degrees"
                " Celsius (41 degrees Fahrenheit)."
            ),
        }
+    elif city.lower() == "kyoto":
+        return {
+            "status": "success",
+            "report": (
+                "The weather in Kyoto is sunny with a temperature of 25 degrees"
+                " Celsius (41 degrees Fahrenheit)."
+            ),
+        }
    else:
        return {
            "status": "error",
            "error_message": f"Weather information for '{city}' is not available.",
        }
get_weather 関数内の、受け取った city 文字列に応じて処理を分岐させる部分に「Kyoto(京都)」を追加しました。
これにより、「どの都市の天気を知りたいですか?」という問いに対して「kyoto」と答えると、京都用に追加した処理が正しく実行されるようになります。
ニューヨークと京都の緯度経度を答えてくれるようにしてみた
- イメージ
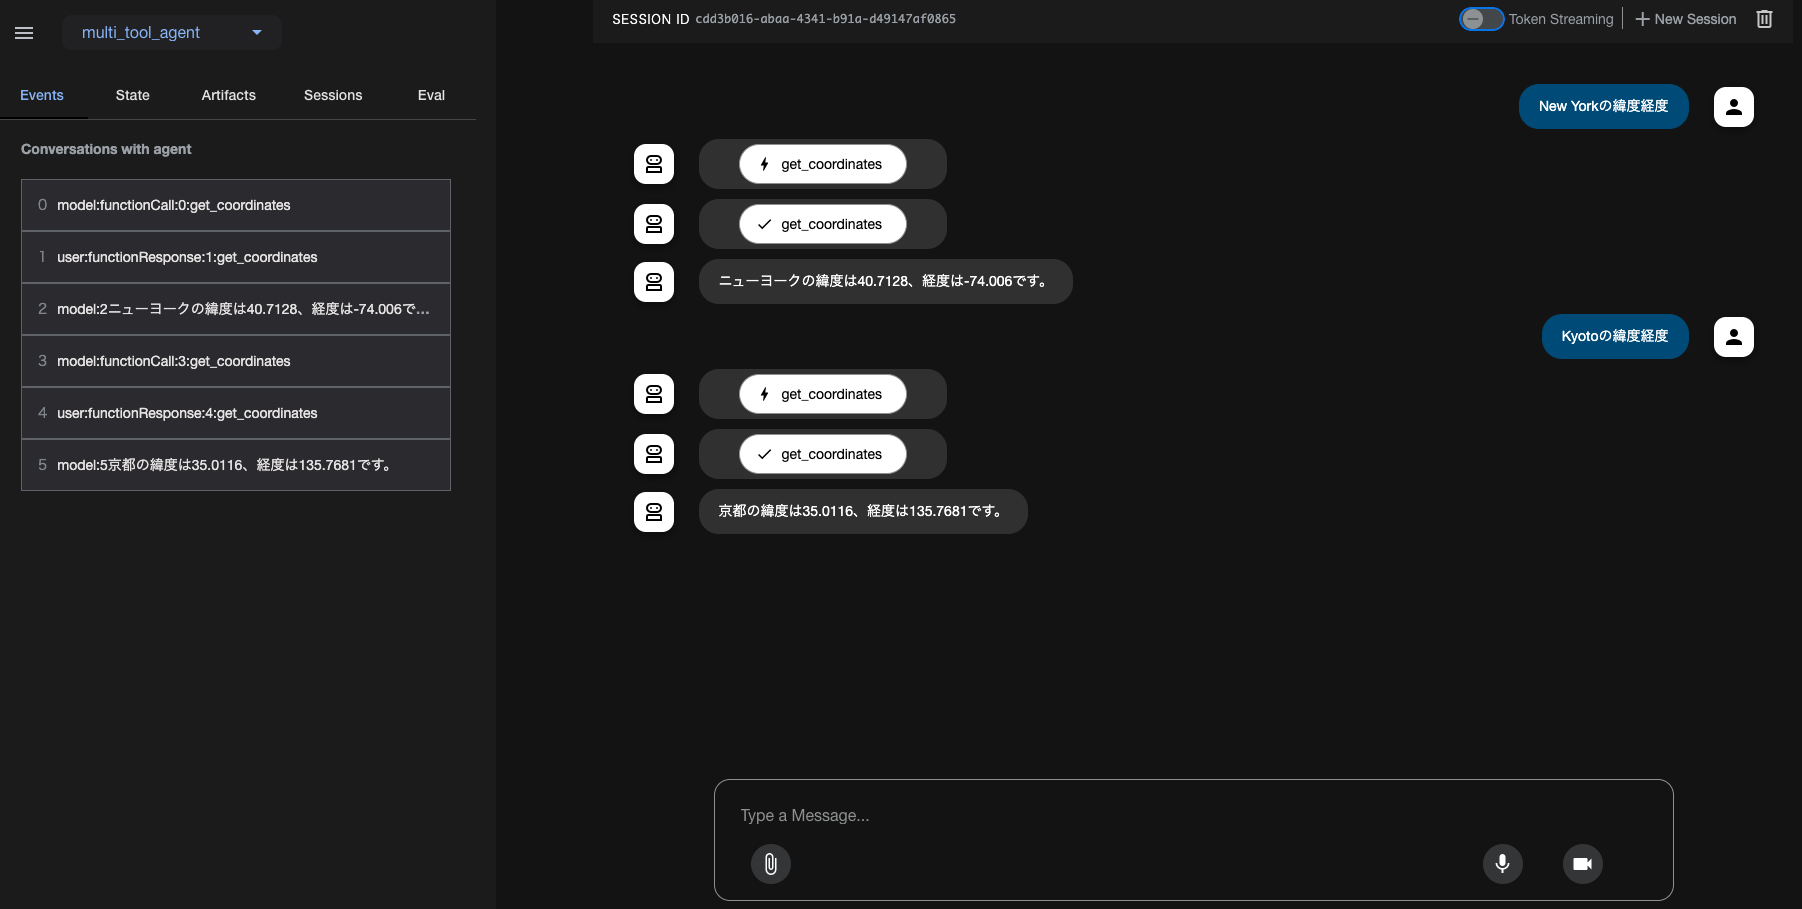
- 変更箇所(agent.py)
1.以下の関数を加える
def get_coordinates(city: str) -> dict:
    """Retrieves the latitude and longitude coordinates for a specified city.

    Args:
        city (str): The name of the city for which to retrieve the coordinates.

    Returns:
        dict: status and coordinates or error msg.
    """
    if city.lower() == "new york":
        return {
            "status": "success",
            "coordinates": {
                "latitude": 40.7128,
                "longitude": -74.0060
            }
        }
    elif city.lower() == "kyoto":
        return {
            "status": "success",
            "coordinates": {
                "latitude": 35.0116,
                "longitude": 135.7681
            }
        }
    else:
        return {
            "status": "error",
            "error_message": f"Coordinates for '{city}' are not available."
        }
2.Agent関数のtoolsに作成したget_coordinatesを追加する
root_agent = Agent(
    name="weather_time_agent",
    model="gemini-2.0-flash",
    description=(
        "Agent to answer questions about the time and weather in a city."
    ),
    instruction=(
        "You are a helpful agent who can answer user questions about the time and weather in a city."
    ),
-    tools=[get_weather, get_current_time],
+    tools=[get_weather, get_current_time, get_coordinates],
)
緯度・経度を取得するための新しい関数を追加し、それをツールとしてAIAgentに認識させることで、エージェントが緯度・経度の質問にも答えられるようになりました。
ただし、この関数の中身は都市名に応じて値を返す単純な分岐処理になっているため、「ニューヨーク」か「京都」の緯度・経度しか答えてくれません。
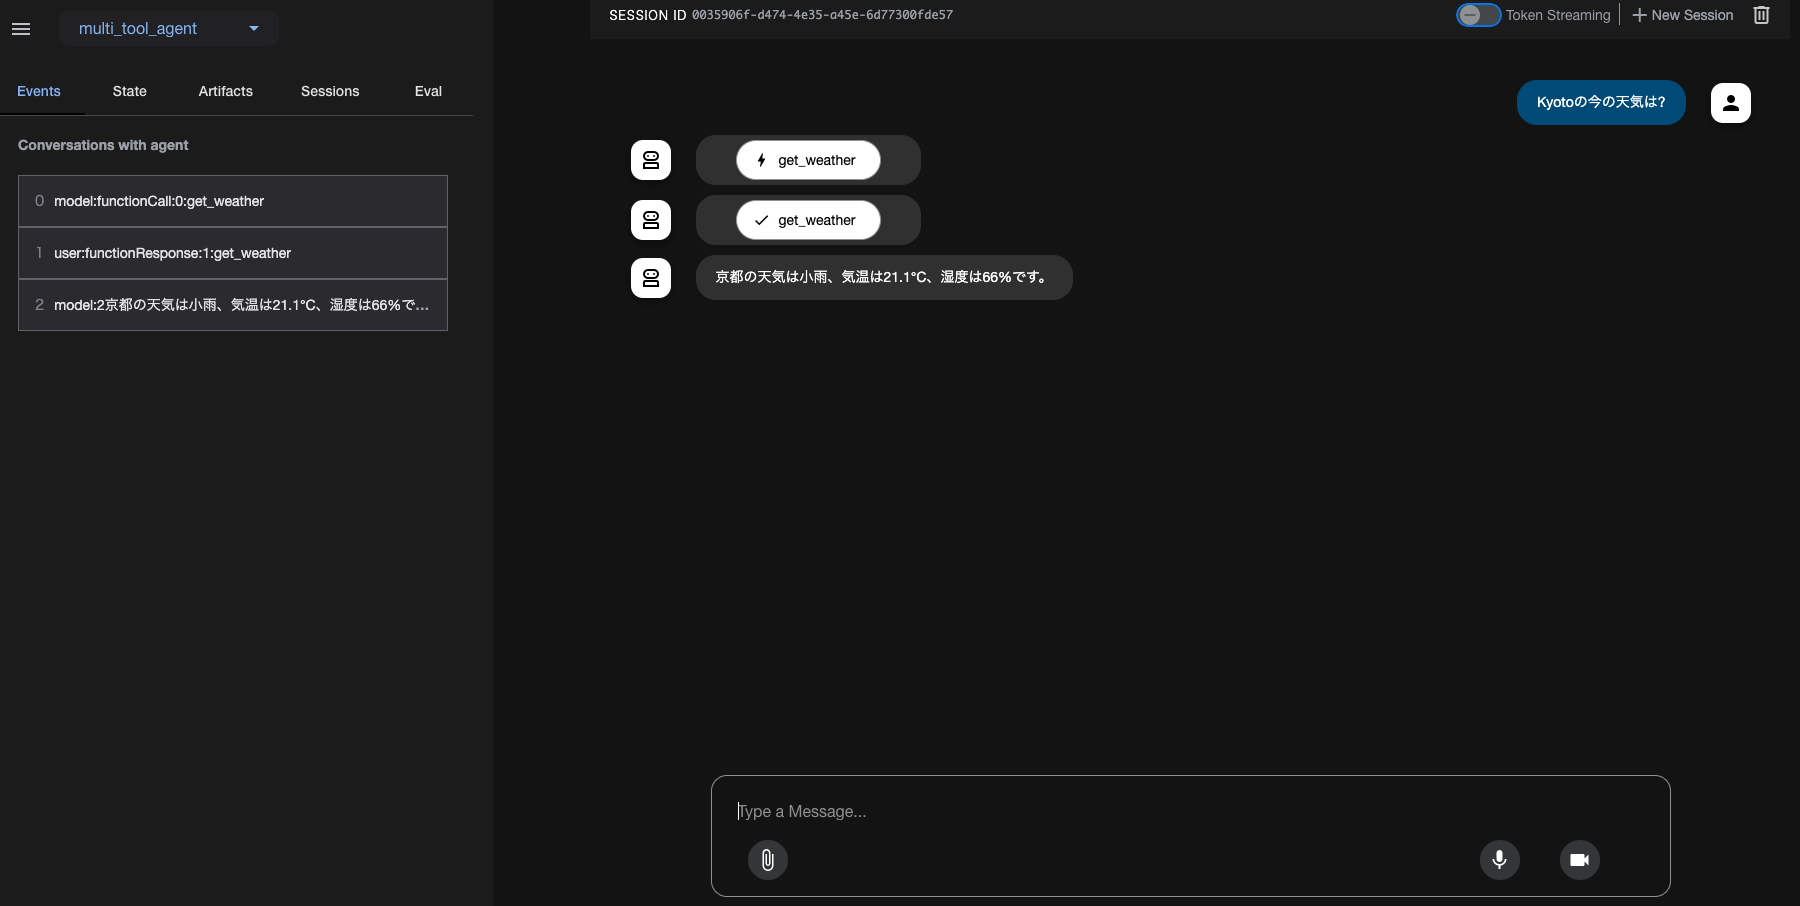
APIを使って今の気象を答えてくれるようにしてみた
- イメージ
0.先に以下のサイトでAPIキーを作成してください。
- 変更箇所(agent.py)
1.get_weather 関数を以下のコードに差し替え、YOUR_API_KEY_HERE の部分を作成したAPIキーに置き換えてください
def get_weather(city: str) -> dict:
    """Retrieves the current weather report for a specified city using OpenWeatherMap API.

    Args:
        city (str): The name of the city for which to retrieve the weather report.

    Returns:
        dict: status and result or error msg.
    """
    # TODO: Replace with your own OpenWeatherMap API key
    # Get your API key from: https://home.openweathermap.org/api_keys
    api_key = "YOUR_API_KEY_HERE"
    if not api_key:
        return {
            "status": "error",
            "error_message": "Please set a valid OpenWeatherMap API key in the code."
        }

    # Get coordinates for the city
    coords = get_coordinates(city)
    if coords["status"] == "error":
        return coords

    # Make API request to OpenWeatherMap
    base_url = "https://api.openweathermap.org/data/2.5/weather"
    params = {
        "lat": coords["coordinates"]["latitude"],
        "lon": coords["coordinates"]["longitude"],
        "appid": api_key,
        "units": "metric"  # Use metric units (Celsius)
    }

    try:
        response = requests.get(base_url, params=params)
        response.raise_for_status()
        data = response.json()

        # Extract relevant weather information
        temp_celsius = data["main"]["temp"]
        temp_fahrenheit = (temp_celsius * 9/5) + 32
        weather_desc = data["weather"][0]["description"]
        humidity = data["main"]["humidity"]

        report = (
            f"The weather in {city} is {weather_desc} with a temperature of "
            f"{temp_celsius:.1f} degrees Celsius ({temp_fahrenheit:.1f} degrees Fahrenheit). "
            f"Humidity is {humidity}%."
        )

        return {
            "status": "success",
            "report": report
        }

    except requests.exceptions.RequestException as e:
        return {
            "status": "error",
            "error_message": f"Failed to fetch weather data: {str(e)}"
        }
OpenWeatherMapのAPIを使用して、リアルタイムの天気情報を取得するAIエージェントを作成しました。
このように、処理の中に外部APIを組み込むことで、より実用的なエージェントに仕上がってきます。
ただし、APIのリクエストには緯度・経度の情報が必要です。
現在、緯度経度を取得する関数は「ニューヨーク」と「京都」にしか対応していないため、天気を取得するこの関数も現時点ではその2都市のみの対応となっています。
感想
プロンプトに応じて適切な関数を自動で選んで実行してくれるのは、とても面白く、実用性を感じました。
チャットベースで柔軟に動作するエージェントを簡単に作れるのは、かなり魅力的です。
一方で、気になった点もいくつかありました。
- APIキーはユーザー自身が取得・入力する必要があり、UXとしてはやや不親切
- 関数内の処理はすべて手書き、API連携も自分で実装する必要があり、工数がかかる
- 関数設計に注意が必要で、似たような関数が複数あると誤って実行されるリスクがある
- 特に業務システムなどでは、誤動作のリスクを考えると、従来のように実行する関数をあらかじめ固定する方式の方が安全
- (※環境依存かもしれませんが)予測変換を確定するEnterキーで、そのままメッセージが送信されてしまうUIは少し使いづらく感じました
課題も見えましたが、チャット内容から自動で処理を選ぶという体験には、大きな将来性を感じました。
最後の応用でも触れましたが、処理の中に外部APIを組み込むことで、より実用的なエージェントが構築できそうです。作り込み次第では、さまざまなタスクに対応できる万能エージェントも実現可能だと感じました。
ぜひみなさんも使ってみてください![]()