RailsでSpotifyAPIとOmmniAuthのソーシャルログインを実装
環境
- Ruby 3.0.3
- Rails 6.1.4
前提
Authorization Code Flowというエンドユーザーの情報を取得でき長時間実行アプリケーションに適しているものを利用します。
https://developer.spotify.com/documentation/general/guides/authorization/code-flow/
他にも2種類のトークンがあるので目的に合わせてトークンの発行をしてください。
Spotifyでのログインのみなのでdeviseだったりを使わずに実装します。
手順
1. SpotifyAPIを利用するための準備
下記のリンクがSpotifyAPIを利用するときの設定等を行うサイトになります。
https://developer.spotify.com/dashboard/
まずSpotifyを利用したことがない場合は、Spotifyアカウントを作成する必要があるので公式ホームページから指示に従って無料のアカウントを作成してください。
DASHBOARDにログインし、「CREATE AN APP」からアプリ名と簡単な説明を入力しアプリの作成をします。
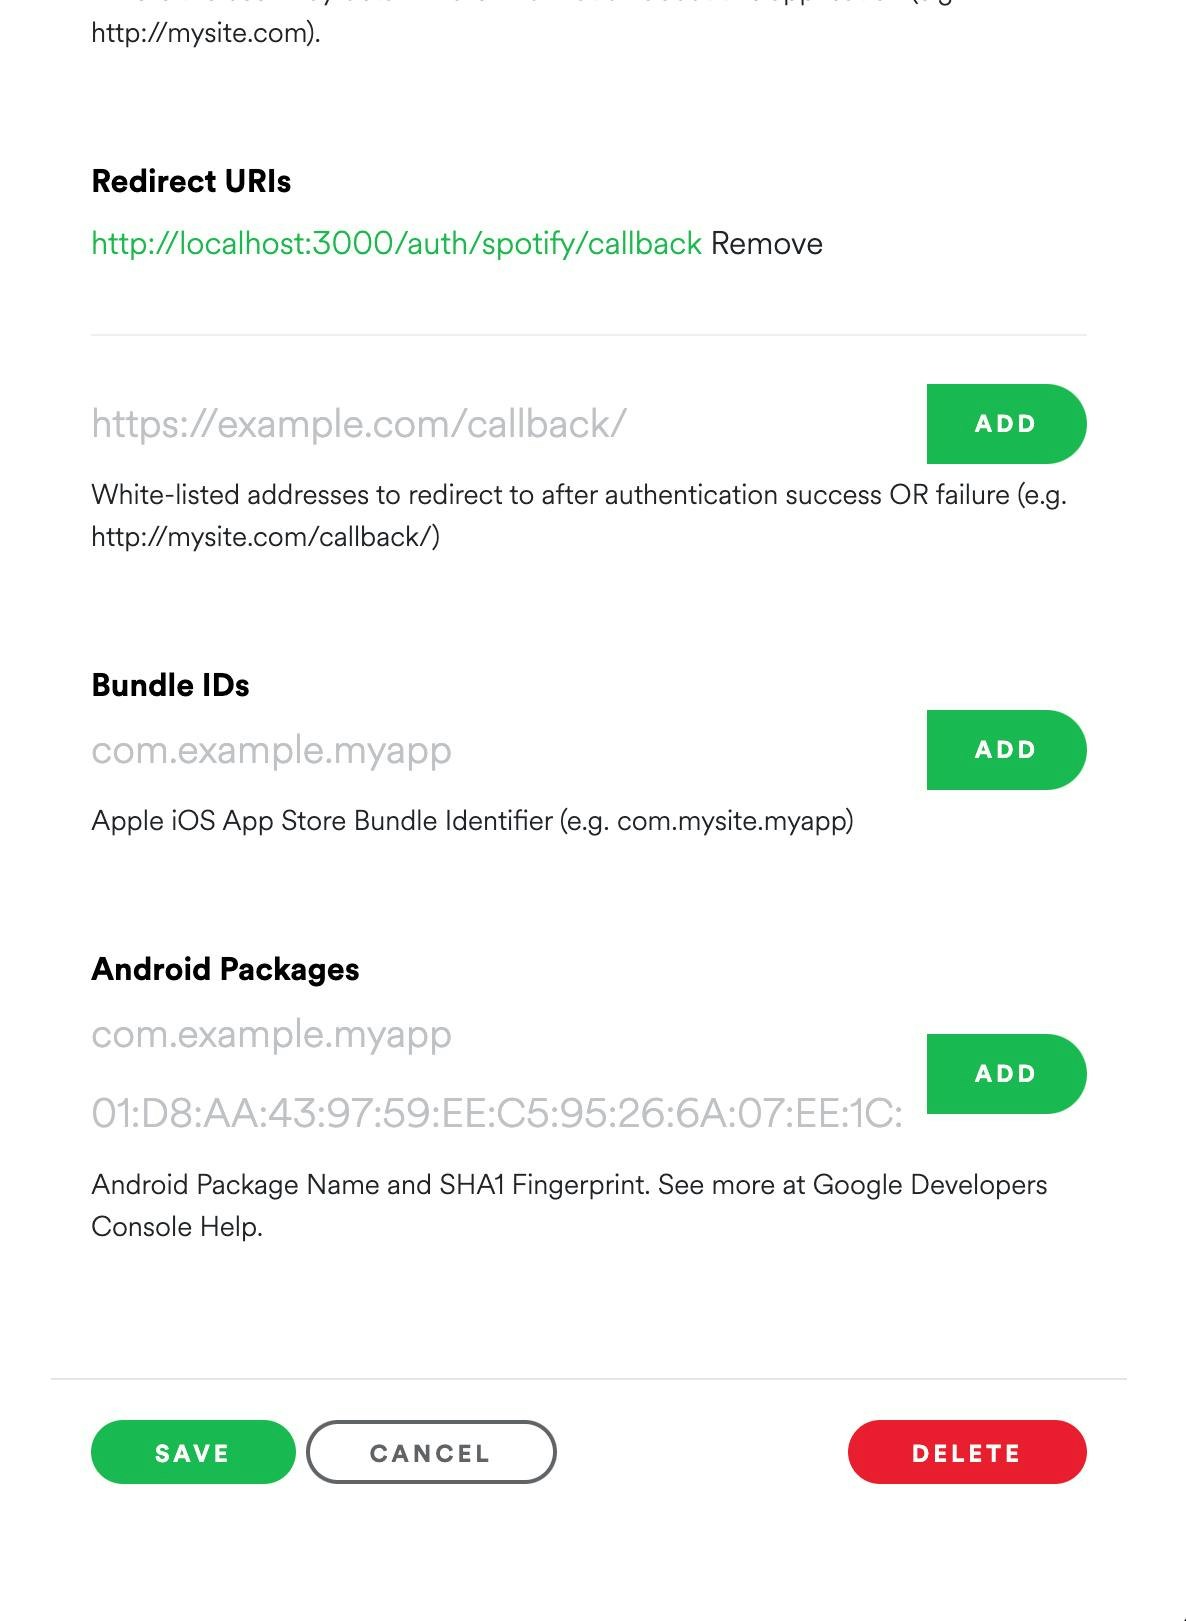
作成後はclient IDと隠れているClient Secretを確認し、EDIT SETTINGSからRedirect URIsを設定する。
Redirect URIsは今回OmniAuthを使うのでhttp://localhost:3000/auth/spotify/callbackを使う
2. Railsアプリに必要なGemの準備
dotenvomniauth-spotify
dotenvの設定
インストール後、.envを作成し確認したClient IDとClient Secretを追加する。このファイルは公開しないので.gitignoreに追加する。
SPOTIFY_CLIENT_ID = "*****"
SPOTIFY_CLIENT_SECRET = "*****"
omniauth-spotifyの設定
config/initializer/omniauth.rbを作成し、.envに設定したkeyを使って設定する。
認可範囲を自分が取得したい範囲のものを設定する。今回はユーザーのプロフィールに関係するものだけを選択。
認可範囲は下記のリンクから
https://developer.spotify.com/documentation/general/guides/authorization/scopes/
Rails.application.config.middleware.use OmniAuth::Builder do
  provider :spotify, ENV[SPOTIFY_CLIENT_ID], ENV[SPOITFY_CLIENT_SECRET]
     scope: 'playlist-read-private user-read-private user-read-email'
end
3. ログイン機能の作成
ルーティングの設定
Rails.application.routes.draw do
  get '/new', to: 'sessions#new'
  get '/auth/:provider/callback', to: 'sessions#create'
end
ログインボタンの実装
= link_to 'spotifyでログイン', "/auth/spotify", method: :post
ログイン処理の実装
def create
  user = User.find_or_create_from_omniauth!(request.env["omniauth.auth"])
  session[user_id] = user.id
  redirect_to root_path
end
request.env["omniauth.auth"]の中身
{"provider"=>"spotify",
 "uid"=>"******",
 "info"=>
  {"name"=>"***",
   "nickname"=>"*******",
   "email"=>nil,
   "urls"=>{"spotify"=>"https://open.spotify.com/user/******"},
   "image"=>nil,
   "birthdate"=>nil,
   "country_code"=>"JP",
   "product"=>"premium",
   "follower_count"=>0},
 "credentials"=>
  {"token"=>
    "******",
   "refresh_token"=>
    "******",
   "expires_at"=>1662430288,
   "expires"=>true},
 "extra"=>
  {"raw_info"=>
    {"country"=>"JP",
     "display_name"=>"***",
     "explicit_content"=>{"filter_enabled"=>false, "filter_locked"=>false},
     "external_urls"=>{"spotify"=>"https://open.spotify.com/user/*******"},
     "followers"=>{"href"=>nil, "total"=>0},
     "href"=>"https://api.spotify.com/v1/users/******",
     "id"=>"******",
     "images"=>[],
     "product"=>"premium",
     "type"=>"user",
     "uri"=>"spotify:user:******"}}}
受け取ったユーザーの情報を処理する
def self.find_or_create_from_omniauth!(auth_hash)
  user = User.find_or_initialize_by!(provider: auth_hash[:provider], uid: auth_hash)
  user.update!(
    name: auth_hash[:info][:name],
    image: auth_hash[:info][:image],
    access_token: auth[:credentials][:token],
    refresh_token: auth[:credentials][:refresh_token]
  )
user
end
これでログイン機能の完成です。
認証のみに使う場合はUser.find_or_create_by!を使いますが、今回はユーザーの情報を使ったり画像の更新があった場合にここで更新したかったのでfind_or_initialize_by!でuserを作り、update!する仕様にしました。
また、本来であればaccess_tokenとrefresh_tokenをそのまま登録するのはセキュリティ的に良くないので暗号化するためにGemのattr_encryptedをインストール、設定します。