はじめに
アーキテクチャシミュレータGem5について、インストールから簡単な使い方まで説明する。なお、インストール環境はMac、エミュレート対象はLinuxとする。
Gem5の概要
Gem5はアーキテクチャシミュレータで、CPUその他様々なハードウェアをシミュレートできる。Gem5にはFull System (FS)モードと、System Call Emulation (SE) モードの二種類のモードが存在する。FSモードは、その名の通り「全部シミュレーションする」モードで、とりあえずQEMUみたいなもんだと思えば良いと思う。SEモードは、その名の通りシステムコールをエミュレーションすることで、OS不要でユーザプログラムを実行できる。FSモードの方がより「リアル」なシミュレーションができるが、OSが介在するため、例えばOSによるスケジューリングの影響を受けたりする。SEモードはOS不要であるため、ユーザプログラムの解析に集中できる。また、デバイスドライバが足りないとかそういうことを考えなくても良い。
本稿では、とりあえずMac上で、SEモードで、x86Linux向けコードを実行し、解析するところまでやる。
Gem5のインストールとビルド
まず、Gem5をダウンロードする。Gitリポジトリがあるので、適当なディレクトリでクローンすれば良い。
git clone --depth 1 https://gem5.googlesource.com/public/gem5
cd gem5
ビルドにはSConsを使うので、もし入っていなければ入れる。
brew install scons
また、ビルドの実行にはPython 2系列が必要なようだ。僕はpyenvで環境管理していたので2系列に切り替えた。
pyenv local anaconda2-4.4.0
ビルドは、Gem5リポジトリの中でsconsコマンドを使う。
scons build/X86/gem5.opt
sconsは、まずbuildというディレクトリを探すが、存在しないのでbuild_optsを探しに行く。するとそこにX86があるので、それを参照しつつ、buildを作って、そこにgem5のバイナリを作る。ものすごく時間がかかるので、コアがたくさんある人は-j 8とかやって並列ビルドしたほうが良いかも。
ビルドが終わったら実行バイナリができたか確認する。
$ ./build/X86/gem5.opt --version
gem5.opt 2.0
できたっぽいですね。
テストもしてみよう。リポジトリにx86-linuxのサンプルバイナリが入っているので、実行してみる。
$ ./build/X86/gem5.opt ./configs/example/se.py -c ./tests/test-progs/hello/bin/x86/linux/hello
gem5 Simulator System.  http://gem5.org
gem5 is copyrighted software; use the --copyright option for details.

gem5 compiled Aug 27 2019 12:23:47
gem5 started Aug 27 2019 12:27:22
gem5 executing on watanabe-iMac.local, pid 65602
command line: ./build/X86/gem5.opt ./configs/example/se.py -c ./tests/test-progs/hello/bin/x86/linux/hello

Global frequency set at 1000000000000 ticks per second
warn: DRAM device capacity (8192 Mbytes) does not match the address range assigned (512 Mbytes)
0: system.remote_gdb: listening for remote gdb on port 7000
**** REAL SIMULATION ****
info: Entering event queue @ 0.  Starting simulation...
Hello world!
Exiting @ tick 5984000 because exiting with last active thread context
「Hello world!」を実行するプログラムをSEモードで実行し、無事に「Hello world!」が表示された。
自分のプログラムの実行
さて、自分のコードをコンパイルして、gem5で動かしてみよう。Mac上でクロスコンパイルとかするのは面倒なので、適当なLinuxマシンでコンパイルしたバイナリを持ってきて、それを動かすことにする。なお、SEモードで実行するプログラムを用意する時、全てのライブラリを静的にリンクしてやらなければならない。SEモードはシステムコールをエミュレーションしてくれるため、OSイメージが不要となるが、逆にOSがよしなにやってくれていたダイナミックリンクができないためだ。
まず、適当なプログラムを書こう。
# include <stdio.h>

int main(){
  printf("My first gem5\n");
  return 0;
}
これを-staticをつけてビルドする。もし、
$ gcc test.c -static
/usr/bin/ld: -lc が見つかりません
collect2: エラー: ld はステータス 1 で終了しました
などと言われてビルドに失敗したら、静的リンク用のライブラリがインストールされていない。CentOSなら、
sudo yum install glibc-static
で入るはず。
あらためて、gcc test.c -staticでビルドしたバイナリを持ってきて、以下を実行する。
gem5 Simulator System.  http://gem5.org
gem5 is copyrighted software; use the --copyright option for details.

gem5 compiled Aug 27 2019 12:23:47
gem5 started Aug 27 2019 14:35:34
gem5 executing on watanabe-iMac.local, pid 70256
command line: ./build/X86/gem5.opt ./configs/example/se.py -c a.out

Global frequency set at 1000000000000 ticks per second
warn: DRAM device capacity (8192 Mbytes) does not match the address range assigned (512 Mbytes)
0: system.remote_gdb: listening for remote gdb on port 7000
**** REAL SIMULATION ****
info: Entering event queue @ 0.  Starting simulation...
My first gem5
Exiting @ tick 6672500 because exiting with last active thread context
無事に実行できた。なお、実行するとカレントディレクトリにm5outというディレクトリができて、そこに情報が入る。例えばstats.txtにはこんな感じの統計情報が入る。
---------- Begin Simulation Statistics ----------
final_tick                                    6672500                       # Number of ticks from beginning of simulation (restored from checkpoints and never reset)
host_inst_rate                                 460199                       # Simulator instruction rate (inst/s)
host_mem_usage                                 691024                       # Number of bytes of host memory used
host_op_rate                                   918524                       # Simulator op (including micro ops) rate (op/s)
host_seconds                                     0.01                       # Real time elapsed on the host
host_tick_rate                              530785140                       # Simulator tick rate (ticks/s)
sim_freq                                 1000000000000                       # Frequency of simulated ticks
sim_insts                                        5735                       # Number of instructions simulated
どの命令が何回実行されたか、キャッシュミスはどのくらいおきたかなど、有用な情報が入っているので参考にされたい。
実行パイプラインの可視化
Gem5は、命令ごとに「フェッチ、デコード、ディスパッチ、リタイア」といったパイプライン情報を取ることができる。それを可視化してみよう。
こんなコードを実行することにしよう。
# include <stdio.h>

int main(){
  __asm__("CLC");
  printf("My first gem5\n");
  return 0;
}
プログラムを実行した際のトレース情報が膨大なので、とりあえず無害であまり使われない命令clcを目印代わりに突っ込んでいる。これをgcc -static test2.cでコンパイルしたバイナリを持ってきて、以下を実行する。
$ ./build/X86/gem5.opt --debug-flags=O3PipeView --debug-file=trace.out configs/example/se.py --cpu-type=DerivO3CPU --caches -c ./a.out
gem5 Simulator System.  http://gem5.org
gem5 is copyrighted software; use the --copyright option for details.

gem5 compiled Aug 27 2019 12:23:47
gem5 started Aug 27 2019 14:41:23
gem5 executing on watanabe-iMac.local, pid 70375
command line: ./build/X86/gem5.opt --debug-flags=O3PipeView --debug-file=trace.out configs/example/se.py --cpu-type=DerivO3CPU --caches -c ./a.out

Global frequency set at 1000000000000 ticks per second
warn: DRAM device capacity (8192 Mbytes) does not match the address range assigned (512 Mbytes)
0: system.remote_gdb: listening for remote gdb on port 7000
**** REAL SIMULATION ****
info: Entering event queue @ 0.  Starting simulation...
My first gem5
Exiting @ tick 22164000 because exiting with last active thread context
これは、デバッグフラグとしてパイプライン情報を表示する(O3PipeView)を指定し、トレース情報をtrace.outとして出力せよ、という意味だ。trace.outはm5outというディレクトリの下に保存される。
注意点として、Gem5の公式ドキュメントではCPUタイプの指定で--cpu-type=detailedとせよ、と書いてあるのだが、うちの環境では--cpu-type=DerivO3CPUとしないとトレース情報が出力されなかった。
何も指定しないとすべての情報が出力されるので注意。printf一つだけのバイナリでtrace.out'は7.8MBになった。必要があれば--debug-startで開始tickを、-m`で終了tickを指定することで調べる範囲を狭めることができる。
m5out/trace.outができたらそれを可視化しよう。
$ ./util/o3-pipeview.py -o pipeview.out --color m5out/trace.out
Processing trace...  done!
およそ3万2千行(7.5MB)のpipeview.outが出力される。
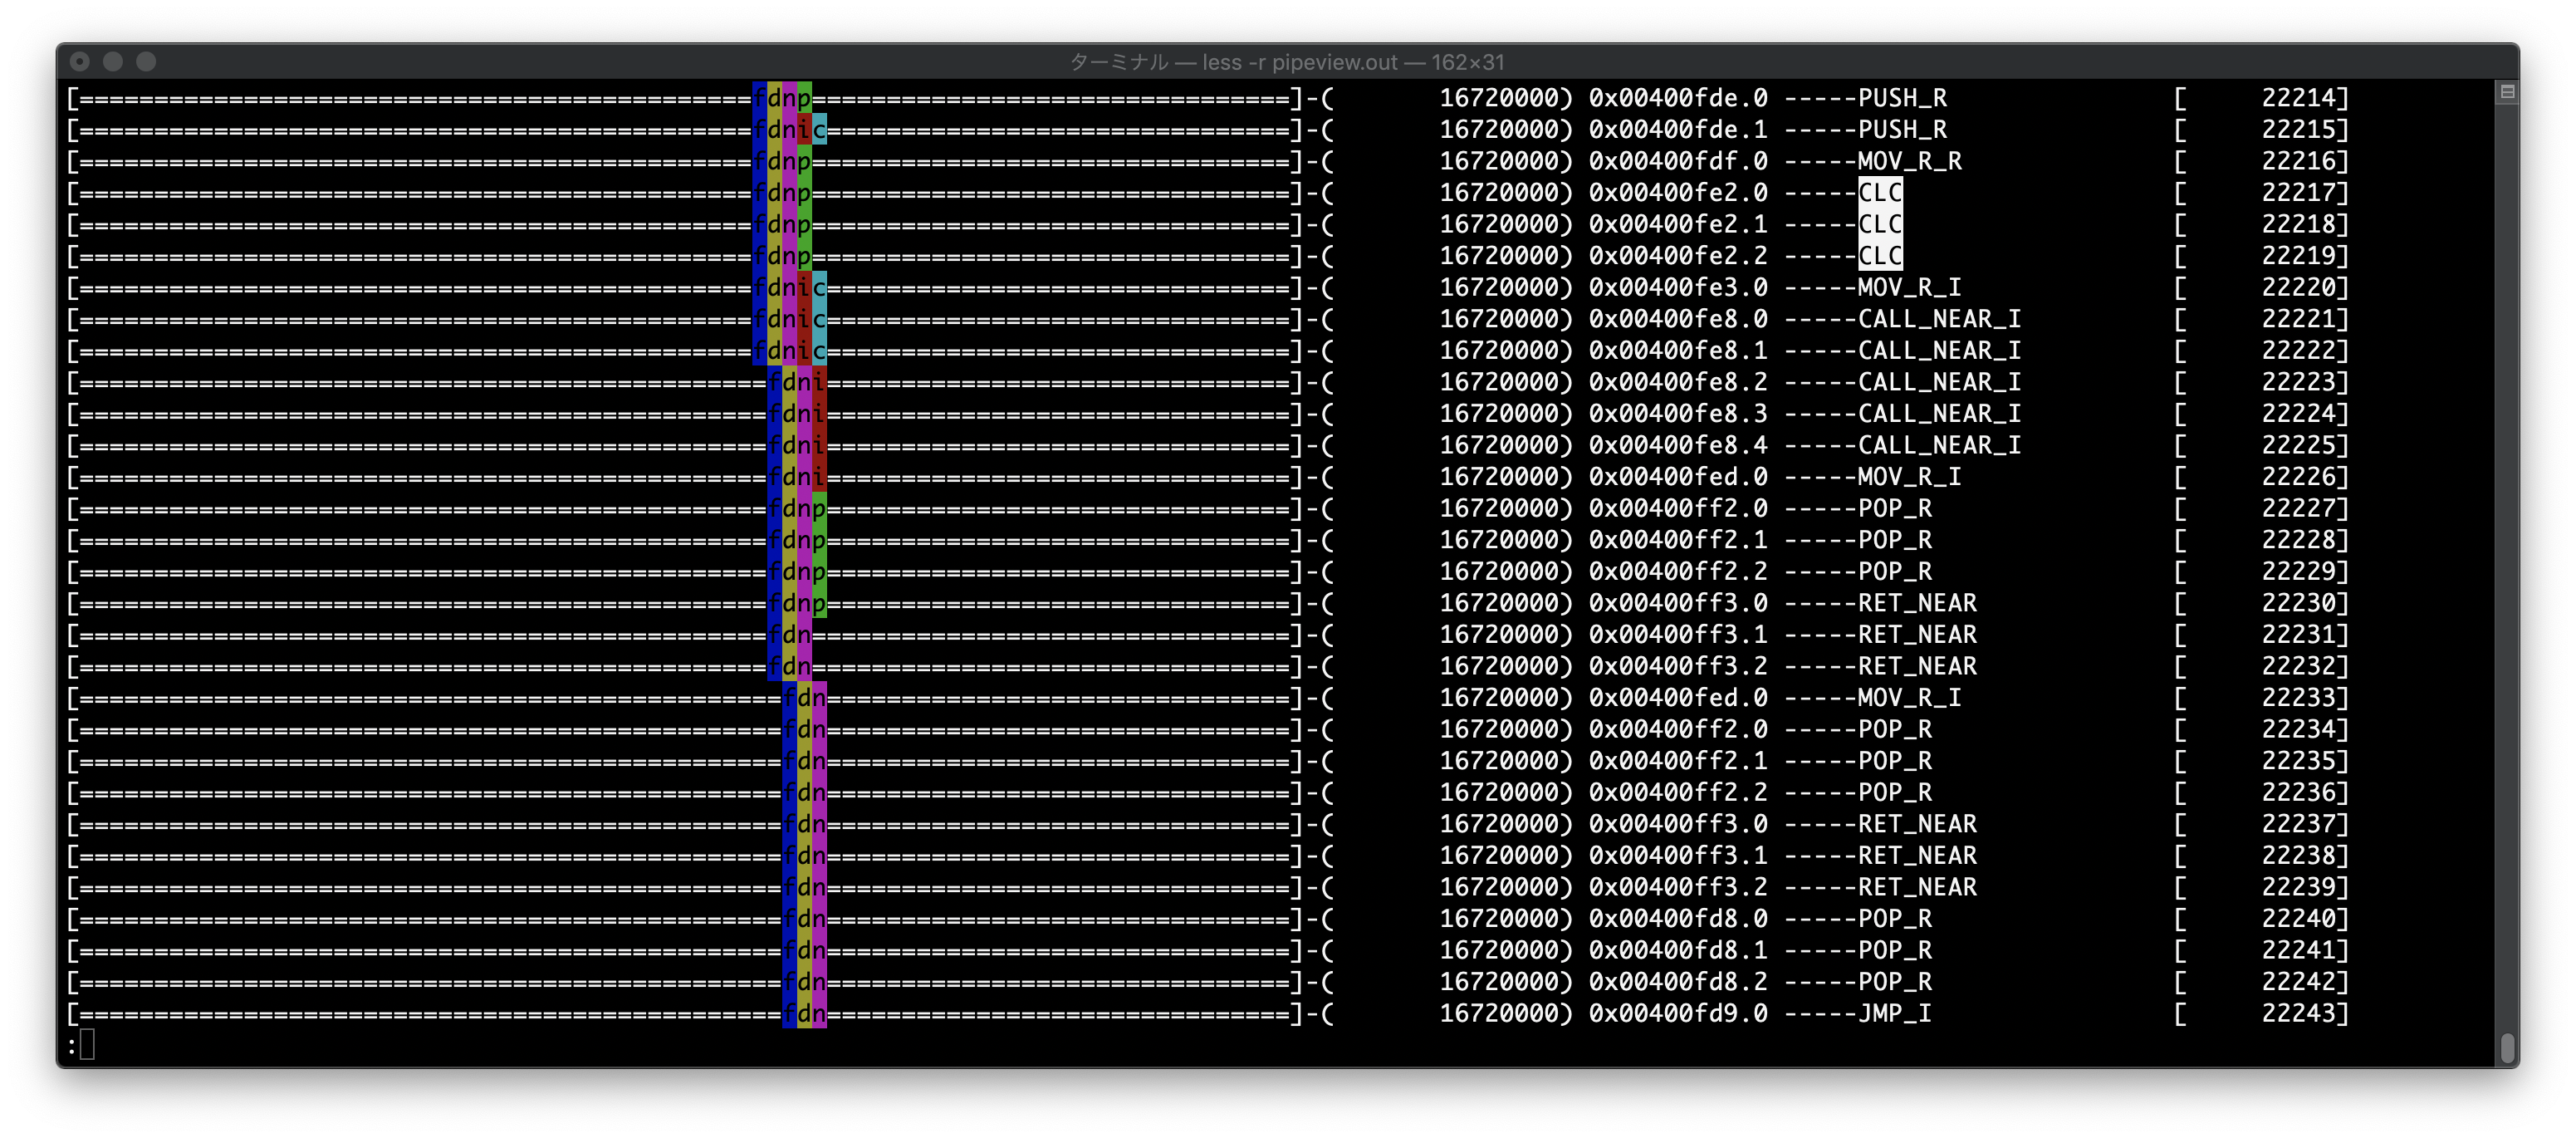
これをless -rするとパイプラインの様子を見ることができる。
対応するアセンブリと比較してみよう。
.LFB0:
  pushq %rbp
  movq  %rsp, %rbp
# APP
# 4 "test2.c" 1
  CLC
# 0 "" 2
# NO_APP
  movl  $.LC0, %edi
  call  puts
  movl  $0, %eax
  popq  %rbp
  ret
最初にPUSHして、MOV_R_R(レジスタからレジスタへのMOV)して、CLC呼んで、MOV_R_I(即値をレジスタへMOV)して、CALL_NEAR_Iして、MOV_R_Iして、POP_Rして、RET_NEARでおしまい、というわけで、ちゃんとそのまま実行していることがわかる。
まとめ
MacにGem5をインストールし、Linuxでビルドしたバイナリを実行し、そのパイプラインを可視化してみた。本稿が少しでもこれからこういうのでいろいろ調べたりするガチ勢の助けになれば幸いである。
