はじめに
Next.js のフロントエンドテストといえば、Jest や Vitest を使うことが多いと思いますが、今回は超高速な JavaScript ランタイムの Bun を使う方法をご紹介します。
Bunとは
Bun とは Node.js の代替を目指して作られた超高速ランタイムであり、JavaScript や TypeScript でアプリを作るためのすべてがそろった便利なツールです。現在も活発に開発が続けられていて、どんどん便利になっています。
詳しくは公式ドキュメントをお読みください。
Bun公式ドキュメント
環境
- Next.js: v15.3.0
- bun: v1.2.8
- typescript: v5.8.3
プロジェクトの作成
今回は Bun を使ってサクッと Next.js のプロジェクトを作っていきます。
作成手順の詳細は公式ドキュメントを見てください。
Bunのインストール
すでに bun が入っている人は飛ばしてOKです。
curl -fsSL https://bun.sh/install | bash
Next.jsプロジェクトの作成
いくつか質問されるので好みのものを答えてください。私の回答を参考に載せておきます。
bun create next-app

# ✔ What is your project named?
> next-with-bun
# ✔ Would you like to use TypeScript?
> Yes
# ✔ Would you like to use ESLint?
> No
# ✔ Would you like to use Tailwind CSS?
> Yes
# ✔ Would you like your code inside a `src/` directory?
> Yes
# ✔ Would you like to use App Router? (recommended)
> Yes
# ✔ Would you like to use Turbopack for `next dev`?
> Yes
# ✔ Would you like to customize the import alias (`@/*` by default)?
> Yes
# ✔ What import alias would you like configured?
> @/*
# Creating a new Next.js app in /Users/harunaoka/project/next-with-bun.

# Using bun.

# Initializing project with template: app-tw
Tailwind CSS はとても便利な CSS フレームワークなので、もし触ったことがない方はこれを機に触ってみてください。
Tailwind CSS公式サイト
パッケージのバージョンを最新化しておきます。
# プロジェクトのディレクトリへ移動
cd next-with-bun
# パッケージの最新化
bun update --latest
起動してみる
Next.jsのプロジェクトを立ち上げてみます。(デフォルトでは port 3000 で立ち上がりますが、port 3000 が使用中の場合は別のportで立ち上がります)
bun run dev

# $ next dev --turbopack
#   ▲ Next.js 15.3.0 (Turbopack)
#   - Local:        http://localhost:3000
#   - Network:      http://xxx.xxx.x.xx:3000

# ✓ Starting...
# ✓ Ready in 644ms
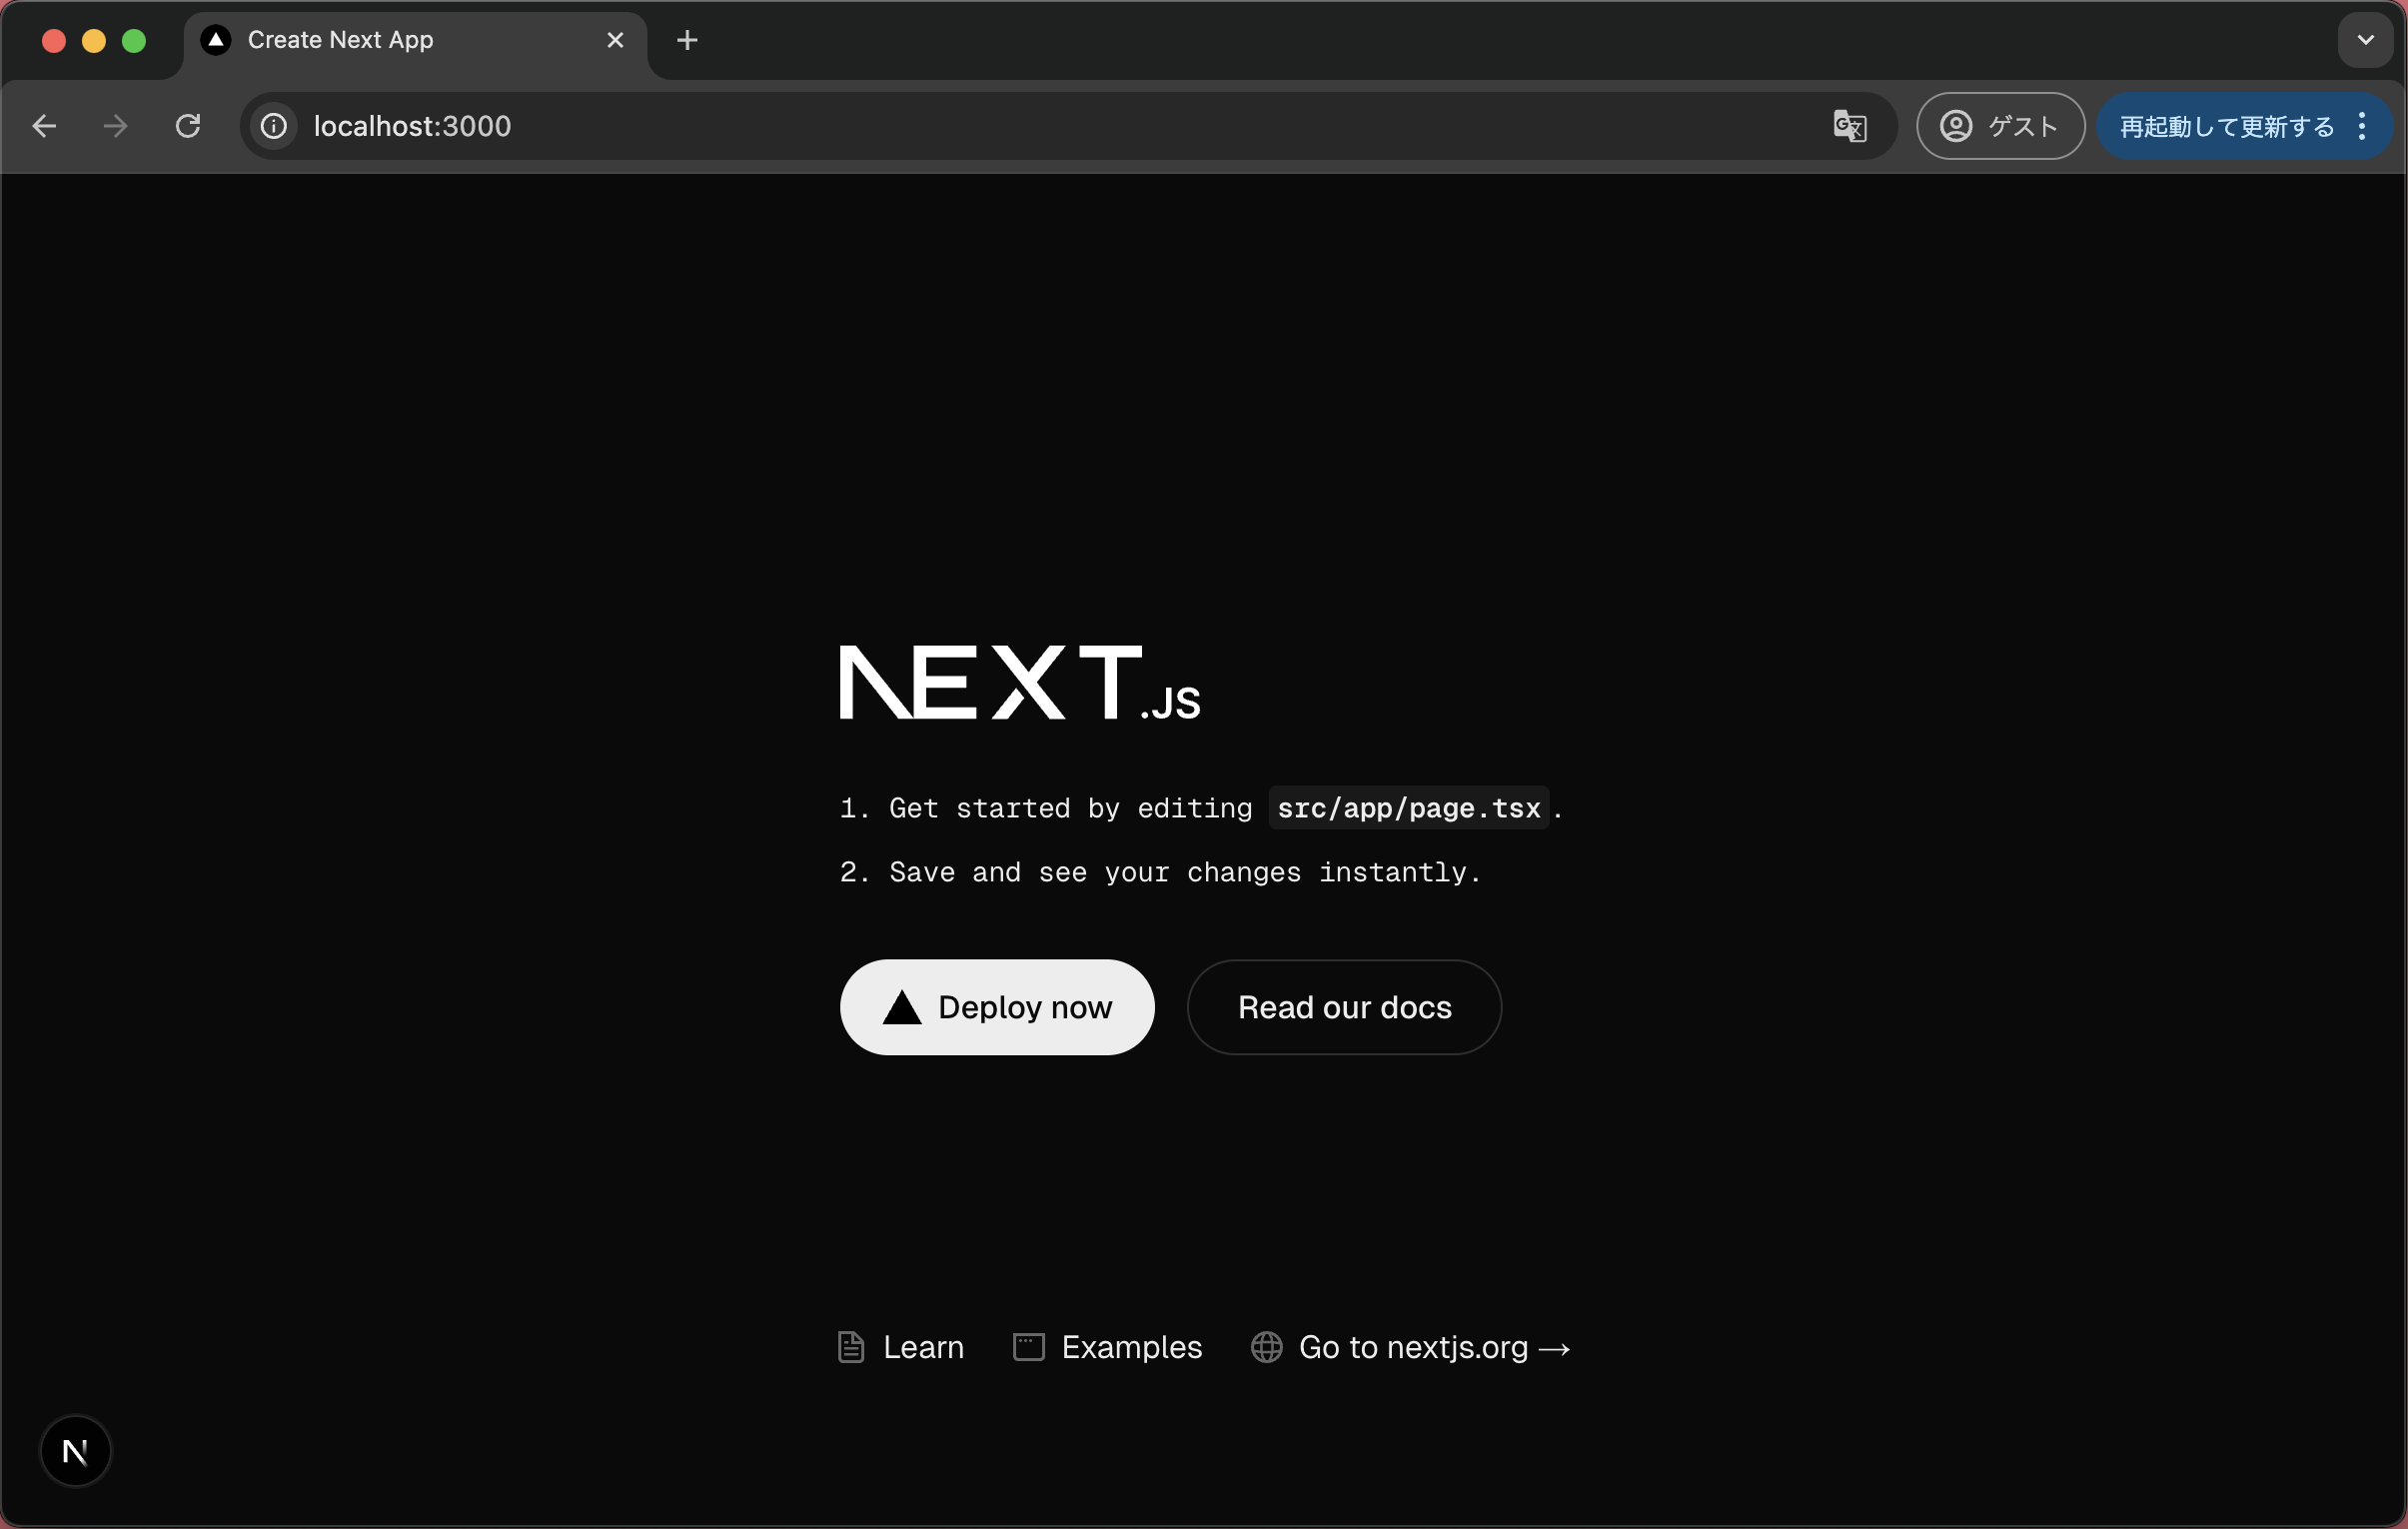
http://localhost:3000にアクセスして下画像のように表示されればOKです。
テスト環境の準備
React Testing Library
React コンポーネントを操作するためのライブラリが必要なのでインストールします。
bun add -d @testing-library/react @testing-library/dom
happy-dom
Bun にはブラウザ機能がないため、DOM を使うテストでは仮想のブラウザ環境を提供する happy-dom が必要なのでインストールします。
bun add -d @happy-dom/global-registrator
# happydom.ts と bunfig.toml をルート配下に作成
touch happydom.ts bunfig.toml
import { GlobalRegistrator } from "@happy-dom/global-registrator";

GlobalRegistrator.register();
[test]
preload = "./happydom.ts"
bunfig.toml は Bun の設定ファイルです。ここではテスト実行前に happydom.ts を読み込むように指定しています。
bun-types
Bun の組み込み API の TypeScript 定義が必要なのでインストールします。
bun add -d @types/bun
tsconfig.json に types を追加します。
{
  "compilerOptions": {
    "target": "ES2017",
    "lib": ["dom", "dom.iterable", "esnext"],
    "allowJs": true,
    "skipLibCheck": true,
    "strict": true,
    "noEmit": true,
    "esModuleInterop": true,
    "module": "esnext",
    "moduleResolution": "bundler",
    "resolveJsonModule": true,
    "isolatedModules": true,
    "jsx": "preserve",
    "incremental": true,
    "plugins": [
      {
        "name": "next"
      }
    ],
    "paths": {
      "@/*": ["./src/*"]
-   }
+   },
+   "types": ["bun-types"]
  },
  "include": ["next-env.d.ts", "**/*.ts", "**/*.tsx", ".next/types/**/*.ts"],
  "exclude": ["node_modules"]
}
テスト実装
例えば以下のようなボタンコンポーネントがあるとします。
import React from "react";

interface ButtonProps extends React.ButtonHTMLAttributes<HTMLButtonElement> {
  color?: "gray" | "blue" | "red" | "green";
  className?: string;
}

export default function Button({ color, className, ...props }: ButtonProps) {
  const baseClass = "rounded-md px-6 py-3 text-white";
  const colorClass =
    color === "gray"
      ? "bg-zinc-500 hover:bg-zinc-600"
      : color === "blue"
      ? "bg-sky-600 hover:bg-sky-700"
      : color === "red"
      ? "bg-red-600 hover:bg-red-700"
      : color === "green"
      ? "bg-green-600 hover:bg-green-700"
      : "";

  return (
    <button
      className={baseClass + " " + colorClass + " " + className}
      {...props}
    />
  );
}
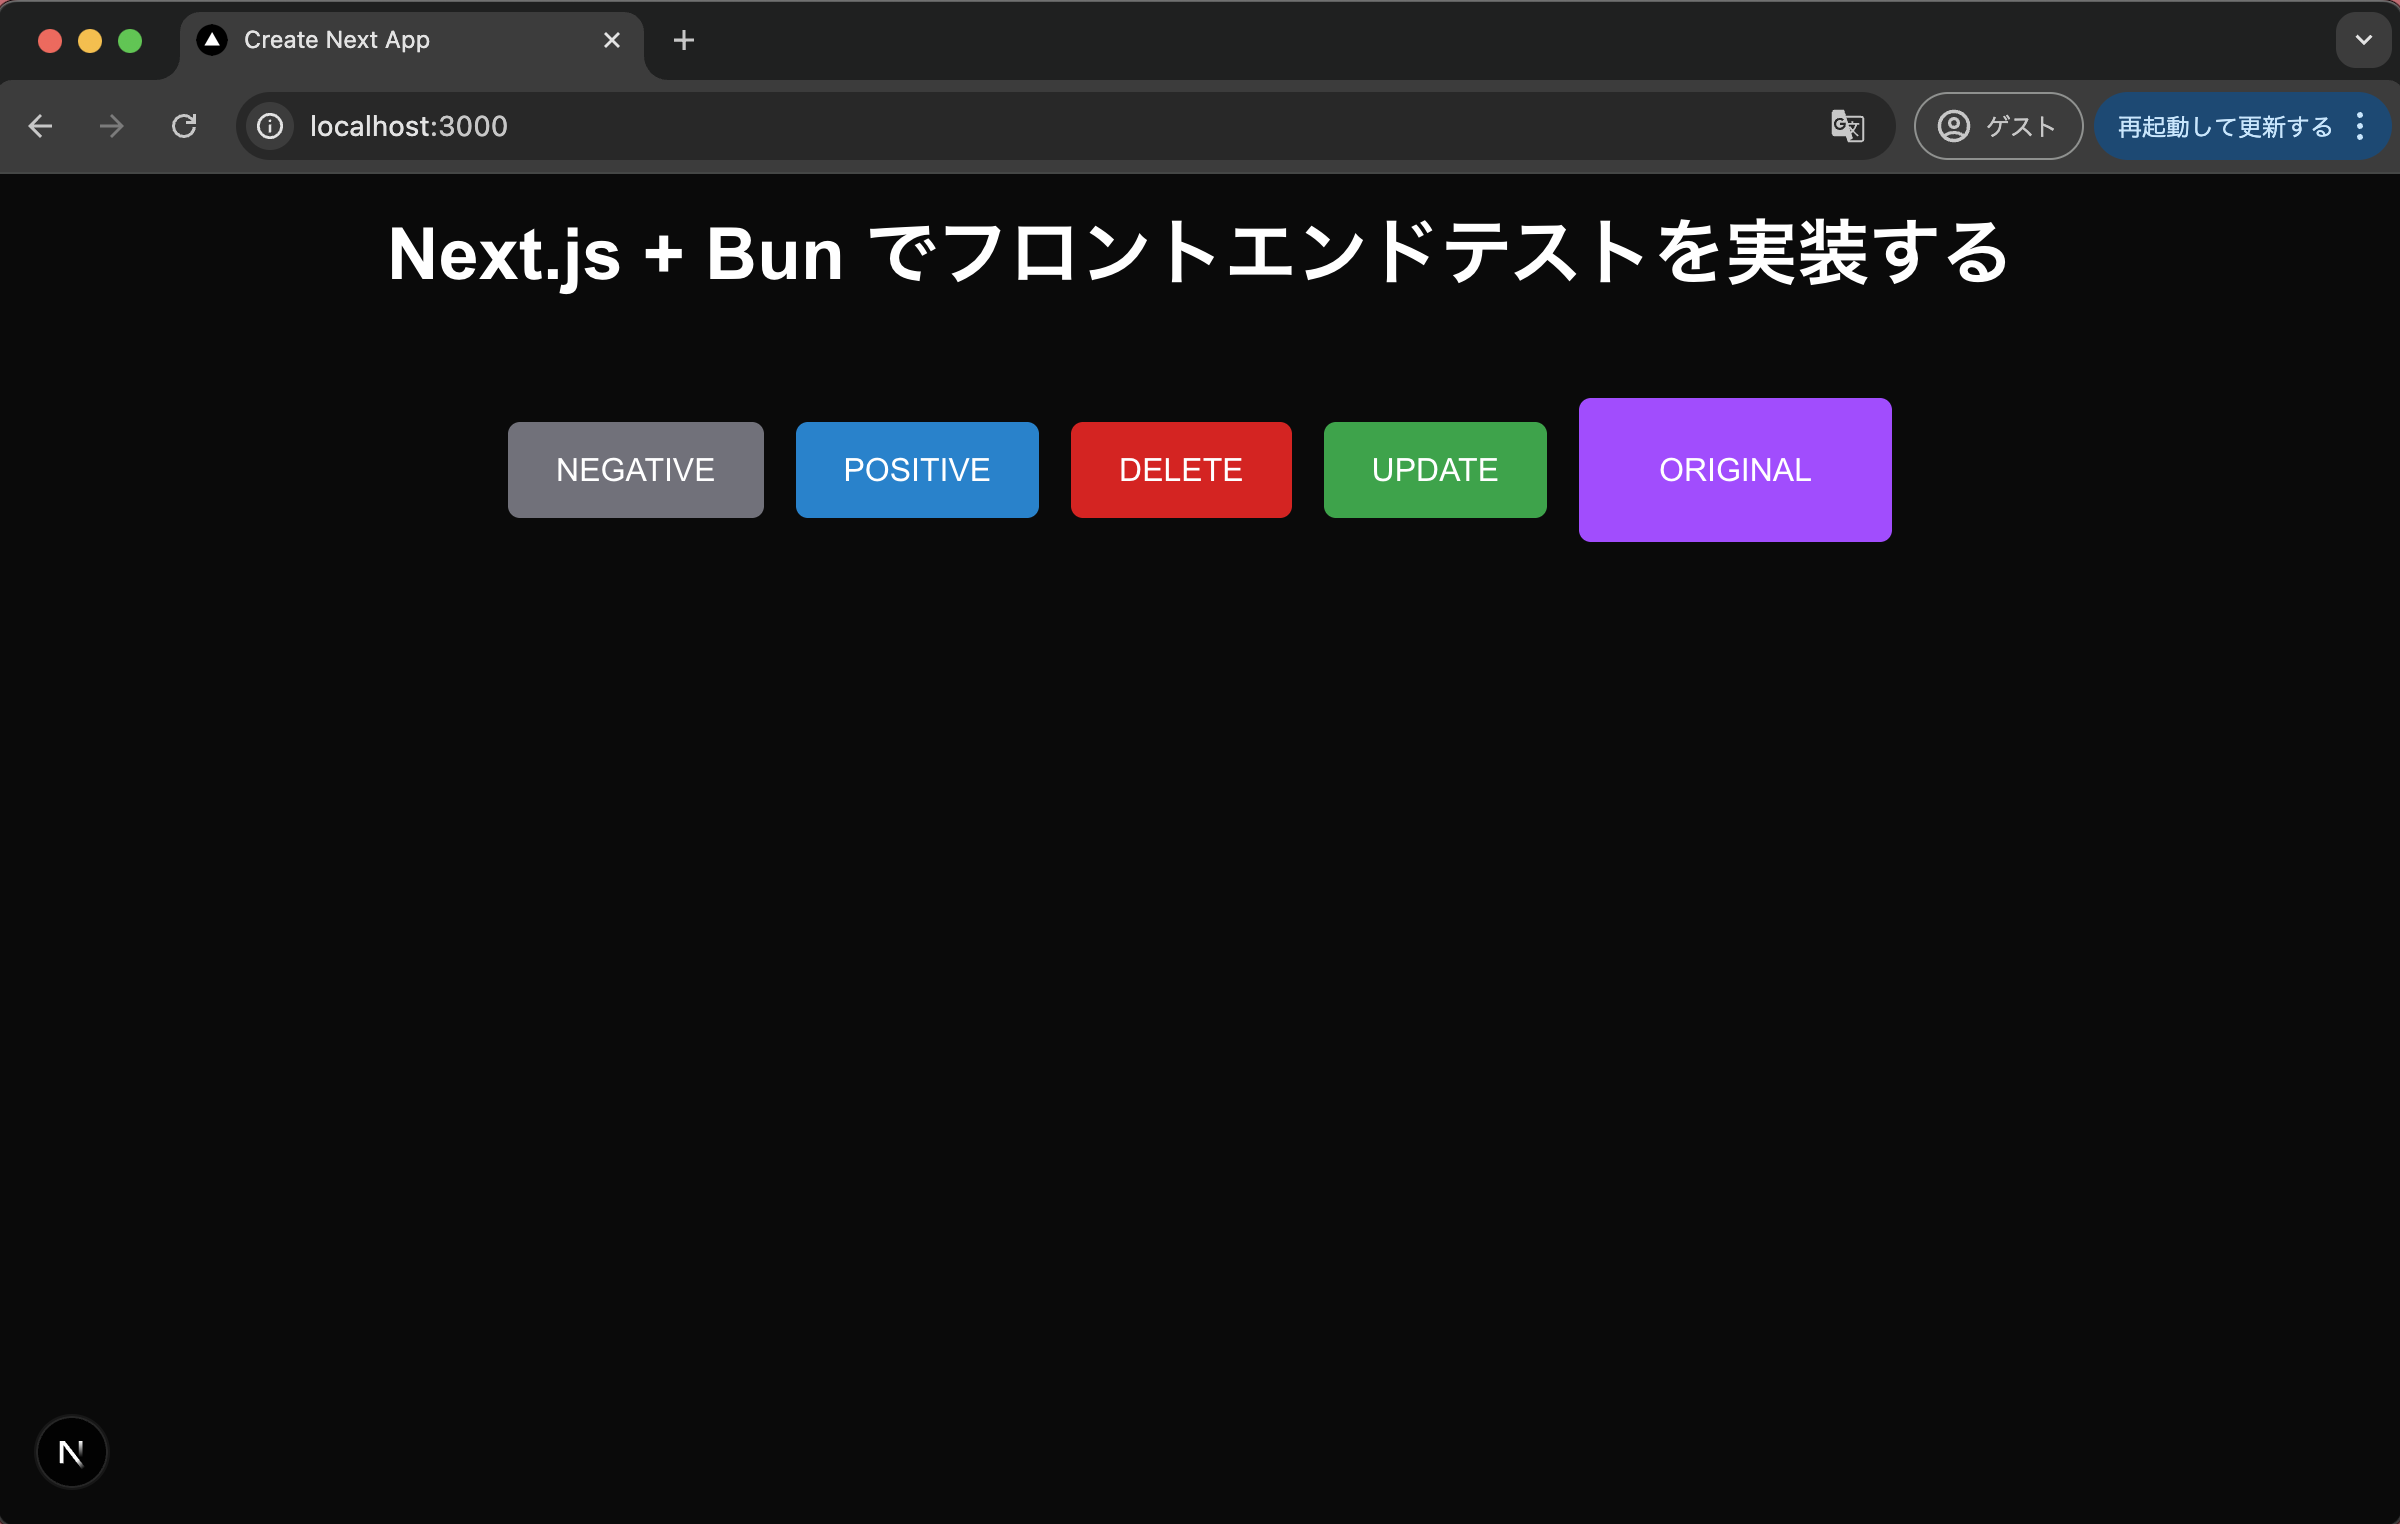
見た目はこんな感じです。(トップページに表示してみました)
import Button from "@/components/Button";

export default function HomePage() {
  return (
    <>
      <h1 className="mb-8 p-5 text-4xl font-bold text-white text-center">
        Next.js + Bun でフロントエンドテストを実装する
      </h1>
      <div className="flex gap-4 items-center justify-center">
        <Button color="gray">NEGATIVE</Button>
        <Button color="blue">POSITIVE</Button>
        <Button color="red">DELETE</Button>
        <Button color="green">UPDATE</Button>
        <Button className="bg-purple-500 hover:bg-purple-600 rounded-2xl px-10 py-6">
          ORIGINAL
        </Button>
      </div>
    </>
  );
}
テストファイルを作成します。
mkdir src/componenets/__test__
touch src/componenets/__test__/Button.spec.tsx
import Button from "@/components/Button";
import { render, screen } from "@testing-library/react";
import { describe, expect, mock, test } from "bun:test";

const baseClassName = "rounded-md px-6 py-3 text-white";
const colorGrayClassName = "bg-zinc-500 hover:bg-zinc-600";
const colorBlueClassName = "bg-sky-600 hover:bg-sky-700";
const colorRedClassName = "bg-red-600 hover:bg-red-700";
const colorGreenClassName = "bg-green-600 hover:bg-green-700";
const colorCustomClassName =
  "bg-purple-500 hover:bg-purple-600 rounded-2xl px-10 py-6";

describe("Button", () => {
  test("色を指定したボタンが表示できる", () => {
    render(<Button color="gray">グレー</Button>);
    const button = screen.getByRole("button", { name: "グレー" });
    expect(button.className).toContain(baseClassName);
    expect(button.className).toContain(colorGrayClassName);
    expect(button.textContent).toBe("グレー");

    render(<Button color="blue">ブルー</Button>);
    const buttonBlue = screen.getByRole("button", { name: "ブルー" });
    expect(buttonBlue.className).toContain(baseClassName);
    expect(buttonBlue.className).toContain(colorBlueClassName);
    expect(buttonBlue.textContent).toBe("ブルー");

    render(<Button color="red">レッド</Button>);
    const buttonRed = screen.getByRole("button", { name: "レッド" });
    expect(buttonRed.className).toContain(baseClassName);
    expect(buttonRed.className).toContain(colorRedClassName);
    expect(buttonRed.textContent).toBe("レッド");

    render(<Button color="green">グリーン</Button>);
    const buttonGreen = screen.getByRole("button", { name: "グリーン" });
    expect(buttonGreen.className).toContain(baseClassName);
    expect(buttonGreen.className).toContain(colorGreenClassName);
    expect(buttonGreen.textContent).toBe("グリーン");
  });
  test("クラス名が適用される", () => {
    render(
      <Button className={colorCustomClassName}>カスタムクラス</Button>,
    );
    const button = screen.getByRole("button", { name: "カスタムクラス" });
    expect(button.className).toContain(baseClassName);
    expect(button.className).toContain(colorCustomClassName);
    expect(button.textContent).toBe("カスタムクラス");
  });
  test("Click イベントが発火する", () => {
    const onClick = mock();
    render(<Button onClick={onClick}>クリック</Button>);
    const button = screen.getByRole("button", { name: "クリック" });
    button.click();
    expect(onClick).toHaveBeenCalled();
  });
});
React TestingLibrary は各 HTML タグに対応する role が決まっていて、それらを使って要素を取得できます。(参考:[React TestingLibrary]各HTMLタグに対応するroleを理解する)
上記の例では getByRole("button", { name: "{button タグの中のテキスト}" }); で特定のボタン要素を取得しています。
また、Bun には Jestライクなマッチャー(.toContain() .toHaveBeenCalled() .toBe() など)が用意されています。現在 Bun で使用できるマッチャーは下記のページを参照してください。Jest との完全互換を目指していますが、一部未対応です。
ラジオボタンコンポーネントも作成して、テストを書いてみます。
touch src/componenets/Radio.tsx src/componenets/__test__/Radio.spec.tsx
import React from "react";

interface RadioProps extends React.InputHTMLAttributes<HTMLInputElement> {
  className?: string;
  label: string;
  labelClassName?: string;
}

export default function Radio({
  className,
  label,
  labelClassName,
  ...props
}: RadioProps) {
  const baseClass = "mr-1";
  return (
    <label className={labelClassName}>
      <input type="radio" className={baseClass + " " + className} {...props} />
      {label}
    </label>
  );
}
import Radio from "@/components/Radio";
import { render, screen } from "@testing-library/react";
import { describe, expect, mock, test } from "bun:test";

const baseClassName = "mr-1";

describe("Radio", () => {
  test("ラベルとラジオボタンが表示される", () => {
    render(<Radio value="test" label="ラジオボタン表示" />);
    const radioButton = screen.getByLabelText(
      "ラジオボタン表示",
    ) as HTMLInputElement;
    expect(radioButton).not.toBeNull();
    expect(radioButton.className).toContain(baseClassName);
    const label = radioButton.parentElement;
    expect(label).not.toBeNull();
  });

  test("クラス名が適用される", () => {
    render(
      <Radio
        value="test"
        label="クラス名を付けたよ"
        className="text-red-500"
        labelClassName="text-2xl"
      />,
    );
    const radioButton = screen.getByLabelText(
      "クラス名を付けたよ",
    ) as HTMLInputElement;
    expect(radioButton.className).toContain(`${baseClassName} text-red-500`);
    const label = radioButton.parentElement;
    expect(label?.className).toContain("text-2xl");
  });

  test("ラジオボタンのチェックが切り替えられる", () => {
    const handleChange = mock();
    render(
      <>
        <Radio
          name="radio-test"
          value="test1"
          label="ラジオボタン1"
          defaultChecked
          onChange={handleChange}
        />
        <Radio
          name="radio-test"
          value="test2"
          label="ラジオボタン2"
          onChange={handleChange}
        />
      </>,
    );
    const radioButton1 = screen.getByLabelText(
      "ラジオボタン1",
    ) as HTMLInputElement;
    const radioButton2 = screen.getByLabelText(
      "ラジオボタン2",
    ) as HTMLInputElement;
    expect(radioButton1.checked).toBe(true);
    expect(radioButton2.checked).toBe(false);

    // ラジオボタン2を選択する
    radioButton2.click();
    expect(handleChange).toHaveBeenCalled();
    expect(radioButton1.checked).toBe(false);
    expect(radioButton2.checked).toBe(true);
  });
});
上記の例では getByLabelText() で一致するラベルから要素を取得しています。
getByRole("radio") でも取得は可能ですが、この場合 input タグの中にテキストが無いため { name: "{input タグの中のテキスト}" } での指定ができません。複数のラジオボタンから特定の要素を取得するために、ラベルで指定しています。
テストの実施
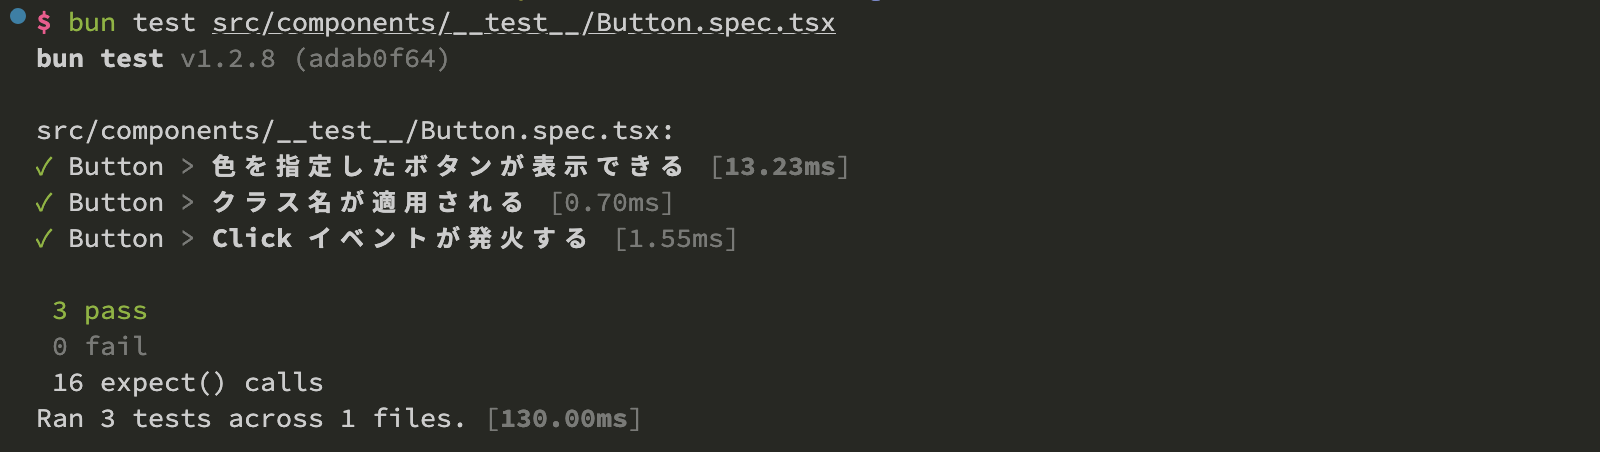
下記のコマンドでテストを実行してみます。
# 全てのテストを実行
bun test
# 特定のテストファイルだけ実行
bun test src/components/__test__/Button.spec.tsx
下記のようにテストが通ってくれればOKです。
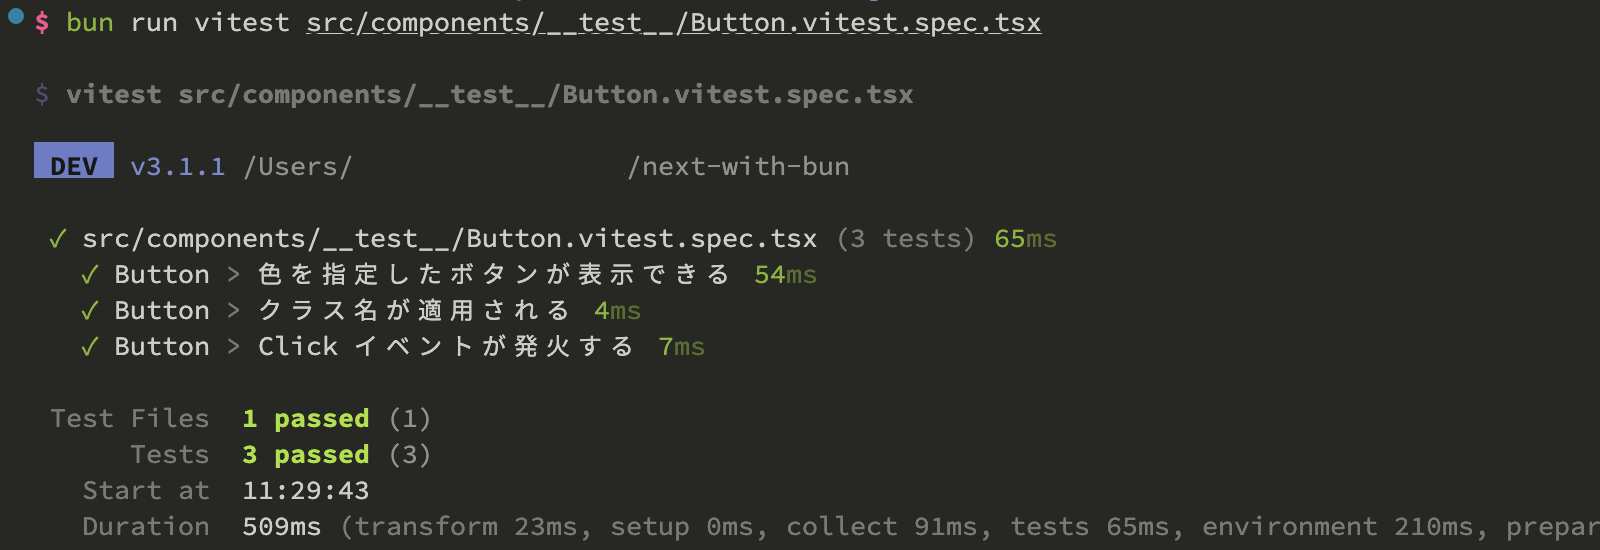
Jest との実行時間の比較
同じテストコードをJestで実行したところ、以下の結果になりました。
Buttonコンポーネント
Bun => [実行時間: 130ms]
Jest => [実行時間: 421ms]
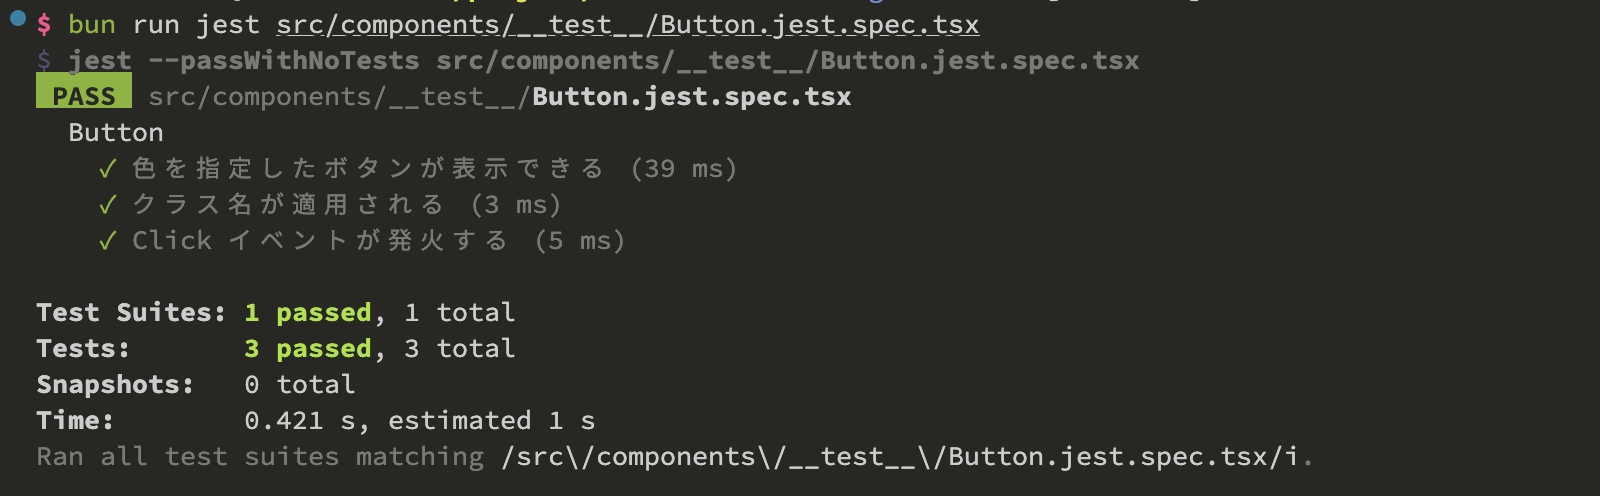
Vitest => [実行時間: 509ms]
Radioコンポーネント
Bun => [実行時間: 114ms]
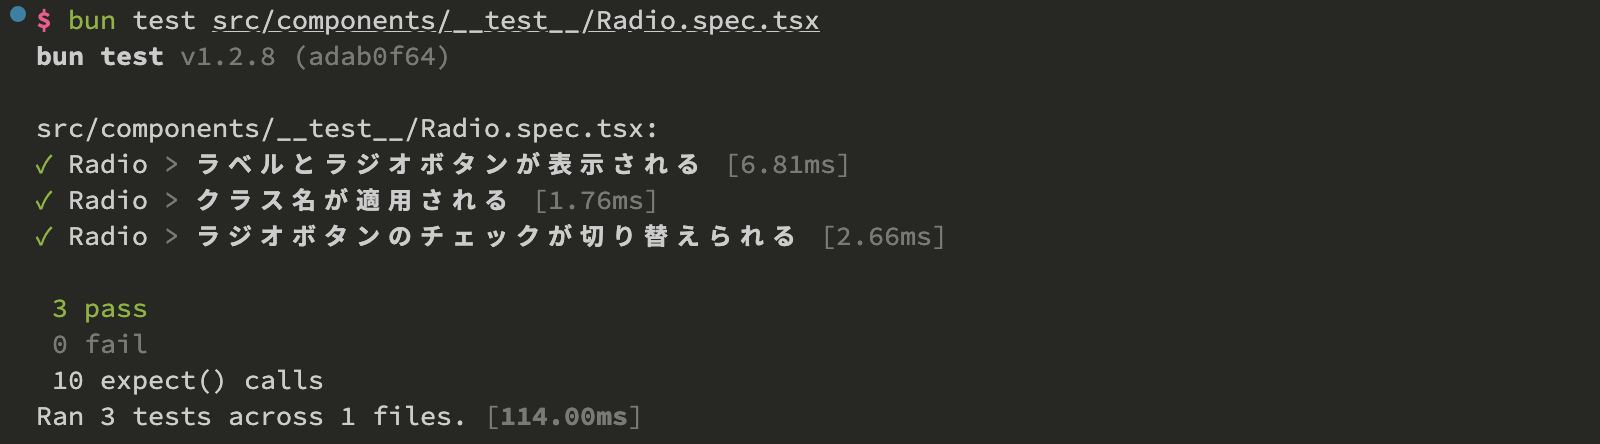
Jest => [実行時間: 341ms]

Vitest => [実行時間: 375ms]
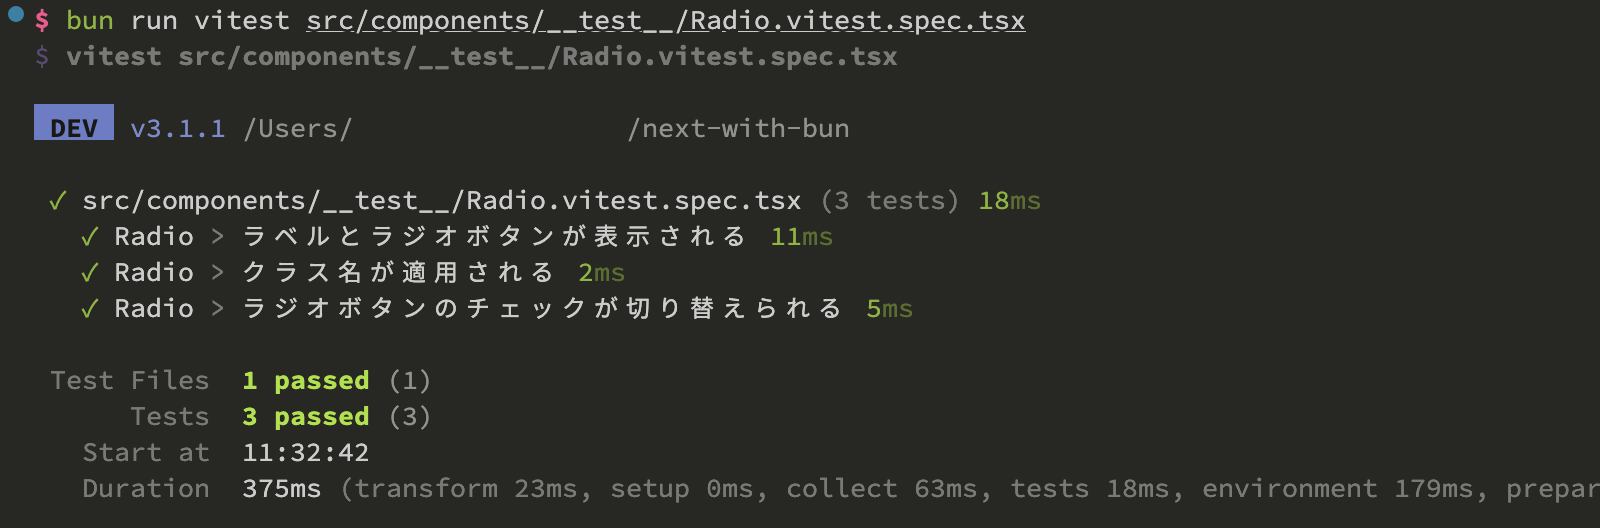
Bun test がダントツで速いです。
テスト項目が少ないので体感はそこまで変わりませんが、テストが多くなってきたときにこの差のありがたみが感じられそうですね。
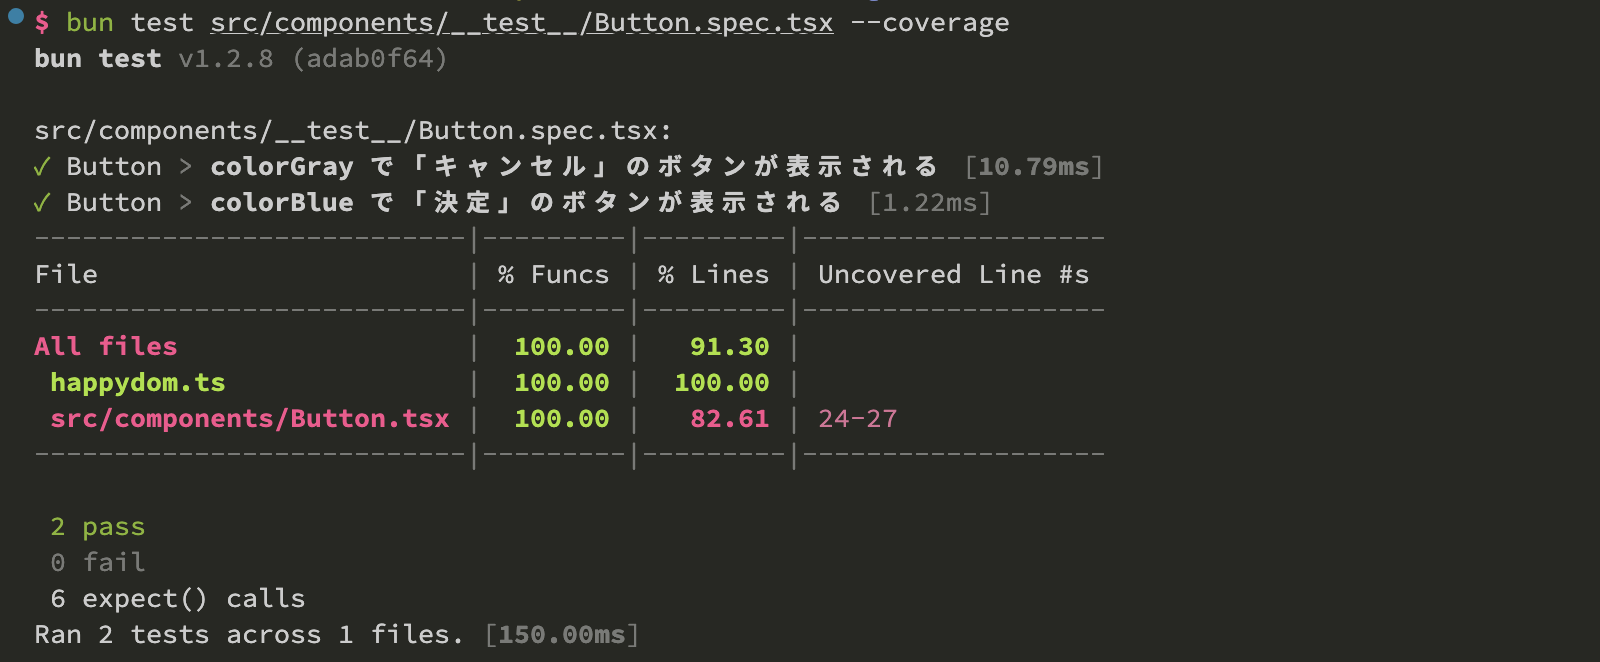
Coverage
ちなみに bun test に --coverage オプションをつければ、カバレッジも測定できます。先ほどのテストコードを最初の2つだけにして実行すると、以下のようにカバーできていない部分を教えてくれます。
おまけ
ファイル名のパターン一致でテストを実施する
今回ユニットテストを書くにあたってファイル名を *.spec.tsx としたのには理由があります。そも前提として、Bun test は以下のパターンにマッチするファイルを自動でテストしてくれます。
*.test.{js|jsx|ts|tsx}*_test.{js|jsx|ts|tsx}*.spec.{js|jsx|ts|tsx}*_spec.{js|jsx|ts|tsx}
ユニットテストの場合は *.spec.tsx、インテグレーションテストの場合は *.test.tsx のパターンで作成することで、テスト実行時にユニットテストのみ/インテグレーションテストのみで実行できます。
# ユニットテストのみ実行したいとき
bun test **/*.spec.tsx

# インテグレーションテストのみ実行したいとき
bun test **/*.test.tsx
テスト名のパターン一致でテストを実施する
一応、describe() や test() で設定した名前の中から、一致する名前を持つテストのみを実行するオプションもあります。
例えば全てのユニットテストの describe にプレフィックスとして unit: をつけておけば、bun test -t "unit:" で対象のテストのみ実行できます。
describe("unit:Button", () => {
    .....
});
# unit: が含まれるテストのみ実行したいとき
bun test -t "unit:"
補足
- Jest/Vitest で実装されたテストを Bun に移行する場合、そのまま実行できるケースが多いが一部は置き換えが必要
- E2E テストには Playwright や Cypress との併用もおすすめ
まとめ
今回は Next.js のフロントエンドテストを Bun で実装する方法 を紹介しました。この記事では少ないテスト項目での比較しかできていませんが、Vitest から Bun test に置き換えたら 3 分弱かかっていたテストが 10 秒弱になったという記事もありました。(参考:bun testが速いのでvitestから置き換えたらめちゃ高速化された)
これを機に Bun での実装をぜひ検討してみてください。
他にも、
- Bun を使えば Next.js プロジェクトの作成もサクッとできる
- 既存の Jest/Vitest のテストの多くが Bun でも再利用可能(少しの修正でOK)
などのメリットもあります。
Bun はまだ発展途上な部分もありますが、スピードやシンプルさの面で非常に魅力的な選択肢だと思います。
今回紹介した内容のサンプルコードも公開しているので、ぜひ参考にしてみてください。