本記事は Craft Egg Advent Calendar 2021 12/22の記事です。
12/21の記事は@YuheiTakagawaさんの「最近のFreeBSDコンテナ事情」でした。
はじめに
株式会社Craft EggでUnityクライアントエンジニアをしている山元です。
12/4には「Beta版のUnity Gaming Servicesを導入して軽く触ってみる」を書きました。
今回の記事について
自分が前回書いた Beta版のUnity Gaming Servicesを導入して軽く触ってみる の続きの内容になっています。
今回は Unity Gaming Services 内にある Vivox の機能を利用し iOS の実機と通話してみようと思います。
早速触って試してみる
検証環境
Mac Big Sur
Iphone iOS14.3
Unity 2021.2.7b1
Unity Authentication 1.0.0-pre.6
Unity Vivox 15.1.150002-pre.2
Gaming Servicesの準備
PackageManager, Unity Editor, Unity DashBoard にてそれぞれ準備を行なっていきましょう。
PackageManager
Unity Editor で Gaming Services の機能を利用するため manifest.json に以下のPackageを追加する必要があります。
"dependencies": {
    "com.unity.services.authentication": "1.0.0-pre.6",
    "com.unity.services.vivox": "15.1.150002-pre.2"
 }
Unity Editor
Gaming Services の Unity Project ID を作成します。
詳しい手順は前回の記事にあるので今回は省略させていただきます。
Unity DashBoard
ダッシュボードでは Vivox の機能を有効にする設定が必要です。
手順:
・ Unity Dashboard 側で先ほど作成した Unity Project を選択する
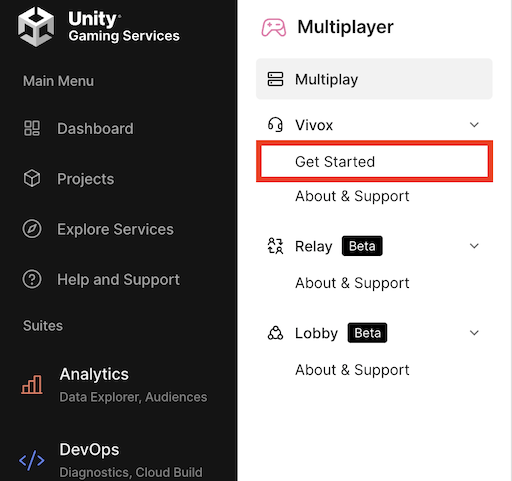
・ 今回は Vivox 機能を試すので左タブ下の方にある Multiplayer を選択する
・「Vivox」 の Get Started を選択する
・各項目を入力する
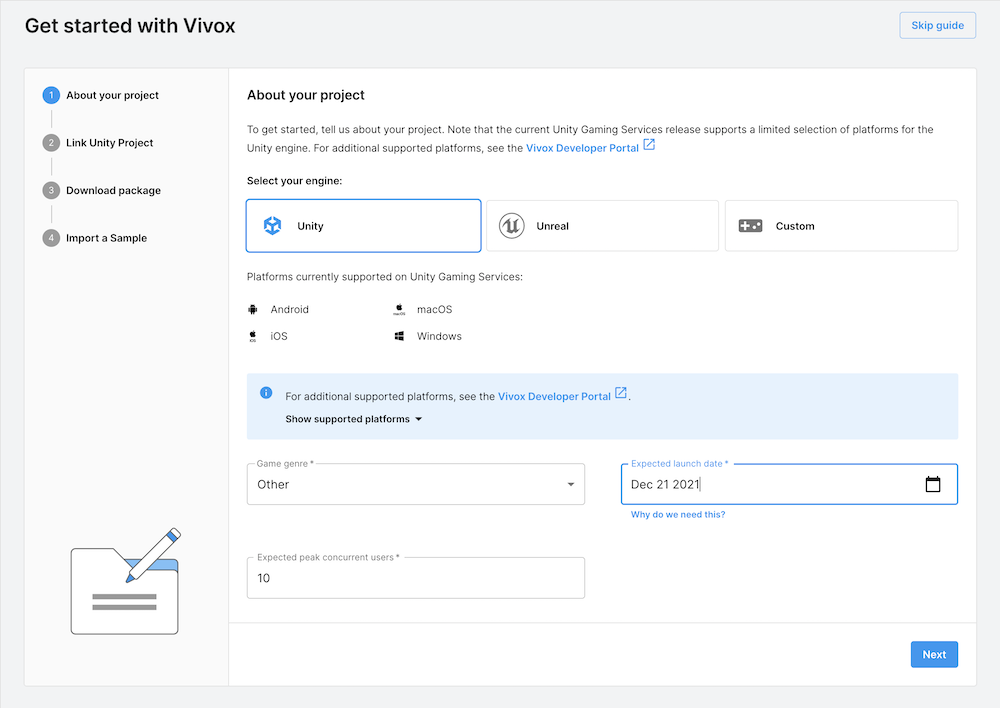
(自分の例だとUnity ゲームジャンル:その他 ピークユーザー:10 公開日:2021/12/21)
Unity Editor
再度 Unity Editor に戻ってVivoxの設定を行います。
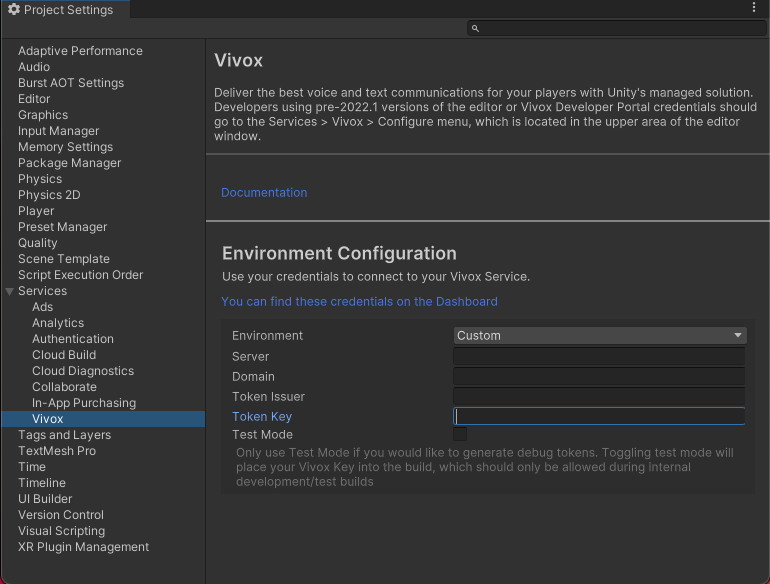
Environment Configuration の Environment を Automatic にすると Credentials が自動で設定されます。
実装
ログイン
Unity Gaming Services は何をするにしても Unity Authentication を使用して認証を通す必要があります。
なのでまずはUnity Authentication の初期化と匿名サインイン処理を行います。
そして今回は Vivox を使用するのでしっかり初期化を読んであげましょう。
    private async void Start()
    {
        // Unity Gaming Services の初期化処理
        await UnityServices.InitializeAsync();
        await AuthenticationService.Instance.SignInAnonymouslyAsync();

        // Vivox の初期化処理
        VivoxService.Instance.Initialize();

        _loginSession = Login("hoge");
    }
ログインですが GetLoginSession 関数を使用して loginSession を取得します。
この loginSession を利用してログインやログアウトを行うことができます。
    /// <summary>ログイン処理</summary>
    /// <param name="displayName">表示名</param>
    /// <returns>ログインセッション</returns>
    private ILoginSession Login(string displayName = null)
    {
        ILoginSession loginSession = VivoxService.Instance.Client.GetLoginSession(new Account(displayName));

        // 接続状態の更新時コールバック追加
        loginSession.PropertyChanged += OnLoginSessionPropertyChanged;

        loginSession.BeginLogin
        (
            loginSession.GetLoginToken(),
            SubscriptionMode.Accept,
            null,
            null,
            null,
            asyncResult => loginSession.EndLogin(asyncResult));

        return loginSession;
    }
接続状態が更新された時コールバックを通して現在のログイン状態を取得することができます。
LoggedIn でログインの終了を検知できるので次にチャンネルに参加していきましょう。
    /// <summary>接続状態の更新時コールバック</summary>
    private void OnLoginSessionPropertyChanged(object sender, PropertyChangedEventArgs propertyChangedEventArgs)
    {
        var loginSession = (ILoginSession) sender;

        Debug.Log($"LoginSessionState:{loginSession.State}");

        switch (loginSession.State)
        {
            case LoginState.LoggedIn:
                // ログインが終わったらfugaチャンネルに参加
                _channelSession = JoinChannel("fuga");
                break;
        }
    }
チャンネルの参加
こちらも先程のログインの流れと大きく変わらず GetChannelSession 関数を通して channelSession を取得することができます。
IChannelSession はチャンネルの入室やコールバックの設定などチャンネルに関する様々な操作をすることができるインターフェースです。
これまでの操作を通してチャンネルの入室に成功すると、もうこれだけで通話が可能になります。
とても簡単ですね!
    /// <summary>チャンネルに参加する処理</summary>
    /// <param name="channelName">チャンネル名</param>
    /// <returns>チャンネルセッション</returns>
    private IChannelSession JoinChannel(string channelName)
    {
        Channel channel = new Channel(channelName);

        IChannelSession channelSession = _loginSession.GetChannelSession(channel);

        // チャネル入室
        channelSession.BeginConnect(
            true,
            true,
            true,
            channelSession.GetConnectToken(),
            ar => channelSession.EndConnect(ar));

        return channelSession;
    }
アプリを落とせば自動的にログアウトはされますが明示的にログアウトしたい場合は以下のような手順で、
channelSession loginSession の順で終了処理を行なっていきます。
    /// <summary>ログアウト</summary>
    private void Logout()
    {
        _channelSession.Disconnect();
        _loginSession.PropertyChanged -= OnLoginSessionPropertyChanged;
        _loginSession.Logout();
    }
iOSでの通話
ここから iOS 向けにビルドを行い通話を行うのですが、
iOS で通話する際マイクへのアクセスを要求する必要がありますが今のままでは要求できず通話を行うことができません。
今回はこちらの記事を参考にさせてもらいマイクへのアクセス要求を行いました。
以上を全て行うと Unity Editr と iOS の実機で通話を行うことができます!
まとめ
今回は Unity Gaming Services 内にある Vivox を使って、通話機能の実装を行ってみました!
コードを少し書くだけでとてもお手軽に通話機能が作れてしまいとても驚かされております。
また、今回の Vivox 実装は Vivox 公式ドキュメントを参考に実装を行いました。
チャンネルに対する細かいコールバックの指定やテキストチャット機能なども組み込むことができるので気になった方は是非読んでみてください!
ここまで読んで頂きありがとうございました!
Craft Egg Advent Calendar 2021 明日は@mrtm30の記事になります!